
Sourdough Pumpkin Bread (with a cinnamon swirl)
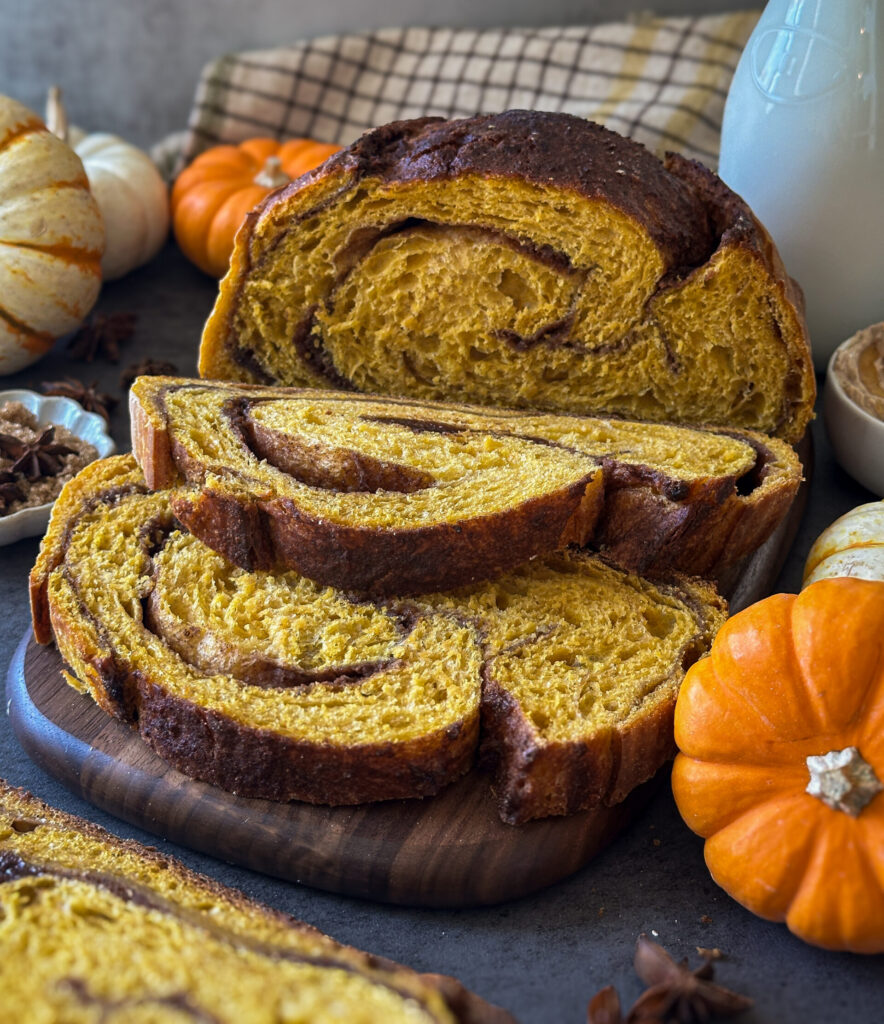
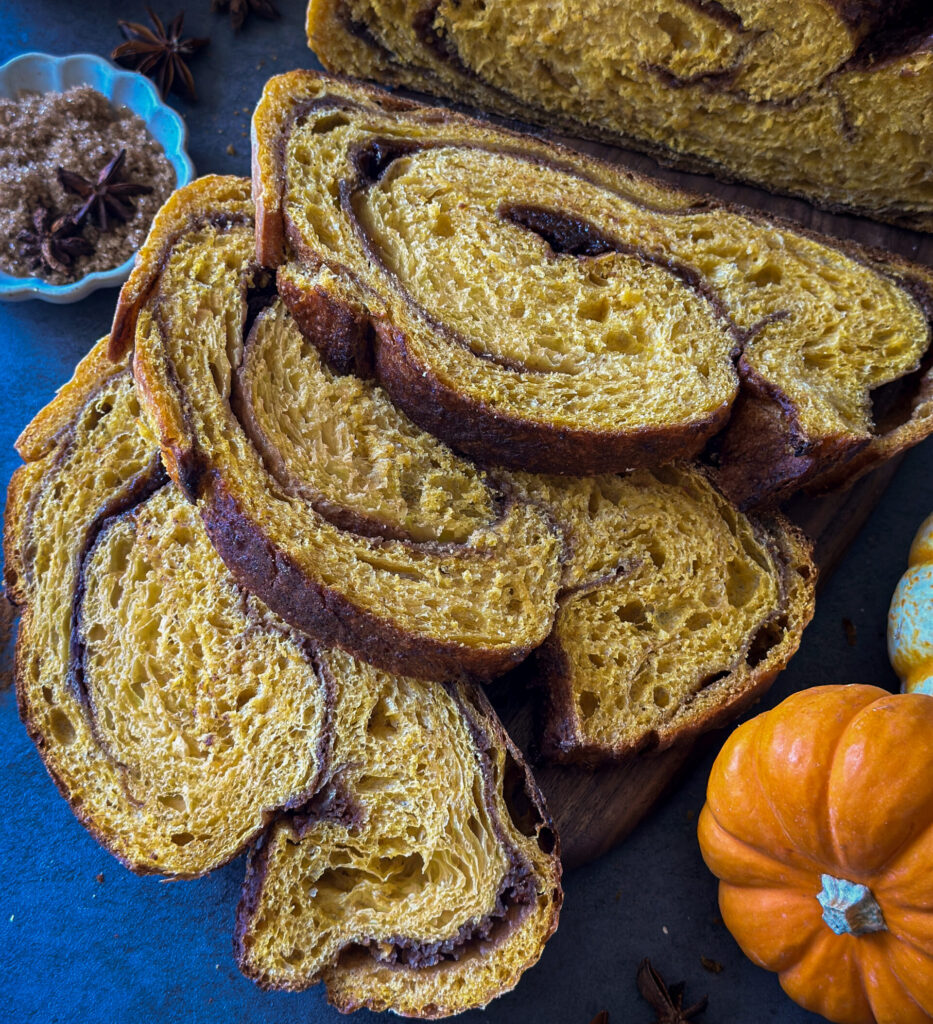
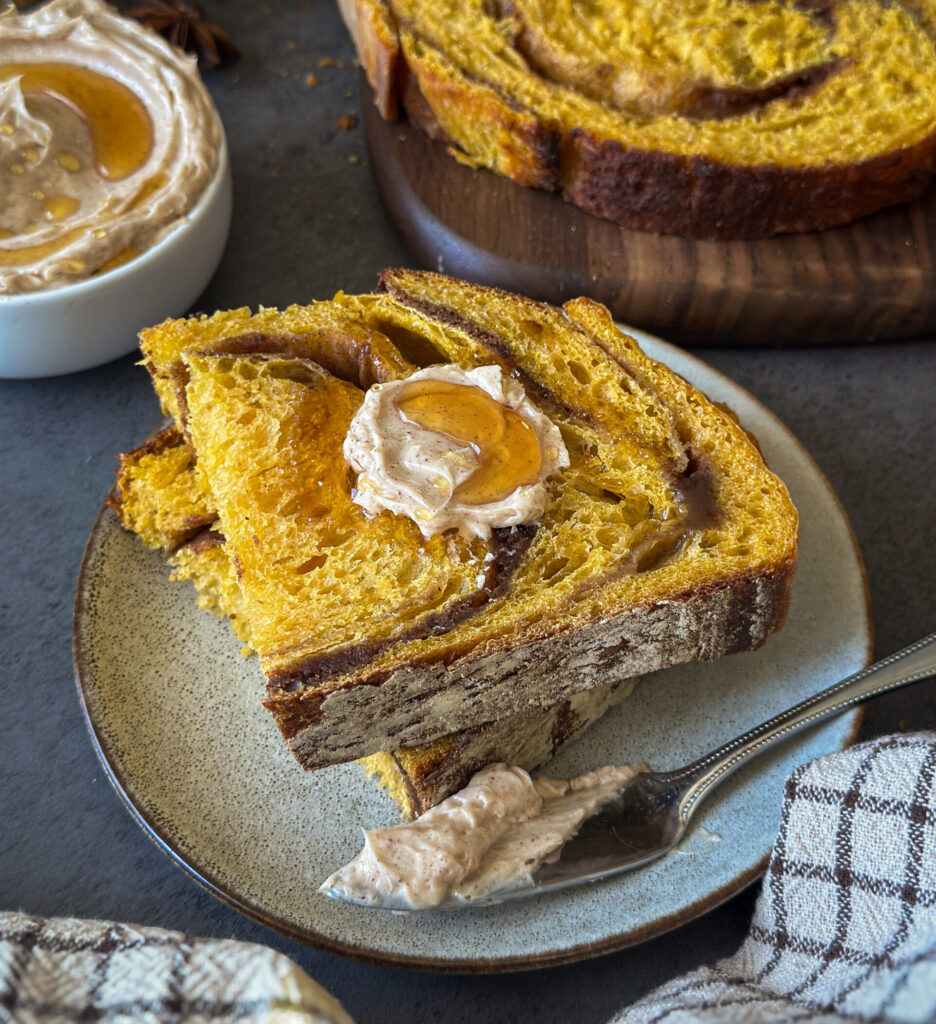
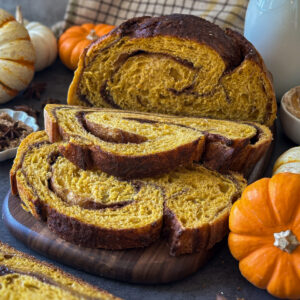
Soft, cozy, and full of warm pumpkin spice, this Sourdough Pumpkin Bread (with a cinnamon swirl) has thick ribbons of brown sugar and cinnamon throughout every slice. It’s lightly sweet, soft from pumpkin, and especially good warm with Honey Cinnamon Butter. In this recipe I’m going to show you exactly how to shape this bread to get that perfect swirl!
Table of contents
Why You’ll Love This Recipe
- Soft pumpkin flavor: Pumpkin keeps the crumb soft and tender for days.
- Thick cinnamon swirl: A simple layering method gives this bread thick ribbons of cinnamon sugar in every slice.
- No leaky filling: Flour in the filling prevents leakage, and specific shaping keeps the filling tucked inside.
- 100% sourdough: Made with active sourdough starter for the best flavor and all the fermentation benefits.
Tools You’ll Need:
- Digital kitchen scale– for weighing out your ingredients (highly recommended for accuracy). This one linked here is great to start with.
- Measuring cups & spoons- (optional, if you prefer to not use a scale).
- Bowl or straight edge container for mixing and proofing dough– to mix your dough and make sure your dough is rising properly. You can use a clear square Tupperware for this, I don’t recommend a bowl as it is hard to assess your rise. I’ve linked here the container I like to use.
- Banneton basket (or a medium bowl lined with a lint-free cloth)- to proof dough. I’ve linked a quality banneton and cover here if you’d like to see what I use.
- Lint-free cloth or plastic wrap– to cover the dough while resting.
- 5-quart Dutch oven with lid- for baking your loaf. This is an affordable 5-quart Dutch oven that I purchased as my first linked here.
- Parchment paper or silicone bread sling– To keep bread from sticking to Dutch oven. A reusable bread sling can be really convenient and also helps avoid burning hands on your Dutch oven. I use this set linked here all the time!
- Sharp knife or lame for scoring– a sharp knife will work for scoring your bread, but I do recommend investing in a lame (razor blade) which will make the process much easier. Here is a great lame to purchase to start out linked here.
- Digital food thermometer (optional)- to check the temperature of your starter and dough, this ensures a more reliable result. I use this one linked here.
- Bread Knife– for cutting your bread once cooled. I love this bread knife linked here.
Gather your Ingredients:
- Cultured Sourdough Starter- A strong sourdough starter is key to making this bread. It should be recently fed and doubled to use in this recipe. Need help making a starter? Visit my Sourdough Starter Guide to get started!
- All-purpose Flour– Forms the structure of the loaf with a soft, balanced crumb. You can also use bread flour. Flour also binds the swirl mixture to prevent leaking and create a clean spiral.
- Water- Filtered water, spring water, and non-chlorinated tap water are all fine options to use.
- Salt- any high quality sea salt is fine to use in your bread. I typically use Redmond Sea Salt, I recommend staying away from iodized salt as it can inhibit yeast and bacteria development.
- Honey– This adds a natural sweetness, promotes browning on the crust, and keeps the crumb soft. You can substitute for sugar, maple syrup, or agave if you like but I find honey to have the best flavor.
- Avocado Oil– Enhances moisture and tenderness in the dough. You can substitute for any neutral cooking oil, but I don’t recommend olive oil as the flavor can be overpowering.
- Pumpkin Puree– This adds softness and pumpkin flavor to the bread. Don’t use pumpkin pie filling only use 100% pumpkin puree.
- Ground Cinnamon, Nutmeg, Ginger, and Cardamom– Creates the warm, spiced flavor that defines the swirl through the bread. I will list a pumpkin pie spice blend below to swap for the ginger, nutmeg, and cardamom if desired.
- Brown Sugar– Adds sweetness that melts into the cinnamon swirl.
- Salted Butter (optional)- for brushing on top of the loaf for a softer crust and deeper flavor.
Instructions
Step 1: Feed Your Starter Night Before Baking
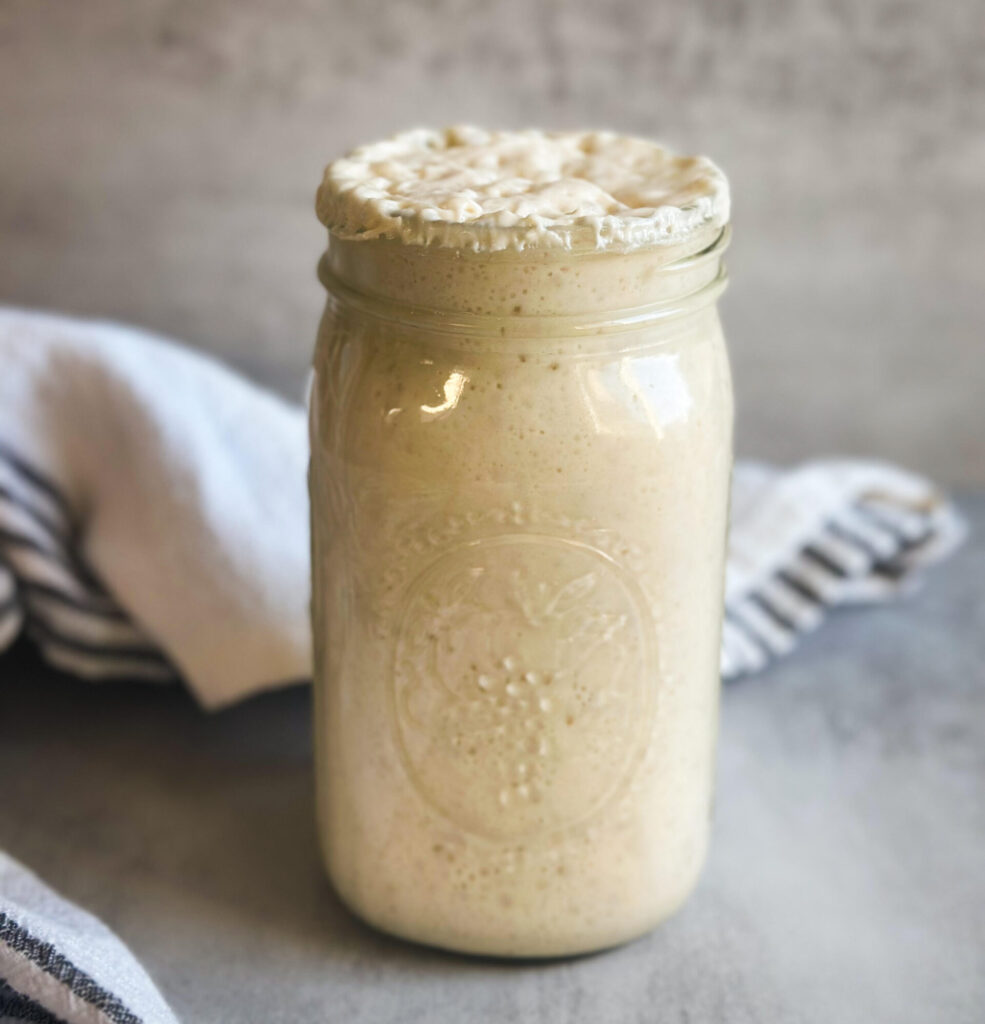
To ensure a bubbly and active starter, feed your starter the night before baking.
Use a 1:2:2 ratio to feed your starter (this means one part mature mother starter, two times the water, two times the flour).
Mix flour and water in a jar with a spatula, cover loosely with lid, and mark the volume of the starter in your jar with a rubber band or piece of tape and marker. Let starter sit at room temperature (70-75 degrees) overnight until bubbly and doubled in size.
Step 2: Make the Dough
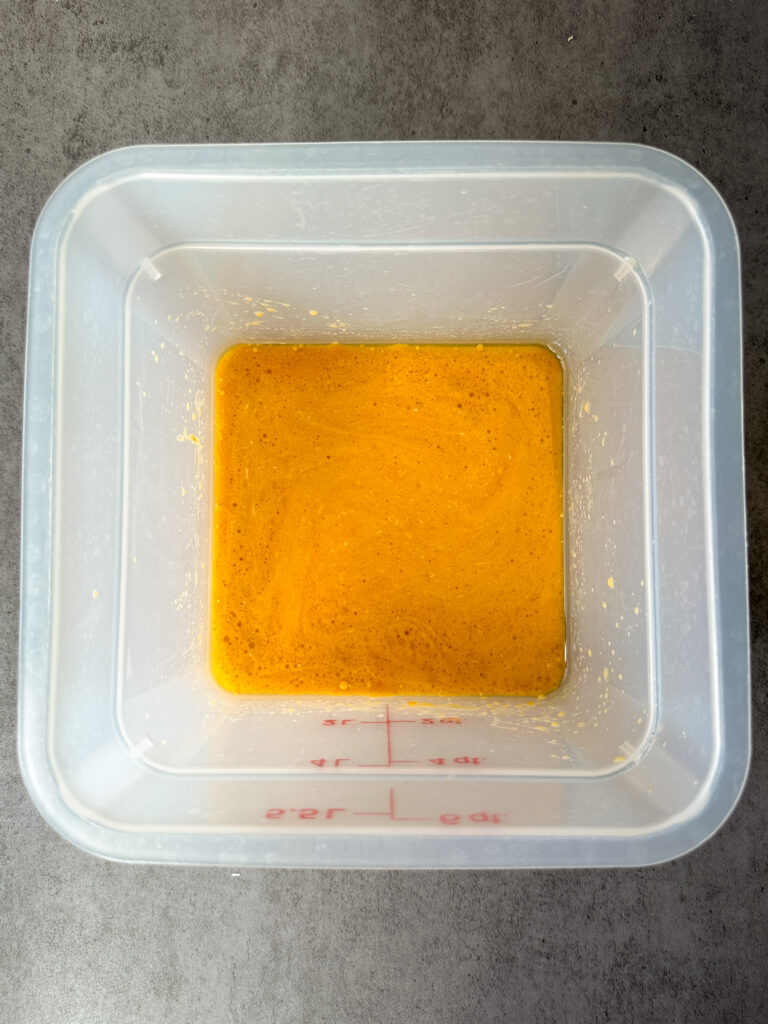
In a large bowl (or as I prefer a clear straight edge container), mix the active starter, pumpkin puree, water, avocado oil, honey, and vanilla until everything is well combined.
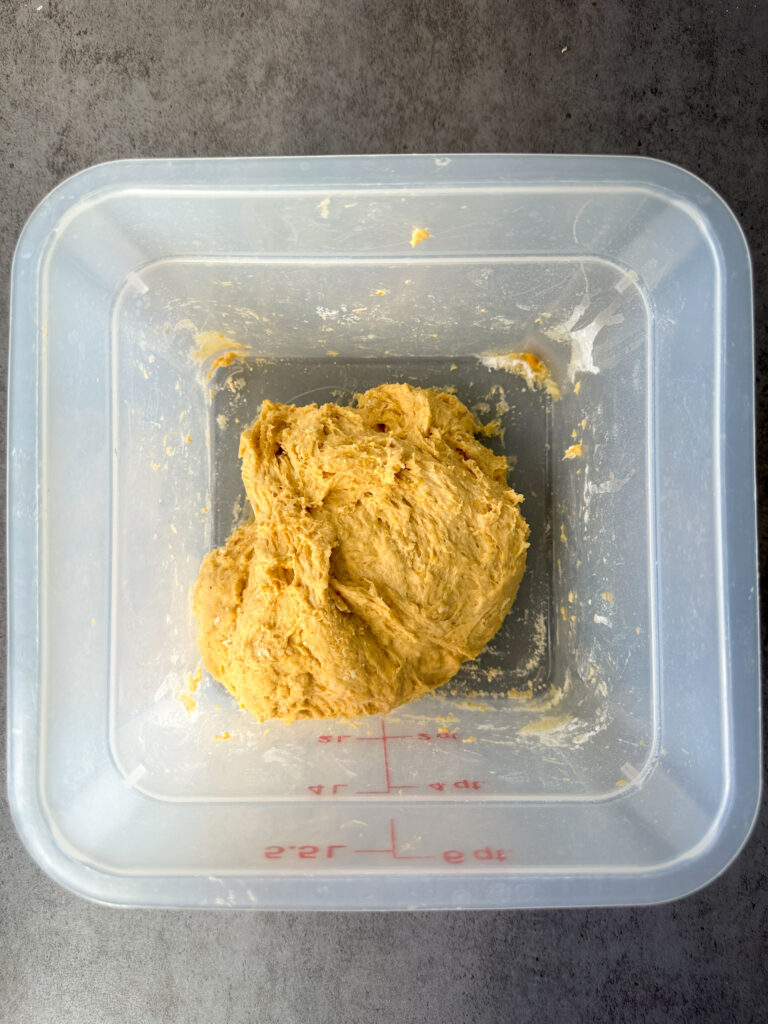
Add the salt and flour to the starter mixture. Stir and knead with your hand or dough whisk until all ingredients are combined into a shaggy dough. Cover with a damp towel or plastic and let it rest for 30 minutes at room temperature (70-77 degrees).
Step 3: Stretch and Folds
After the rest, begin your stretch and folds. This helps build structure in your dough.
How to do a stretch and fold: Starting at the edge of the dough with wet hands, gently lift one edge of the dough, stretch it up, and fold it over the center. Rotate the bowl/container 90 degrees and repeat with the next side. Do this for all four sides of the dough to form a ball.
Cover the dough and let it rest for 30 minutes. Repeat this stretch-and-fold process two more times at 30 minute intervals for a total of 3 sets. Your dough should go from being rough and clumpy to smooth and silky.
Step 4: Bulk Fermentation
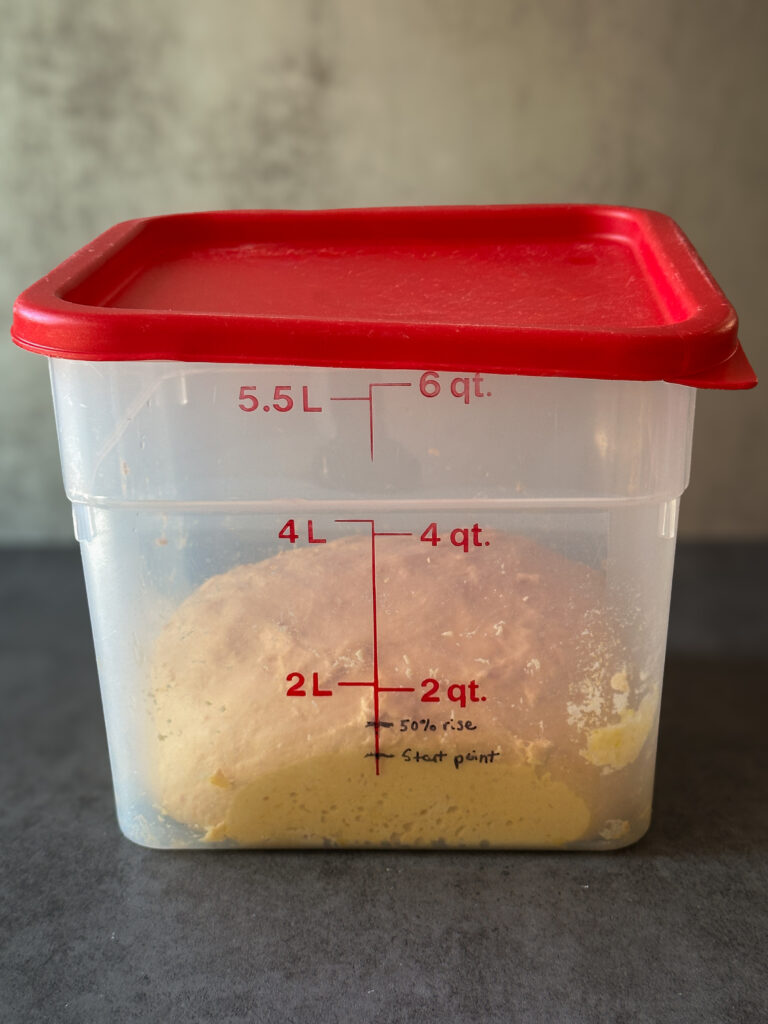
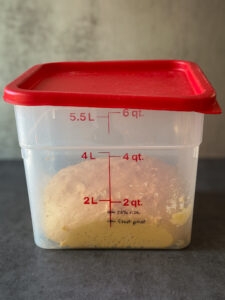
After the stretch and folds, cover the dough and let it bulk ferment for 5-6 hours. Keep the dough at a temperature of 75–78°F (24–26°C) for best results. The dough should rise by about 50%.
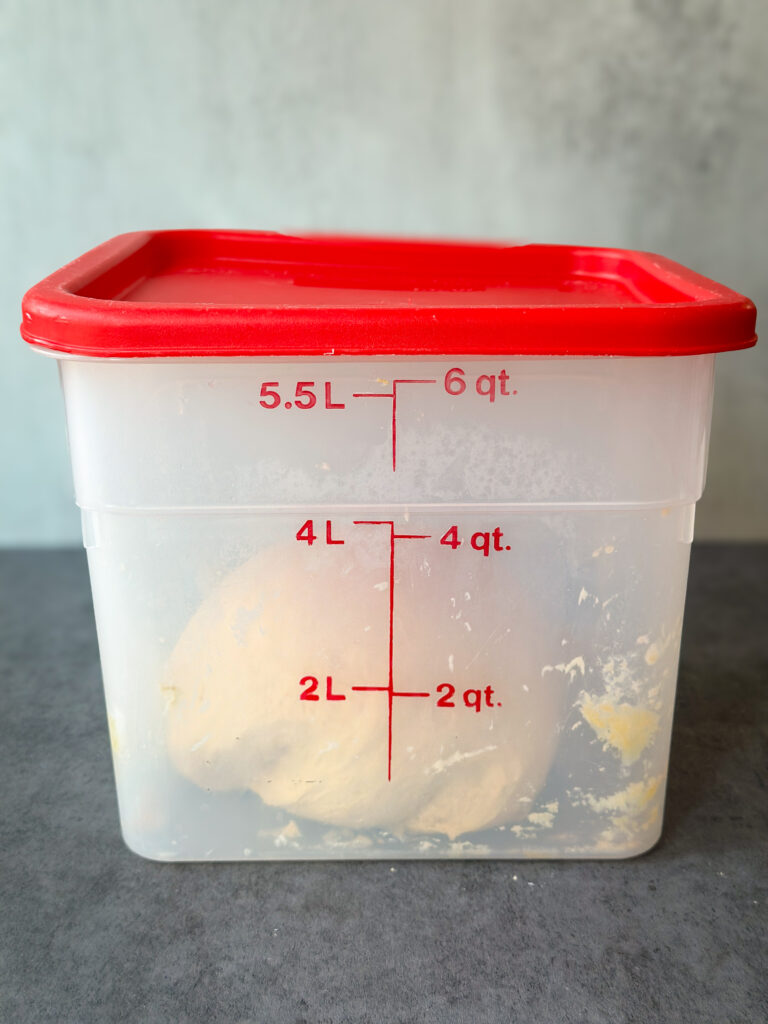
Assessing Rise Tip: After your dough is incorporated, try to gently push the dough down to be level in the bowl or container after the stretch and folds. Mark roughly where your dough is hitting on the side of the container with a sharpie or dry erase marker (you can put a piece of tape over if you don’t want to mark your bowl or jar).
After you mark the volume, make another mark above the that where the dough would be if it rose roughly 50 percent. This will be your target for how much you want your dough to rise during bulk fermentation. This dough is very easy to overproof, so I strongly suggest a guide and to shape it right BEFORE it reaches a 50 percent rise.
Cover the dough and allow it to rest in a warm spot until it has reached a 40-50 percent rise.
Other signs of dough being properly fermented and ready for shaping include fermentation bubbles, a domed top, and springs back when you poke it with your finger.
Step 5: Shaping & Filling the Loaf
In a small bowl, prepare your cinnamon swirl filling by mixing together the brown sugar, cinnamon, ginger, nutmeg, cardamom and flour until well combined. Set aside.
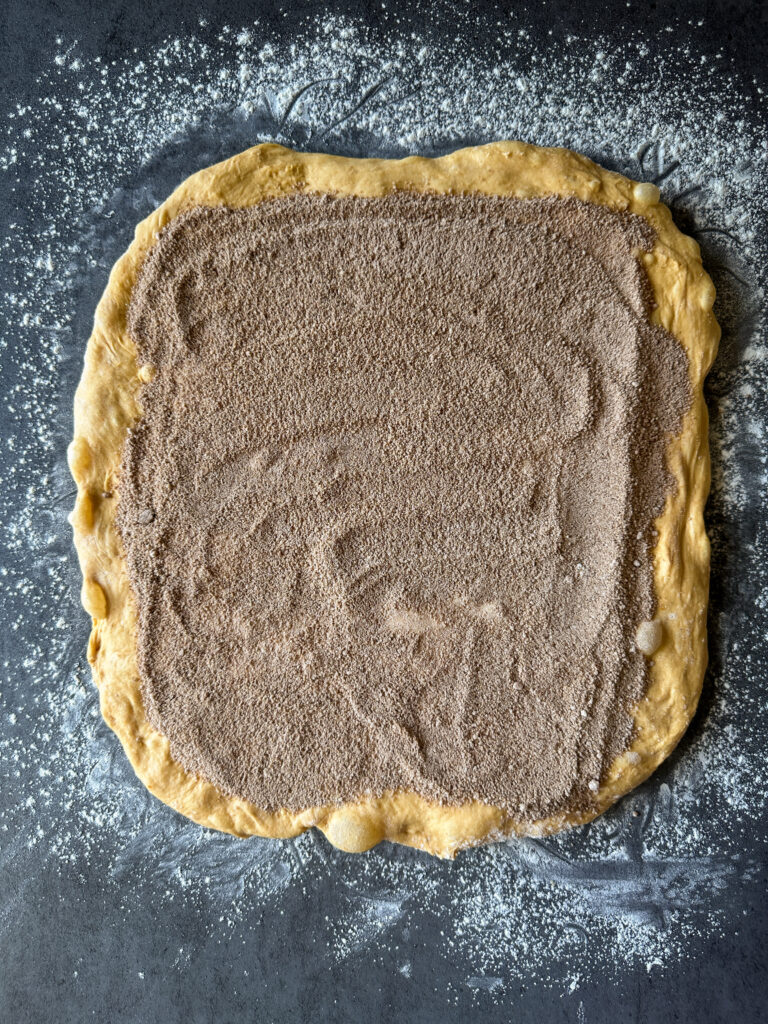
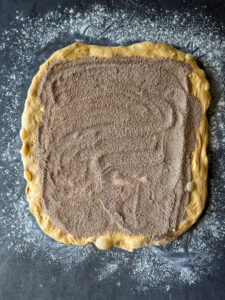
Flour your work surface well and turn out the dough gently. Pre-shape by gently stretching it into a loose square about 12×12 inches.
Sprinkle approximately ⅔ of the cinnamon sugar mixture evenly over the surface, leaving about a ½-inch border around the edges.
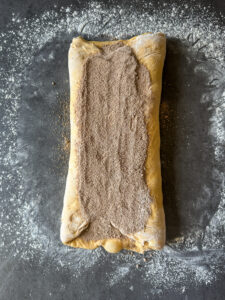
Perform a letter fold: Fold one long third of the dough toward the center. Fold the opposite third over it, just like folding a letter. Gently press the dough to secure the layers without squeezing out all of the air.
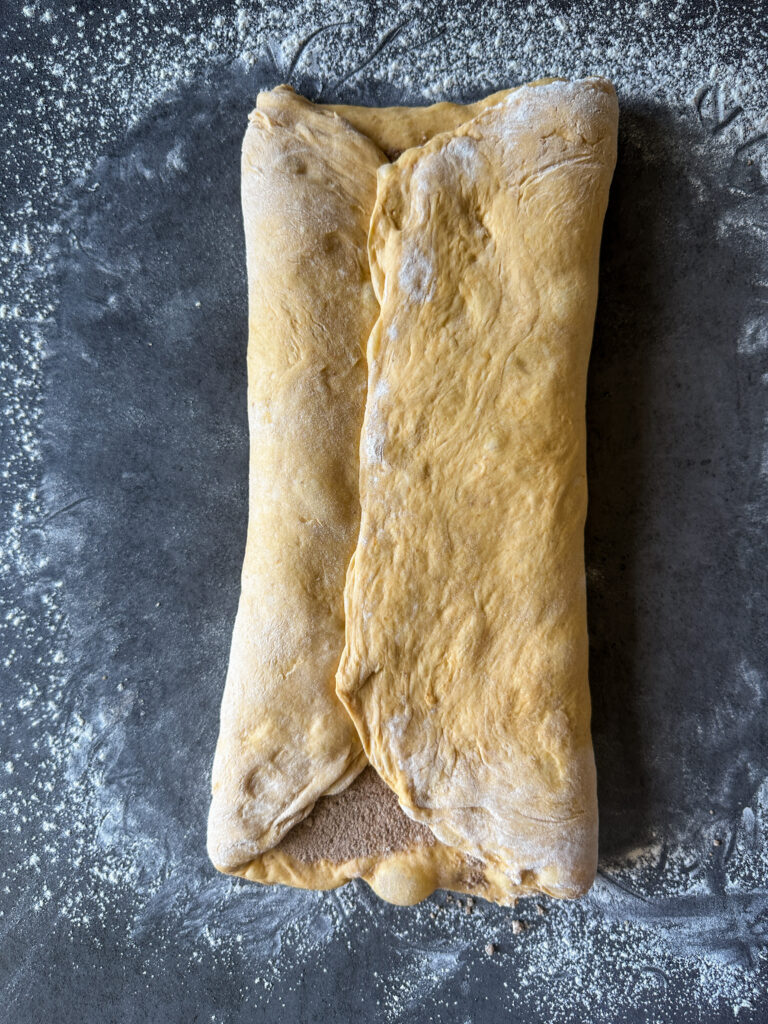
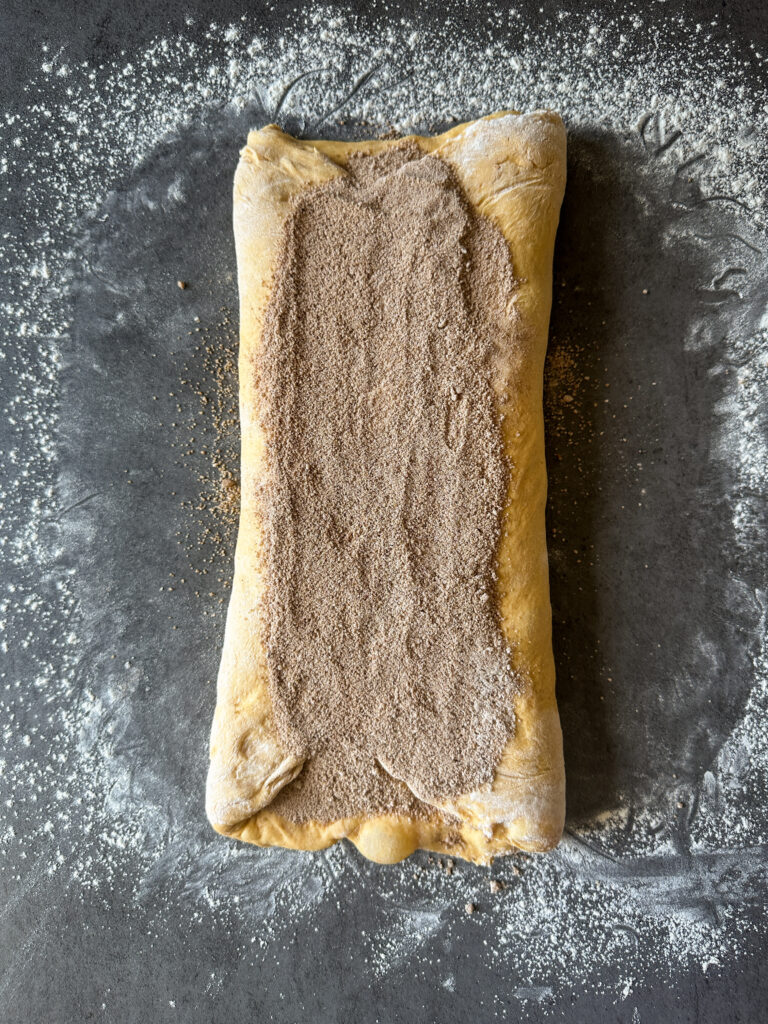
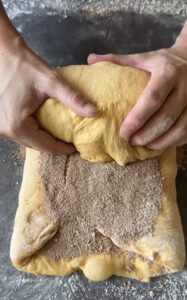
You will now have created a long rectangle shape about 5 inches wide. Sprinkle the remaining ⅓ of the cinnamon sugar mixture over the folded dough, again leaving a small border around the edges. This border is important! Don’t skip it.
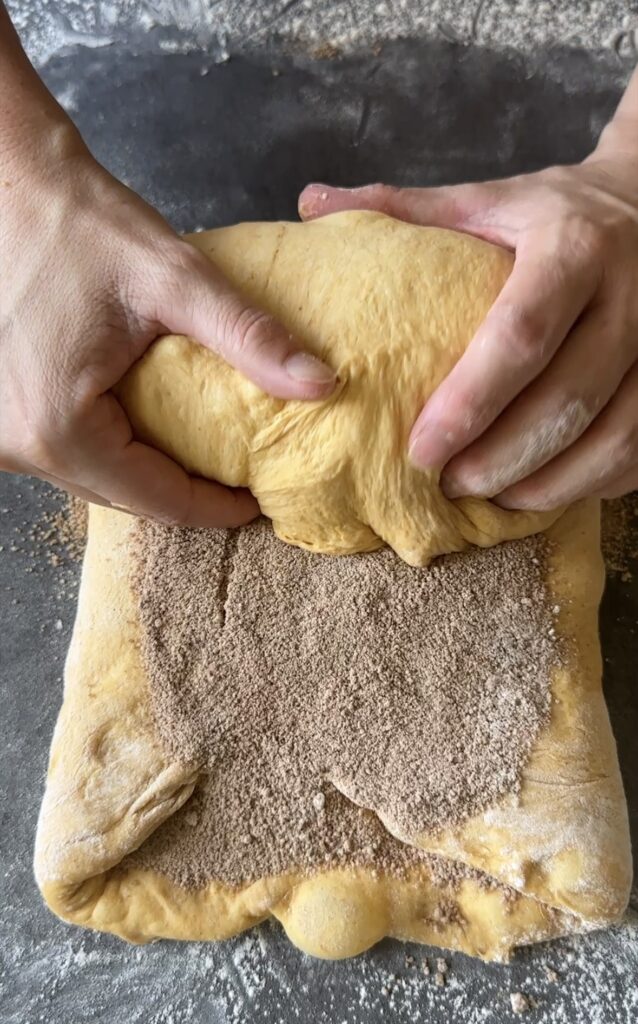
Starting at one short end, gently roll or fold the dough over itself to create a compact loaf similar to a football shape seam side up.
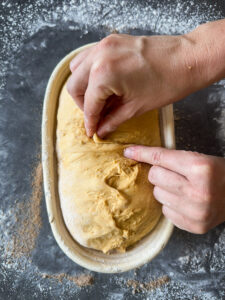
It’s very important to pinch and stich all of the seams together at the ends of the loaf and the seam along the top to make sure none of the cinnamon sugar filling can leak out. Once the bread goes in the refrigerator, any open holes will cause leakage we don’t want.
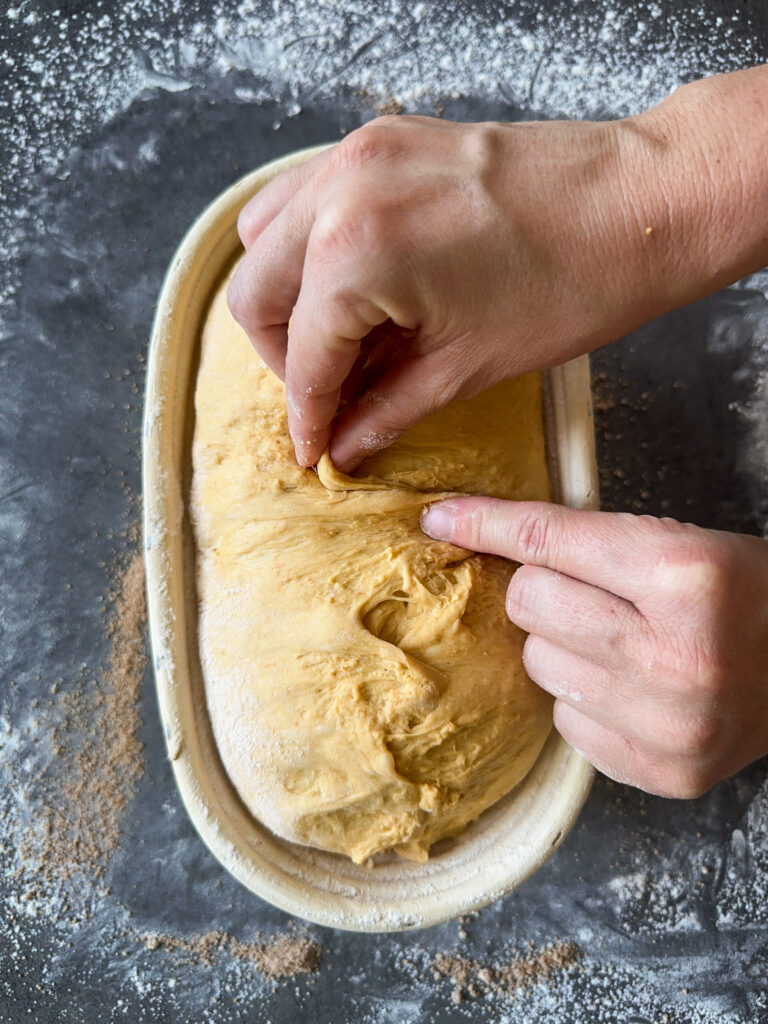
Flour your banneton (the dough can be sticky so don’t forget this) and transfer your loaf seam side up into the floured banneton. Cover the banneton with a cover or plastic wrap.
Transfer the dough to the refrigerator overnight for continued cold fermentation (this step can’t be skipped).
Step 6: Preheat the Oven & Bake
Preheat the oven to 500°F (260°C) convection bake. Place a Dutch oven inside the oven and preheat with Dutch oven inside.
Take the dough out of the fridge. Turn the bread out onto parchment paper or bread sling dusted with flour.
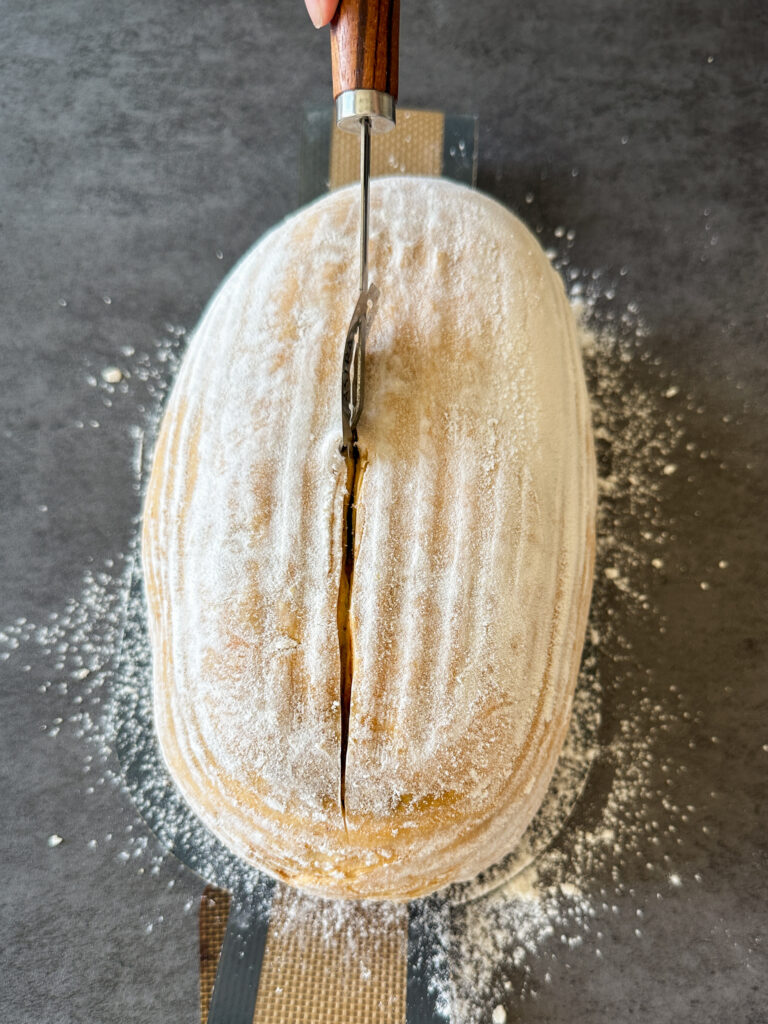
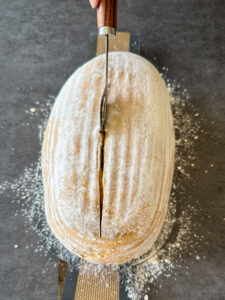
Use a lame or sharp knife to score the top with one cut down the center (make sure the cut isn’t too deep or you’ll cut into all of your cinnamon sugar layers).
This cut should be about 1/4 inch deep from one end of the loaf to the next. This score helps the loaf retain a nice shape while it rises and expands in the oven.
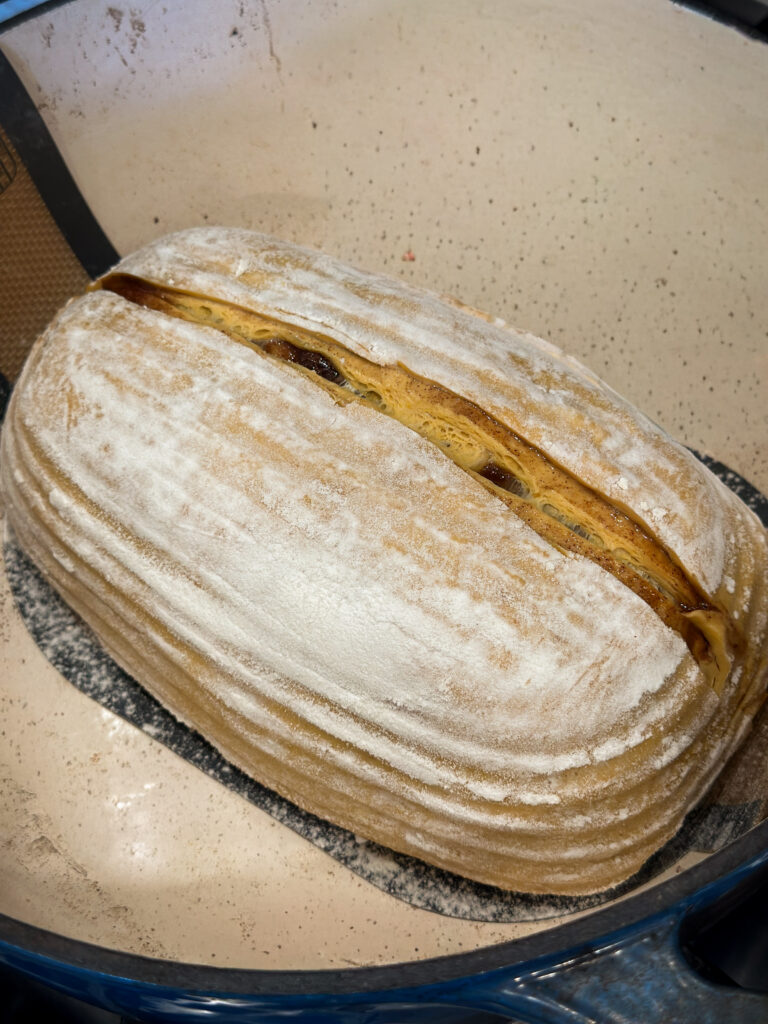
Carefully transfer the bread into the hot Dutch oven (using parchment paper or a bread sling for easy lifting).
If you want to avoid the bottom burning, place a baking sheet on the rack under the Dutch oven to create a barrier.
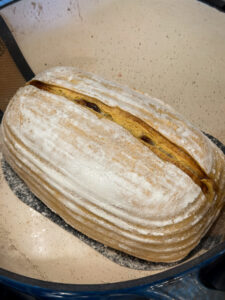
Reduce the oven heat and bake the bread at 450°F (230°C) for 40 minutes with the lid on. Remove the lid and bake for another 5-10 minutes to develop a crispy crust. Internal temperature of loaf should read between 200 F.
Step 7: Cool Completely Before Slicing
Once the bread is baked, remove the bread from the Dutch oven and transfer to a wire rack carefully.
While the bread is still warm, brush the exterior with melted butter for a shiner crust and softer finish. I like how my bread looks with the step, but it can be skipped.
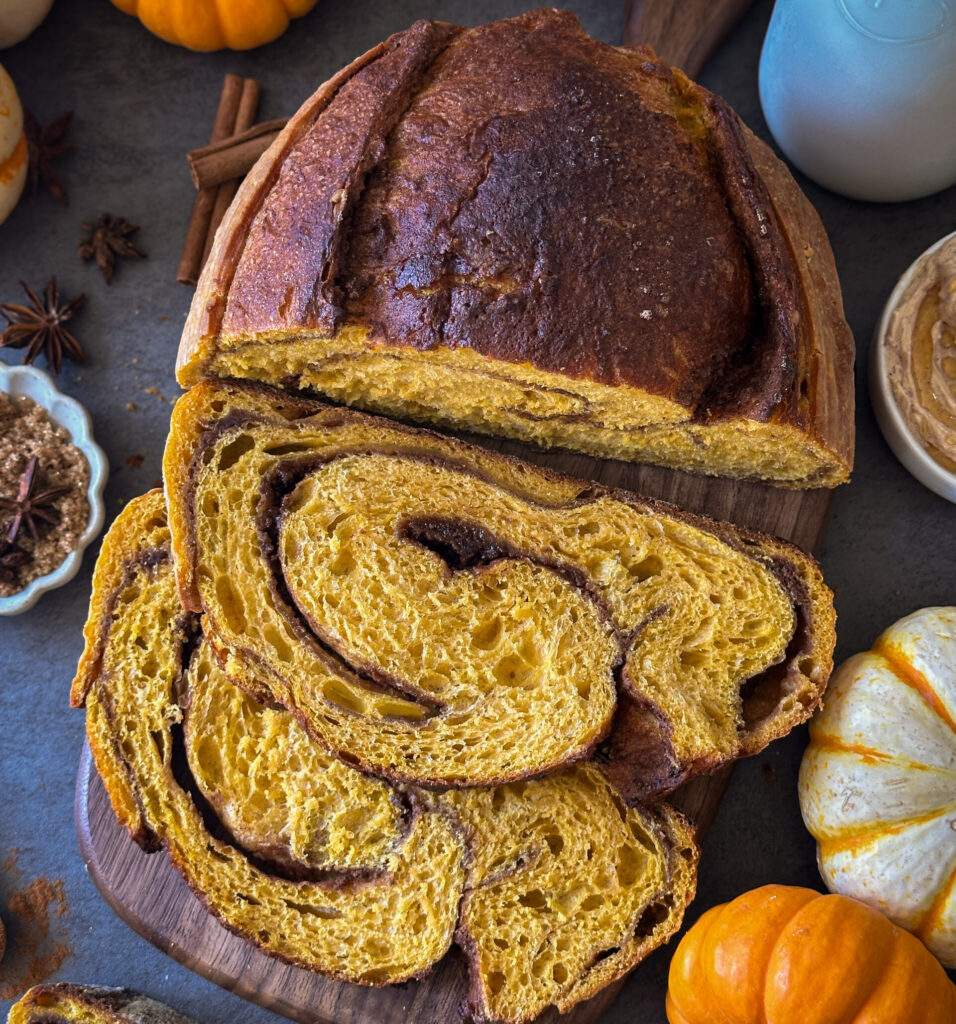
Let the bread cool completely (at least 1-2 hours) before slicing. Cutting too soon will result in a gummy crumb because the inside is still setting!
I like to serve this loaf with a fresh batch of my Honey Cinnamon Butter.
Yields 1 loaf
How to Store:
Room Temperature- Store wrapped at room temperature for up to 4 days. Reheat slices in the oven or toaster for best texture!
Freezer- Store sliced bread in the freezer in a Ziplock bag with all air removed. For easier separation, put pieces of parchment between the slices before freezing. Allow to thaw to room temperature and toast for best flavor.
FAQ’S
No. This recipe relies on an active, bubbly starter for proper rise and structure.
This can happen if the dough is rolled too loosely or the filling was uneven. Spread the filling evenly, then roll tightly and seal the seam well.
The top should be golden brown, and the internal temperature should be around 195–200°F.
No. This won’t result in the same flavor and texture. Use 100% pumpkin puree.
Either under proofing or over proofing. Follow my steps closely for temperature and rise cues for the best results.
The flour helps absorb some of the moisture released as the brown sugar melts. This helps create defined cinnamon ribbons while reducing the chance of large gaps forming between the layers.
It should be soft and slightly tacky but strong enough to hold its shape after your folds. Pumpkin purée varies considerably in moisture, so resist adding extra water just because the dough initially feels firm. It will soften as it rests.
If you loved this recipe, drop a comment and leave a star review and don’t forget to checkout more of my sourdough pumpkin recipes!
Sourdough Pumpkin Recipes:
- Sourdough Pumpkin Donuts (with brown sugar maple glaze)
- Sourdough Pumpkin Cinnamon Swirl Bread
- Sourdough Pumpkin Cream Cheese Muffins (with oat crumble!)
- Sourdough Pumpkin Oatmeal Chocolate Chip Cookies
Sourdough Pumpkin Bread (with a cinnamon swirl)
Equipment
- digital kitchen scale – for weighing out your ingredients (highly recommended for accuracy). This one linked here is great to start with.
- Measuring cups & spoons – (optional, if you prefer to not use a scale).
- Bowl or straight edge container for mixing and proofing dough – to mix your dough and make sure your dough is rising properly. You can use a clear square Tupperware for this, I don't recommend a bowl as it is hard to assess your rise. I've linked here the container I like to use.
- Banneton basket (or a medium bowl lined with a lint-free cloth) – to proof dough. I've linked a quality banneton and cover here if you'd like to see what I use.
- Lint-free cloth or plastic wrap – to cover the dough while resting.
- 5-quart Dutch oven with lid – for baking your loaf. This is an affordable 5-quart Dutch oven that I purchased as my first linked here.
- Parchment paper or silicone bread sling – To keep bread from sticking to Dutch oven. A reusable bread sling can be really convenient and also helps avoid burning hands on your Dutch oven. I use this set linked here all the time!
- Sharp knife or lame for scoring – a sharp knife will work for scoring your bread, but I do recommend investing in a lame (razor blade) which will make the process much easier. Here is a great lame to purchase to start out linked here.
- Digital food thermometer (optional) – to check the temperature of your starter and dough, this ensures a more reliable result. I use this one linked here.
- Bread knife – for cutting your bread once cooled. I love this bread knife linked here.
Ingredients
Feed Your Starter:
- 2 (25g) Tbsp mature sourdough starter
- 1/3 (50g) cup all-purpose flour add a little extra flour if mixture is too thin; should be pancake batter consistency
- 1/4 (50g) cup water
Pumpkin Sourdough:
- ¾ (200g) cup room temperature water
- ½ (100g) cup active sourdough starter 100% hydration
- ¾ (180g) cup pumpkin purée
- 2½ (50g) Tbsp honey or ¼ cup packed (50g) brown sugar
- 2 (30g) Tbsp avocado oil or neutral oil
- 1 tsp vanilla extract
- 4 (500g) cups all-purpose flour or bread flour
- 2 (12g) tsp fine sea salt
Pumpkin Spice Cinnamon Swirl:
- ½ (85g) cup brown sugar
- ⅓ (40g) cup all-purpose flour
- 2½ tsp ground cinnamon
- ¼ tsp ground ginger (you can swap the ginger, nutmeg, and cardamom for 1 tsp pumpkin pie spice blend or omit it)
- ⅛ tsp ground nutmeg
- ⅛ tsp ground cardamom
For Brushing:
- 2 (28g) Tbsp salted butter melted
Instructions
Step 1: Feed Your Starter Night Before Baking
- To ensure a bubbly and active starter, feed your starter the night before baking.
- Use a 1:2:2 ratio to feed your starter (this means one part mature mother starter, two times the water, two times the flour).
- Mix flour and water in a jar with a spatula, cover loosely with lid, and mark the volume of the starter in your jar with a rubber band or piece of tape and marker. Let starter sit at room temperature (70-75 degrees) overnight until bubbly and doubled in size.2 (25g) Tbsp mature sourdough starter, 1/3 (50g) cup all-purpose flour, 1/4 (50g) cup water
Step 2: Make the Dough
- In a large bowl (or as I prefer a clear straight edge container), mix the active starter, pumpkin puree, water, avocado oil, honey, and vanilla until everything is well combined.¾ (200g) cup room temperature water, ½ (100g) cup active sourdough starter, ¾ (180g) cup pumpkin purée, 2½ (50g) Tbsp honey , 2 (30g) Tbsp avocado oil , 1 tsp vanilla extract
- Add the salt and flour to the starter mixture. Stir and knead with your hand or dough whisk until all ingredients are combined into a shaggy dough. Cover with a damp towel or plastic and let it rest for 30 minutes at room temperature (70-77 degrees).4 (500g) cups all-purpose flour, 2 (12g) tsp fine sea salt
Step 3: Stretch and Folds
- After the rest, begin your stretch and folds. This helps build structure in your dough.
- How to do a stretch and fold: Starting at the edge of the dough with wet hands, gently lift one edge of the dough, stretch it up, and fold it over the center. Rotate the bowl/container 90 degrees and repeat with the next side. Do this for all four sides of the dough to form a ball.
- Cover the dough and let it rest for 30 minutes. Repeat this stretch-and-fold process two more times at 30 minute intervals for a total of 3 sets. Your dough should go from being rough and clumpy to smooth and silky.
Step 4: Bulk Fermentation
- After the stretch and folds, cover the dough and let it bulk ferment for 5-6 hours. Keep the dough at a temperature of 75–78°F (24–26°C) for best results. The dough should rise by about 50%.
- Assessing Rise Tip: After your dough is incorporated, try to gently push the dough down to be level in the bowl or container after the stretch and folds. Mark roughly where your dough is hitting on the side of the container with a sharpie or dry erase marker (you can put a piece of tape over if you don't want to mark your bowl or jar).
- After you mark the volume, make another mark above the that where the dough would be if it rose roughly 50 percent. This will be your target for how much you want your dough to rise during bulk fermentation. This dough is very easy to overproof, so I strongly suggest a guide and to shape it right BEFORE it reaches a 50 percent rise.

- Cover the dough and allow it to rest in a warm spot until it has reached a 40-50 percent rise.
- Other signs of dough being properly fermented and ready for shaping include fermentation bubbles, a domed top, and springs back when you poke it with your finger.
Step 5: Shaping & Filling the Loaf
- In a small bowl, prepare your cinnamon swirl filling by mixing together the brown sugar, cinnamon, ginger, nutmeg, cardamom and flour until well combined. Set aside.½ (85g) cup brown sugar, ⅓ (40g) cup all-purpose flour, 2½ tsp ground cinnamon, ¼ tsp ground ginger, ⅛ tsp ground nutmeg, ⅛ tsp ground cardamom
- Flour your work surface well and turn out the dough gently. Pre-shape by gently stretching it into a loose square about 12×12 inches.
- Sprinkle approximately ⅔ of the cinnamon sugar mixture evenly over the surface, leaving about a ½-inch border around the edges.
- Perform a letter fold: Fold one long third of the dough toward the center. Fold the opposite third over it, just like folding a letter. Gently press the dough to secure the layers without squeezing out all of the air.
- You will now have created a long rectangle shape about 5 inches wide. Sprinkle the remaining ⅓ of the cinnamon sugar mixture over the folded dough, again leaving a small border around the edges. This border is important! Don’t skip it.
- Starting at one short end, gently roll or fold the dough over itself to create a compact loaf similar to a football shape seam side up.

- It’s very important to pinch and stich all of the seams together at the ends of the loaf and the seam along the top to make sure none of the cinnamon sugar filling can leak out. Once the bread goes in the refrigerator, any open holes will cause leakage we don’t want.
- Flour your banneton (the dough can be sticky so don’t forget this) and transfer your loaf seam side up into the floured banneton. Cover the banneton with a cover or plastic wrap.
- Transfer the dough to the refrigerator overnight for continued cold fermentation (this step can’t be skipped).
Step 6: Preheat the Oven & Bake
- Preheat the oven to 500°F (260°C) convection bake. Place a Dutch oven inside the oven and preheat with Dutch oven inside.
- Take the dough out of the fridge. Turn the bread out onto parchment paper or bread sling dusted with flour.
- Use a lame or sharp knife to score the top with one cut down the center (make sure the cut isn’t too deep or you’ll cut into all of your cinnamon sugar layers).
- This cut should be about 1/4 inch deep from one end of the loaf to the next. This score helps the loaf retain a nice shape while it rises and expands in the oven.
- Carefully transfer the bread into the hot Dutch oven (using parchment paper or a bread sling for easy lifting).
- If you want to avoid the bottom burning, place a baking sheet on the rack under the Dutch oven to create a barrier.
- Reduce the oven heat and bake the bread at 450°F (230°C) for 40 minutes with the lid on. Remove the lid and bake for another 5-10 minutes to develop a crispy crust. Internal temperature of loaf should read between 200 F.
Step 7: Cool Completely Before Slicing
- Once the bread is baked, remove the bread from the Dutch oven and transfer to a wire rack carefully.
- While the bread is still warm, brush the exterior with melted butter for a shiner crust and softer finish. I like how my bread looks with the step, but it can be skipped.2 (28g) Tbsp salted butter
- Let the bread cool completely (at least 1-2 hours) before slicing. Cutting too soon will result in a gummy crumb because the inside is still setting!
- I like to serve this loaf with a fresh batch of my Honey Cinnamon Butter.
- Yields 1 loaf