
Sourdough Star Bread
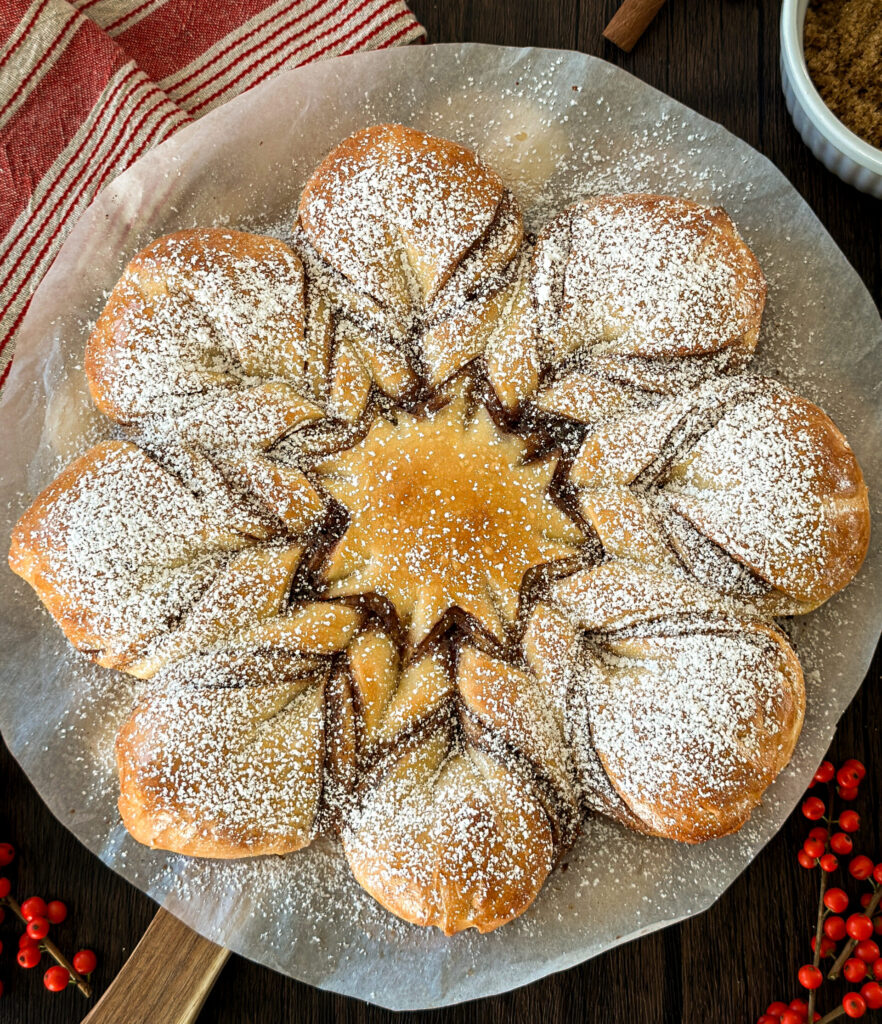
This Sourdough Star Bread is as beautiful as it is delicious! Made with soft, fluffy sourdough and layered with buttery cinnamon sugar filling, it’s the perfect holiday bake and so much easier to make than it looks. With its beautiful twisted layers and golden crust, it makes a stunning centerpiece for any holiday gathering. If the shaping intimidates you, don’t let it. I’ll walk you through each step so you can make your own with confidence.
Why You’ll Love This Recipe
- Easier than it looks: Those beautiful twists may look complicated, but the shaping is surprisingly simple!
- Make it same day: This recipe uses a generous amount of starter so you can make your star bread all in one day.
- Layers of cinnamon sugar: Every soft, fluffy piece has buttery cinnamon sugar tucked between the layers.
- Beautiful holiday centerpiece: If you’re looking for a Christmas bake to impress your guests, this is the recipe you need!
Tools You’ll Need:
- Stand mixer with dough hook (or strong hands!) – for mixing the dough. You can also mix this dough by hand!
- Digital scale– recommended for accurate measurements and weighing your dough. I love this digital kitchen scale.
- Measuring cups and spoons– for measuring ingredients.
- Whisk- to combine ingredients.
- Spatula- to spread the butter.
- Small bowl- to combine the cinnamon sugar.
- Rolling pin- to roll out the dough.
- Sharp knife or pizza cutter- to cut the dough into for star shape.
- Small round or star cookie cutter (optional)- to help guide your cuts for the star.
- Parchment paper- to line the baking sheet.
- Baking sheet- to bake the star bread.
- Pastry Brush- to brush star with egg wash.
- Small sieve- to dust the star with powdered sugar.
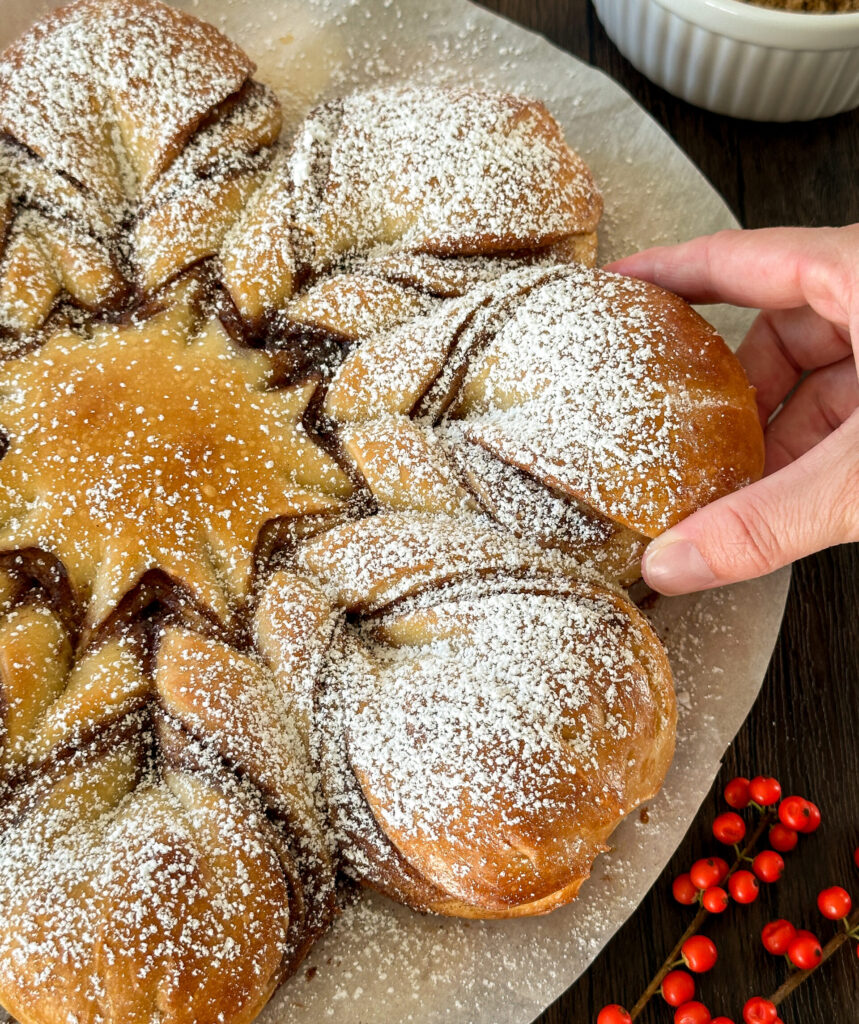
Gather Your Ingredients:
- Whole milk– milk enriches this dough making it soft and tender.
- Egg- adds tenderness and structure to the dough working as a binder.
- Sourdough starter- You’ll need a mature sourdough starter to feed and make the sweet levain.
- Water- used to feed the sweet levain.
- Unsalted butter- enriches the dough and helps the cinnamon sugar stick.
- White Sugar- sweetens the dough and cuts the tang of the starter with a sweet levain.
- Sea salt- balances out the sweetness.
- Vanilla extract- for warmth and depth of flavor to the star bread.
- All-purpose flour- I recommend AP flour over bread flour to create a more tender crumb. You can substitute for bread flour if needed!
- Powdered sugar (or confectioner’s)– to dust on top of the star bread for a pretty finish.
- Brown Sugar- you’ll need brown sugar for the cinnamon sugar filling.
- Ground Cinnamon- Mixed into the brown sugar filling for that classic cinnamon flavor.
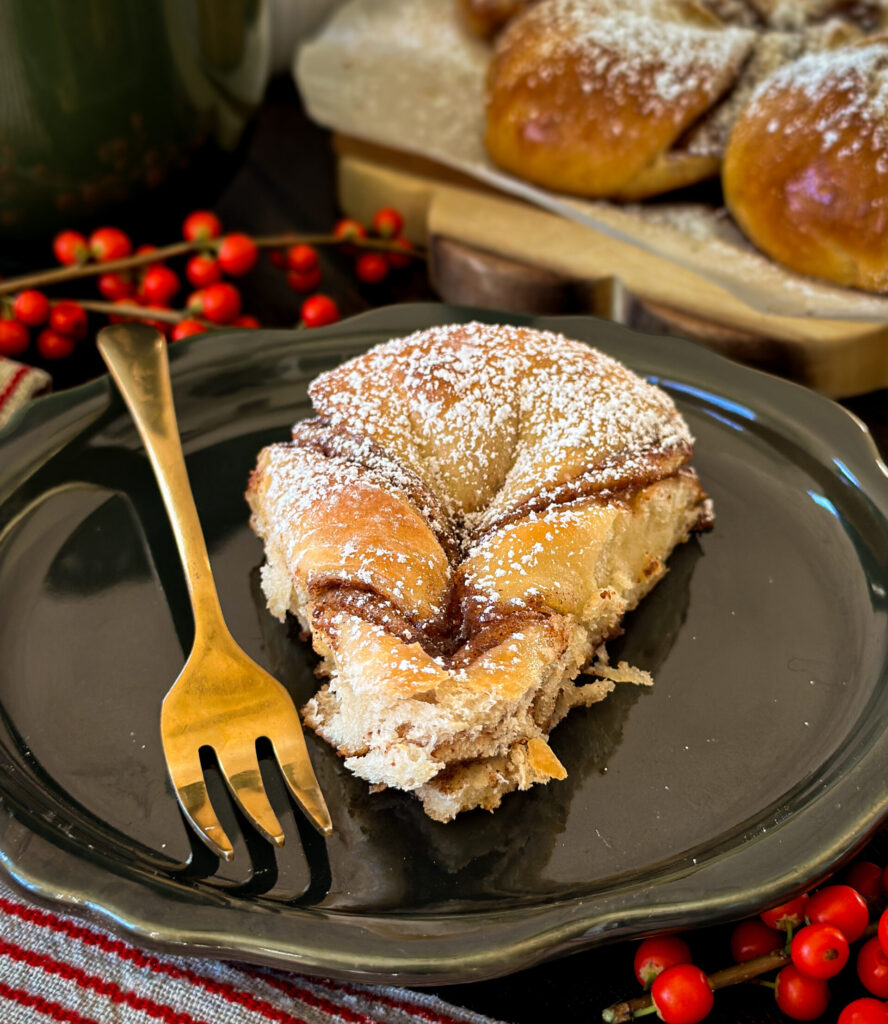
Instructions
Step 1: Make the Sweet Levain (Night Before)
To start your dough, you’ll want to mix a sweet levain the night before. If this sounds intimidating, it’s not! It’s literally just adding sugar to your starter. This curbs the tang of the sourdough for the perfect dough.
In a clean jar, mix your mother starter with the flour, water, and sugar. Give it a good stir, and allow it to rest at room temperature (optimally 73-75 degrees F). I like to mark the volume in my jar with a rubber band so it’s easy to asses the rise the next morning. When the sweet levain has doubled in size, it’s time to mix your cinnamon roll dough.
Step 2: Mix the Dough
In a stand mixer fitted with a dough hook or large mixing bowl, add all of the sweet levain, whole milk, egg, sugar, and vanilla. Whisk ingredients together quickly, it’s okay if it’s lumpy.
Add your flour and salt into your wet ingredients.
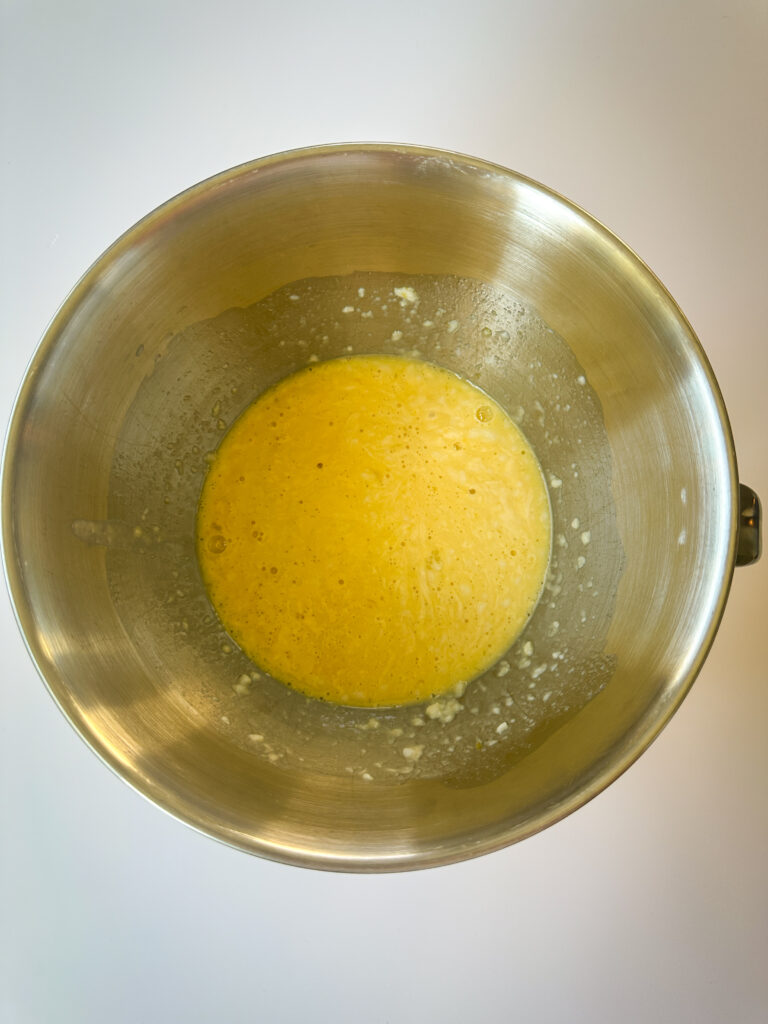
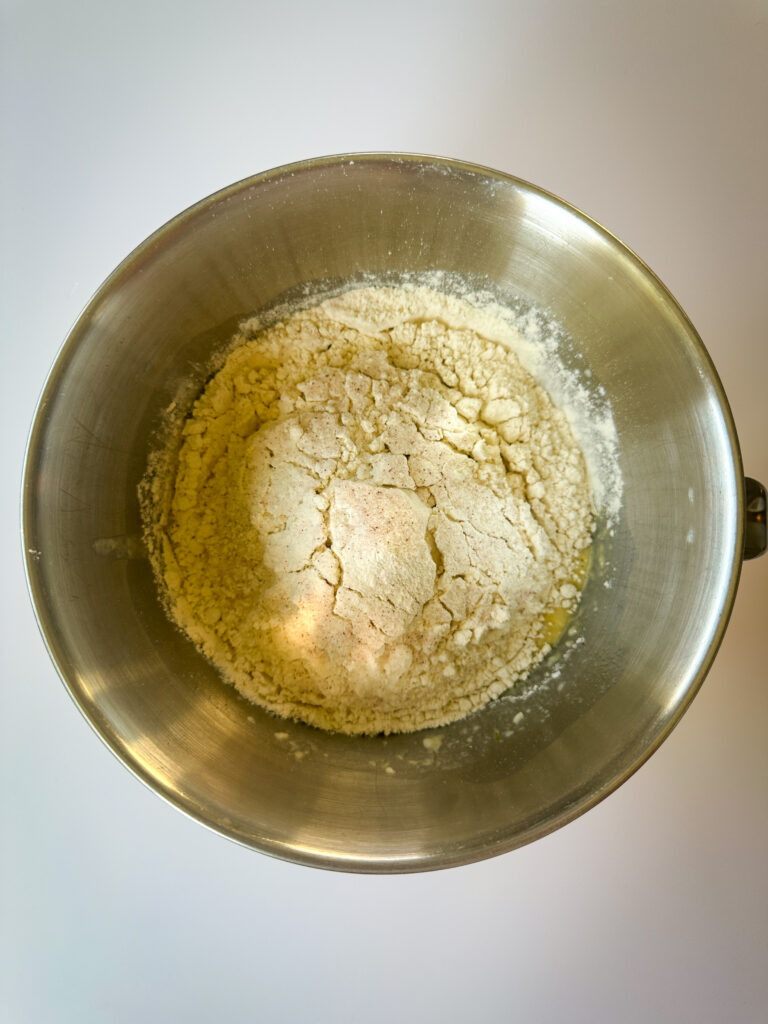
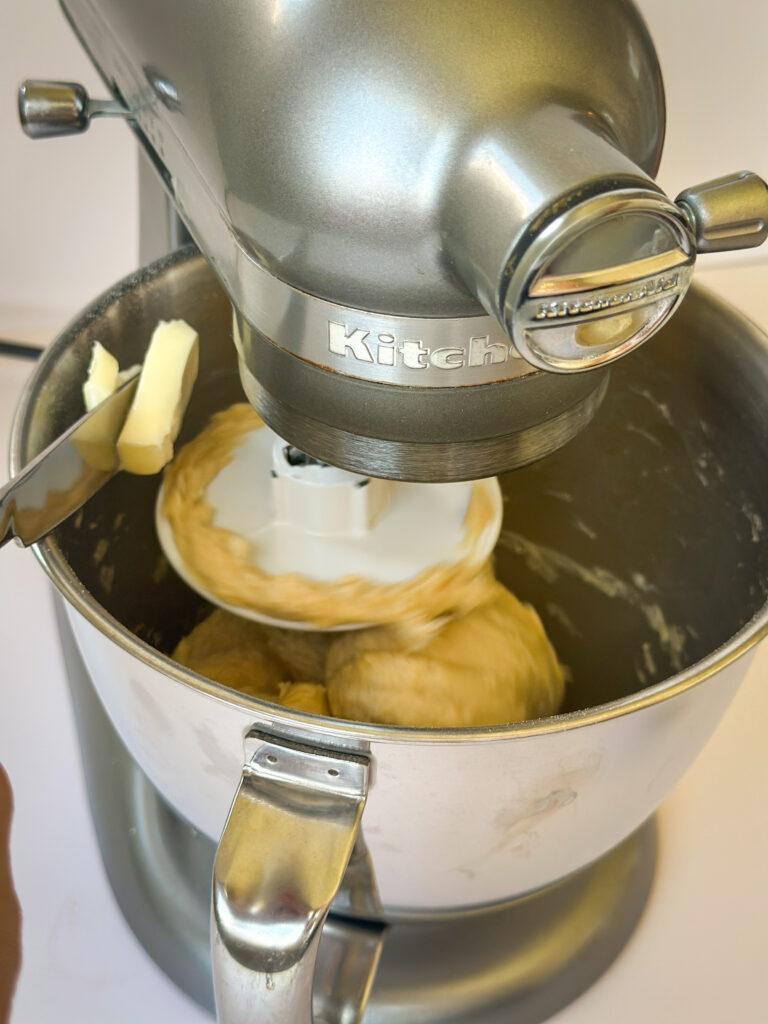
Stand mixer directions: Mix on low until a shaggy dough forms, about 2-3 minutes. Scrape down the bowl if needed.
Hand mixing directions: If using your hands, knead until you work the dough together. This is a higher hydration dough, so be aware it will be sticky.
Once the dough has come together add the softened butter, a tablespoon at a time mixing each tablespoon in until adding the next.
Use a dough scraper to scrape the edges of the bowl to make sure everything is getting mixed in.
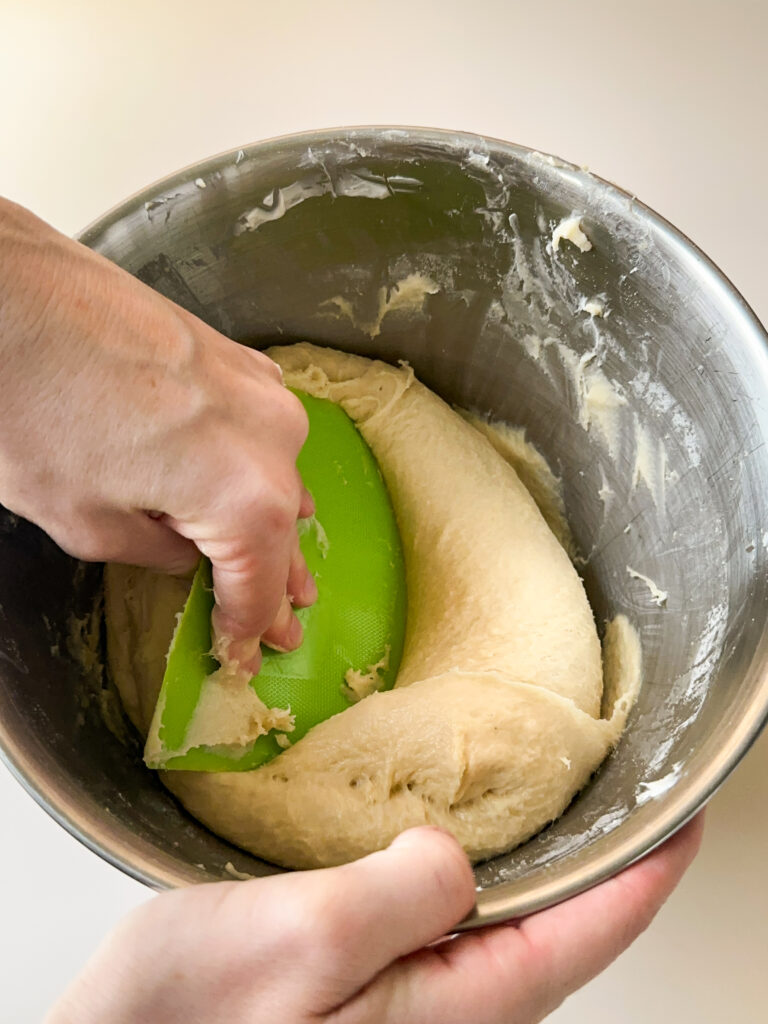
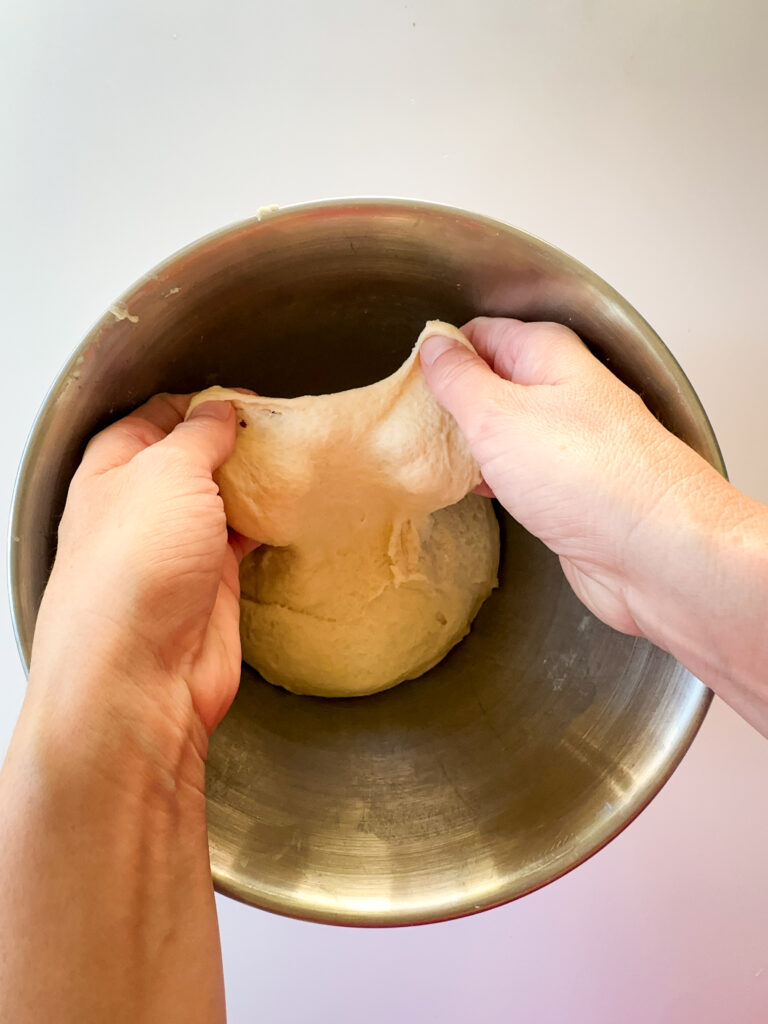
Stand mixer directions: Continue mixing on medium-low (speed 2–3) for 8–10 minutes, until dough is smooth, elastic, and tacky but not sticky.
Mixing by hand: knead dough until butter has fully incorporated and dough is smooth and tacky.
Mixing Notes: If kneading in a mixer or if dough is very wet when mixing by hand, add an additional 25 grams (3 Tablespoons) of flour and mix into dough. Make sure to work flour in completely and assess if you need more flour.
Do not add more than 50 grams of flour at this stage, or you will lose the high hydration of the dough and end up with a dense dough.
If you’re using a stand mixer, the dough can become more warm and sticky and I have found kneading dough with my hand (perform a set of stretch and folds) for a minute after mixing in my stand mixer really helps bring the dough together.
Step 3: Bulk Fermentation
Spray a clean bowl with oil. Shape the dough into a smooth ball and place it in the bowl. Cover with plastic wrap.
How to perform a stretch and fold: Beginning at the edge of the bowl, lift the dough up without tearing it, and fold it back into the center. Repeat this step around the edge of the bowl until the dough forms a ball. This is one set of stretch and folds. Cover the dough again and return it to a warm environment to rest 30 minutes.
Stand mixer directions: perform one set of stretch and folds after 30 minutes to strengthen your dough.
Hand mixing directions: perform 3 sets of stretch and folds at 30 minute intervals at the beginning of bulk fermentation. After stretch and folds are completed, cover dough and allow to continue proofing.
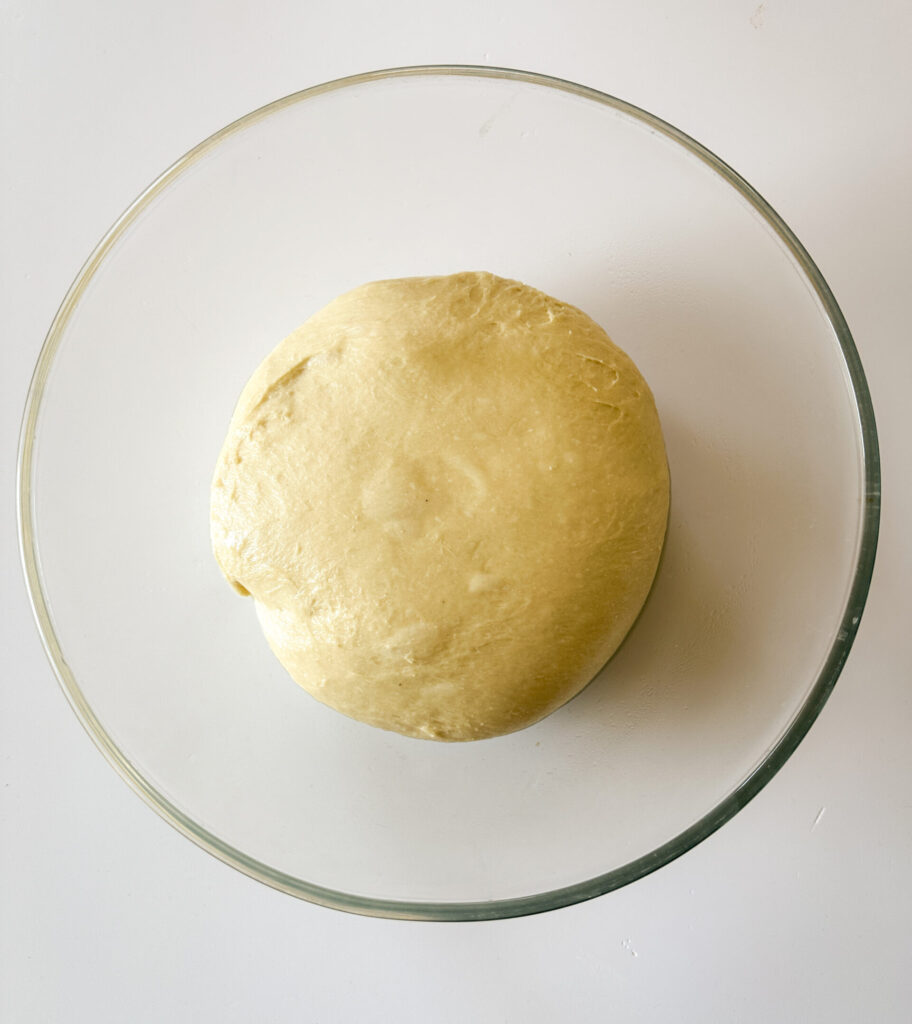
Let the dough rise at 75–80°F until doubled in size, this takes about 5–6 hours. If your house is very cold, you can put dough in the oven with the light on for a warmer atmosphere.
This proofing time is a general guide, this process may take longer the key is to assess when the dough has nearly doubled that’s when it’s ready.
Overnight Fermentation: Once the dough has finished rising, you can cover and transfer to the refrigerator overnight for a longer ferment or you can skip this step and go straight to making your star.
Step 4: Roll out the Dough
In a small mixing bowl, combine the brown sugar, cinnamon, flour and salt for the filling and set this aside.
Make sure your butter is fully softened for the filling too before proceeding with the star bread, it needs to be a spreadable consistency.
Transfer the dough to the floured work surface, and flour the top of the dough and the rolling pin, Divide the dough into 3 equals sections (approximately 275 g each).
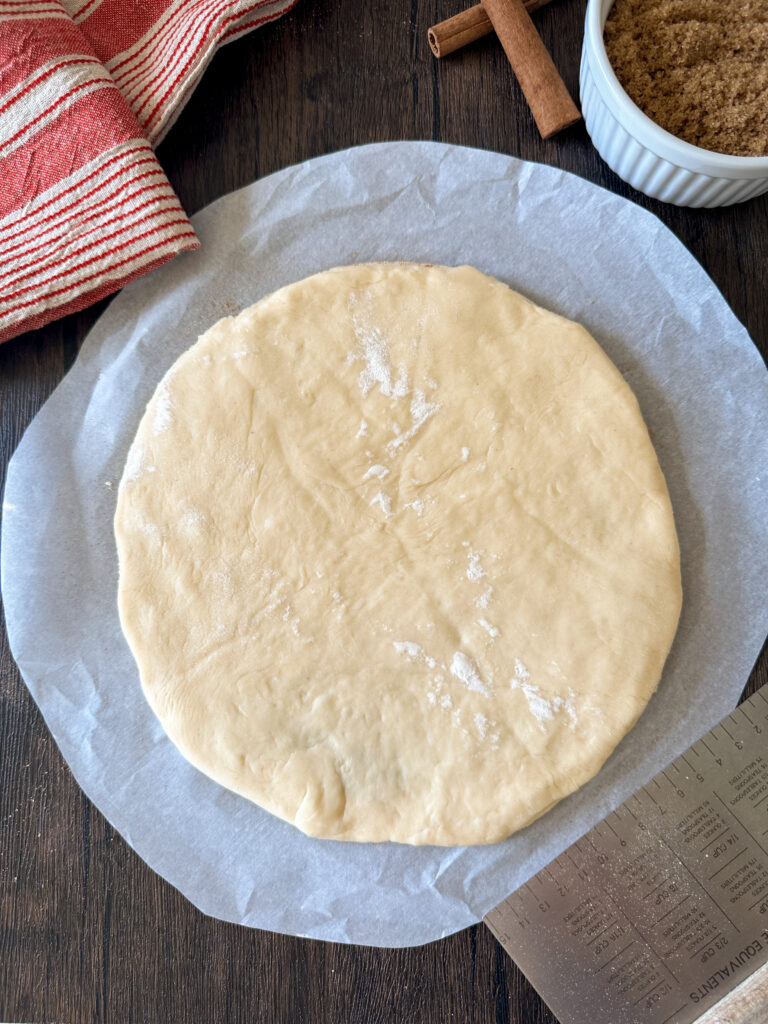
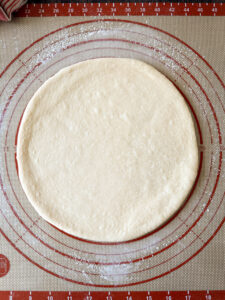
Starting with your first dough ball, roll it out to slightly larger than a dinner plate (about a 10 inch circle). I use a pastry mat for this, but you can also use a large dinner plate as a guide.
Using a knife or pizza wheel, trim your edges to make a clean circle.
Make sure you keep lightly flouring your dough and surfaces to avoid sticking, this will make transferring the dough easier.
Fold the dough in half and then quarters, and transfer to a parchment lined baking sheet. Unfold the dough to form the circle on the tray.
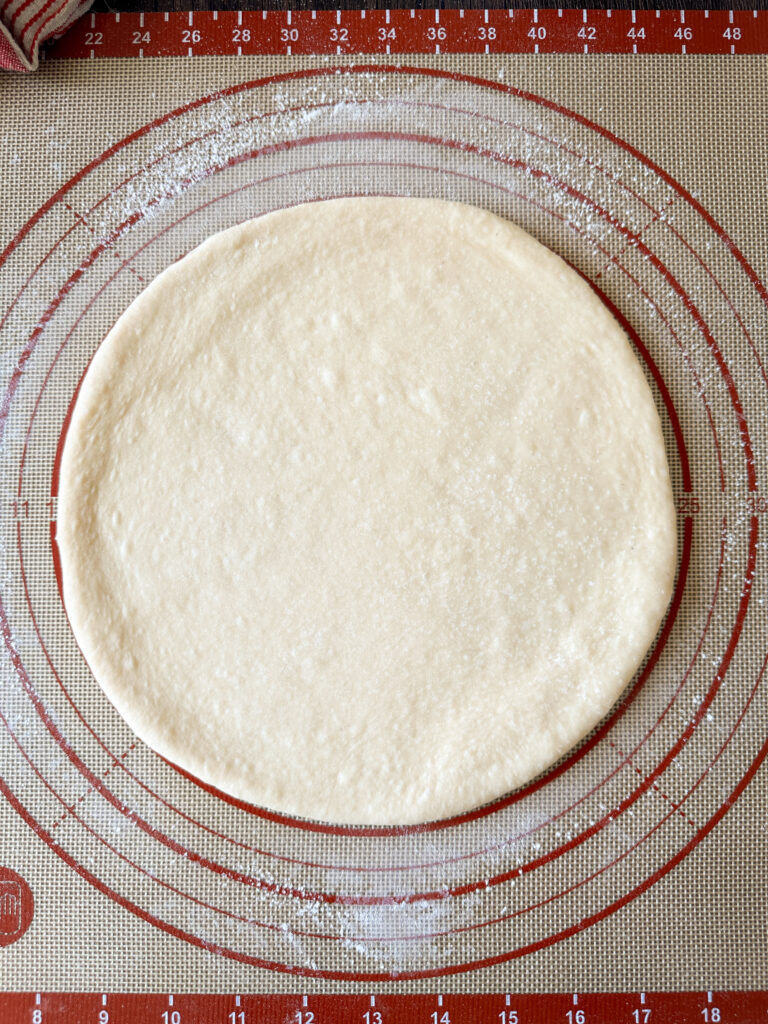
Repeat this step with your remaining 2 sections of dough, forming a total of 3 10 inch round circles. Place each section on parchment lightly floured for easy assembly of your star.
Step 5: Shape the Star
Now for the fun part, let’s assemble the star!
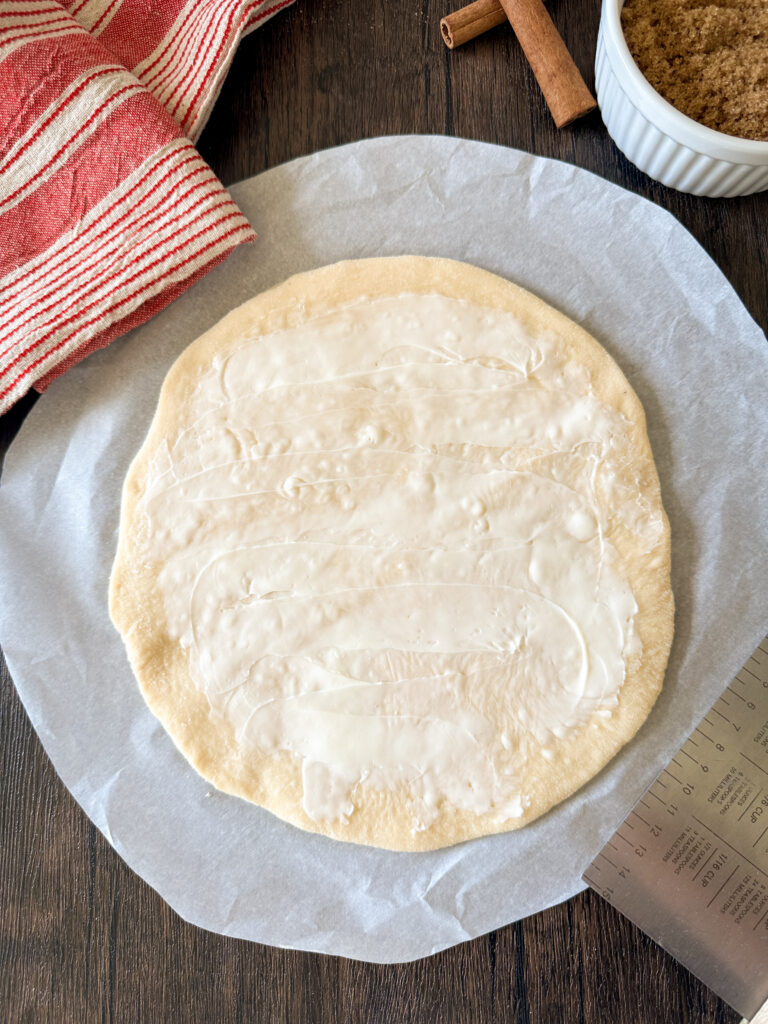
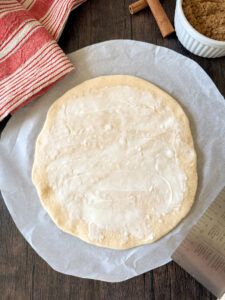
Starting with one circle of dough, use half of the butter and spread it in a thin layer over the top of the dough leaving a 1/4 inch border.
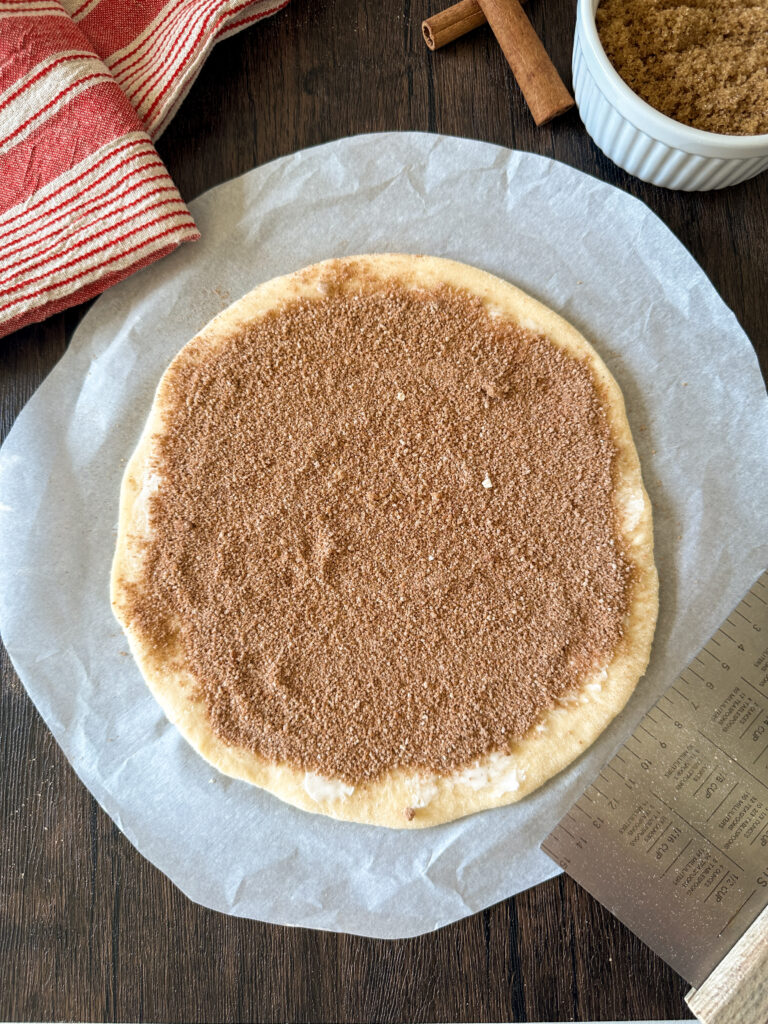
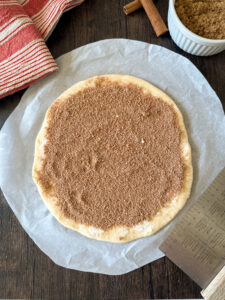
Sprinkle half of the cinnamon sugar blend on top of the butter layer.
Take a second circle of dough, and layer it on top of the cinnamon sugar. Stretch the edges to make sure they meet, then gently press with your fingers to seal them.
Repeat the same step of spreading butter and cinnamon sugar on top of the dough, using the remaining butter and cinnamon sugar (make sure to leave the 1/4 inch edge).
Layer the final circle of dough on top, and press the edges to seal everything down.
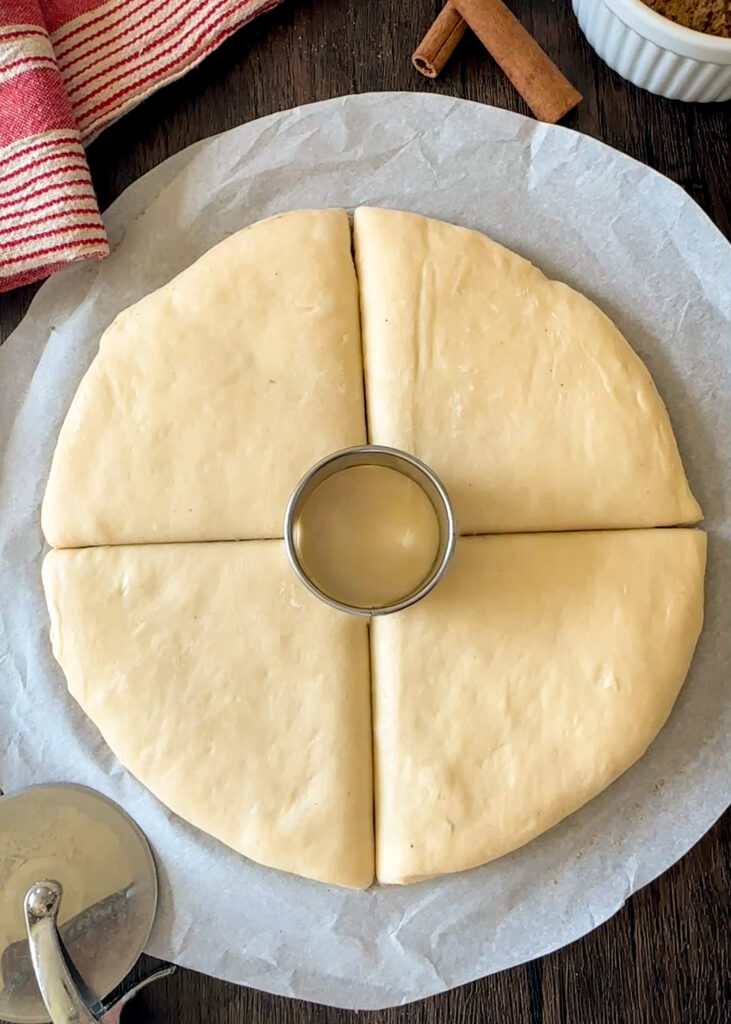
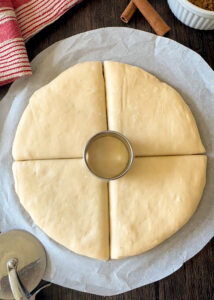
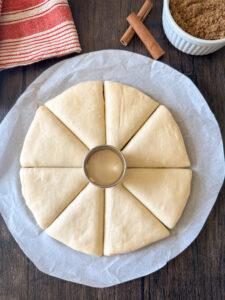
Place a small star or circle cookie cutter in the center of the circle, or use a small cup or measuring cup (about 3 inches wide) to make sure you don’t cut too far and keep the center intact.
Using your pizza wheel or a sharp knife, make 4 evenly spaced cuts from the edge of the dough to the center mark, dividing the dough in quarters but leaving the center intact.
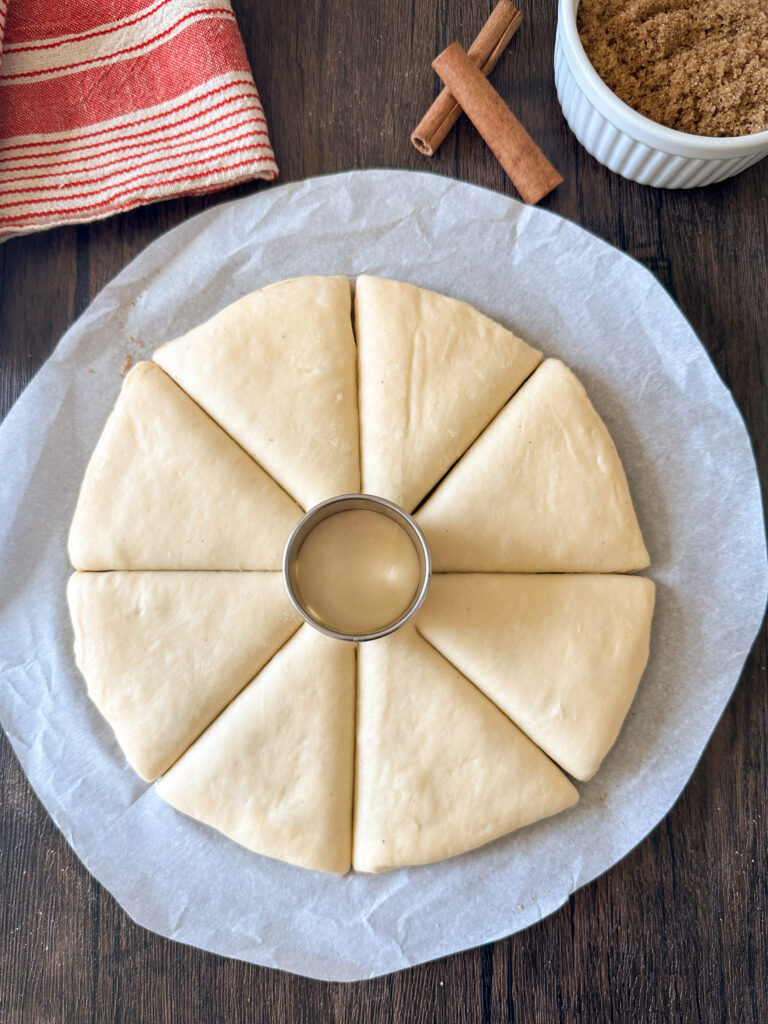
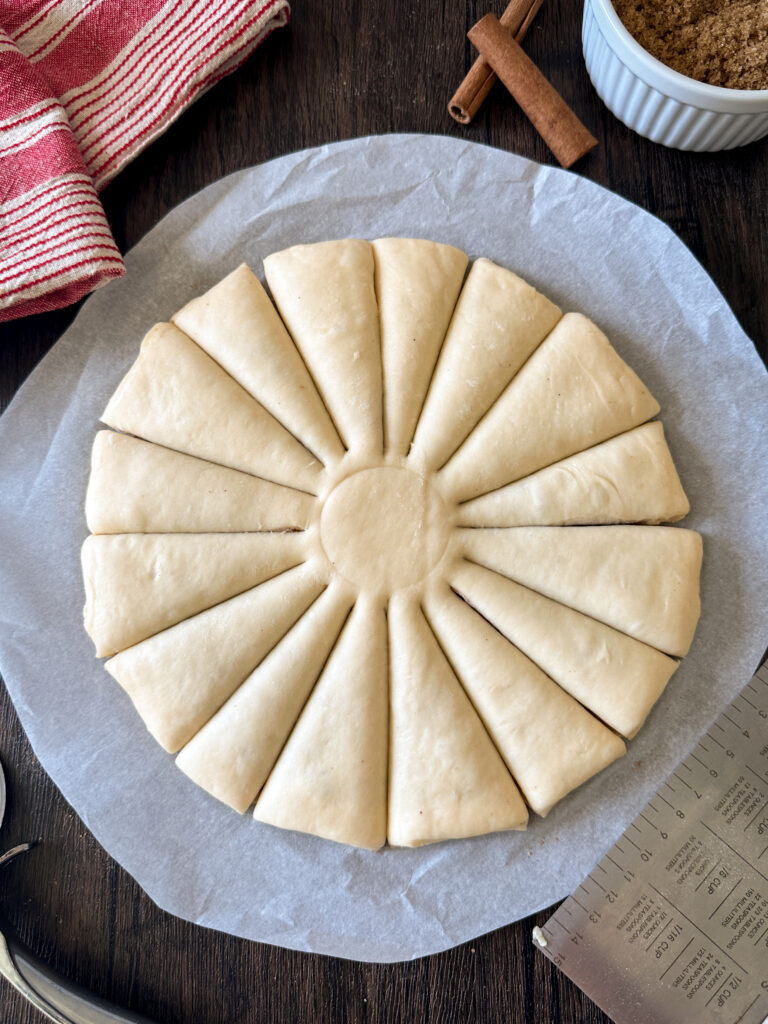
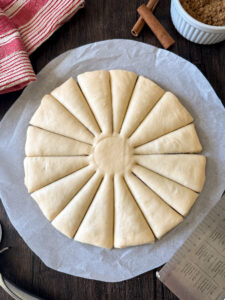
Cut each of those quarters in half, to create 8 equal wedges. Cut each of those wedges again, stopping at the center mark, to form 16 total strands radiating from the center.
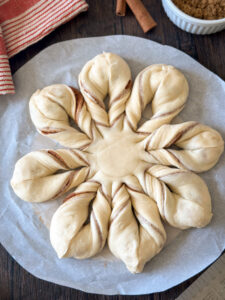
You should now have 16 evenly sized strips attached to the center circle. perfect for twisting to form your star.
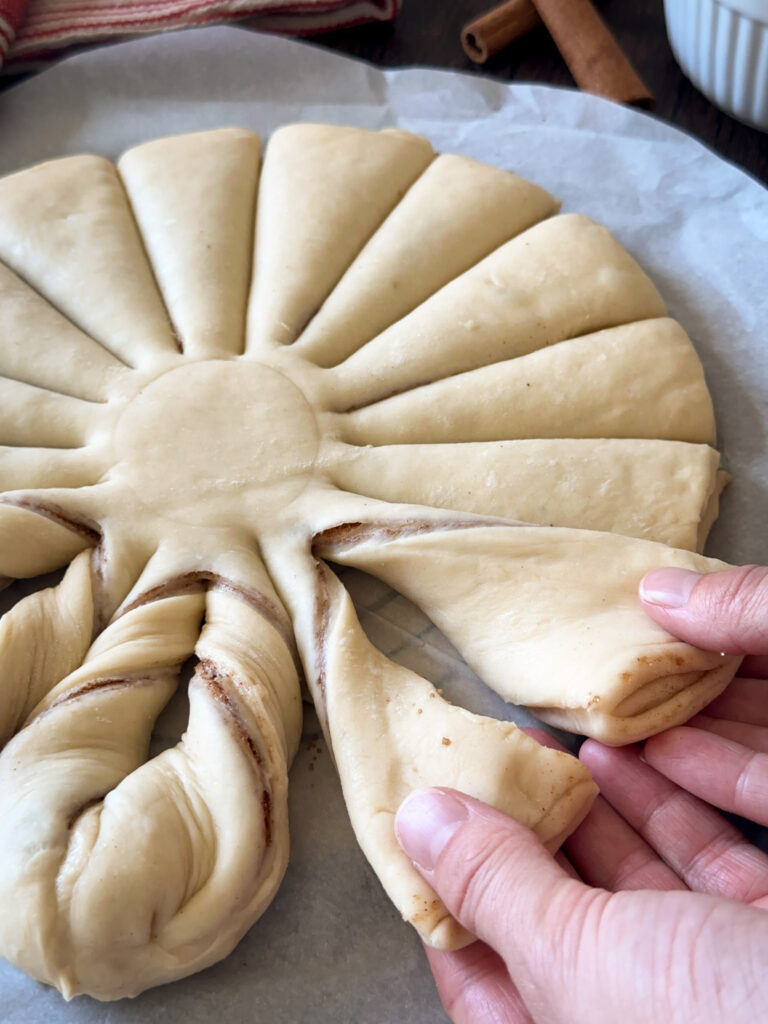
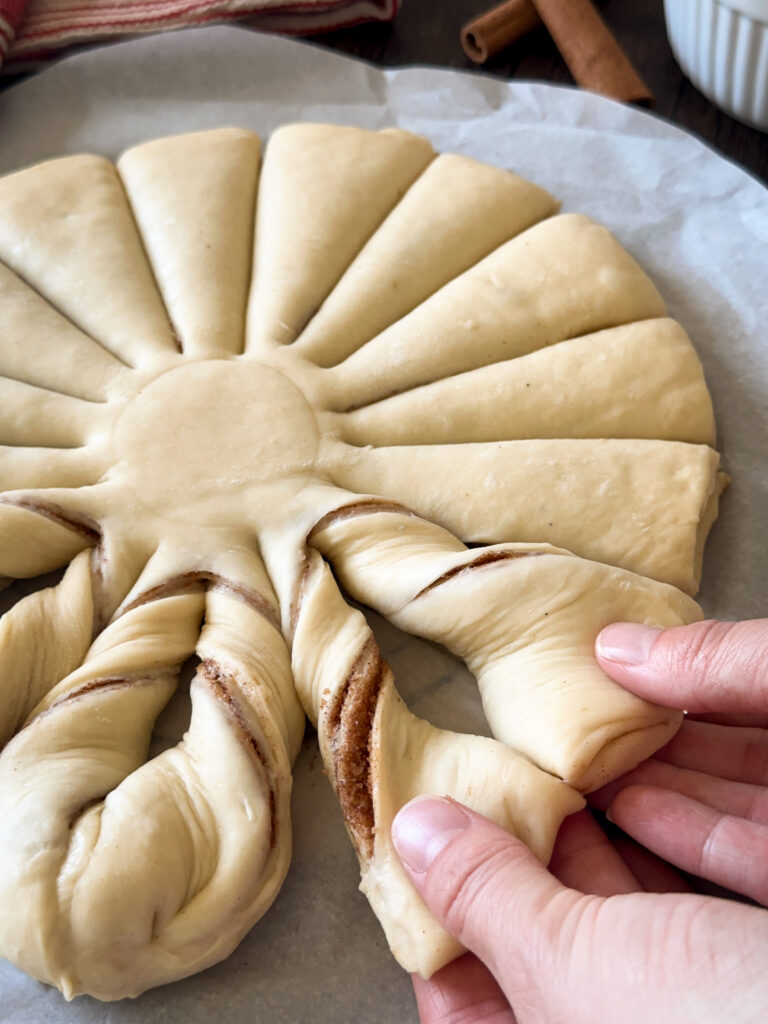
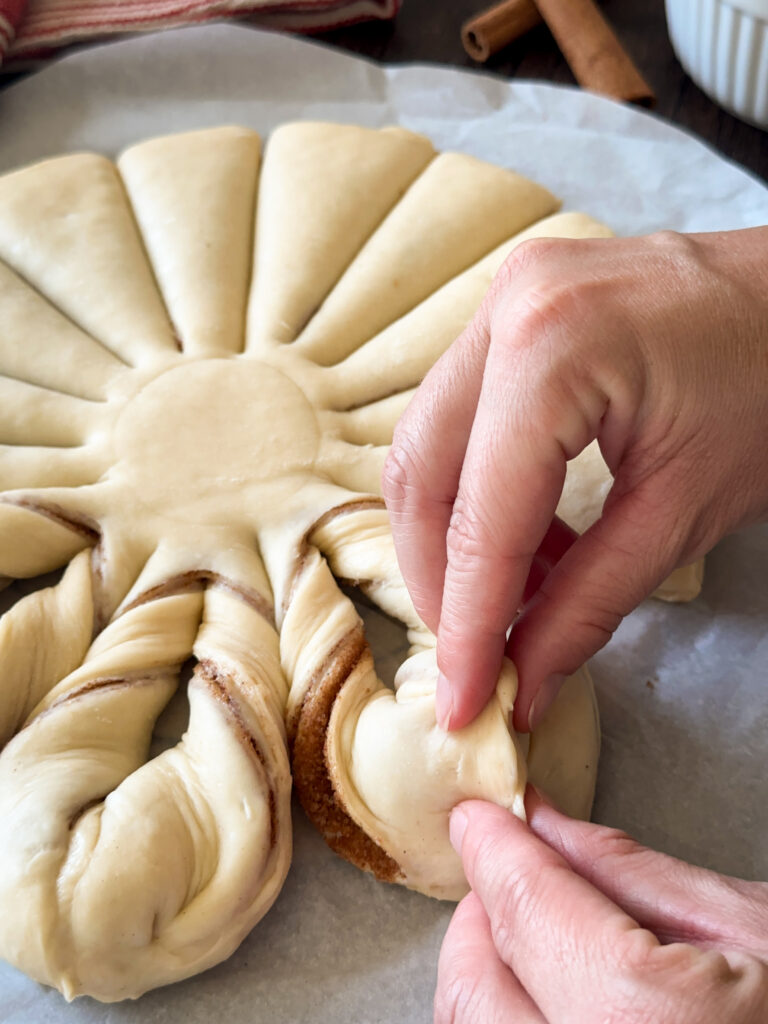
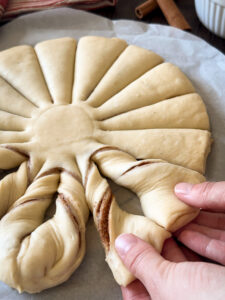
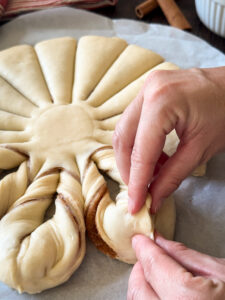
To twist the star points, take two neighboring strands and twist them away from each other, one to the left and one to the right making 2 full twists.
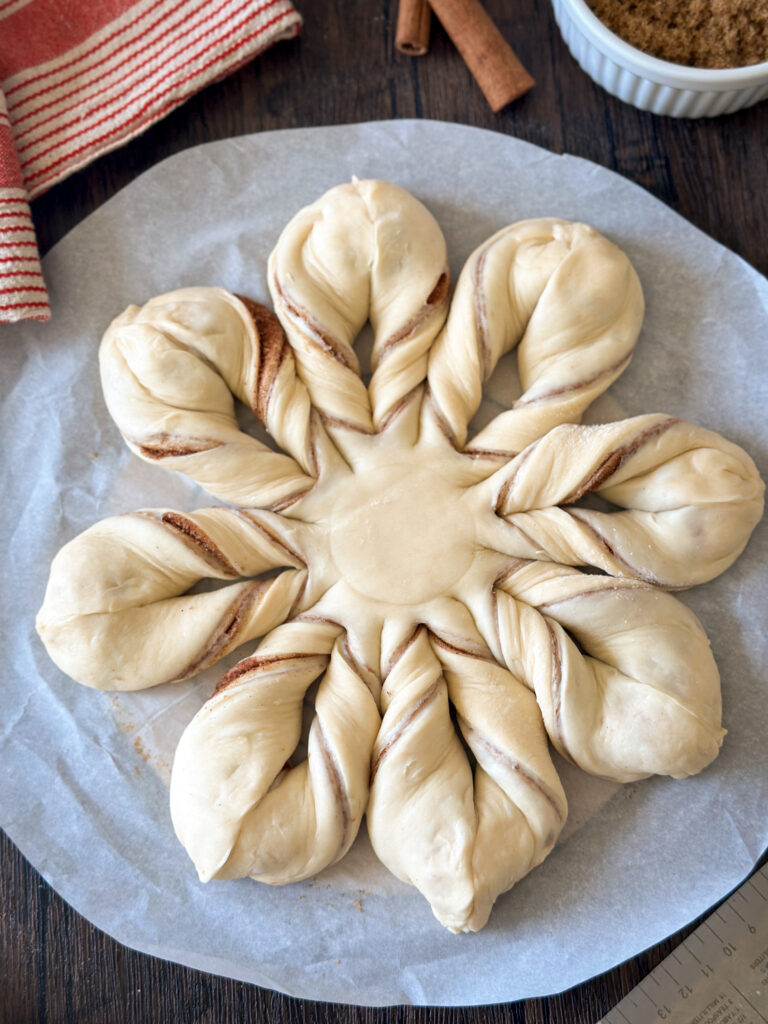
Pinch the ends together and tuck them under to form one star point. Repeat this step with the remaining strands until you’ve formed eight points to your star.
Don’t worry about perfection, the star will puff in the oven and create a beautiful design no matter what!
Step 6: Final Proof and Baking
Cover the shaped star bread loosely with lightly greased plastic wrap, and allow to rise in a warm place for approximately 45 minutes. You don’t want to overproof this, or your star will puff too much and lose it’s shape.
Preheat the oven to 375°F.
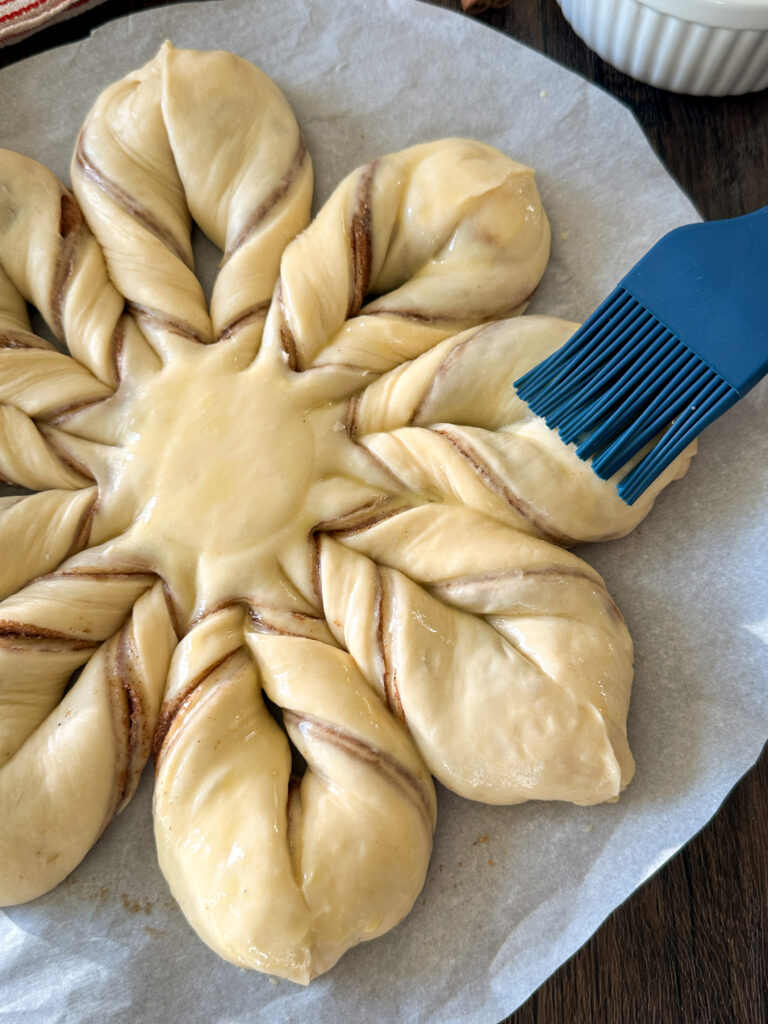
Right before you bake the star, beat 1 egg with 1 Tablespoon of water and use a pastry brush or a paper towel folded to apply the egg wash lightly all over the star for a golden finish.
Bake the star bread on the center rack for approximately 22-25 minutes, until golden brown and baked through. Don’t overbake this, or you’ll lose that gooey texture!
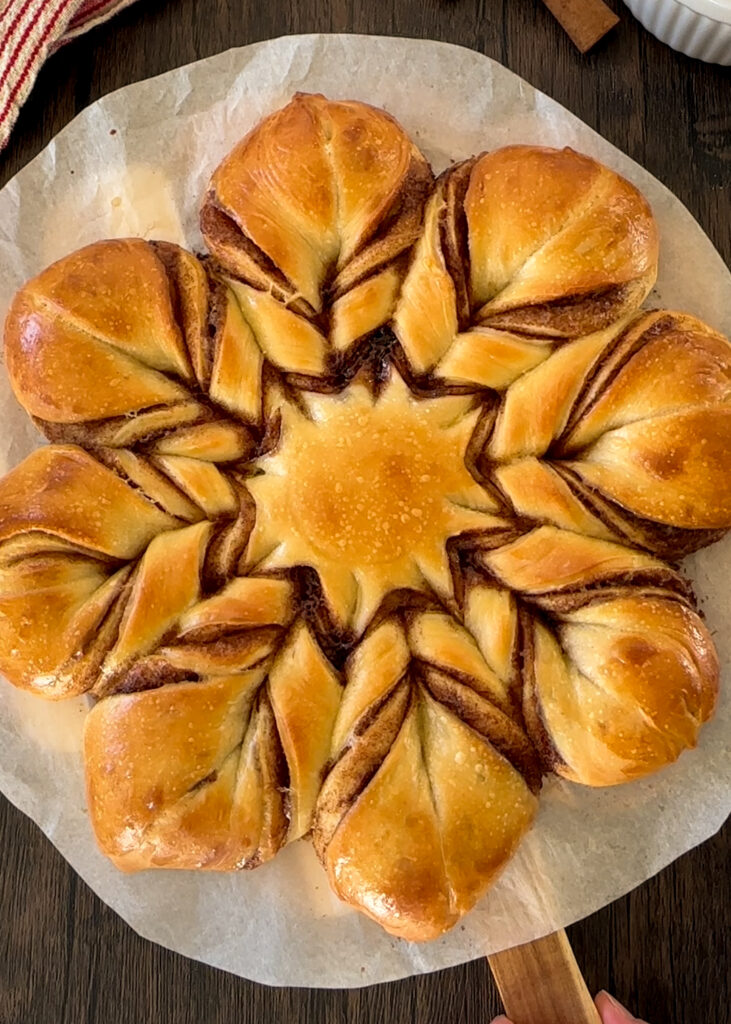
The internal temperature of the thickest dough section should reach approximately 190–195°F. If the top begins browning too quickly, loosely tent with aluminum foil for the remaining baking time.
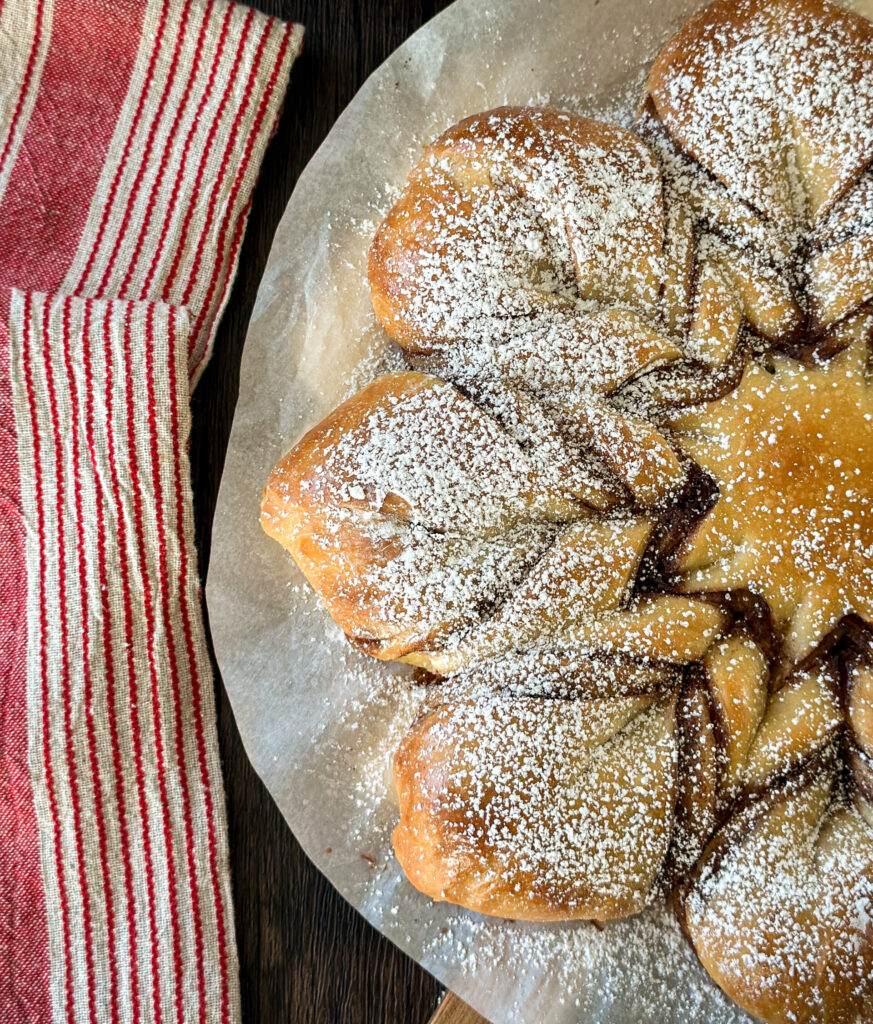
Allow the bread to cool for 10–15 minutes, then dust with powdered sugar lightly right before serving warm.
Yields 1 star bread
How to Store:
Room Temperature- Keep star bread in an airtight container at room temp up to 2 days. Gently reheat to enjoy!
FAQ’S
Yes! After shaping, cover the star bread tightly and refrigerate overnight. DO NOT proof before refrigerating, and allow it to finish proofing at room temperature before baking.
The flour stabilizes the filling as it bakes. This keeps it thick, the swirls defined, and leak free!
It’s optional, but highly recommended for that golden finish. You can also use milk!
If you loved this recipe, drop a comment and leave a star review and don’t forget to checkout more of my sourdough Christmas recipes!
Sourdough Christmas Recipes:
- Sourdough Cranberry Bliss Bars
- Sourdough Discard Cinnamon Roll Pull-Apart Christmas Tree
- Sourdough Discard Pull-Apart Garlic Roll Wreath
Sourdough Star Bread
Equipment
- Stand mixer with dough hook (or strong hands!) – for mixing the dough. You can also mix this dough by hand!
- Digital scale – recommended for accurate measurements and weighing your dough. I love this digital kitchen scale.
- Measuring cups and spoons – for measuring ingredients.
- Whisk – to combine ingredients.
- Spatula – to spread the butter.
- Small Bowl – to combine the cinnamon sugar.
- Rolling Pin – to roll out the dough.
- Sharp knife or pizza cutter – to cut the dough into for star shape.
- Small round or star cookie cutter (optional) – to help guide your cuts for the star.
- Parchment paper – to line the baking sheet.
- Baking Sheet – to bake the star bread.
- Pastry brush – to brush star with egg wash.
- Small sieve – to dust the star with powdered sugar.
Ingredients
Sweet Levain:
- 2 (25g) Tbsps active sourdough starter
- ¾ (100g) cup all-purpose flour
- ⅓ (100g) cup water
- 1 1/2 (25g) tablespoons granulated white sugar
Wet Ingredients:
- 3/4 (200g) cup sweet levain
- ½ (140g) cup whole milk slightly warmed
- 1 egg
- 3 (35g) tablespoons granulated white sugar
- 1 teaspoon vanilla extract
- ¼ (56g) cup unsalted butter softened
Dry Ingredients:
- 3 (375g) cups all-purpose flour
- 1¼ (7g) teaspoons fine sea salt
Cinnamon Sugar Filling:
- ½ (100g) cup brown sugar
- 1 tablespoon ground cinnamon
- 1 (8g) tablespoon all-purpose flour
- 1/8 tsp sea salt
- ¼ (56g) cup unsalted butter very soft
Optional Finishing:
- Powdered sugar for dusting
Instructions
Step 1: Make the Sweet Levain (Night Before)
- To start your dough, you’ll want to mix a sweet levain the night before. If this sounds intimidating, it’s not! It’s literally just adding sugar to your starter. This curbs the tang of the sourdough for the perfect dough.
- In a clean jar, mix your mother starter with the flour, water, and sugar. Give it a good stir, and allow it to rest at room temperature (optimally 73-75 degrees F). I like to mark the volume in my jar with a rubber band so it’s easy to asses the rise the next morning. When the sweet levain has doubled in size, it’s time to mix your cinnamon roll dough.2 (25g) Tbsps active sourdough starter, ¾ (100g) cup all-purpose flour, ⅓ (100g) cup water, 1 1/2 (25g) tablespoons granulated white sugar
Step 2: Mix the Dough
- In a stand mixer fitted with a dough hook or large mixing bowl, add all of the sweet levain, whole milk (avoid getting it hot or it will make the starter die), egg, sugar, and vanilla. Whisk ingredients together quickly, it's okay if it's lumpy.3/4 (200g) cup sweet levain, ½ (140g) cup whole milk, 1 egg, 3 (35g) tablespoons granulated white sugar, 1 teaspoon vanilla extract
- Add your flour and salt into your wet ingredients.3 (375g) cups all-purpose flour, 1¼ (7g) teaspoons fine sea salt
- Stand mixer directions: Mix on low until a shaggy dough forms, about 2-3 minutes. Scrape down the bowl if needed.
- Hand mixing directions: If using your hands, knead until you work the dough together. This is a higher hydration dough, so be aware it will be sticky.
- Once the dough has come together add the softened butter, a tablespoon at a time mixing each tablespoon in until adding the next.¼ (56g) cup unsalted butter
- Use a dough scraper to scrape the edges of the bowl to make sure everything is getting mixed in.
- Stand mixer directions: Continue mixing on medium-low (speed 2–3) for 8–10 minutes, until dough is smooth, elastic, and tacky but not sticky.
- Mixing by hand: knead dough until butter has fully incorporated and dough is smooth and tacky.
- Mixing Notes: If kneading in a mixer or if dough is very wet when mixing by hand, add an additional 25 grams (3 Tablespoons) of flour and mix into dough. Make sure to work flour in completely and assess if you need more flour.
- Do not add more than 50 grams of flour at this stage, or you will lose the high hydration of the dough and end up with a dense dough.
- If you’re using a stand mixer, the dough can become more warm and sticky and I have found kneading dough with my hand (perform a set of stretch and folds) for a minute after mixing in my stand mixer really helps bring the dough together.
Step 3: Bulk Fermentation
- Spray a clean bowl with oil. Shape the dough into a smooth ball and place it in the bowl. Cover with plastic wrap.
- How to perform a stretch and fold: Beginning at the edge of the bowl, lift the dough up without tearing it, and fold it back into the center. Repeat this step around the edge of the bowl until the dough forms a ball. This is one set of stretch and folds. Cover the dough again and return it to a warm environment to rest 30 minutes.
- Stand mixer directions: perform one set of stretch and folds after 30 minutes to strengthen your dough.
- Hand mixing directions: perform 3 sets of stretch and folds at 30 minute intervals at the beginning of bulk fermentation. After stretch and folds are completed, cover dough and allow to continue proofing.
- Let the dough rise at 75–80°F until doubled in size, this takes about 5–6 hours. If your house is very cold, you can put dough in the oven with the light on for a warmer atmosphere.
- This proofing time is a general guide, this process may take longer the key is to assess when the dough has nearly doubled that’s when it’s ready.
- Overnight Fermentation: Once the dough has finished rising, you can cover and transfer to the refrigerator overnight for a longer ferment or you can skip this step and go straight to making your star.
Step 4: Roll out the Dough
- In a small mixing bowl, combine the brown sugar, cinnamon, flour and salt for the filling and set this aside.½ (100g) cup brown sugar, 1 tablespoon ground cinnamon, 1 (8g) tablespoon all-purpose flour, 1/8 tsp sea salt
- Make sure your butter is fully softened for the filling too before proceeding with the star bread, it needs to be a spreadable consistency.¼ (56g) cup unsalted butter
- Transfer the dough to the floured work surface, and flour the top of the dough and the rolling pin, Divide the dough into 3 equals sections (approximately 275 g each).
- Starting with your first dough ball, roll it out to slightly larger than a dinner plate (about a 10 inch circle). I use a pastry mat for this, but you can also use a large dinner plate as a guide.

- Using a knife or pizza wheel, trim your edges to make a clean circle.
- Make sure you keep lightly flouring your dough and surfaces to avoid sticking, this will make transferring the dough easier.
- Fold the dough in half and then quarters, and transfer to a parchment lined baking sheet. Unfold the dough to form the circle on the tray.
- Repeat this step with your remaining 2 sections of dough, forming a total of 3 10 inch round circles. Place each section on parchment lightly floured for easy assembly of your star.
Step 5: Shape the Star
- Now for the fun part, let’s assemble the star!
- Starting with one circle of dough, use half of the butter and spread it in a thin layer over the top of the dough leaving a 1/4 inch border.
- Sprinkle half of the cinnamon sugar blend on top of the butter layer.
- Take a second circle of dough, and layer it on top of the cinnamon sugar. Stretch the edges to make sure they meet, then gently press with your fingers to seal them.
- Repeat the same step of spreading butter and cinnamon sugar on top of the dough, using the remaining butter and cinnamon sugar (make sure to leave the 1/4 inch edge).
- Layer the final circle of dough on top, and press the edges to seal everything down.
- Place a small star or circle cookie cutter in the center of the circle, or use a small cup or measuring cup (about 3 inches wide) to make sure you don’t cut too far and keep the center intact.
- Using your pizza wheel or a sharp knife, make 4 evenly spaced cuts from the edge of the dough to the center mark, dividing the dough in quarters but leaving the center intact.

- Cut each of those quarters in half, to create 8 equal wedges.
- Cut each of those wedges again, stopping at the center mark, to form 16 total strands radiating from the center.
- You should now have 16 evenly sized strips attached to the center circle. perfect for twisting to form your star.
- To twist the star points, take two neighboring strands and twist them away from each other, one to the left and one to the right making 2 full twists.
- Pinch the ends together and tuck them under to form one star point. Repeat this step with the remaining strands until you’ve formed eight points to your star.
- Don’t worry about perfection, the star will puff in the oven and create a beautiful design no matter what!
Step 6: Final Proof and Baking
- Cover the shaped star bread loosely with lightly greased plastic wrap, and allow to rise in a warm place for approximately 45 minutes. You don’t want to overproof this, or your star will puff too much and lose it’s shape.
- Preheat the oven to 375°F.
- Right before you bake the star, beat 1 egg with 1 Tablespoon of water and use a pastry brush or a paper towel folded to apply the egg wash lightly all over the star for a golden finish.
- Bake the star bread on the center rack for approximately 22-25 minutes, until golden brown and baked through. Don’t overbake this, or you’ll lose that gooey texture!
- The internal temperature of the thickest dough section should reach approximately 190–195°F. If the top begins browning too quickly, loosely tent with aluminum foil for the remaining baking time.
- Allow the bread to cool for 10–15 minutes, then dust with powdered sugar lightly right before serving warm.
- Yields 1 star bread