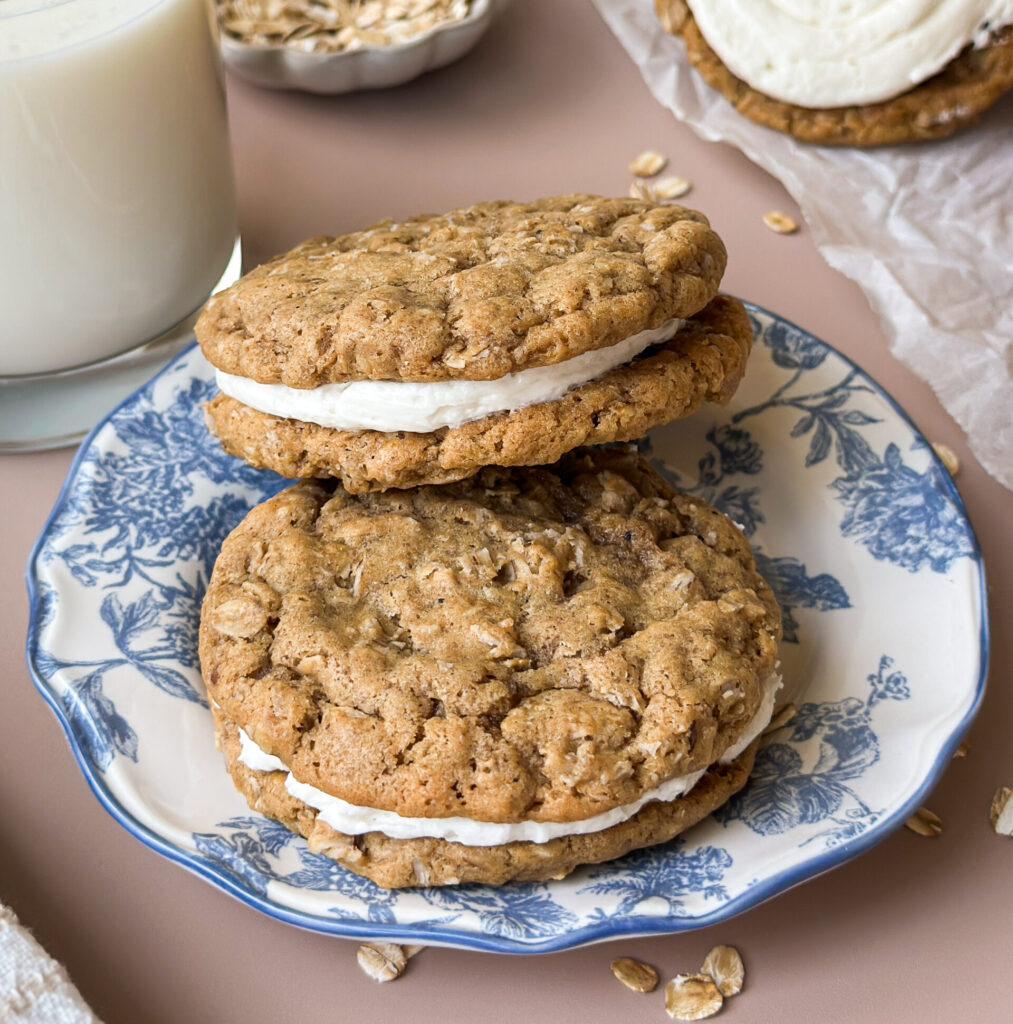
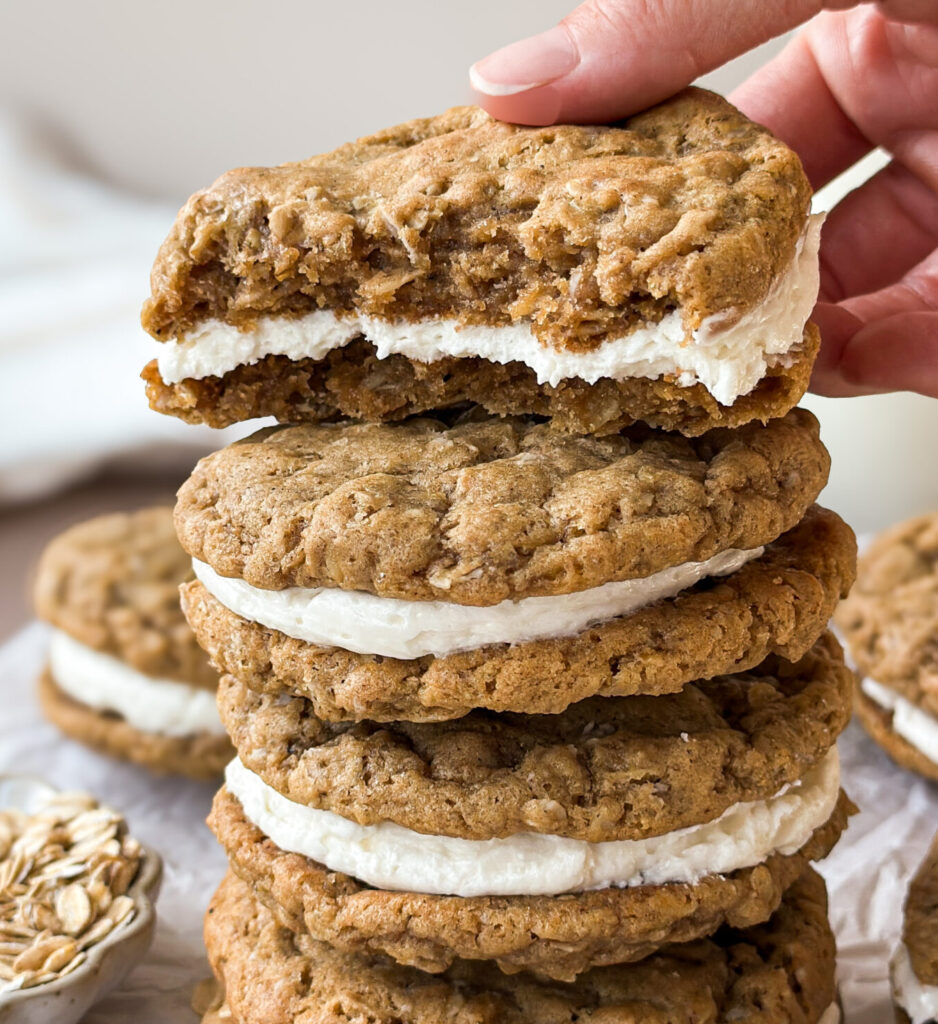
Sourdough Oatmeal Cream Pies
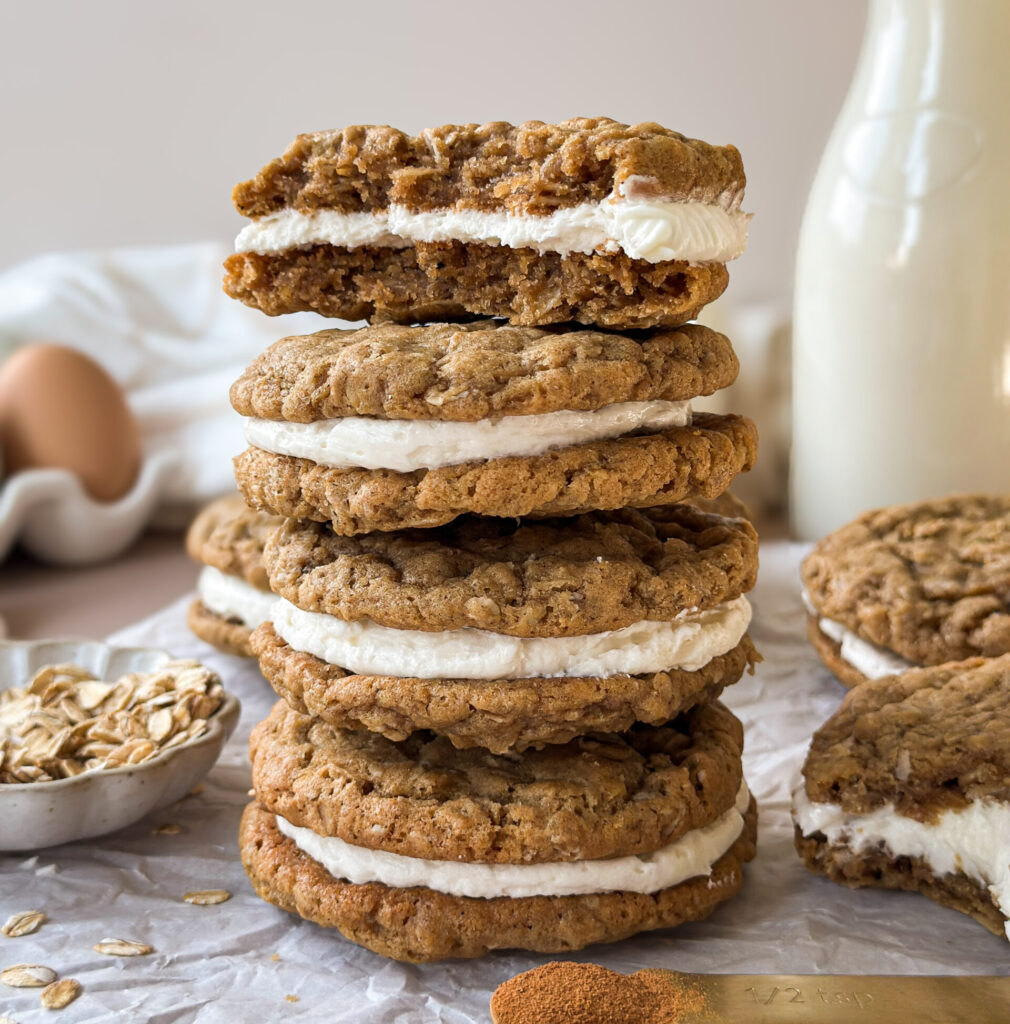
If you grew up loving classic oatmeal cream pies, these Sourdough Oatmeal Cream Pies are the homemade version you need. They’re thick, chewy brown butter oatmeal cookies filled with the fluffiest marshmallow vanilla cream. They’re nostalgic, cozy, and taste like the snack cake we grew up loving, only softer, richer, and made from scratch.
Why You’ll Love This Recipe
- Little Debbie Copycat: These pies are nostalgic and as close as you can get to the ones we grew up eating, but even richer and better.
- Thick and chewy: The oatmeal cookies are soft in the middle, golden on the edges, and the perfect thickness for sandwiching.
- Rich brown butter flavor: Brown butter makes these nutty, cozy, and gives them that little something extra.
- Dreamy cream filling: Fluffy marshmallow vanilla cream fills each pie and makes every bite a treat.
- Uses up discard: Have discard to use? This is such a delicious way to use it up!
Tools You’ll Need:
- Medium sized pot- for browning your butter.
- Large mixing bowl or stand mixer bowl- for mixing your cookie dough.
- Stand or hand mixer- for combining the cookie dough and filling.
- Digital kitchen scale (optional)– for accurate measuring, especially helpful with sourdough baking. I linked the one I like here.
- Measuring cups and spoons– for measuring ingredients.
- Spatula- to help combine the cookie dough.
- 3 Tablespoon cookie scoop (optional)- to scoop the cookie dough, I love this cookie scoop that makes the job easy. You can also use a scale if you prefer!
- 3 half size baking sheets- For baking the cookies.
- Parchment Paper or silicone mats- to line the baking sheets to avoid cookies sticking.
- Medium sized bowl- to combine the marshmallow cream filling.
- Pastry bag or Ziplock- to pipe the filling between the cookies.
Next, Gather Your Ingredients:
- Unsalted Butter– Creates your brown butter to make that nutty toffee taste, and used in the cream filling.
- Egg + egg yolk- Adds richness and moisture to the cookie.
- Sourdough discard– Adds flavor and moisture and is the magic that ferments your dough. Can be used fed, past peak, or straight from the fridge.
- White Granulated Sugar- Sweetens cookies. Helps give cookies that crackly top and crisp edge.
- Molasses- creates a chewier texture and adds more caramel flavor to the cookies. I like to use unsulphered molasses like Grandma’s. You can skip it if you would like!
- Rolled Oats- adds texture and chew to the cookies. Make sure to use rolled oats, DO NOT use steel cut.
- Ground Cinnamon- brings cozy spice to the cookies.
- Brown Sugar– Adds sweetness and caramel notes to cookies.
- Vanilla Extract– Adds depth and warmth to cookies and filling.
- All-purpose flour– Provides structure and lift to the cookies. You can substitute bread flour but I like the softness all-purpose gives the cookies.
- Baking Powder– Helps with lift and rise without too much doming in the center.
- Baking Soda– Creates the perfect spread without overpuffing the cookies.
- Sea Salt– Enhances overall flavor and sweetness.
- Powdered Sugar- Sweetens and thickens the cream filling. Do not use granulated sugar, or the filling will be gritty.
- Marshmallow Creme (optional)- I added Jet-puffed Marshmallow Creme to the filling for a closer flavor to the Little Debbie Pies, and the flavor was incredible. I will list a swap on the recipe card if you prefer not to use this though!
- Heavy Cream- to add lightness and thin the cream filling.
Instructions
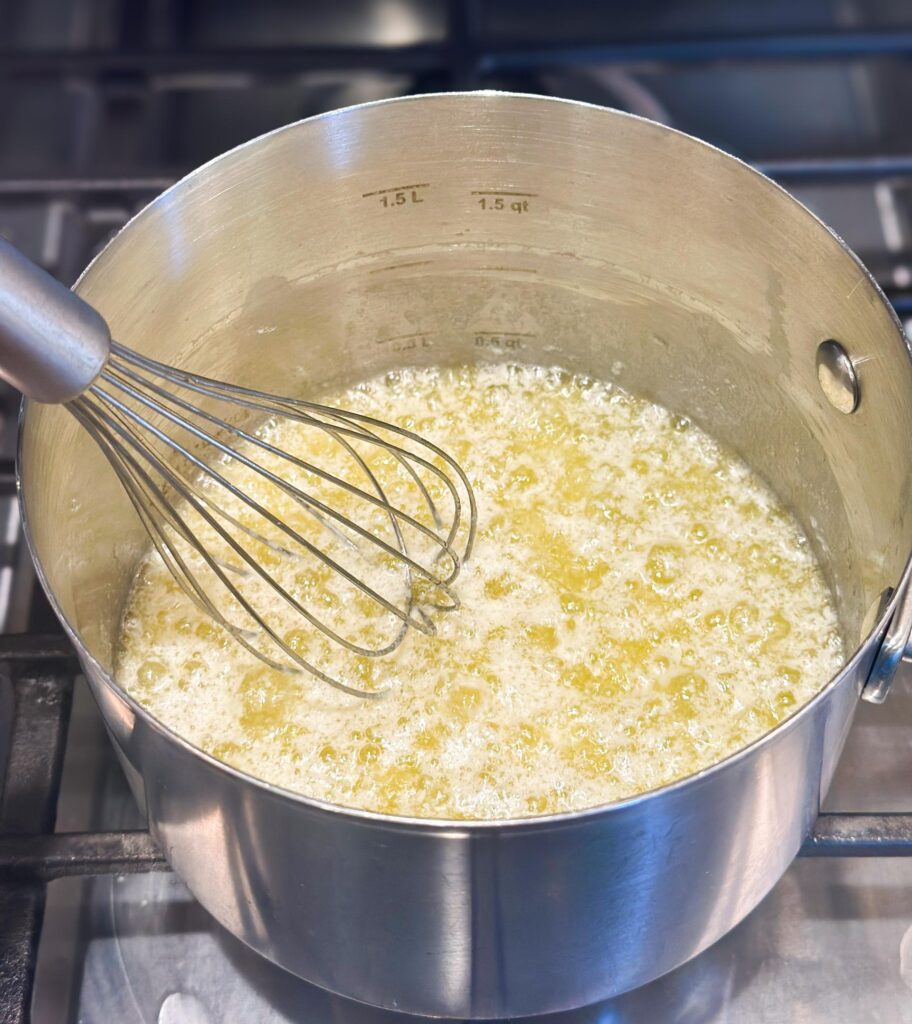
Step 1: Brown the Butter
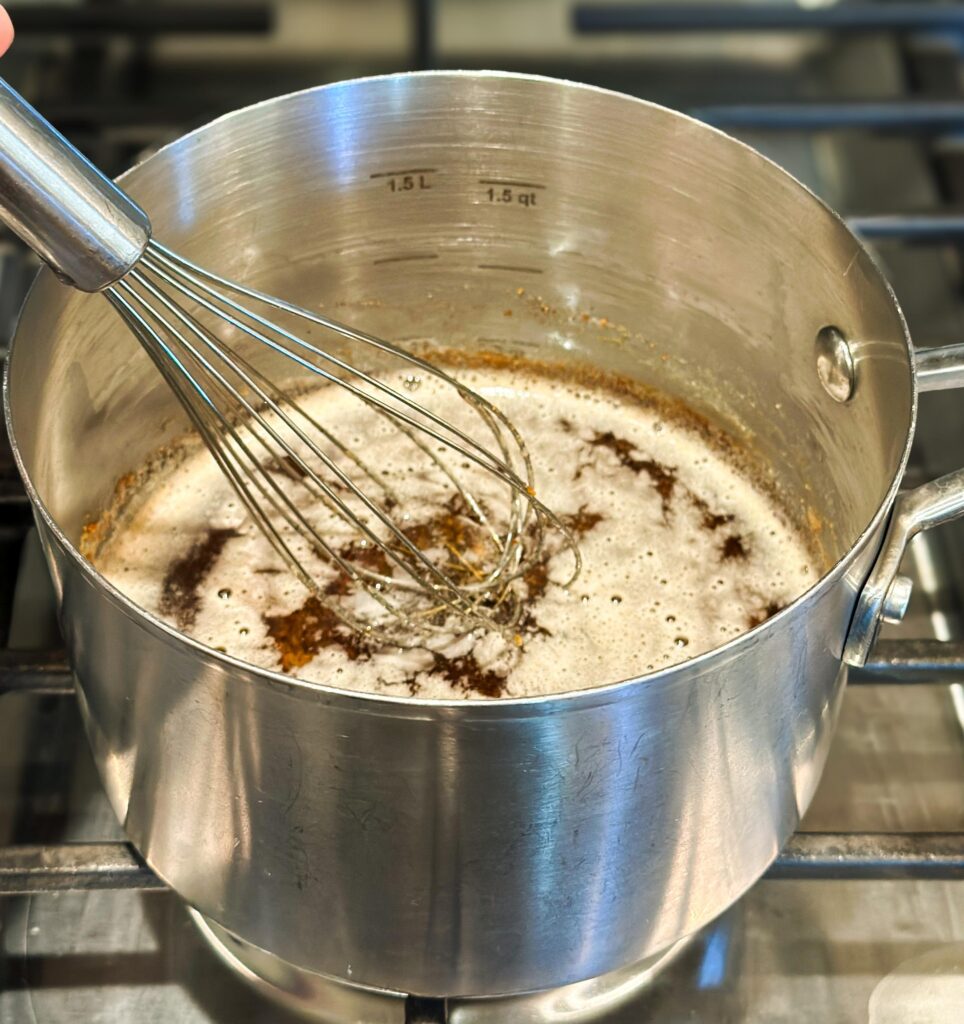
In a medium saucepan or pot, melt the butter over low heat. Continue cooking, stirring frequently, until the butter foams and turns a rich amber color with brown specks at the bottom, emitting a nutty aroma.
Remove from heat immediately. This process typically takes about 5-7 minutes.
Once butter is browned, remove the saucepan from heat and transfer the butter to the mixer bowl to cool to become thicker again.
You can pop the butter in the frig for 30 minutes to speed this process up if needed, just avoid it becoming solid it should be soft.
Step 2: Prepare the Dough
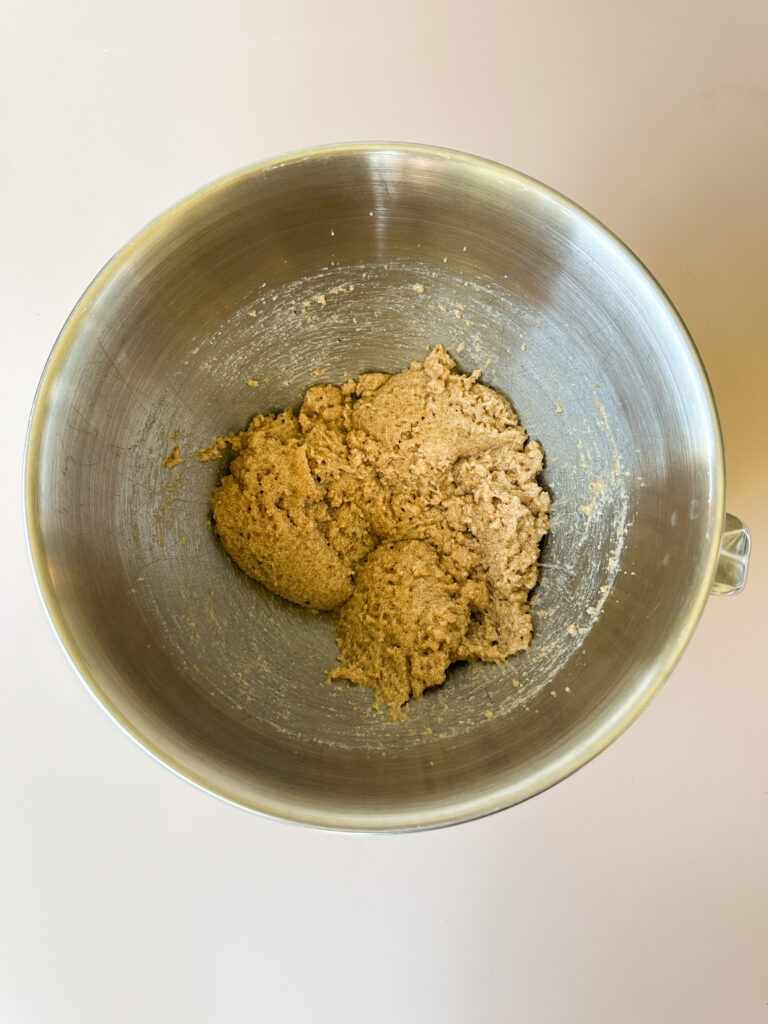
In a large mixing bowl or stand mixer bowl, combine the cooled browned butter, brown sugar, granulated white sugar, and molasses.
Using an electric mixer or stand mixer on medium speed, cream together for approximately 2 minutes until the mixture is light and fluffy. If it’s a bit crumbly, that’s okay!
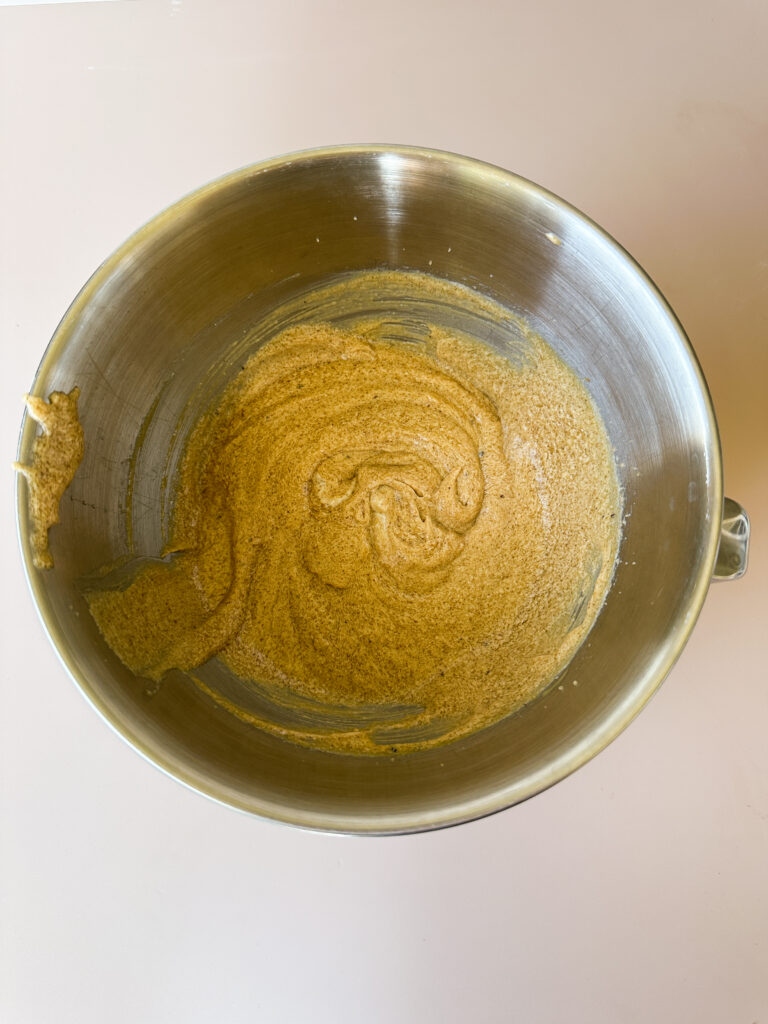
Add the egg, egg yolk, sourdough discard, and vanilla extract to the bowl. Continue to mix on medium speed for another 2 minutes, ensuring all ingredients are well incorporated and fluffy.
Remember to scrape down the sides of the bowl and mix everything at the bottom. This insures all your cookies come out evenly.
Step 3: Incorporate Dry Ingredients
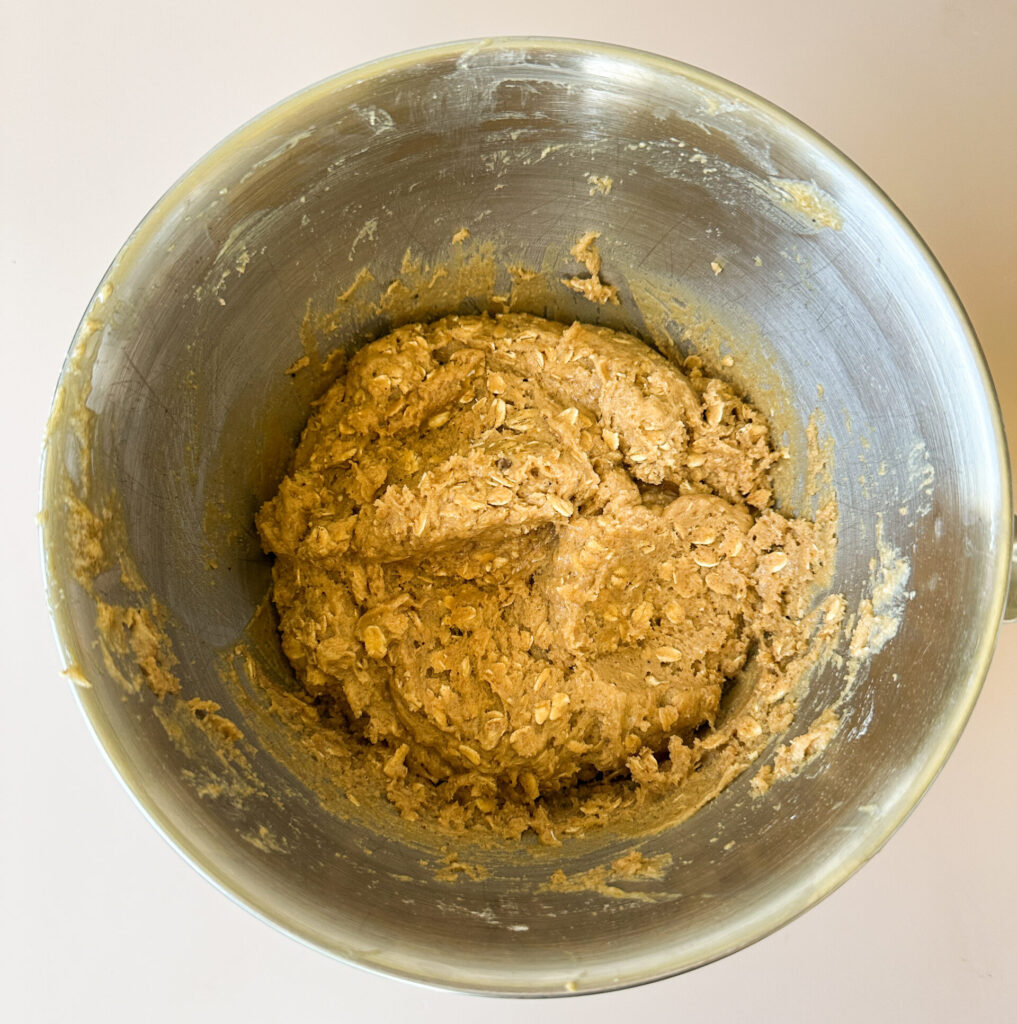
Add the all-purpose flour, rolled oats, ground cinnamon, baking powder, baking soda, and salt to the wet ingredients.
Gradually combine the dry ingredients to the wet mixture, mixing on low speed until just combined. Avoid overmixing to ensure a tender cookie texture.
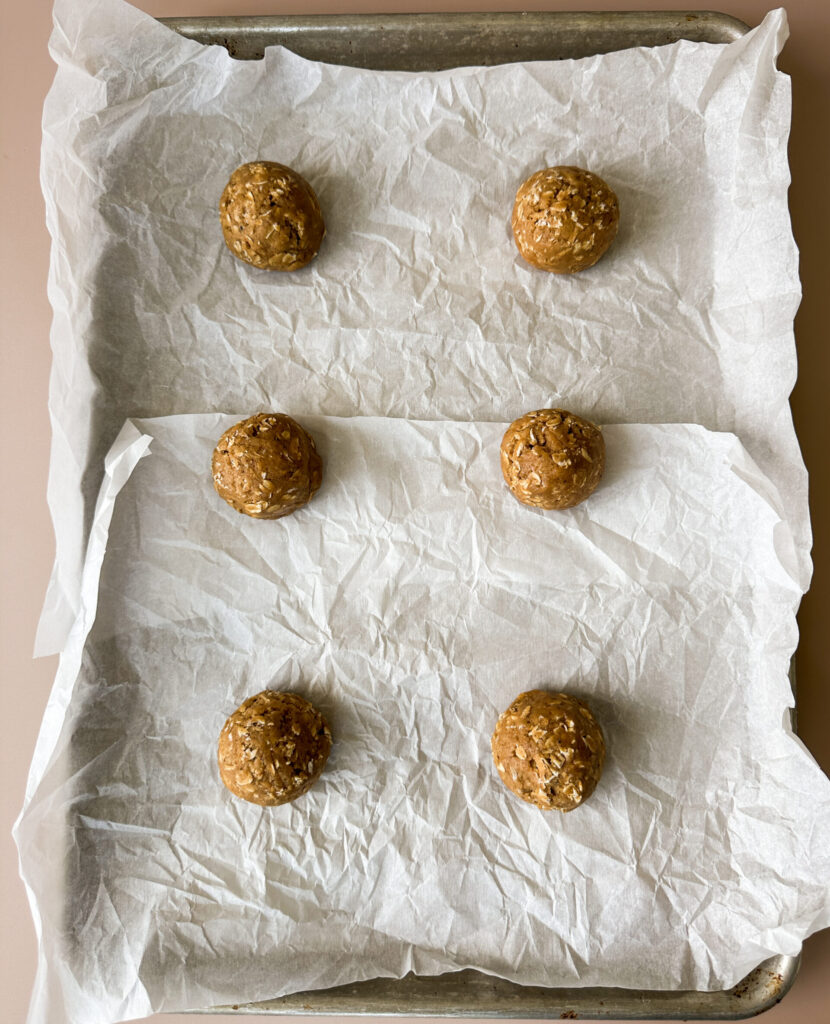
Step 4: Scoop and Chill the Dough
Using a 3 Tablespoon cookie scoop, scoop all of your cookie dough into even balls onto a parchment lined baking sheet. You can also weigh your dough out, each ball should be roughly 50g.
Scooping the dough before chilling was the easiest way for me to shape the cookies. If the dough is too soft, chill for 30 minutes then scoop.
Transfer the sheet with the cookie dough to the refrigerator and refrigerate the dough for at least 1 hour. For optimal fermentation, chill the dough overnight. DO NOT skip the chill it must be chilled at least one hour for the proper texture.
Note about freezing dough: Scoop your cookies and refrigerate overnight to achieve optimal fermentation. If you wish, you can skip this refrigeration step, but your dough won’t ferment as long.
After dough has refrigerated, transfer to airtight containers or zip locks with air removed and freeze. When ready to bake cookies, allow dough to sit out and thaw about 30 minutes and bake cookies as directed below.
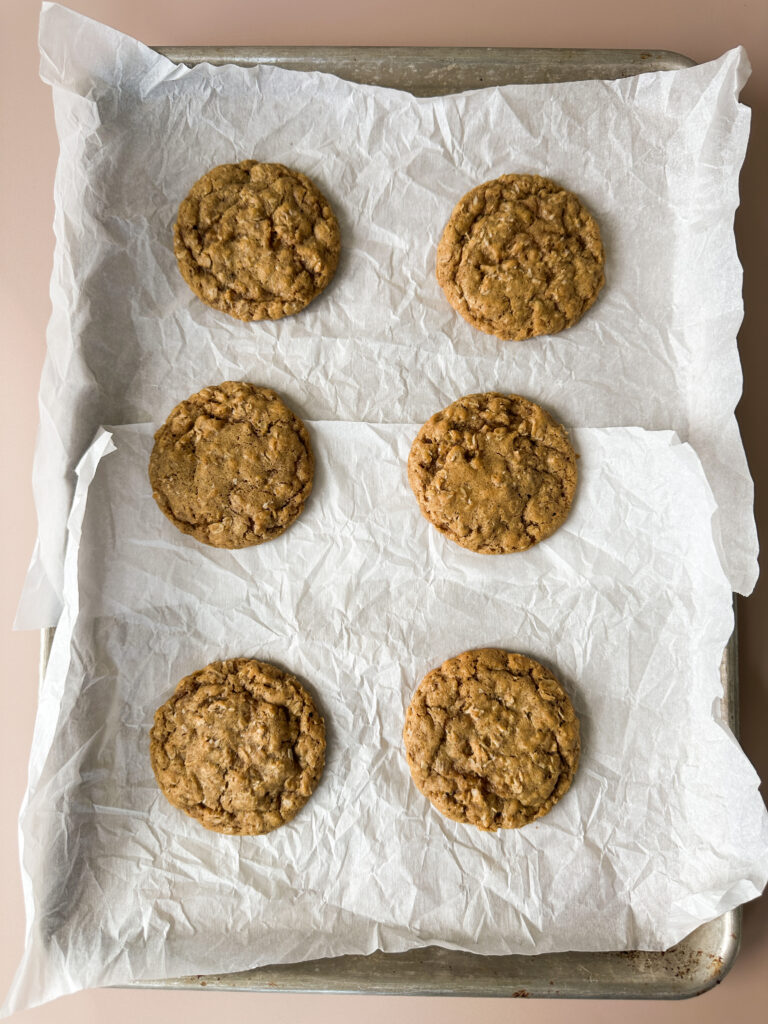
Step 5: Bake the Cookies
Preheat your oven to 350°F (175°C). Line baking sheets with parchment paper (or my preference) silicone mats. I use these silicone mats for the perfect spread on my cookies.
While the oven is preheating, remove the cookie dough balls from the refrigerator and arrange them on cookie sheets. To make sure the cookies don’t touch, I do 3 rows of 2 making 6 cookies per sheet.
Bake in the preheated oven for 14 minutes, or until the edges are golden brown and the centers appear slightly underbaked.
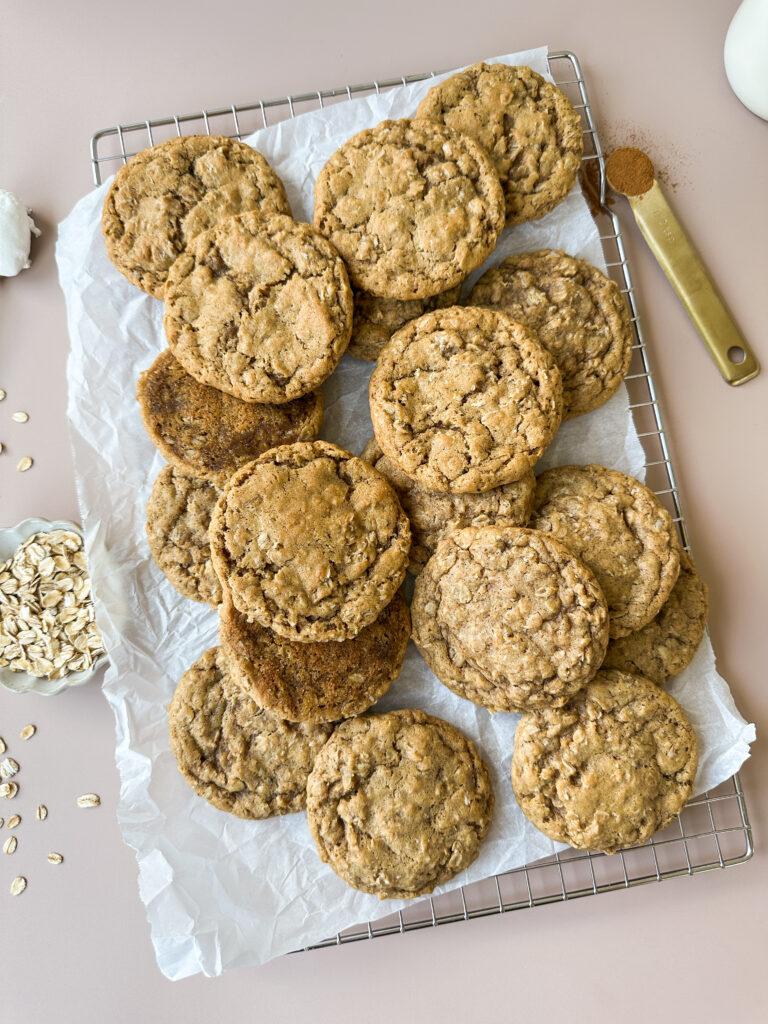
Immediately upon removing from the oven, slap the baking sheets on the countertop to achieve a crinkly appearance on the cookies.
While the cookies are still warm, use a large circular cookie cutter larger than your cookie to perfect the edges and give your cookie a perfect shape.
Place the cookie cutter over the cookie and making a circle that will nudge any irregular edges into a perfect circle (you can also do this with a small bowl).
Transfer the cookies to cooling racks and allow them to cool fully before you fill them.
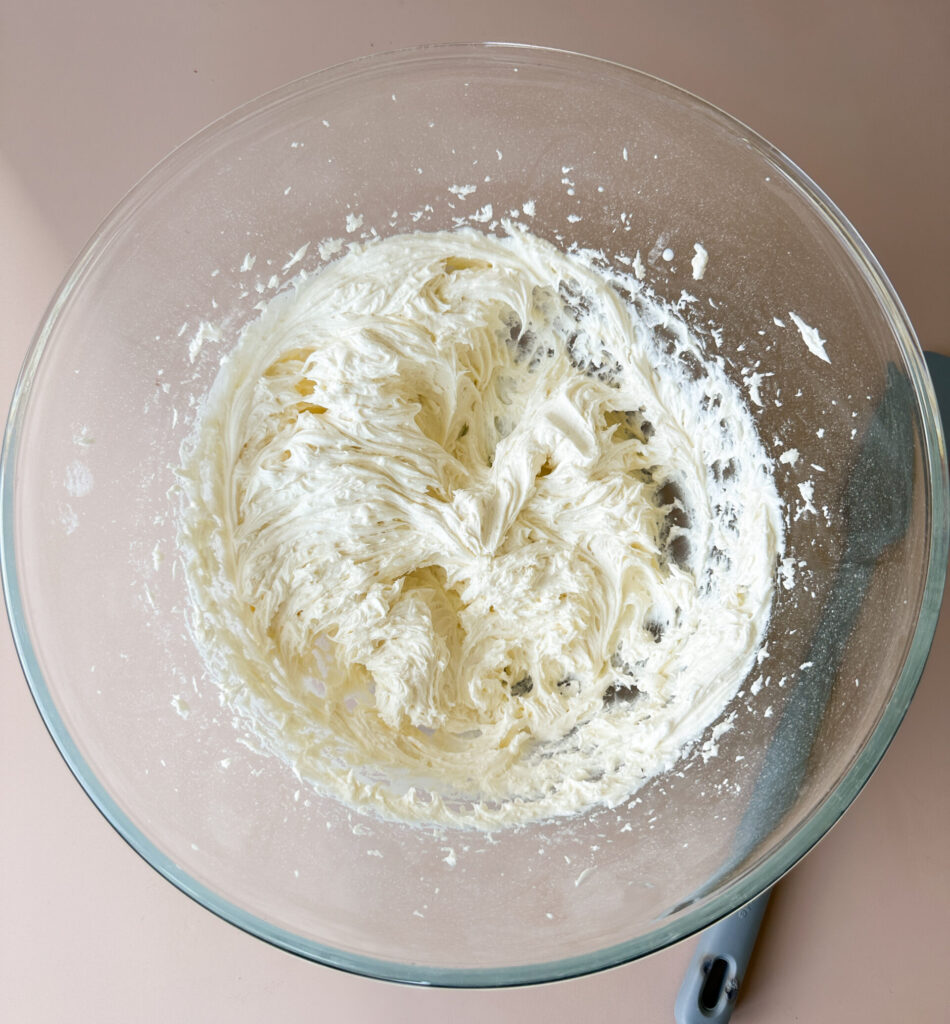
Step 6: Make the Filling and Fill the Cookies
In a mixing bowl, add the softened butter, marshmallow cream, vanilla, and salt.
Using hand beaters or a stand mixer with a paddle attachment, whip the filling until the ingredients are combined.
Add the powdered sugar to the filling, and mix into the filling on low until the sugar is mixed in.
Add the cream gradually to the filling, increasing the speed slowly and mixing until the filling is light and fluffy.
Note: Cold cream can cause the filling to split, so make sure you whip on medium and watch the consistency. Stop mixing if you see the filling start to separate.
Transfer the filling to a pastry bag or a Ziplock, and snip about 1/4 inch of the end of the bag off.
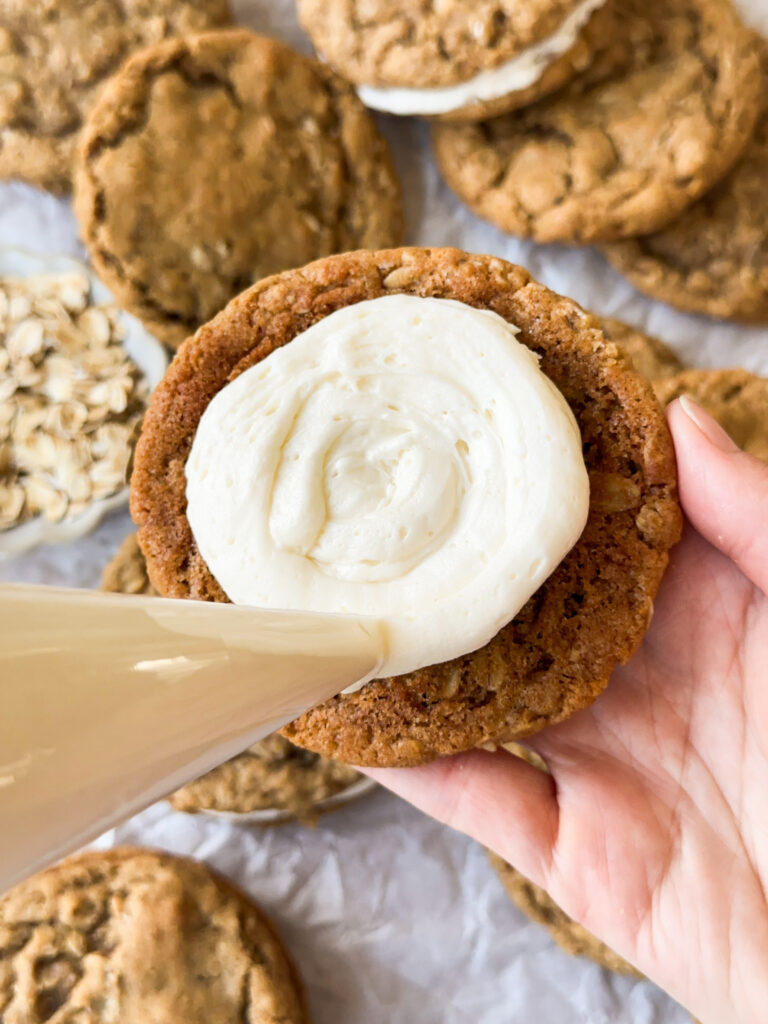
Pipe the filling onto one of the cookies in a circular motion starting from the center and working outward leaving a 1/4 inch border.
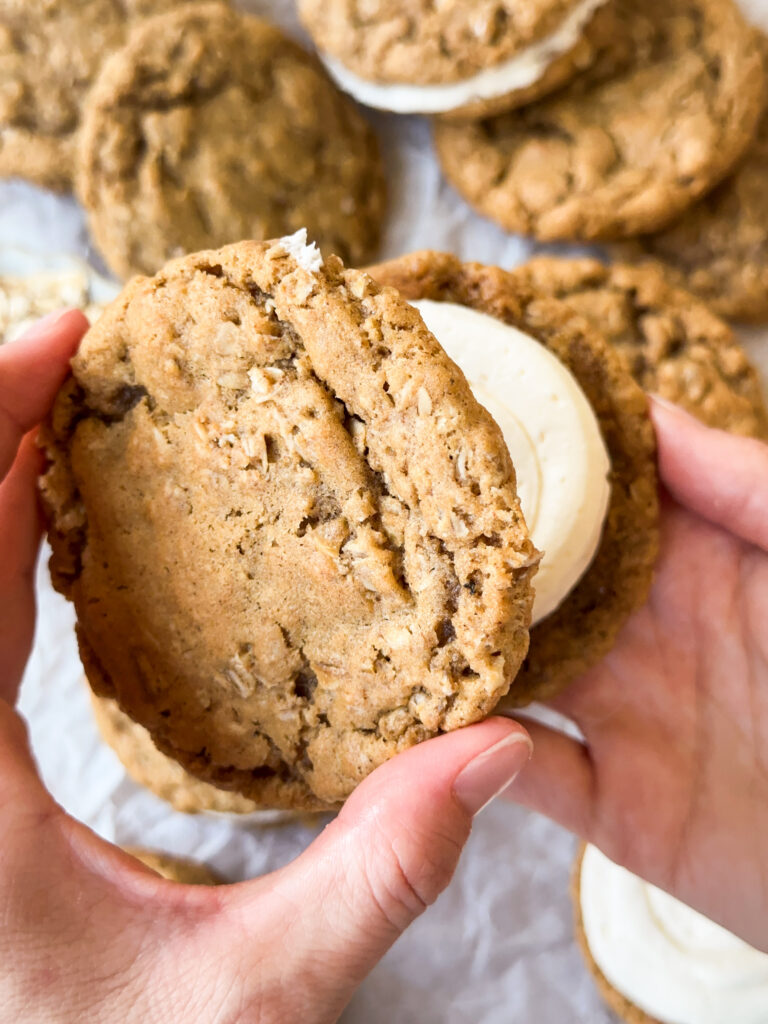
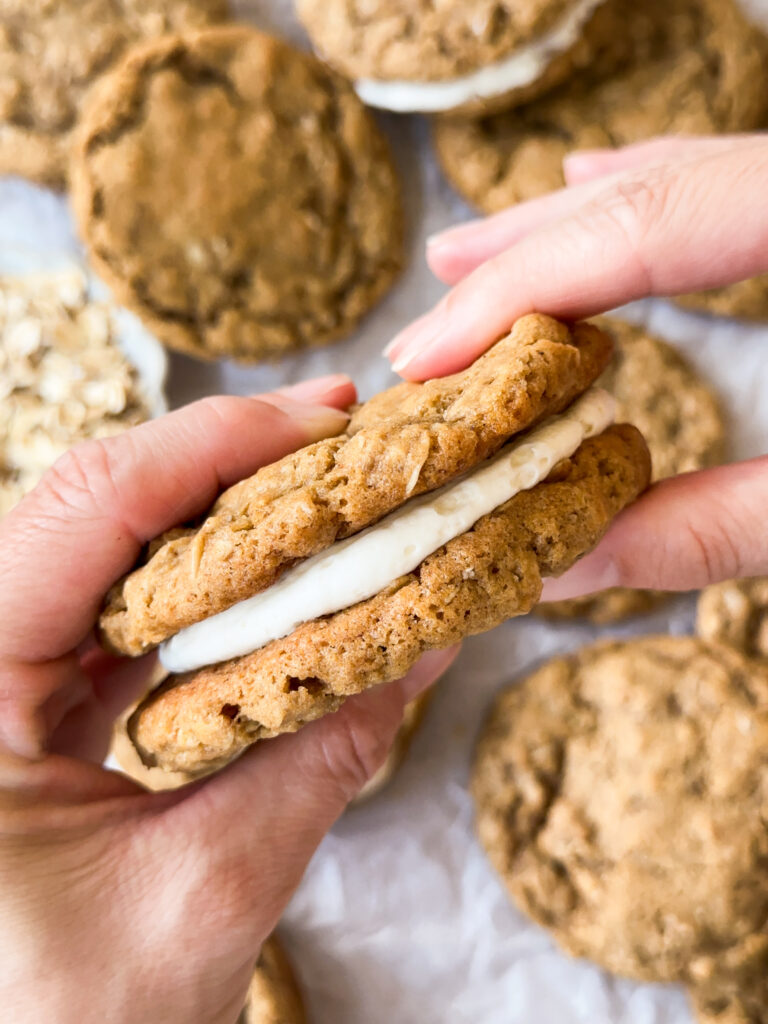
Add another cookie on top and gently squeeze together to even the filling and spread it to the edge.
Repeat this step with the remaining cookies until all of them are filled. This should make 9 cookie pies.
Chill the cream pies for 15-20 minutes to allow the filling to set up, and enjoy!
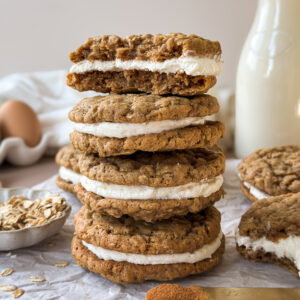
Yields 9 cream pies
How to Store:
Room temperature- Keep in an airtight container for up to 1 day. Because of the cream filling, these are best refrigerated.
Refrigerator- Store assembled sourdough oatmeal cream pies in an airtight container in the refrigerator for up to 5 days. Let them sit at room temperature for 10-15 minutes before serving so the cookies and filling can soften slightly.
Freezer- Wrap each cream pie individually in plastic and freeze for up to 2 months. Thaw in the refrigerator overnight or at room temperature until soft enough to enjoy.
FAQ’S
Chilling prevents spreading and gives you thicker, softer cookies.
Rolled oats are best for this recipe. Quick oats will make the cookies softer and less chewy but you can use it as a substitute if needed.
Yes! To replace the discard, add 1/4 cup (60g) of whole milk to the cookie dough. Mix and bake!
Yes. Use the classic vanilla buttercream filling instead on the recipe card. It will still be sweet, creamy, and delicious, just a little less marshmallowy.
In a pinch, yes. It does add lovely flavor though and help create a chewier texture.
If you enjoyed this recipe, drop a comment and star review and don’t forget to try more of my sourdough cookie recipes!
Sourdough Cookie Recipes:
- Sourdough Nutter Butters
- Sourdough Pistachio Chocolate Chunk Cookies
- Chewy Sourdough Lemon Crinkle Cookies
- Sourdough Butter Pecan Toffee Cookies
Sourdough Oatmeal Cream Pies
Equipment
- Medium sized pot – for browning your butter.
- Large mixing bowl or stand mixer bowl – for mixing your cookie dough.
- Stand or hand mixer – for combining the cookie dough and filling.
- Digital kitchen scale (optional) – for accurate measuring, especially helpful with sourdough baking. I linked the one I like here.
- Measuring cups and spoons – for measuring ingredients.
- Spatula – to help combine the cookie dough.
- 3 Tablespoon cookie scoop (optional) – to scoop the cookie dough, I love this cookie scoop that makes the job easy. You can also use a scale if you prefer!
- 3 half size baking sheets – For baking the cookies.
- Parchment paper or silicone mats – to line the baking sheets to avoid cookies sticking.
- Medium sized bowl – to combine the marshmallow cream filling.
- Pastry bag or ziplock – to pipe the filling between the cookies.
Ingredients
Brown Butter Oatmeal Cookies:
- 1 (227g) cup unsalted butter
- 1 (200g) cup packed brown sugar
- 1/2 (100g) cup granulated white sugar
- 1 (20g) Tbsp molasses
- 1/2 (120g) cup sourdough discard
- 1 large egg
- 1 egg yolk
- 2 tsp vanilla extract
- 2 1/4 (275g) cups all-purpose flour
- 2 1/4 (200g) cups old-fashioned rolled oats
- 1 tsp baking soda
- 1/2 tsp baking powder
- 1 1/4 tsp fine sea salt
- 1 1/2 tsp ground cinnamon
Marshmallow Vanilla Cream Filling:
- 1/2 (113g) cup unsalted butter softened
- 1 3/4 (210g) cups powdered sugar
- 1/4 (60g) cup marshmallow fluff or cream
- 2 (30g) Tbsp heavy cream
- 1 tsp vanilla extract
- 1/8 tsp fine sea salt
Sourdough Discard Swap:
- 1/4 (60g) cup whole milk
Marshmallow Fluff or Cream Swap:
- 2 (240g) cups powdered sugar
Instructions
Step 1: Brown the Butter
- In a medium saucepan or pot, melt the butter over low heat. Continue cooking, stirring frequently, until the butter foams and turns a rich amber color with brown specks at the bottom, emitting a nutty aroma.1 (227g) cup unsalted butter
- Remove from heat immediately. This process typically takes about 5-7 minutes.
- Once butter is browned, remove the saucepan from heat and transfer the butter to a the mixer bowl to cool to become thicker again.
- You can pop the butter in the frig for 30 minutes to speed this process up if needed, just avoid it becoming solid it should be soft.
Step 2: Prepare the Dough
- In a large mixing bowl or stand mixer bowl, combine the cooled browned butter, brown sugar, granulated white sugar, and molasses.1 (200g) cup packed brown sugar, 1/2 (100g) cup granulated white sugar, 1 (20g) Tbsp molasses
- Using an electric mixer or stand mixer on medium speed, cream together for approximately 2 minutes until the mixture is light and fluffy. If it’s a bit crumbly, that’s okay!
- Add the egg, egg yolk, sourdough discard, and vanilla extract to the bowl. Continue to mix on medium speed for another 2 minutes, ensuring all ingredients are well incorporated and fluffy.1/2 (120g) cup sourdough discard, 1 large egg, 1 egg yolk , 2 tsp vanilla extract
- Sourdough Discard Swap: If you don't have discard, swap it out for milk instead at this time and mix it in.1/4 (60g) cup whole milk
- Remember to scrape down the sides of the bowl and mix everything at the bottom. This insures all your cookies come out evenly.
Step 3: Incorporate Dry Ingredients
- Add the all-purpose flour, rolled oats, ground cinnamon, baking powder, baking soda, and salt to the wet ingredients.2 1/4 (275g) cups all-purpose flour, 2 1/4 (200g) cups old-fashioned rolled oats, 1 tsp baking soda, 1/2 tsp baking powder, 1 1/4 tsp fine sea salt, 1 1/2 tsp ground cinnamon
- Gradually combine the dry ingredients to the wet mixture, mixing on low speed until just combined. Avoid overmixing to ensure a tender cookie texture.
Step 4: Scoop and Chill the Dough
- Using a 3 Tablespoon cookie scoop, scoop all of your cookie dough into even balls onto a parchment lined baking sheet. You can also weigh your dough out, each ball should be roughly 50g.
- Scooping the dough before chilling was the easiest way for me to shape the cookies. If the dough is too soft, chill for 30 minutes then scoop.
- Transfer the sheet with the cookie dough to the refrigerator and refrigerate the dough for at least 1 hour. For optimal fermentation, chill the dough overnight. DO NOT skip the chill it must be chilled at least one hour for the proper texture.
- Note about freezing dough: Scoop your cookies and refrigerate overnight to achieve optimal fermentation. If you wish, you can skip this refrigeration step, but your dough won't ferment as long.
- After dough has refrigerated, transfer to airtight containers or zip locks with air removed and freeze. When ready to bake cookies, allow dough to sit out and thaw about 30 minutes and bake cookies as directed below.
Step 5: Bake the Cookies
- Preheat your oven to 350°F (175°C). Line baking sheets with parchment paper (or my preference) silicone mats. I use these silicone mats for the perfect spread on my cookies.
- While the oven is preheating, remove the cookie dough balls from the refrigerator and arrange them on cookie sheets. To make sure the cookies don’t touch, I do 3 rows of 2 making 6 cookies per sheet.
- Bake in the preheated oven for 14 minutes, or until the edges are golden brown and the centers appear slightly underbaked.
- Immediately upon removing from the oven, slap the baking sheets on the countertop to achieve a crinkly appearance on the cookies.
- While the cookies are still warm, use a large circular cookie cutter larger than your cookie to perfect the edges and give your cookie a perfect shape.
- Place the cookie cutter over the cookie and making a circle that will nudge any irregular edges into a perfect circle (you can also do this with a small bowl).
- Transfer the cookies to cooling racks and allow them to cool fully before you fill them.
Step 6: Make the Filling and Fill the Cookies
- In a mixing bowl, add the softened butter, marshmallow cream, vanilla, and salt.1/2 (113g) cup unsalted butter, 1/4 (60g) cup marshmallow fluff or cream , 1 tsp vanilla extract, 1/8 tsp fine sea salt
- Marshmallow Fluff Swap: If you don't want to use the fluff, you can increase the powdered sugar instead at this point.2 (240g) cups powdered sugar
- Using hand beaters or a stand mixer with a paddle attachment, whip the filling until the ingredients are combined.
- Add the powdered sugar to the filling, and mix into the filling on low until the sugar is mixed in.1 3/4 (210g) cups powdered sugar
- Add the cream gradually to the filling, increasing the speed slowly and mixing until the filling is light and fluffy. If the frosting is too thick, add cream in 1 teaspoon increments until it's reached the desired consistency.2 (30g) Tbsp heavy cream
- Note: Cold cream can cause the filling to split, so make sure you whip on medium and watch the consistency. Stop mixing if you see the filling start to separate.
- Transfer the filling to a pastry bag or a Ziplock, and snip about 1/4 inch of the end of the bag off.
- Pipe the filling onto one of the cookies in a circular motion starting from the center and working outward leaving a 1/4 inch border.
- Add another cookie on top and gently squeeze together to even the filling and spread it to the edge.
- Repeat this step with the remaining cookies until all of them are filled. This should make 9 cookie pies.
- Chill the cream pies for 15-20 minutes to allow the filling to set up, and enjoy!
- Yields 9 cream pies
Just wow!! These cookies are so nostalgic. They are the perfect combination of soft, chewy, and have a perfectly fluffy crème filling. I will be making these on rotation.
Hi Aubra, glad you loved this oatmeal cream pie as much as I did!
A top-tier cookie! Two soft, chewy oatmeal cookies held together by a fluffy marshmallow-style crème filling. They are so addictive.
Hi Paul, glad you loved this recipe!