Easy Lemon Curd Recipe
If you haven’t had lemon curd, you’re missing out. It’s silky, smooth, and packed with bright lemon flavor. This Easy Lemon Curd Recipe is made to be stable and reliable for layering in cakes, piping onto frosting, or swirling into bars without disappearing. No more curd that melts into your layers or causes your cake to topple, just a rich, glossy lemon curd that holds shape!
Why You’ll Love This Recipe
- Thick and stable: This lemon curd holds it’s shape for layering cakes or piping without sliding and melting.
- Bright lemon flavor: Fresh, bold citrus that actually tastes like lemon, not overly sweet.
- Smooth and glossy texture: Silky finish that feels bakery quality but made at home.
- Simple ingredients: Made with basic staples you likely already have on hand.
- Versatile and easy to prep ahead: This lemon curd goes with just about everything and is easy to make ahead and store in the frig!
Table of contents
Tools You’ll Need:
- Medium saucepan or pot- For gently heating and cooking the lemon curd evenly without scorching.
- Whisk- Essential for keeping the curd smooth and lump-free as it thickens.
- Zester or Microplane- to zest the lemons. I love this zester and reach for it all the time.
- Heat-safe bowl– For mixing and tempering the curd. I love these mixing bowls that have lids for perfect storage!
- Kitchen scale (optional)– for accurate measuring, especially helpful with baking.
- Measuring cups and spoons- if not using a scale and for smaller ingredients.
- Rubber spatula- Great for scraping the pan and making sure none of that lemony goodness goes to waste.
- Plastic wrap- Pressed directly onto the surface to prevent a skin from forming while it chills.
- Digital cooking thermometer (optional)- helps for accuracy and assessing when the curd is done. I use this one linked here.
- Small glass jar or container- for storing the lemon curd.
Gather Your Ingredients:
- Fresh Lemons- you’ll need both the juice and the zest for the brightest, most natural lemon flavor. The zest is where a lot of the flavor lives. so don’t skip it!
- White Sugar- Sweetens the lemon curd to balance the tart lemons.
- Egg Yolks- The key to a rich, thick curd. They create that smooth, creamy texture and help the curd to set up after it cools.
- Unsalted Butter- Adds richness and gives the curd it’s silky, glossy finish. It also helps smooth out the acidity of the lemon juice.
- Sea Salt- Balances the sweet and sour flavors of the citrus and sugar.
- Vanilla Extract or Paste- Adds a slight warmth to the curd that I love. You can use extract or paste!
Step-By-Step Instructions
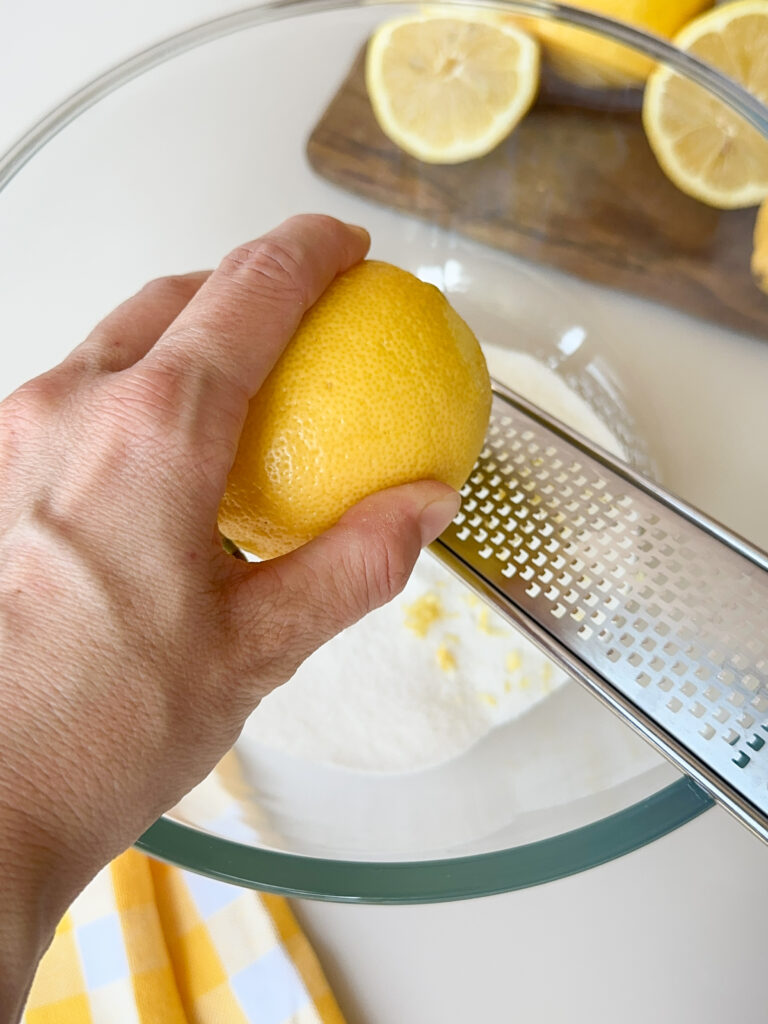
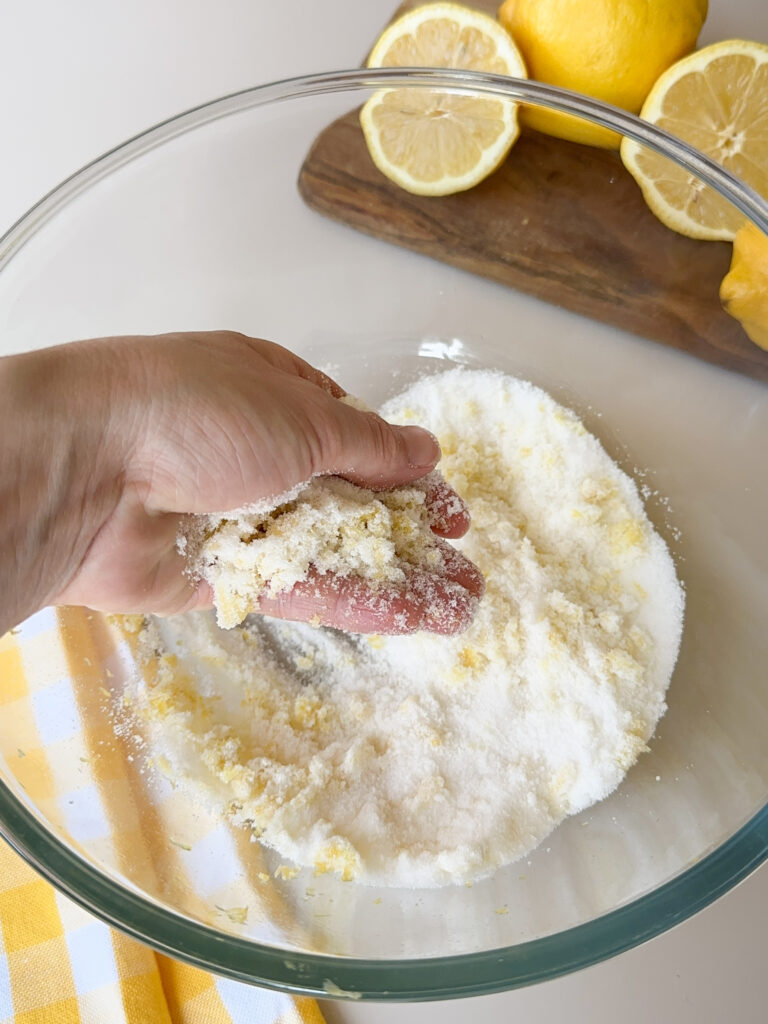
Step 1: Combine the Sugar and Lemon Zest
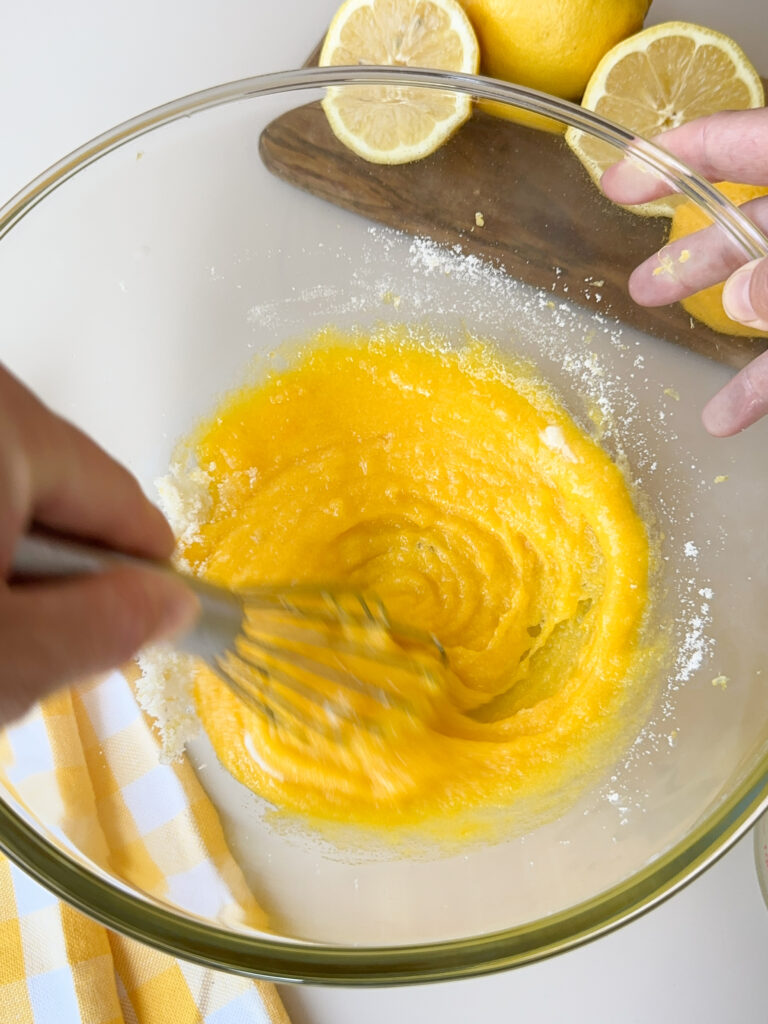
In a mixing bowl, add the white sugar. Using a zester, zest the lemons into the white sugar. Use your fingers to rub the sugar and lemon zest together. This brings out all of the oil in the zest for maximum flavor! The sugar should be slightly damp.
Step 2: Add the Egg Yolks and Lemon Juice
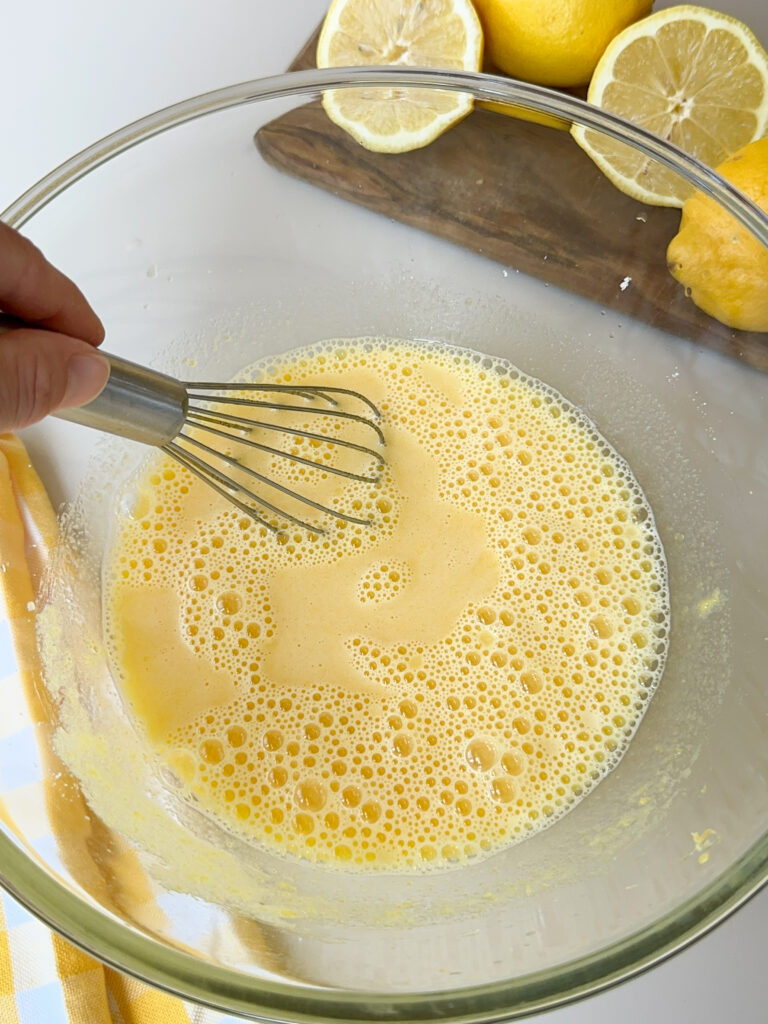
Add the egg yolks into the white sugar and the lemon zest. Whisk the yolks until the mixture is smooth and pale.
While whisking, slowly add the lemon juice.
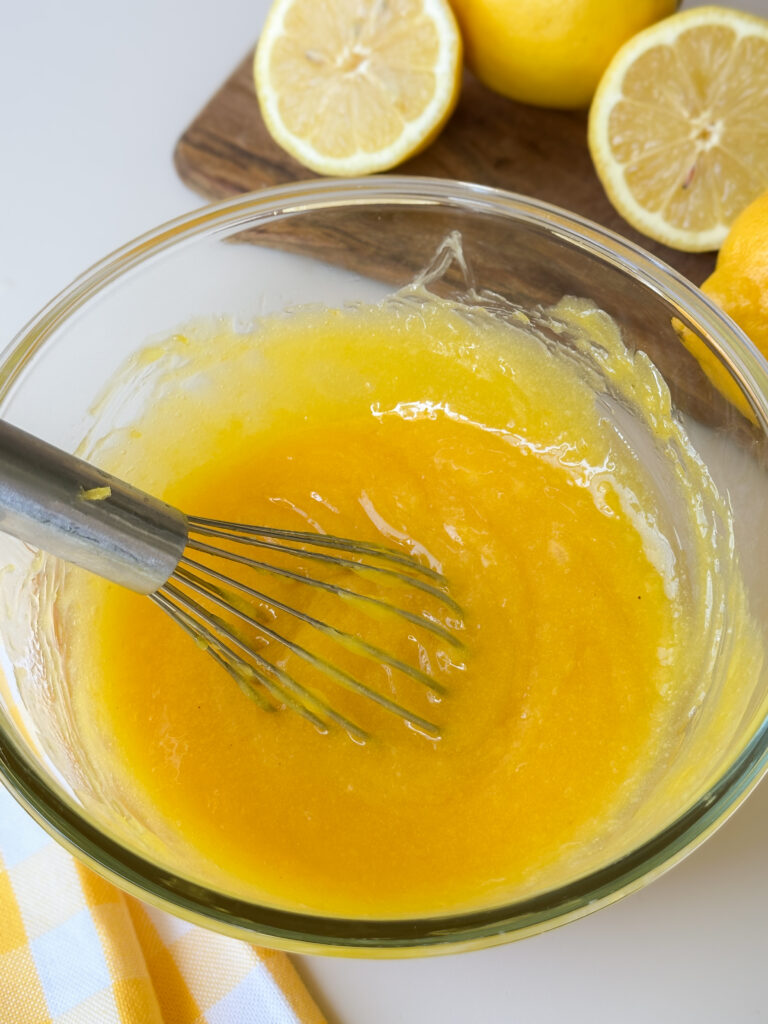
Step 3: Cook the Lemon Curd
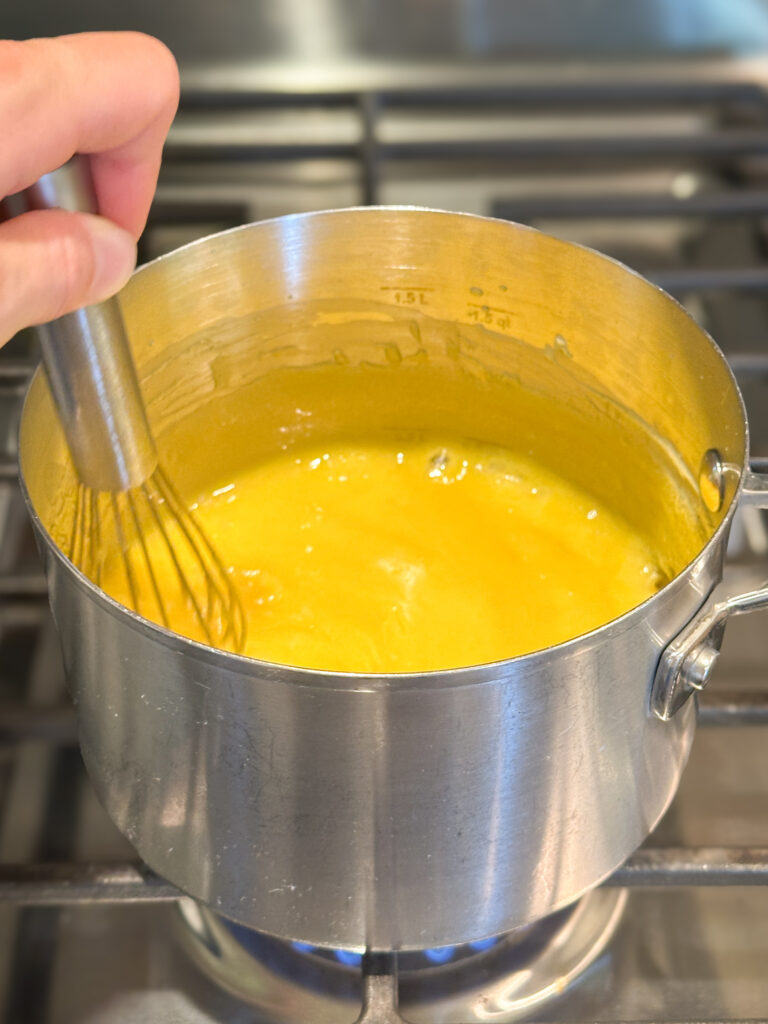
Transfer the mixture to a medium sized pot, and start to cook over low to medium heat. The key to a silky smooth curd is to cook it low and slow, so don’t rush this process!
You’ll want to whisk the curd constantly to avoid the egg from curdling. The curd will start to bubble and cook, it took me roughly 10-12 minutes for it to cook down to a thicker consistency.
Make sure you’re scraping the sides and bottom of the pot to avoid burning at the edges! The temperature for the curd should be 175 F (80 C), it should be smooth and glossy, and coat the back of a spoon.
If you get the curd too hot, you run the risk of it becoming grainy so take your time here.
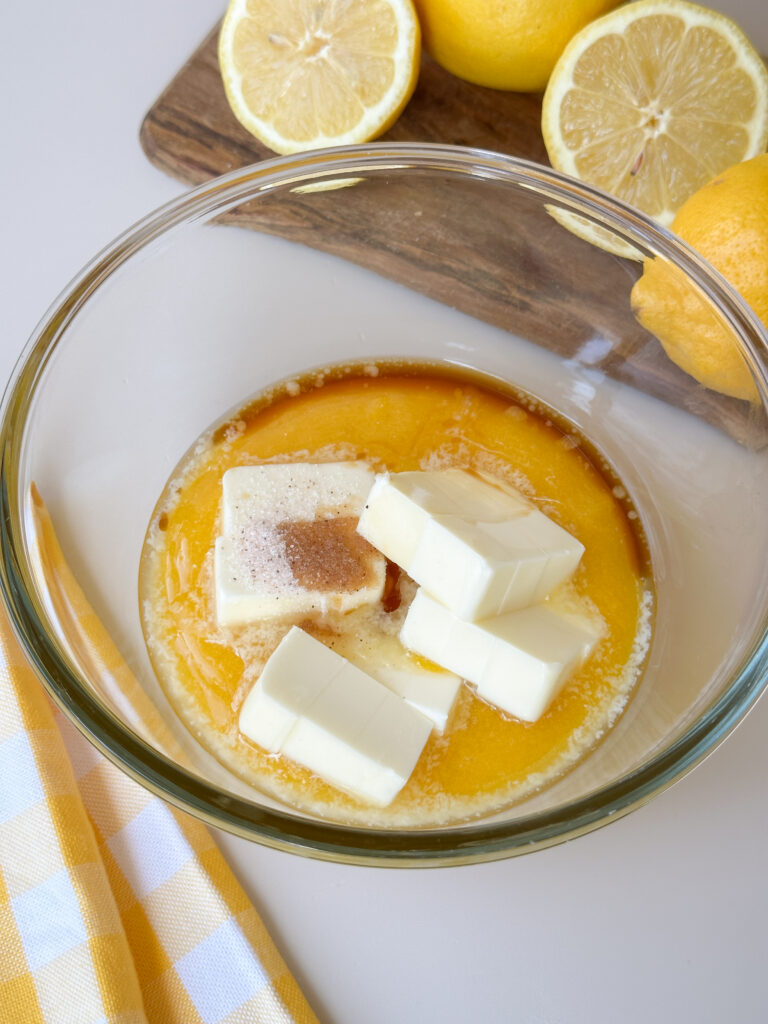
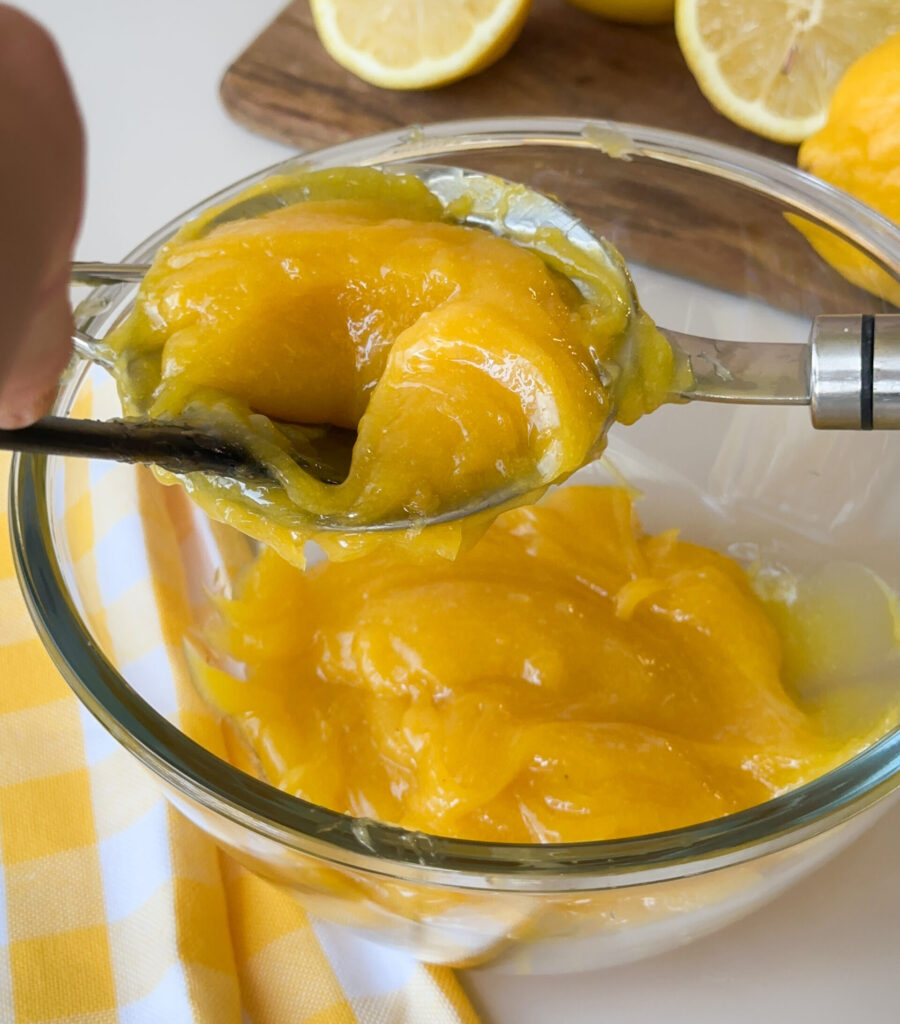
Once the curd is done cooking, transfer it right away to a heat safe bowl.
Cut the cold butter into small cubes, and add the butter, vanilla extract, and salt to the curd.
Whisk all of the remaining ingredients into the curd until all of the butter has melted and the curd is silky and smooth.
Step 4: Strain the Lemon Curd
This next step is optional, but if you’re using the lemon curd as a filling in cakes or want it extra silky don’t skip it!
Using a fine mesh sieve, press the lemon curd into the sieve with a small spatula forcing it through the sieve and straining out any small bits of egg yolk or lemon zest.
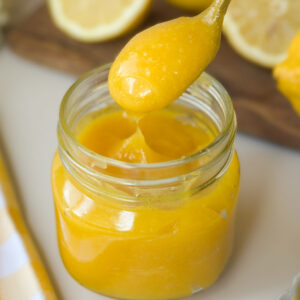
This makes the most delightfully creamy lemon curd, perfect for filling or piping!
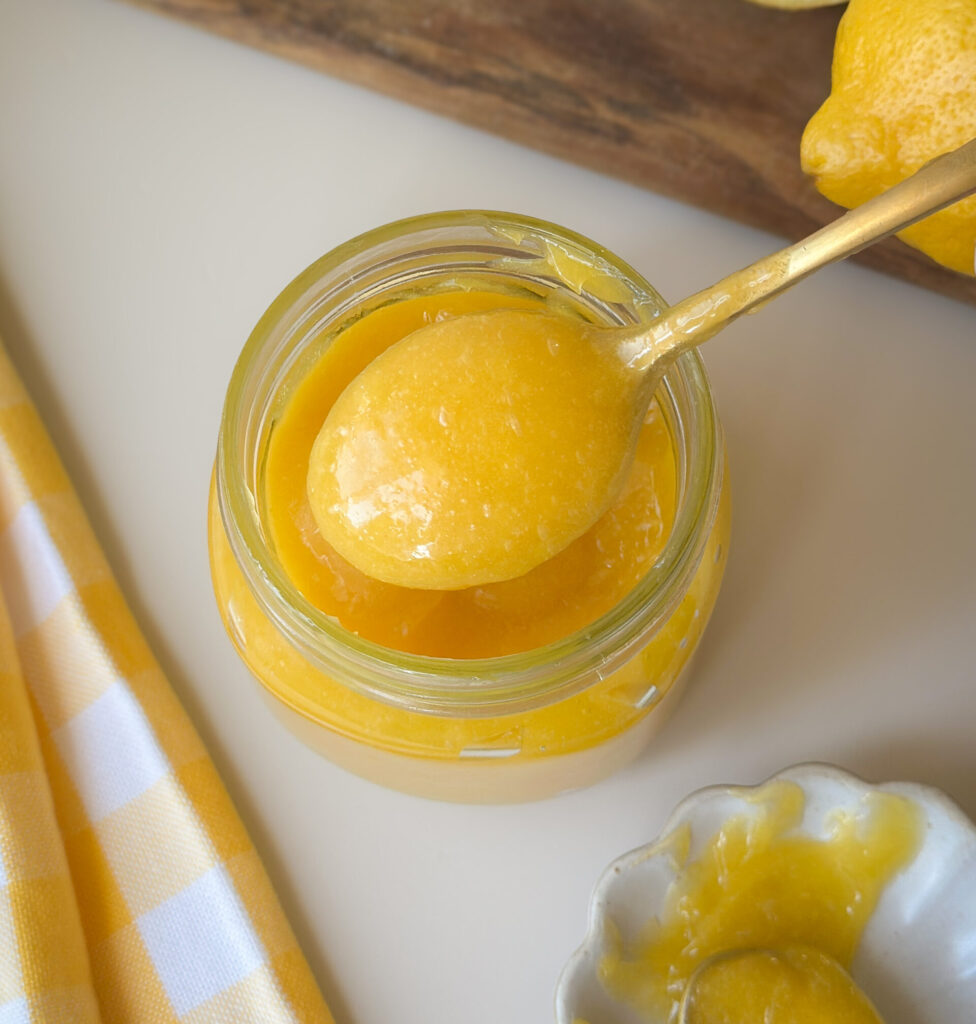
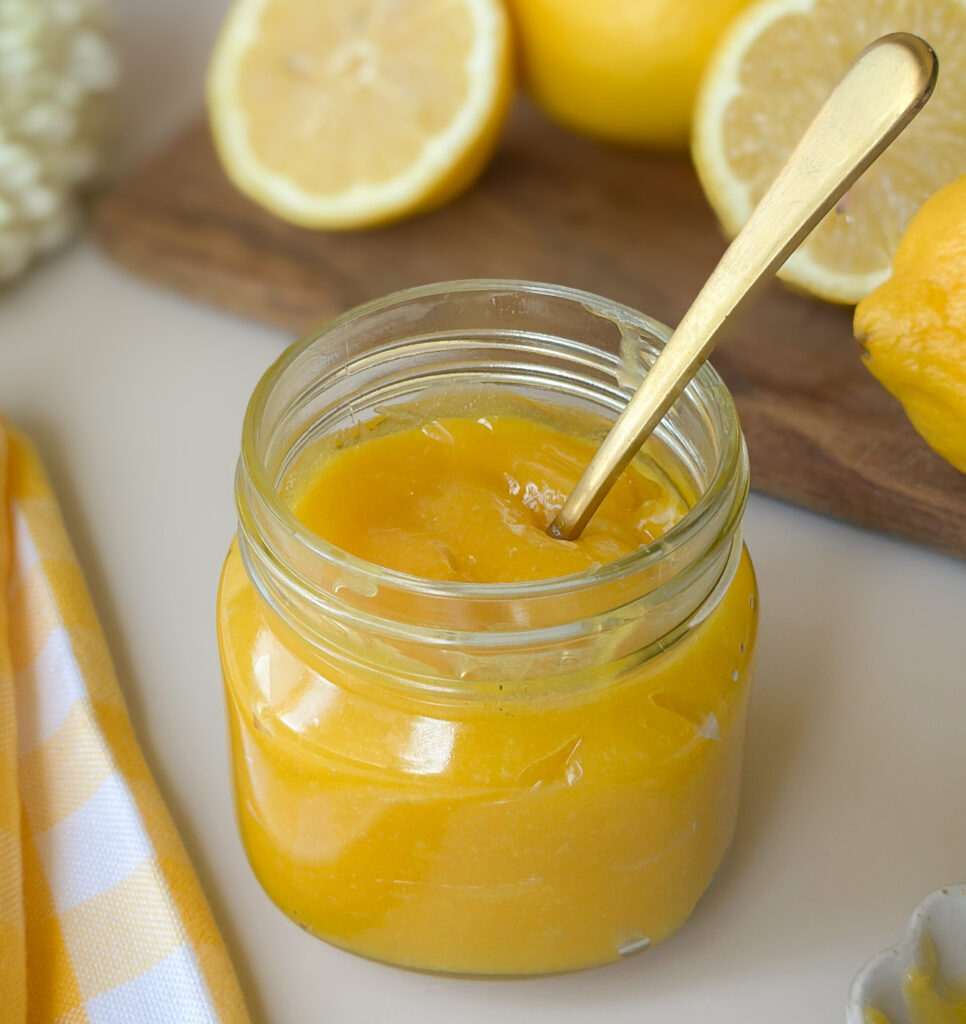
Transfer the lemon curd to a glass jar or container for storage, and press a piece of plastic wrap directly on top of the curd sealing any edges to avoid a skin forming on the top after it sets.
Chill at least 2-3 hours to allow the lemon curd to set up before using in your desired recipe.
Enjoy!
Yields 1 cup (240g)
How to Store:
Refrigerator– Refrigerate, tightly covered, for up to 7 days. Keep plastic wrap directly on the surface to avoid a skin forming.
To gently loosen before using, place the container in a warm water bath (about 100 degrees) and gently stir until smooth again. It will loosen without breaking.
Tips for success
- Whisk constantly to prevent lumps and burnt patches!
- Don’t rush the boil, low and slow is the key to a silky smooth curd.
- Vanilla paste gives visible specks- choose that if you want to see the vanilla flecks.
- Make sure to strain the curd if you want a really silky finish for piping etc.,
Troubleshooting Common Problems with Lemon CUrd
- How do I loosen lemon curd if it gets too thick after chilling? Place the container in a warm water bath (about 100 degrees) and gently stir until smooth again. It will loosen without breaking.
- What do I do if my lemon curd is too thin? Return to low heat and cook, stirring constantly, until it thickens and coats the back of a spoon (about 170–175°F). It will thicken more as it chills.
- How do I thicken lemon curd after it’s cooled? Mix 1 teaspoon cornstarch with a 2 Tablespoons lemon juice, whisk it into the curd, and cook briefly over low heat until the curd thickens.
- Why is my lemon curd too thick? It was slightly overcooked. Let it sit at room temp, then whisk smooth. Add 1–2 teaspoons lemon juice if needed and stir to thin the curd.
- Why is my lemon curd lumpy? The eggs cooked too fast. Strain it until smooth.
- Why is there a skin on top? Air exposure. Press plastic wrap directly on the surface before chilling.
- Why did my lemon curd curdle? It overheated. Try blending the lemon curd with a hand blender to help the texture, and next time cook over a lower heat.
FAQ’S
Yes. It actually gets better as it chills and fully sets – overnight is ideal.
It’s not required, but it gives you that ultra-smooth, bakery-quality finish especially important for layering and piping.
Yes. Once fully chilled, it’s thick enough to pipe cleanly into dots, layers, or fillings.
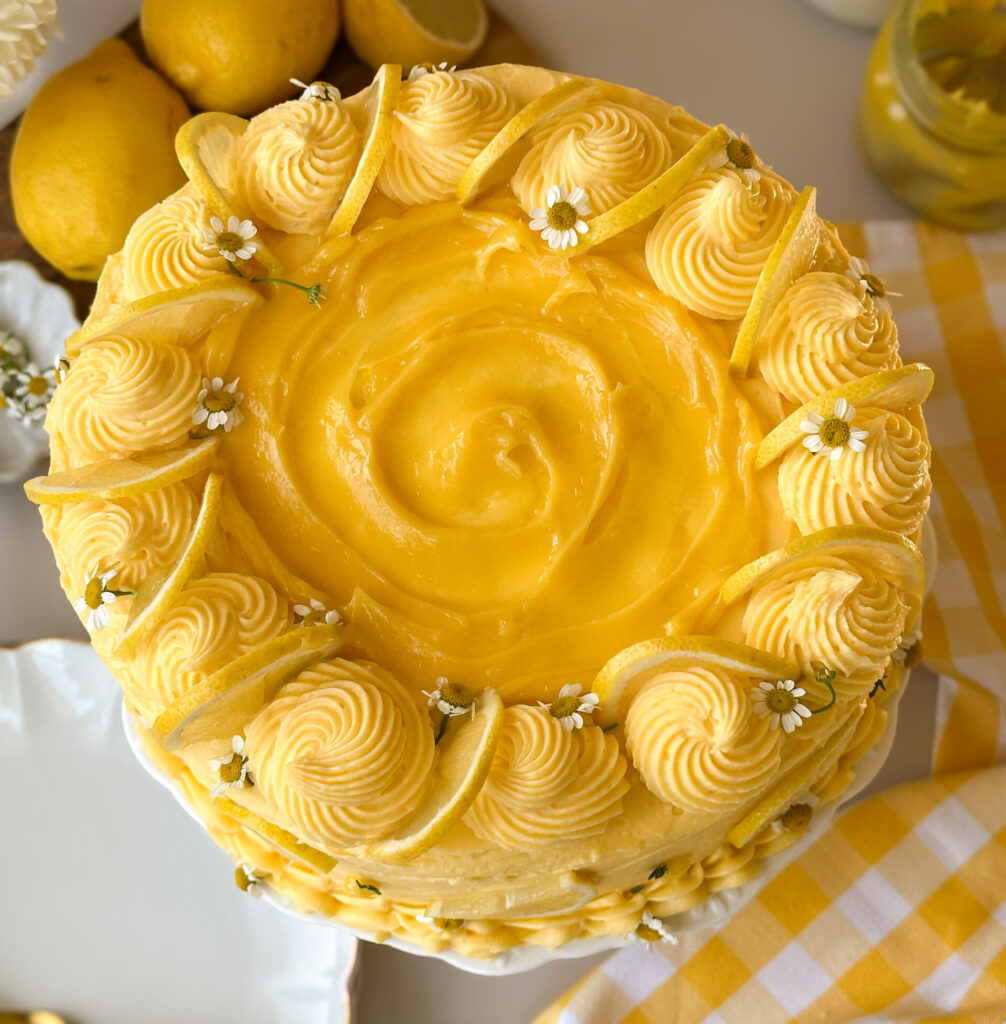
Drop a comment and leave a review if you loved this recipe, and don’t forget to try this easy lemon curd recipe in my Sourdough Lemon Cake!
Easy Lemon Curd Recipe
Equipment
- Medium saucepan or pot – For gently heating and cooking the lemon curd evenly without scorching.
- Whisk – Essential for keeping the curd smooth and lump-free as it thickens.
- Zester or Microplane – to zest the lemons. I love this zester and reach for it all the time.
- Heat-safe bowl – For mixing and tempering the curd. I love these mixing bowls that have lids for perfect storage!
- Kitchen scale (optional) – for accurate measuring, especially helpful with baking.
- Measuring cups and spoons – if not using a scale and for smaller ingredients.
- Rubber Spatula – Great for scraping the pan and making sure none of that lemony goodness goes to waste.
- Plastic wrap – Pressed directly onto the surface to prevent a skin from forming while it chills.
- Digital cooking thermometer (optional) – helps for accuracy and assessing when the curd is done. I use this one linked here.
- Small glass jar or container – for storing the lemon curd.
Ingredients
- 3/4 (150g) cup granulated white sugar
- 2 Tbsp lemon zest 2 lemons zested
- 5 large egg yolks
- 1/2 (120g) cup fresh lemon juice
- 6 (85g) Tbsp unsalted butter cold and cubed
- 1/8 tsp fine sea salt
- 1/2 tsp vanilla
Instructions
Step 1: Combine the Sugar and Lemon Zest
- In a mixing bowl, add the white sugar. Using a zester, zest the lemons into the white sugar. Use your fingers to rub the sugar and lemon zest together. This brings out all of the oil in the zest for maximum flavor! The sugar should be slightly damp.3/4 (150g) cup granulated white sugar, 2 Tbsp lemon zest
Step 2: Add the Egg Yolks and Lemon Juice
- Add the egg yolks into the white sugar and the lemon zest. Whisk the yolks until the mixture is smooth and pale.5 large egg yolks
- While whisking, slowly add the lemon juice.1/2 (120g) cup fresh lemon juice
Step 3: Cook the Lemon Curd
- Transfer the mixture to a medium sized pot, and start to cook over low to medium heat. The key to a silky smooth curd is to cook it low and slow, so don’t rush this process!
- You’ll want to whisk the curd constantly to avoid the egg from curdling. The curd will start to bubble and cook, it took me roughly 10-12 minutes for it to cook down to a thicker consistency.
- Make sure you’re scraping the sides and bottom of the pot to avoid burning at the edges! The temperature for the curd should be 175 F (80 C), it should be smooth and glossy, and coat the back of a spoon.
- If you get the curd too hot, you run the risk of it becoming grainy so take your time here.
- Once the curd is done cooking, transfer it right away to a heat safe bowl.
- Cut the cold butter into small cubes, and add the butter, vanilla extract, and salt to the curd.6 (85g) Tbsp unsalted butter, 1/8 tsp fine sea salt, 1/2 tsp vanilla
- Whisk all of the remaining ingredients into the curd until all of the butter has melted and the curd is silky and smooth.
Step 4: Strain the Lemon Curd
- This next step is optional, but if you’re using the lemon curd as a filling in cakes or want it extra silky don’t skip it!
- Using a fine mesh sieve, press the lemon curd into the sieve with a small spatula forcing it through the sieve and straining out any small bits of egg yolk or lemon zest.
- This makes the most delightfully creamy lemon curd, perfect for filling or piping!
- Transfer the lemon curd to a glass jar or container for storage, and press a piece of plastic wrap directly on top of the curd sealing any edges to avoid a skin forming on the top after it sets.
- Chill at least 2-3 hours to allow the lemon curd to set up before using in your desired recipe!
Best lemon curd ever!!