Sourdough Nutter Butters
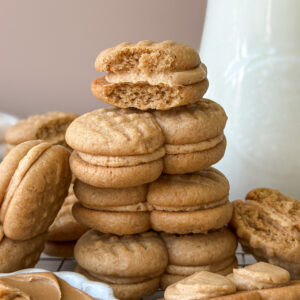
If you grew up loving classic Nutter Butters, this is your sign to make them from scratch. These Sourdough Nutter Butters are a soft, peanut buttery, and sandwiched with a creamy peanut butter filling. This recipe is everything you love about the classic, but better. Easy to make, fun to shape, and dangerously snackable.
Why You’ll Love This Recipe
- Made with pantry staples: Instead of having to google the ingredients on the package, this recipe uses pantry staples you likely already have on hand.
- Soft, nostalgic texture: that classic Nutter Butter feel, but softer, fresher, and even more satisfying.
- Creamy peanut butter filling: A rich smooth peanut butter center brings these cookies together in the best way.
- Fun to shape: The iconic peanut shape is simple to recreate and makes these extra cute (and recognizable!).
- Uses up discard: Have sourdough discard on hand? Use it up with these cookie! I’ve also included a swap for the discard if you want a non-sourdough option under FAQ’s.
Tools You’ll Need:
- Large mixing bowl or stand mixer bowl- for mixing your cookie dough.
- Stand or hand mixer- for combining the cookie dough and filling.
- Digital kitchen scale (optional)– for accurate measuring, especially helpful with sourdough baking. I linked the one I like here.
- Measuring cups and spoons– for measuring ingredients.
- Spatula- to help combine the cookie dough.
- 2 teaspoon cookie scoop (optional)- to scoop the cookie dough, I love this cookie scoop that makes the job easy. You can also use a teaspoon if you prefer!
- 2 half size baking sheets- For baking the cookies.
- Fork- to shape your cookies for that classic Nutter Butter design.
- Parchment Paper or silicone mats- to line the baking sheet to avoid sticking.
- Medium sized bowl- to combine the peanut butter filling.
- Pastry bag or Ziplock- to pipe the filling between the cookies.
Next, Gather Your Ingredients:
- Unsalted Butter– Makes the cookies soft and rich. You’ll also add this to the peanut butter filling.
- Creamy Peanut Butter- You’ll want to make sure you use creamy peanut butter here, Jif or Skippy are great I used the Skippy Natural option. If you swap for a different type of peanut butter, the cookies will be delicious it just may affect the texture of the cookie and filling.
- Egg– Adds richness and moisture to the cookie.
- Sourdough discard– Adds flavor and moisture and is the magic that ferments your dough if you choose to do so. Can be used fed, past peak, or straight from the fridge.
- White Granulated Sugar- Sweetens cookies. Helps give cookies that crackly top and crisp edge.
- Brown Sugar– Adds sweetness and caramel notes to cookies.
- Vanilla Extract– Adds depth and warmth to cookies.
- All-purpose flour– Provides structure and lift to the cookies. You can substitute bread flour but I like the softness all-purpose gives the cookies.
- Cornstarch- Makes the cookies extra soft and helps with overspreading.
- Baking Soda – Creates the perfect spread without overpuffing the cookies.
- Sea Salt – Enhances overall flavor and sweetness.
- Honey– adds the best flavor to the peanut butter filling.
- Heavy Cream- Makes the peanut butter filling light and fluffy.
- Powdered Sugar- thickens and sweetens the peanut butter filling. Don’t use granulated sugar, or the filling will be gritty!
- Flaky Sea Salt (optional) – I love adding Maldon sea salt flakes on top of my cookies for that extra flair. If you haven’t tried this, I highly suggest it! You can find it link here.
Instructions
Step 1: Mix the Cookie Dough
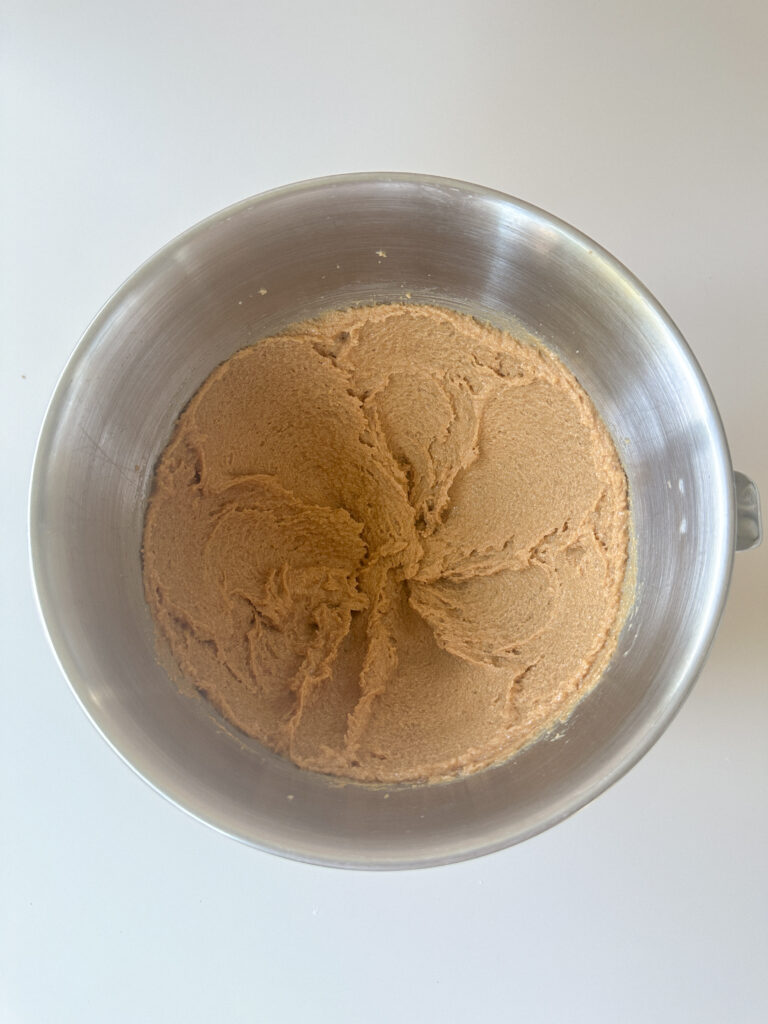
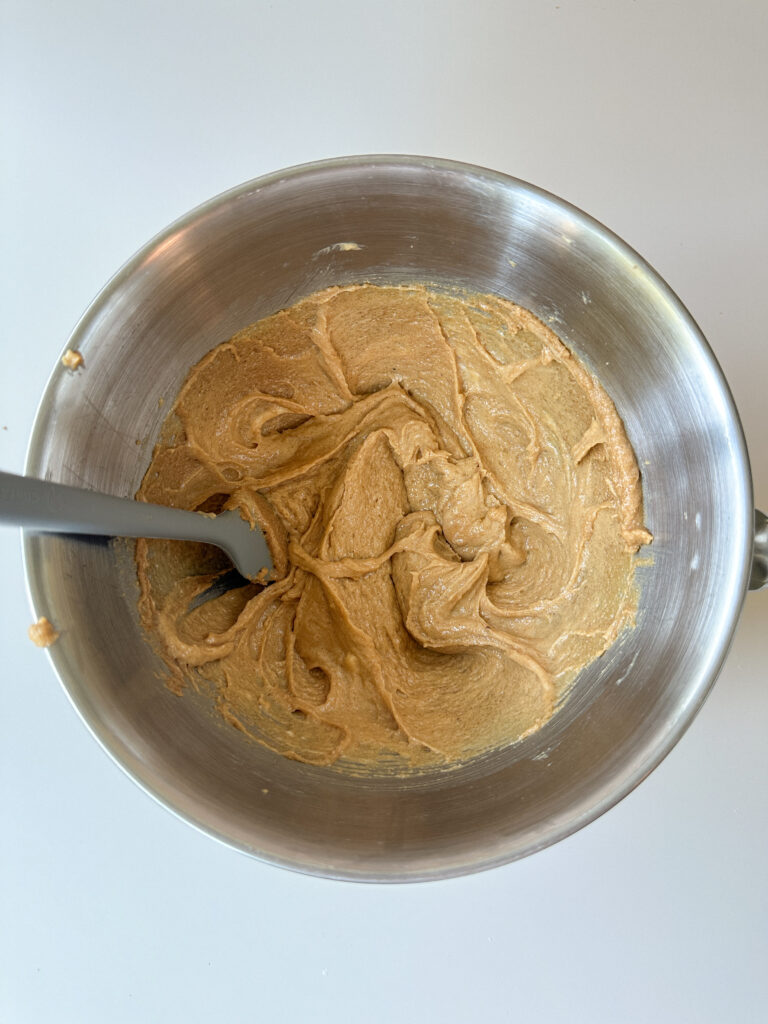
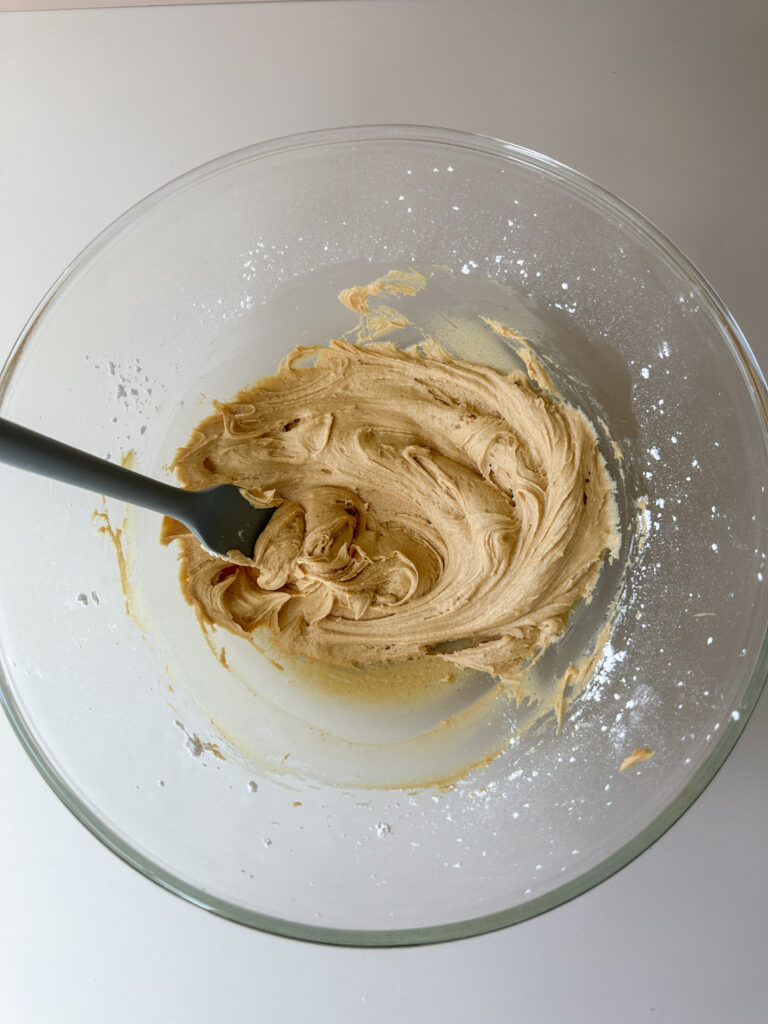
In your mixing bowl, add the softened butter, peanut butter, white sugar, and brown sugar. Cream together on high with beaters or your paddle attachment for 2-3 minutes until the mixture is smooth and fluffy.
Add the sourdough discard, egg, and vanilla to the bowl. Whip in the ingredients for another minute until everything is combined.
In a separate bowl, add the flour, cornstarch, baking soda, and sea salt. Whisk the dry ingredients together.
Add the dry ingredients to the wet, and gently mix them in until the dough is just combined and no flour streaks remain.
Cover the bowl with plastic, and transfer to the refrigerator to chill for at least an hour.
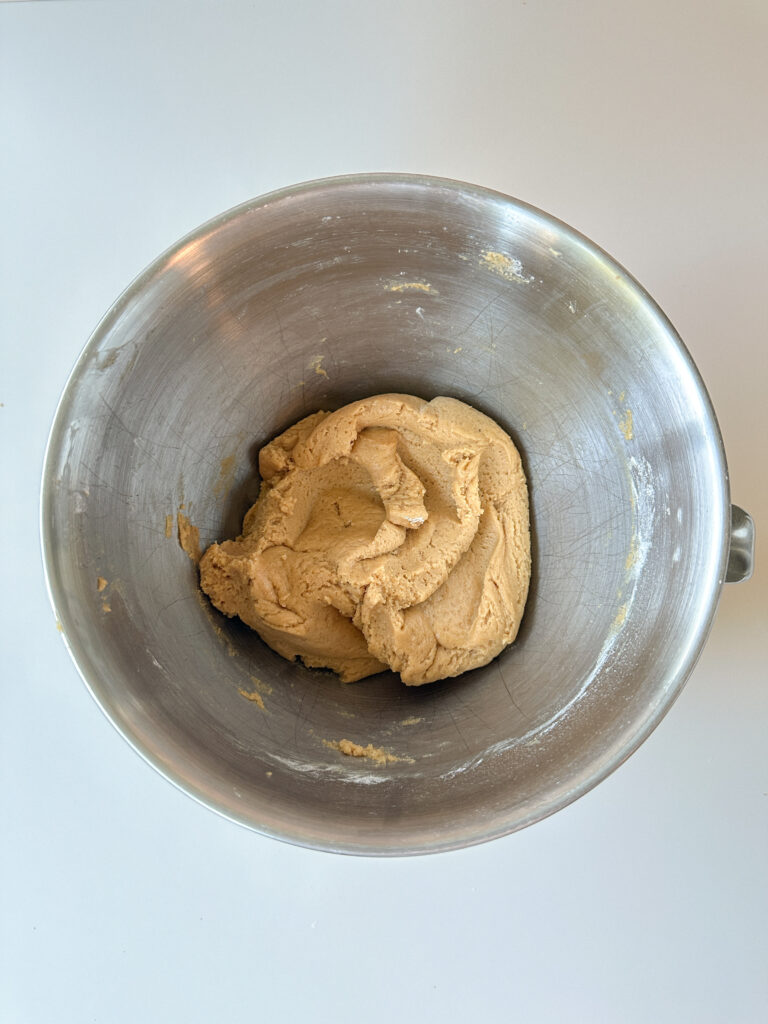
Overnight Fermentation Option: For optimal fermentation, consider chilling the dough overnight. Simply leave the dough in the refrigerator overnight and shape the next day.
Step 2: Shape and Bake the Cookies
Preheat your oven to 350°F. Line two baking sheets with parchment or silicone mats.
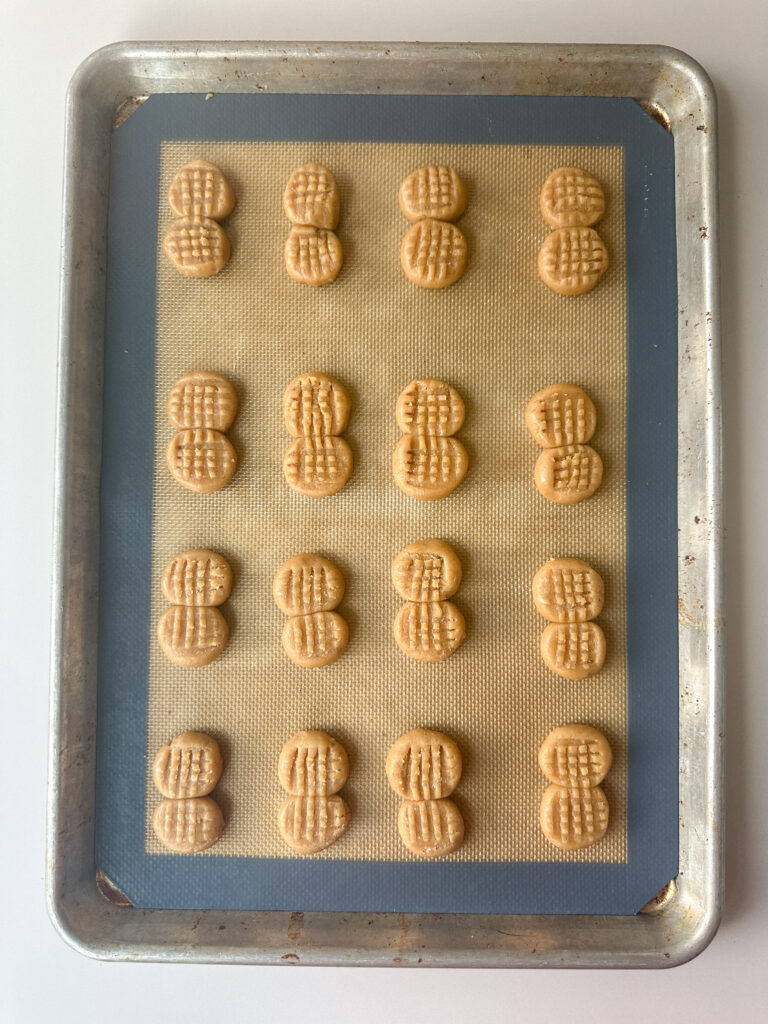
Using a two teaspoon cookie scoop (or a teaspoon), scoop the chilled dough into little balls. Roll the dough between your palms to make smooth balls.
You will split the dough in half if you use a 2 teaspoon scoop, or if using a teaspoon you’ll scoop all the dough into small balls no need to split it.
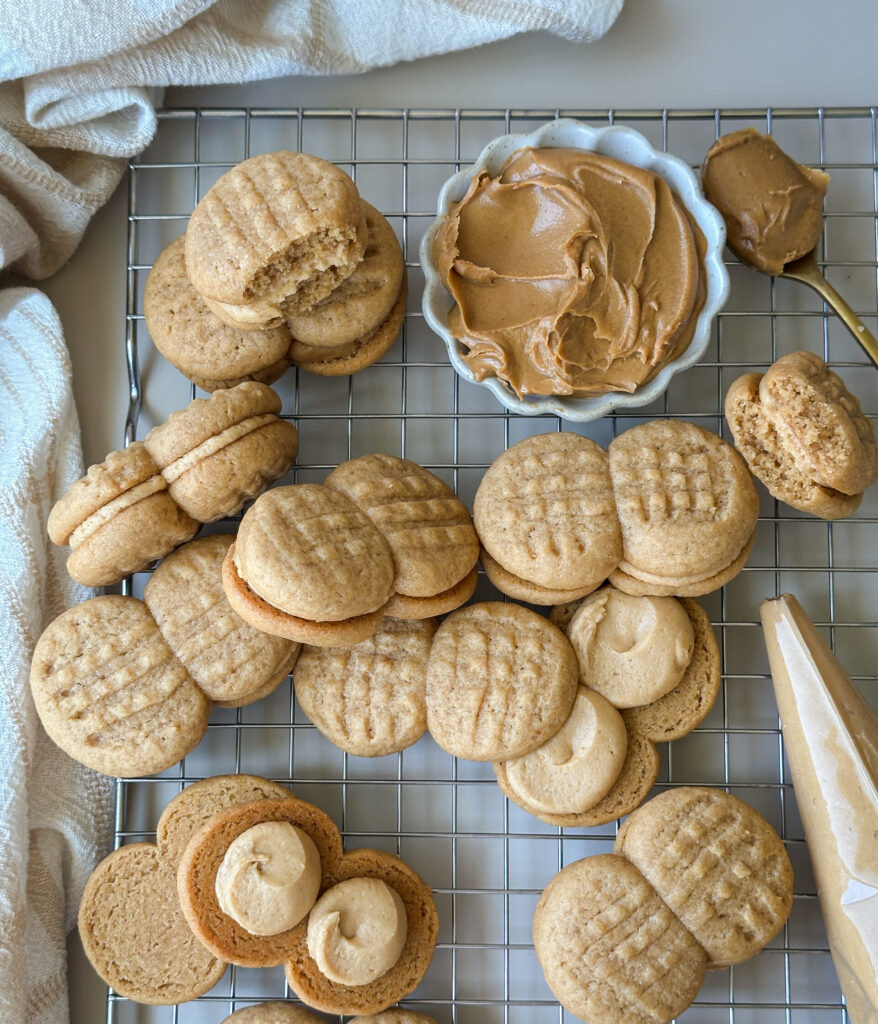
Arrange 2 small cookie dough balls next to each other on the baking sheets. Each of these will make one cookie, I did 16 to each baking sheet.
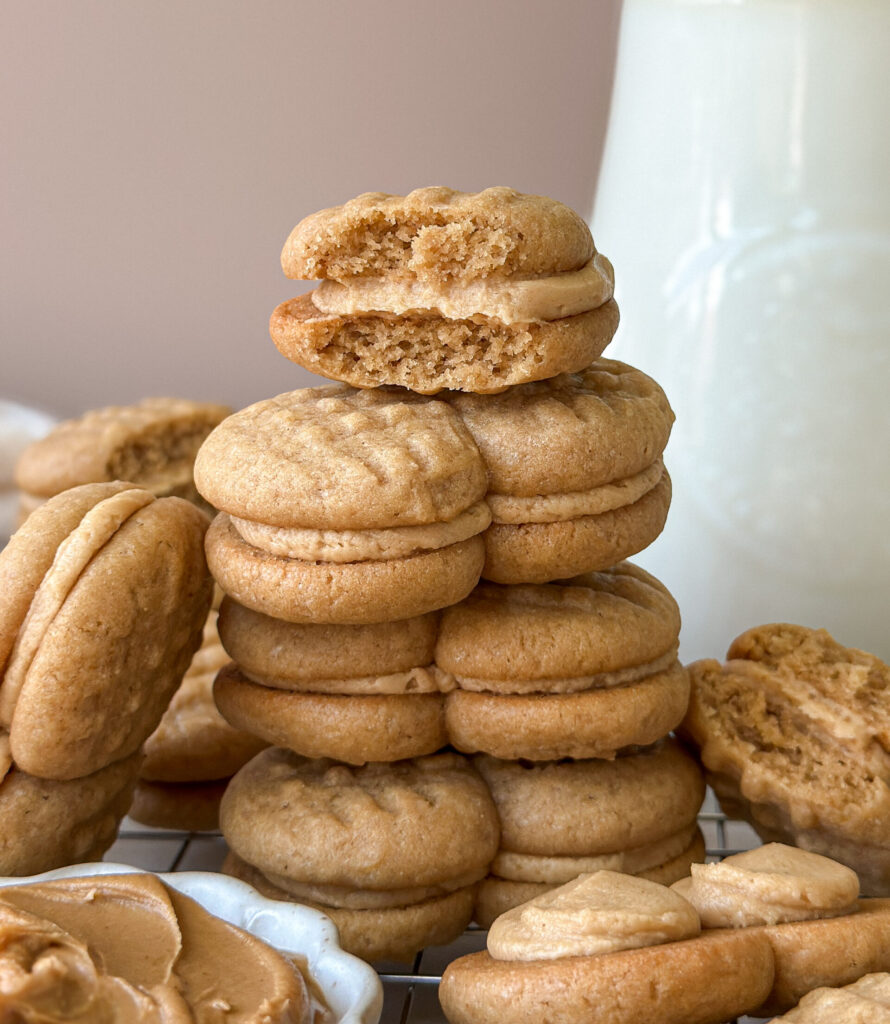
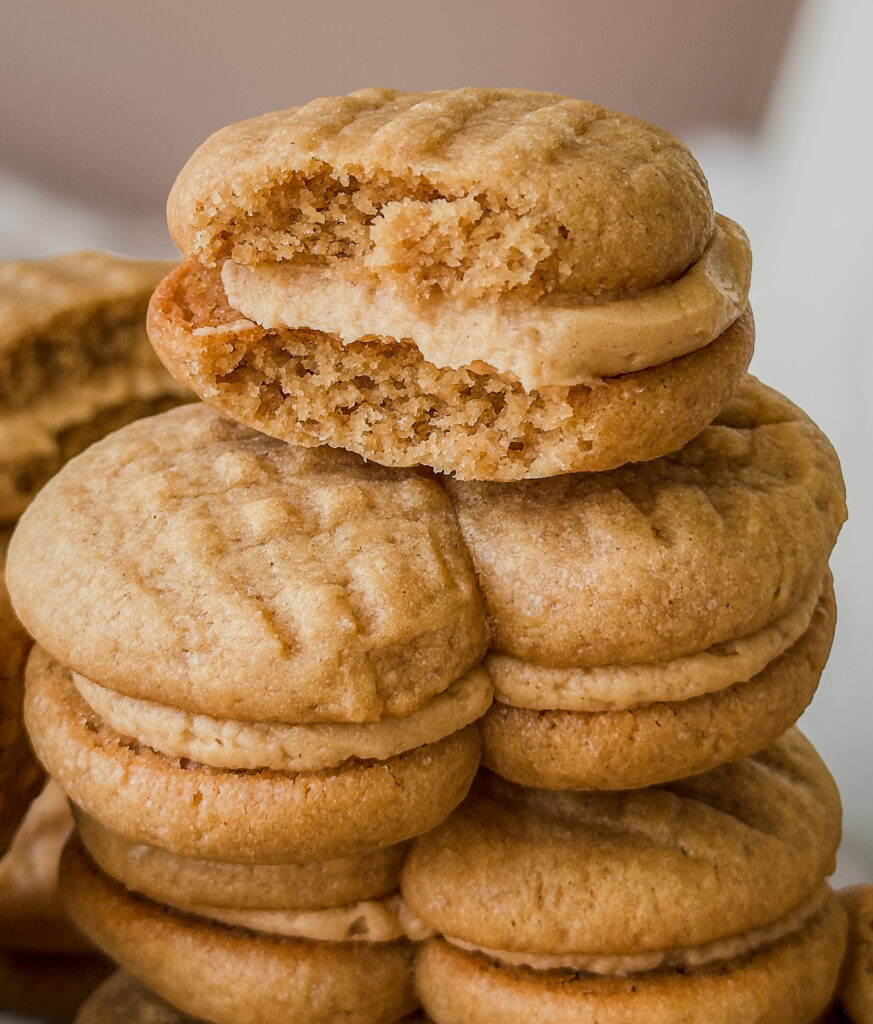
Using a fork, press the two cookie dough balls down with the prongs of the fork to press the balls together and create lines across the cookies lengthwise.
Repeat this step on each side of the cookie creating a criss-cross design on the cookies for that classic Nutter Butter look (see the pictures for details).
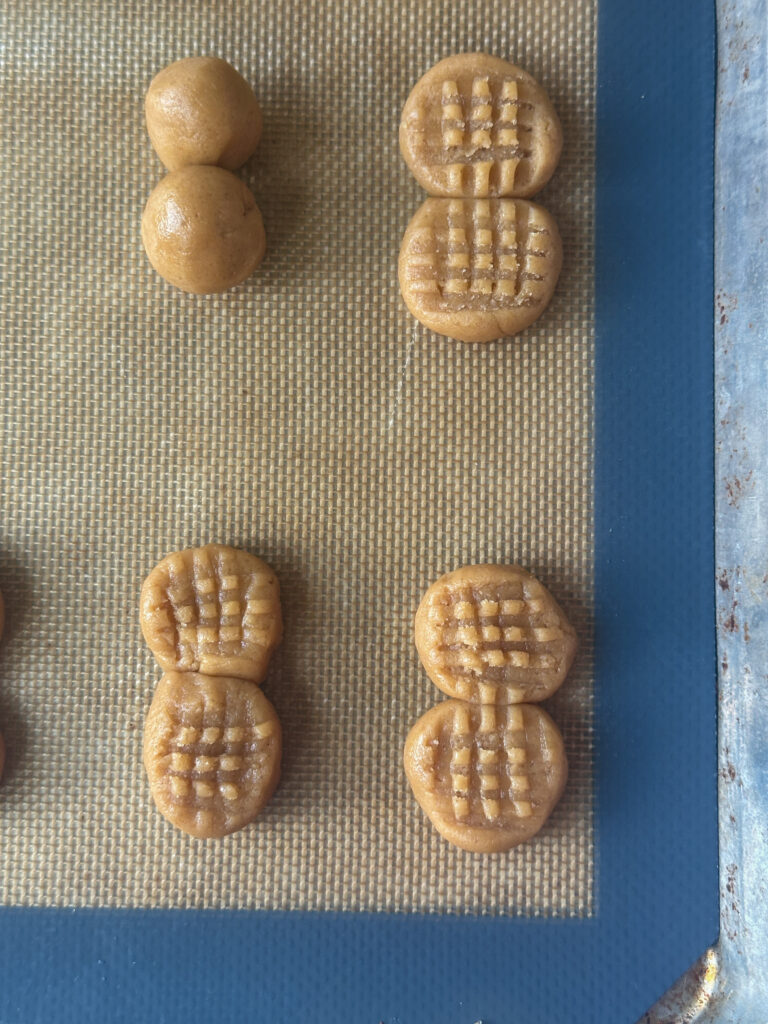
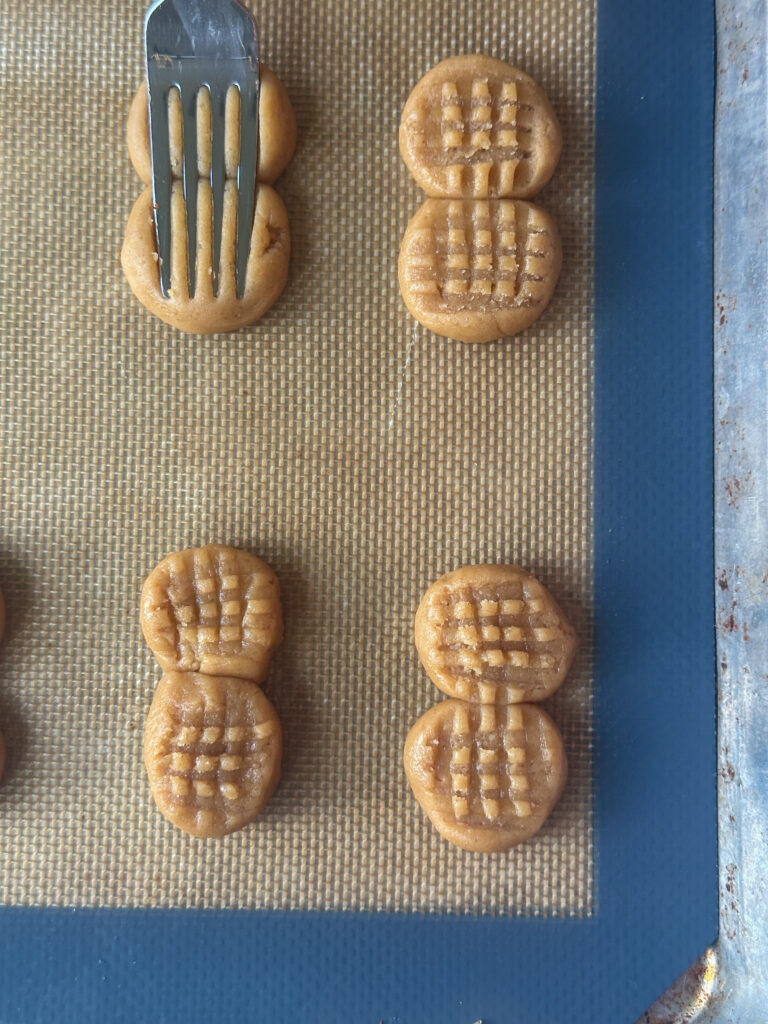

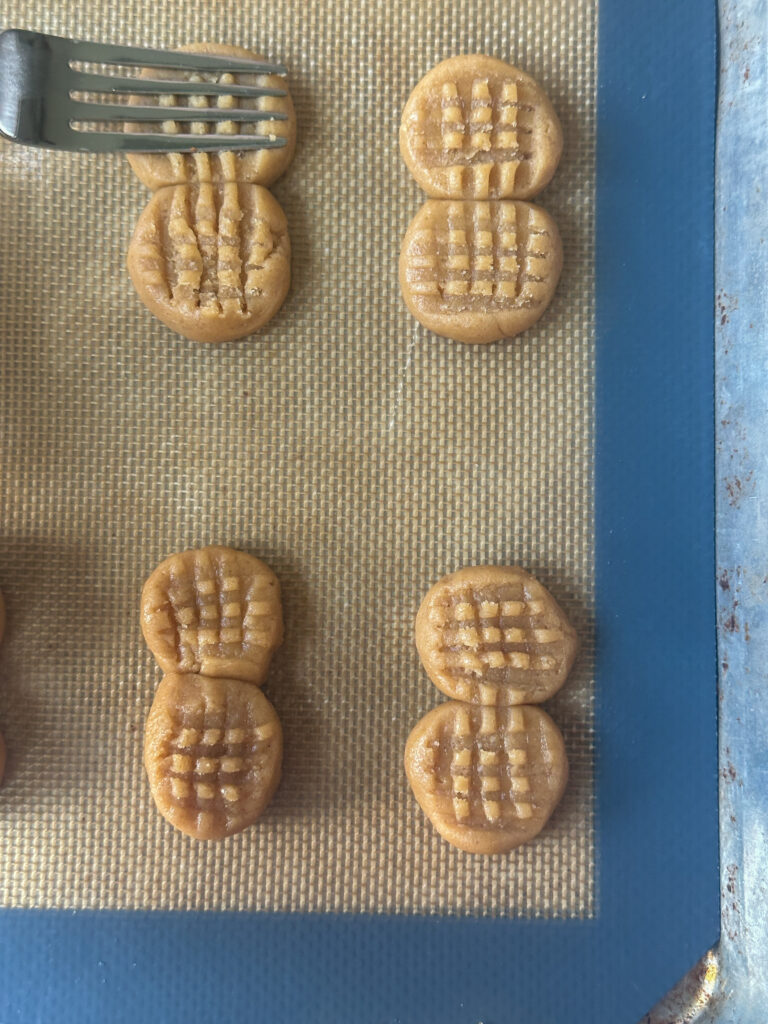
Make this design on all of your cookies before baking.
Transfer the cookies to the preheated oven, and bake the cookies for 14 minutes until the edges are set. If you want a crispier cookie, extended the baking time to 16 minutes.
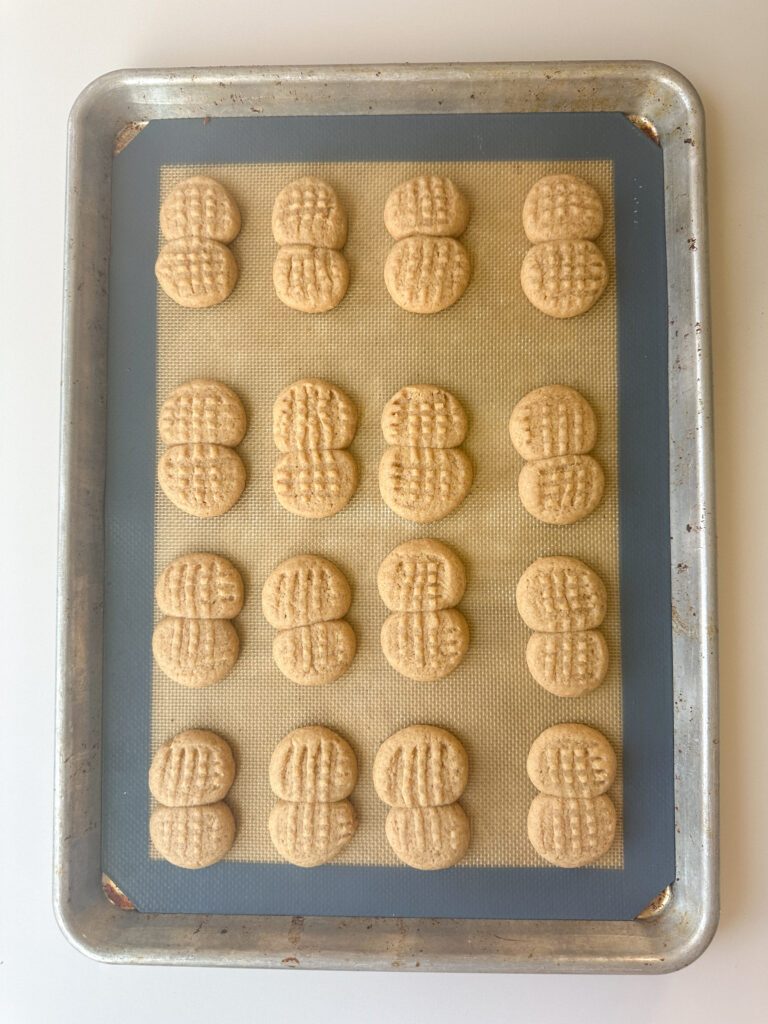
Remove the cookies from the oven and allow them to cool fully before you fill them.
Step 3: Make the Filling and Fill the Cookies
In a mixing bowl, add the peanut butter, softened butter, honey, vanilla, and salt.
Using hand beaters or a stand mixer with a paddle attachment, whip the filling until the ingredients are combined.
Add the powdered sugar to the filling, and mix into the filling on low until the sugar is mixed in.
Add the cream gradually to the filling, increasing the speed slowly and mixing until the filling is light and fluffy.
Note: Cold cream can cause the filling to split, so make sure you whip on medium and watch the consistency. Stop mixing if you see the filling start to separate.
Transfer the filling to a pastry bag or a Ziplock, and snip about 1/4 inch of the end of the bag off.
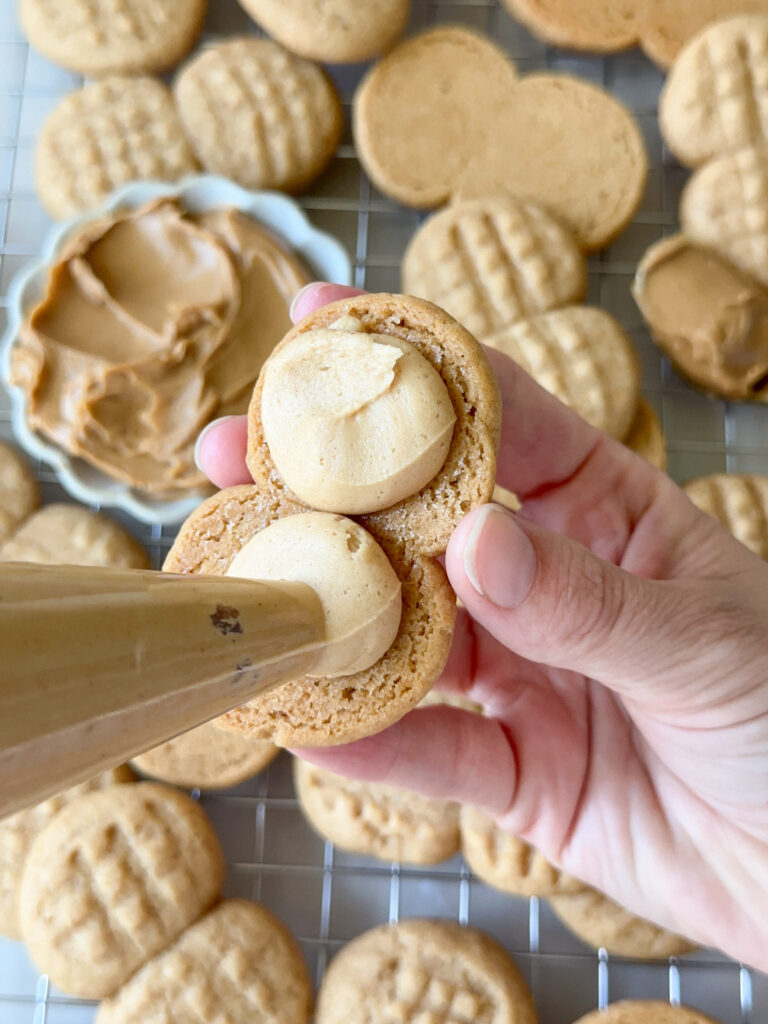
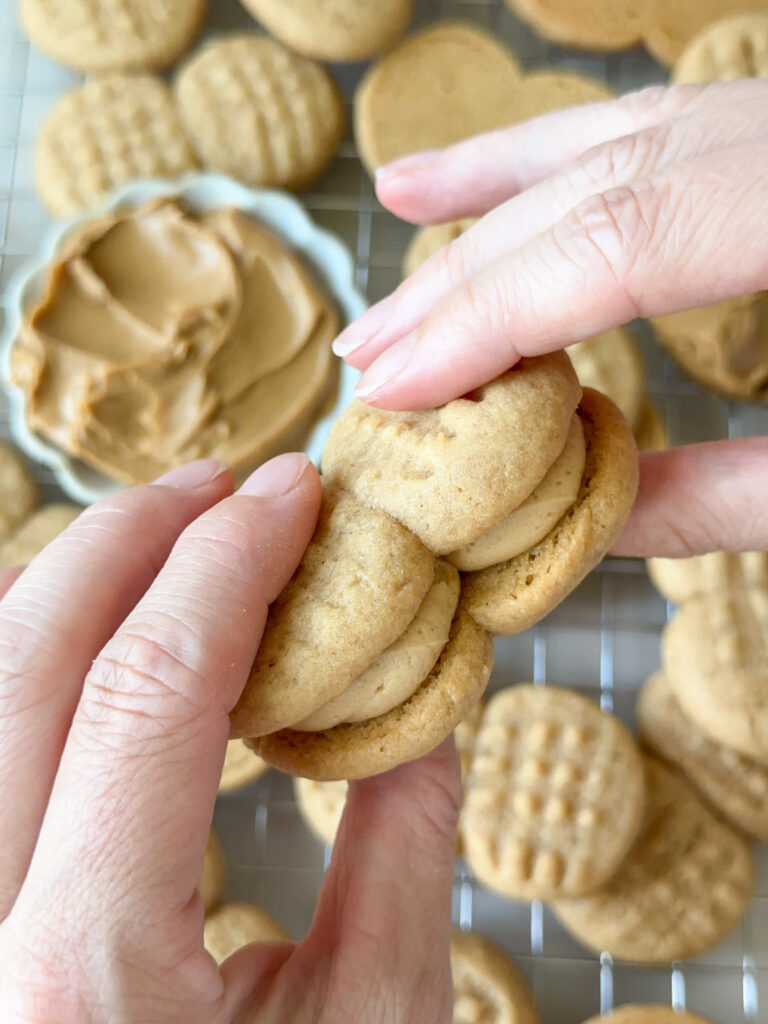
Pipe the filling onto one half of the cookie in circular motions on each side, then add another cookie on top and gently squeeze together.
Repeat this step with the remaining cookies until all of them are filled. This should make 16 sandwich cookies.
Enjoy!
Yields 16 sandwich cookies
How to Store:
Room temperature- Keep in an airtight container for 5-6 days. Place a slice of bread in the container to keep them soft.
FAQ’S
Chilling prevents spreading and gives you thicker, softer cookies.
This creates that classic Nutter Butter look and helps them bake evenly.
Yes! To replace the discard, add 1/4 cup (60g) of whole milk and 2 Tablespoons (20g) extra flour to the cookies. Mix and bake!
If you enjoyed this recipe, drop a comment and star review and don’t forget to try more of my sourdough cookie recipes!
Sourdough Cookie Recipes:
- Sourdough Pistachio Chocolate Chunk Cookies
- Chewy Sourdough Lemon Crinkle Cookies
- Sourdough Butter Pecan Toffee Cookies
Sourdough Nutter Butters
Equipment
- Large mixing bowl or stand mixer bowl – for mixing your cookie dough.
- Stand or hand mixer – for combining the cookie dough and filling.
- Digital kitchen scale (optional) – for accurate measuring, especially helpful with sourdough baking. I linked the one I like here.
- Measuring cups and spoons – for measuring ingredients.
- Spatula – to help combine the cookie dough.
- 2 teaspoon cookie scoop (optional) – to scoop the cookie dough, I love this cookie scoop that makes the job easy. You can also use a teaspoon if you prefer!
- 2 half size baking sheets – For baking the cookies.
- Fork – to shape your cookies for that classic Nutter Butter design.
- Parchment paper or silicone mats – to line the baking sheet to avoid sticking.
- Medium sized bowl – to combine the peanut butter filling.
- Pastry bag or ziplock – to pipe the filling between the cookies.
Ingredients
Peanut Butter Cookies:
- 1/2 (120g) cup creamy peanut butter I used Skippy Natural
- 1/3 (76g) cup unsalted butter softened
- 1/2 (100g) cup brown sugar, packed
- 1/2 (100g) cup granulated white sugar
- 1/3 (80g) cup sourdough discard
- 1 large egg room temperature
- 1 tsp vanilla extract
- 1 1/4 (155g) cups all-purpose flour
- 1/2 Tbsp cornstarch
- 1/2 tsp baking soda
- 3/4 tsp salt
Sourdough Discard Swap:
- 1/4 (60g) cup whole milk
- 2 (20g) Tbspns all-purpose flour
Peanut Butter Filling:
- 1/2 (120g) cup creamy peanut butter
- 1 (120g) cup powdered sugar
- 2 (30g) Tbsp honey
- 2 (30g) Tbsp heavy cream cold
- 1/2 tsp vanilla extract
- 1/8 tsp sea salt
- 2 (30g) Tbsp butter softened
Instructions
Step 1: Mix the Cookie Dough
- In your mixing bowl, add the softened butter, peanut butter, white sugar, and brown sugar. Cream together on high with beaters or your paddle attachment for 2-3 minutes until the mixture is smooth and fluffy.1/2 (120g) cup creamy peanut butter, 1/3 (76g) cup unsalted butter, 1/2 (100g) cup brown sugar, packed, 1/2 (100g) cup granulated white sugar
- Add the sourdough discard, egg, and vanilla to the bowl. Whip in the ingredients for another minute until everything is combined.1/3 (80g) cup sourdough discard , 1 large egg, 1 tsp vanilla extract
- In a separate bowl, add the flour, cornstarch, baking soda, and sea salt. Whisk the dry ingredients together.1 1/4 (155g) cups all-purpose flour, 1/2 Tbsp cornstarch, 1/2 tsp baking soda, 3/4 tsp salt
- Add the dry ingredients to the wet, and gently mix them in until the dough is just combined and no flour streaks remain.
- Sourdough Discard Swap: If you don't have discard, add the milk with the wet ingredients and extra flour with the dry.1/4 (60g) cup whole milk, 2 (20g) Tbspns all-purpose flour
- Cover the bowl with plastic, and transfer to the refrigerator to chill for at least an hour.
- Overnight Fermentation Option: For optimal fermentation, consider chilling the dough overnight. Simply leave the dough in the refrigerator overnight and shape the next day.
Step 2: Shape and Bake the Cookies
- Preheat your oven to 350°F. Line two baking sheets with parchment or silicone mats.
- Using a two teaspoon cookie scoop (or a teaspoon), scoop the chilled dough into little balls. Roll the dough between your palms to make smooth balls.
- You will split the dough in half if you use a 2 teaspoon scoop, or if using a teaspoon you’ll scoop all the dough into small balls no need to split it.
- Arrange 2 small cookie dough balls next to each other on the baking sheets. Each of these will make one cookie, I did 16 to each baking sheet.
- Using a fork, press the two cookie dough balls down with the prongs of the fork to press the balls together and create lines across the cookies lengthwise.
- Repeat this step on each side of the cookie creating a criss-cross design on the cookies for that classic Nutter Butter look (see the pictures in the blog above for details).
- Make this design on all of your cookies before baking.
- Transfer the cookies to the preheated oven, and bake the cookies for 14 minutes until the edges are set. If you want a crispier cookie, extended the baking time to 16 minutes.
- Remove the cookies from the oven and allow them to cool fully before you fill them.
Step 3: Make the Filling and Fill the Cookies
- In a mixing bowl, add the peanut butter, softened butter, honey, vanilla, and salt.1/2 (120g) cup creamy peanut butter, 2 (30g) Tbsp honey, 1/2 tsp vanilla extract, 2 (30g) Tbsp butter, 1/8 tsp sea salt
- Using hand beaters or a stand mixer with a paddle attachment, whip the filling until the ingredients are combined.
- Add the powdered sugar to the filling, and mix into the filling on low until the sugar is mixed in.1 (120g) cup powdered sugar
- Add the cream gradually to the filling, increasing the speed slowly and mixing until the filling is light and fluffy.2 (30g) Tbsp heavy cream
- Note: Cold cream can cause the filling to split, so make sure you whip on medium and watch the consistency. Stop mixing if you see the filling start to separate.
- Transfer the filling to a pastry bag or a Ziplock, and snip about 1/4 inch of the end of the bag off.
- Pipe the filling onto one half of the cookie in circular motions on each side, then add another cookie on top and gently squeeze together.
- Repeat this step with the remaining cookies until all of them are filled. This should make 16 sandwich cookies.
- Enjoy!
I usually don’t leave reviews on recipes but I had to on this one. I have not liked peanut butter in years and as I’m slowly coming to like it again, I saw this recipe on instagram and had to try it. Oh my goodness. The consistency is not too soft yet not too crunchy. The flavor isn’t over powering yet not too subtle. The texture of the cookie with the filling is the perfect sweet tooth craving needs. It’s amazing. This made it to our family recipe list and so excited to be making these for my kids in the years to come!!! Thank you!!! My 3 year old son was already sneaking some out of the kitchen and giving some to his little sister. lol!! First time he’s ever done that. I guess we are officially in that stage of their childhood!
Hi Jess, this comment made me smile! I’m so thrilled this was a hit!
Another great discard recipe of a loved favorite! These are very good and I know I’ll be making them again for my mom and my hubby! I wasn’t sure I could make them look good, but I think I did it! It doesn’t matter anyway how they look, it’s all of the great taste! Thanks Joselyn♥️
Hi Beth, thank you for comment! I’m so happy you loved these nutter butters!
I’m so excited to try these!!!! I’d like to make the filling without heavy cream or butter, any suggestions for a swap?
Hi Arielle, I would try a dairy free shortening!