
Sourdough Jalapeño Popper Bread
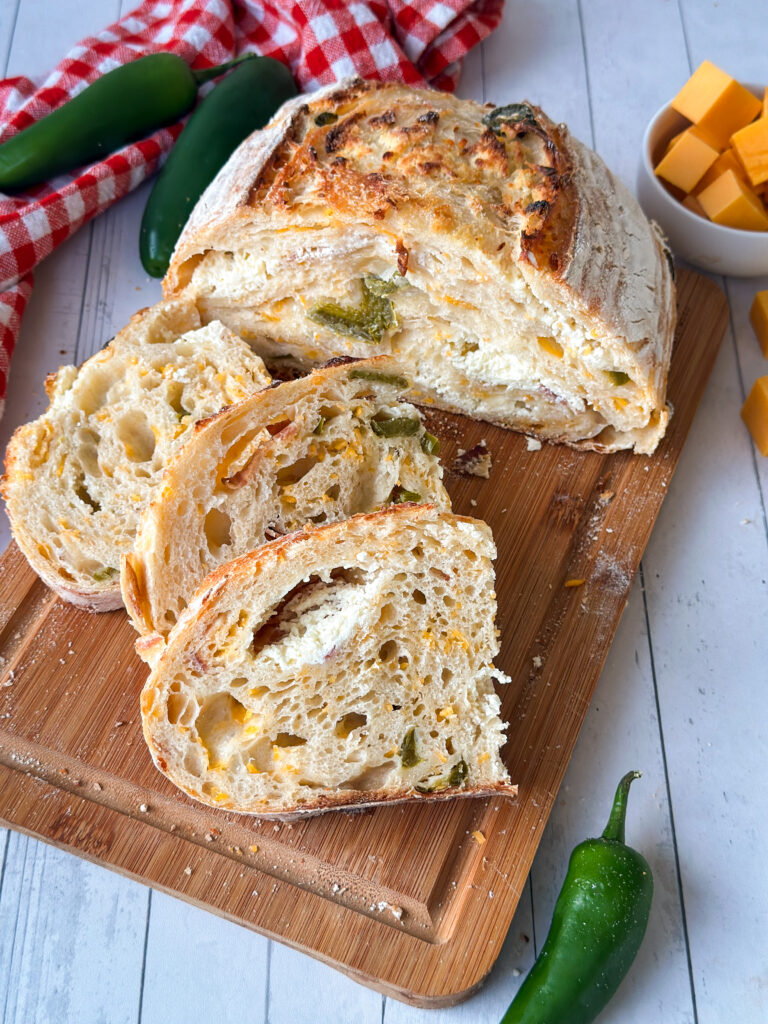
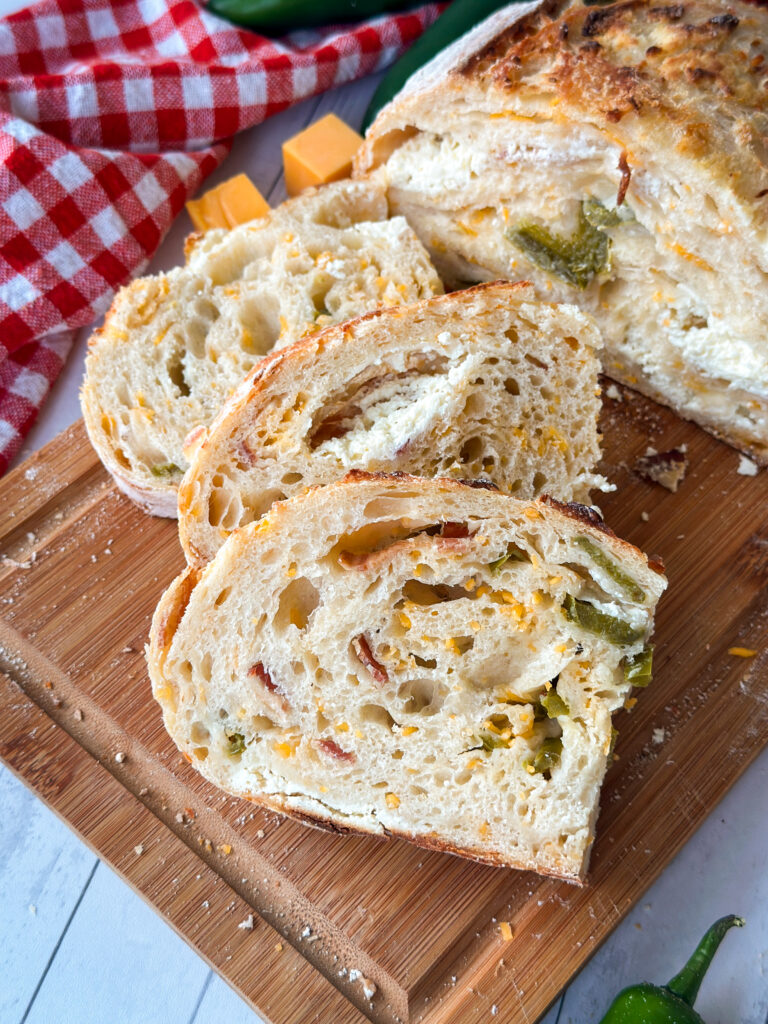
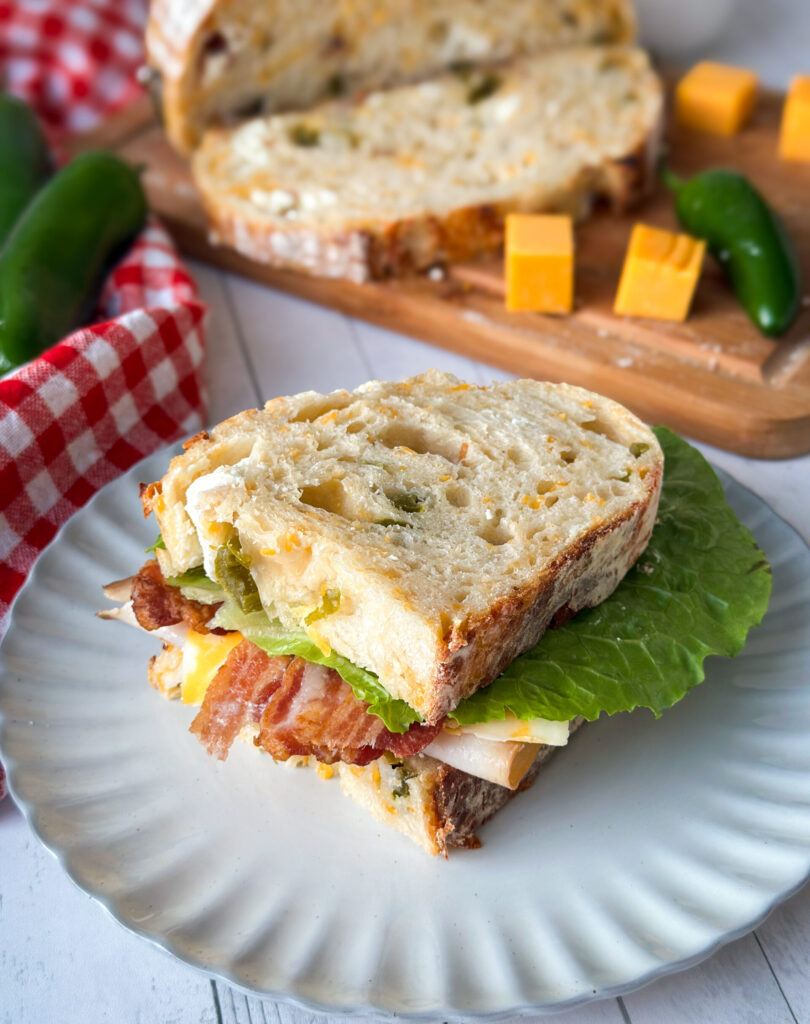
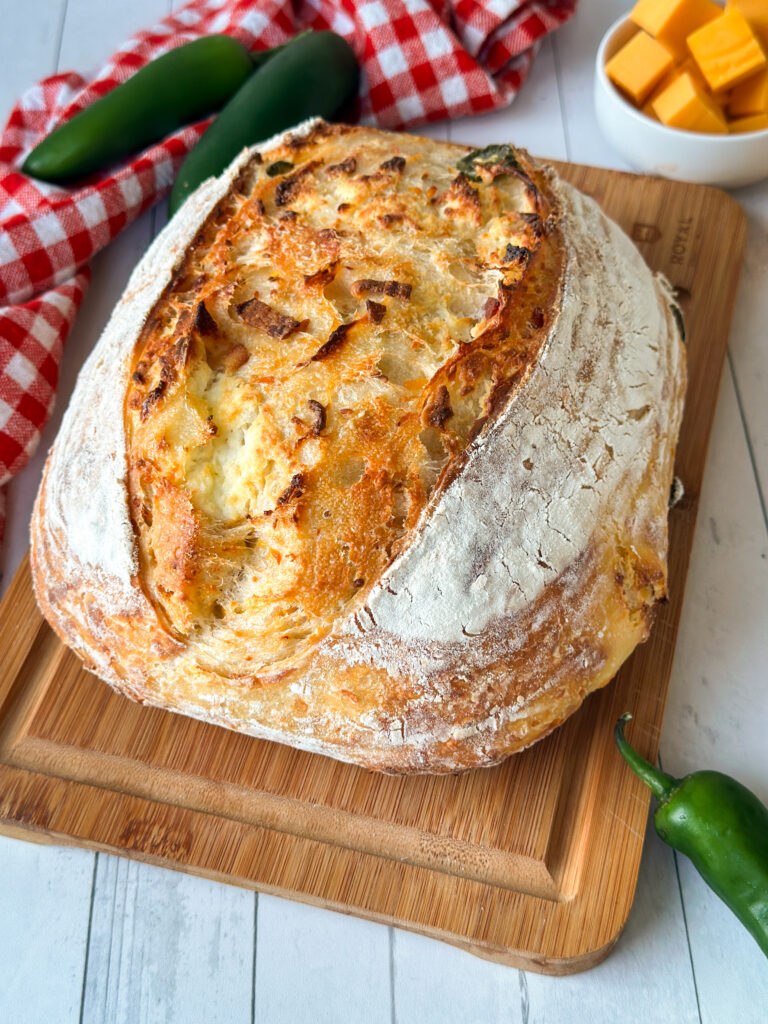
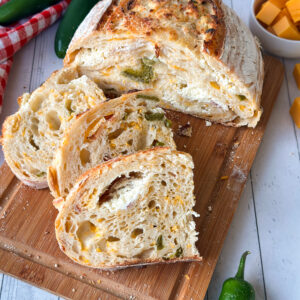
I absolutely love savory bread, and this Sourdough Jalapeño Popper Bread might be my all time favorite. Loaded with pickled jalapenos, sharp cheddar, pockets of cream cheese, and crispy bacon it’s bold, cheesy, and impossible to stop eating. The dough is soft and flavorful, the filling is generous without leaking, and every slice holds together beautifully. It’s perfect served warm with butter, alongside soup or chili, or honestly… straight off the cutting board. This is one of those loaves people remember.
Why You’ll Love This Recipe
- Balanced filling ratio: Generous cheese and jalapenos without weighing down the dough.
- Soft, structured crumb: This loaf is loaded with cream cheese and bacon inclusions but still slices well for sandwiches etc.,
- Designed for baking success: The filling and shaping method keeps the loaf intact and able to rise.
- Clear, guided steps: Built with cues that make the process easy to follow.
- Easy to prep ahead: This bread can be made ahead and the dough refrigerated before until you’re ready to bake to easily fit your busy schedule.
Tools You’ll Need:
- Digital kitchen scale– for weighing out your ingredients (highly recommended for accuracy). This one linked here is great to start with.
- Measuring cups & spoons- (optional, if you prefer to not use a scale).
- Bowl or straight edge container for mixing and proofing dough– to mix your dough and make sure your dough is rising properly. You can use a clear square Tupperware for this, I don’t recommend a bowl as it is hard to assess your rise. I’ve linked here the container I like to use.
- Bench knife (optional)- for shaping loaf. I use this bench knife all the time.
- Banneton basket (or a medium bowl lined with a lint-free cloth)- to proof dough. I’ve linked a quality banneton and cover here if you’d like to see what I use.
- Lint-free cloth or plastic wrap– to cover the dough while resting.
- 5-quart Dutch oven with lid- for baking your loaf. This is an affordable 5-quart Dutch oven that I purchased as my first linked here.
- Parchment paper or silicone bread sling– To keep bread from sticking to Dutch oven. A reusable bread sling can be really convenient and also helps avoid burning hands on your Dutch oven. I use this set linked here all the time!
- Sharp knife or lame for scoring– a sharp knife will work for scoring your bread, but I do recommend investing in a lame (razor blade) which will make the process much easier. Here is a great lame to purchase to start out linked here.
- Digital food thermometer (optional) – to check the temperature of your starter and dough, this ensures a more reliable result. I use this one linked here.
- Hand Beaters- used to beat the cream cheese so it’s light and fluffy.
- Bread Knife– for cutting your bread once cooled. I love this bread knife linked here.
As an amazon affiliate this post may contain affiliate links, which means I may receive a commission for qualifying purchases. I will only recommend products that I personally love and use.
Gather Your Ingredients:
- Cultured Sourdough Starter- A strong sourdough starter is key to making this bread. It should be recently fed and doubled to use in this recipe. Need help making a starter? Visit my Sourdough Starter Guide to get started!
- Flour- To make this process simple, my recommendation is to start off using high protein (high-gluten) flour. Why? Because this flour has the highest gluten percentage to best support the ideal structure and high nutrients needed to support a fast active fermentation process. Typically you’ll see a protein percentage on the bag of flour, I recommend using flour between 11-12% protein (gluten).
- Water- Water hydrates the flour, activating enzymes that break down starches into sugars. These sugars then feed the wild yeast and lactic acid bacteria, creating more fermentation in your bread. It is best practice to use water that is free of chlorine, which can inhibit the microbes. Filtered water, spring water, and non-chlorinated tap water are all fine options to use.
- Salt- any high quality sea salt is fine to use in your bread. I typically use Redmond Sea Salt, I recommend staying away from iodized salt as it can inhibit yeast and bacteria development.
- Pickled jalapenos- I really love using pickled jalapenos in my bread, I find the flavor carries better and the heat! If you can’t find pickled or prefer to use fresh jalapenos you can.
- Sharp cheddar cheese- You can use pre-shredded sharp cheddar or grate your own, either way works!
- Bacon- for that signature jalapeno popper flavor, we need bacon! You can cook fresh bacon or use bacon bits.
- Cream Cheese- Ready for pockets of goodness? Use full-fat cream cheese (never the spread).
Now let’s bake!
Instructions
Step 1: Feed Your Starter Night Before Baking
Baker’s Schedule: 8:00 PM
To ensure a bubbly and active starter, feed your starter the night before baking.
Use a 1:5:5 ratio to feed your starter (this means one part mature mother starter, five times the water, five times the flour).
Mix flour and water in a jar with a spatula, cover loosely with lid, and mark the volume of the starter in your jar with a rubber band or piece of tape and marker. Let starter sit at room temperature (70-75 degrees) overnight until bubbly and doubled in size.
Step 2: Make the Dough
Baker’s Schedule: Day 1- 8:00 AM
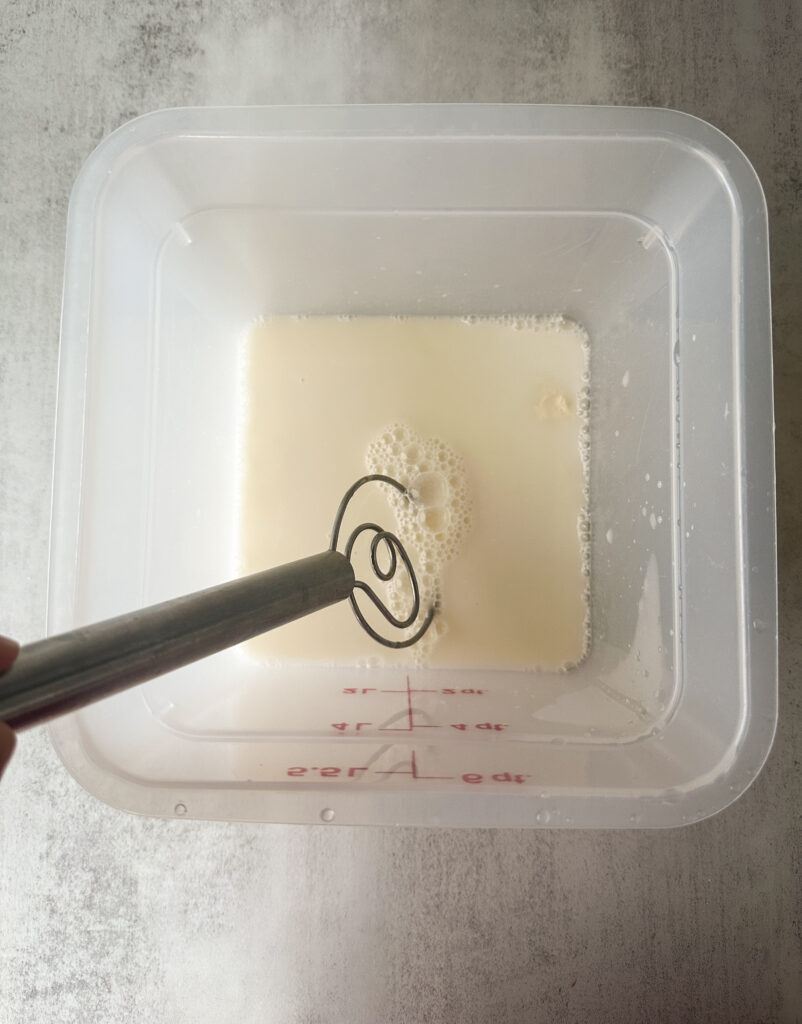
In a large bowl or as I prefer a clear straight edge container, mix the active starter and water until the starter is dissolved.
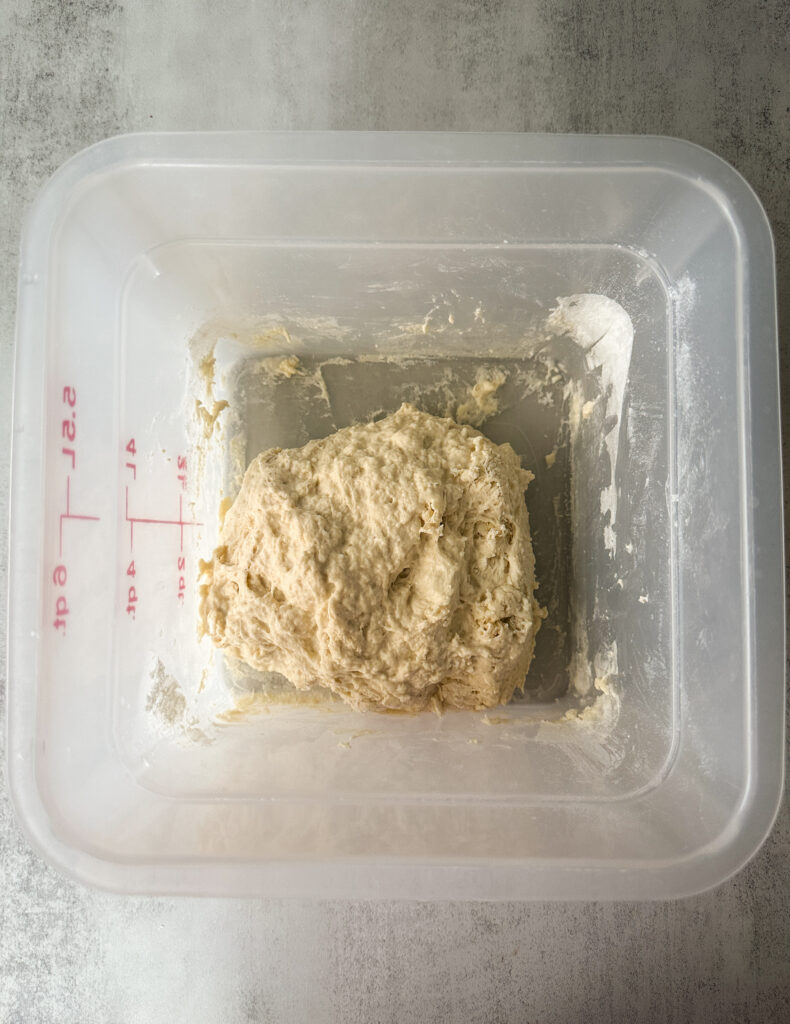
Add the salt and flour to the starter mixture. Stir and knead with your hand until all ingredients are combined into a shaggy dough. Cover with a damp towel or plastic and let it rest for 30 minutes at room temperature (70-77 degrees).
Step 3: Prepare Inclusions
While the dough is resting, line a bowl with a paper towel. Weigh or measure out your pickled jalapenos, and transfer them to the paper-towel lined bowl. Blot all of the moisture from the peppers.
Note for fresh jalapenos: If you prefer to use fresh jalapenos, prepare them at this time by slicing them thinly into rounds (removing the seeds is up to you if you leave them it’ll be spicer). I recommend using food-safe gloves handling the jalapenos and the dough once they’ve been added if using fresh.
Grate your sharp cheddar cheese or measure your pre-shredded cheese and set aside.
Step 4: Strengthen the Dough (Stretch & Folds)
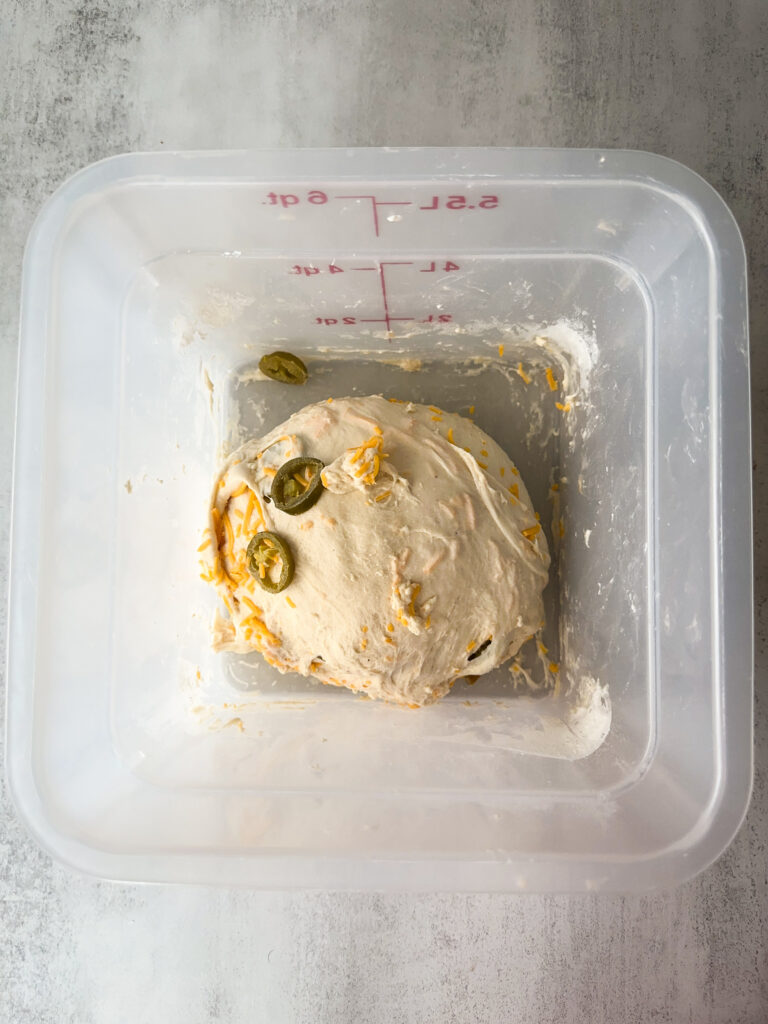
Once the 30 minute rest has finished, add the prepared jalapenos and shredded cheddar to the bowl with your dough.
Next, you’ll begin your stretch and folds. This helps build structure in your dough, strengthen gluten bonds, and incorporate your inclusions.
Starting at the edge of the dough with lightly wet hands, gently lift one edge of the dough, stretch it up, and fold it over the center. Rotate the bowl or container 90 degrees and repeat with the next side. Do this for all four sides of the dough to form a ball.
Cover the dough and let it rest for 30 minutes. Repeat this stretch-and-fold process two more times at 30-minute intervals for a total of 3 sets. Your dough should go from being rough and clumpy to smooth and silky with the inclusions well distributed.
Note on Temperature: Your dough loves a warmer climate, so aim to keep your dough between 73-78 degrees (you can use your digital thermometer to check the temperature). If you need to warm it up, try putting it in the oven with a light on, near a heater, or even on top of a dryer that’s on to conduct some heat!
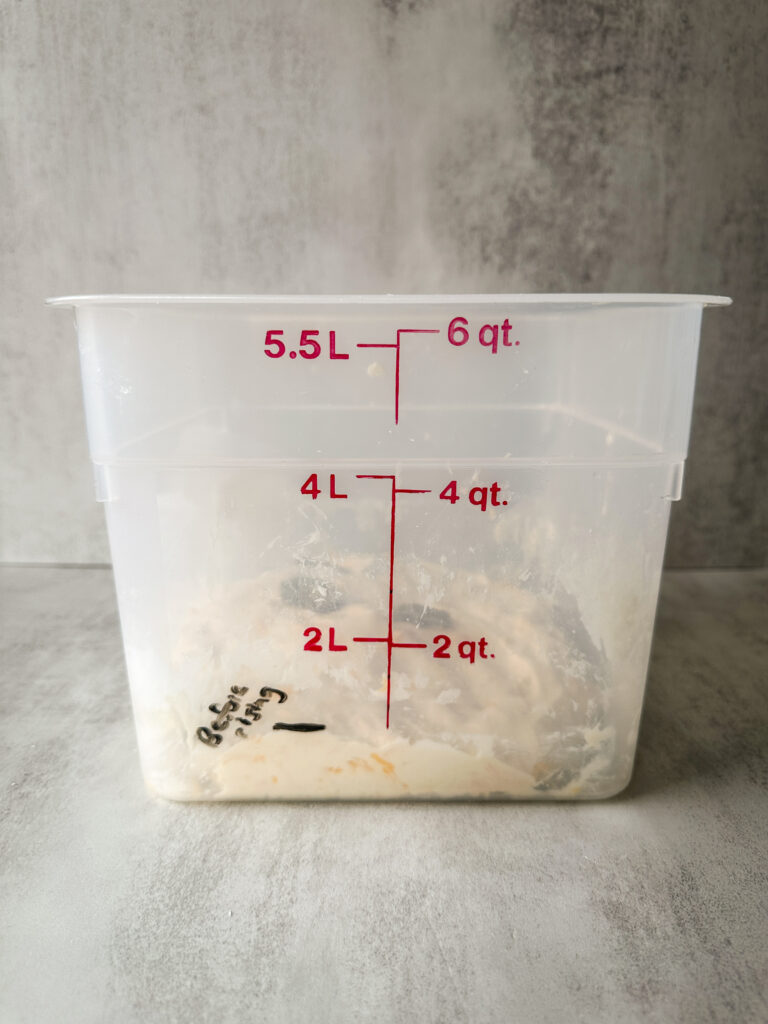
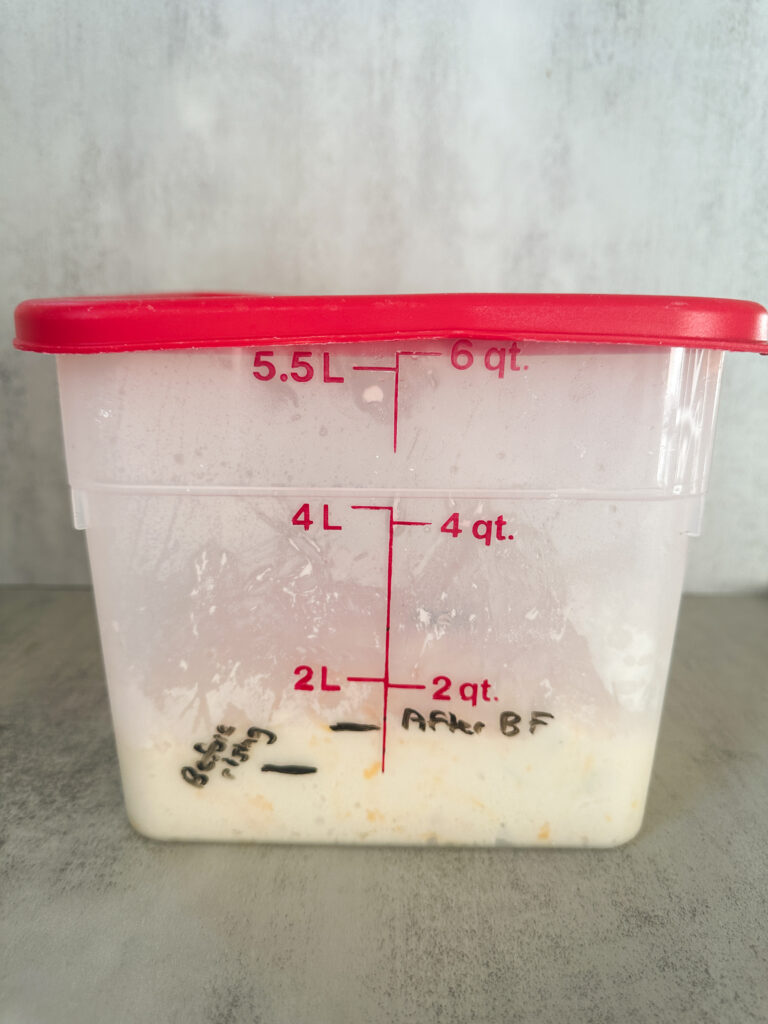
Step 5: Bulk Fermentation
Assessing Rise Tip: After your dough is incorporated, try to gently push the dough down to be level in the bowl or container after the stretch and folds. Mark roughly where your dough is hitting on the side of the container with a sharpie or dry erase marker (you can put a piece of tape over if you don’t want to mark your bowl or jar).
After you mark the volume, make another mark above the that where the dough would be if it rose roughly 50 percent. This will be your target for how much you want your dough to rise during bulk fermentation. This dough is very easy to overproof, so I strongly suggest a guide and to shape it right BEFORE it reaches a 50 percent rise.
Cover the dough and allow it to rest in a warm spot until it has reached a 40-50 percent rise.
Step 6: Prepare the Bacon and Cream Cheese
If you’re cooking your bacon, make sure to prep it while your dough rises and pat it dry of all grease. Allow it to cool, and then break it up into bits. You can also use pre-cooked bacon bits if you’d like.
Add your room temperature cream cheese to a bowl, and whip it with hand beaters so it’s light and fluffy. Set aside for later.
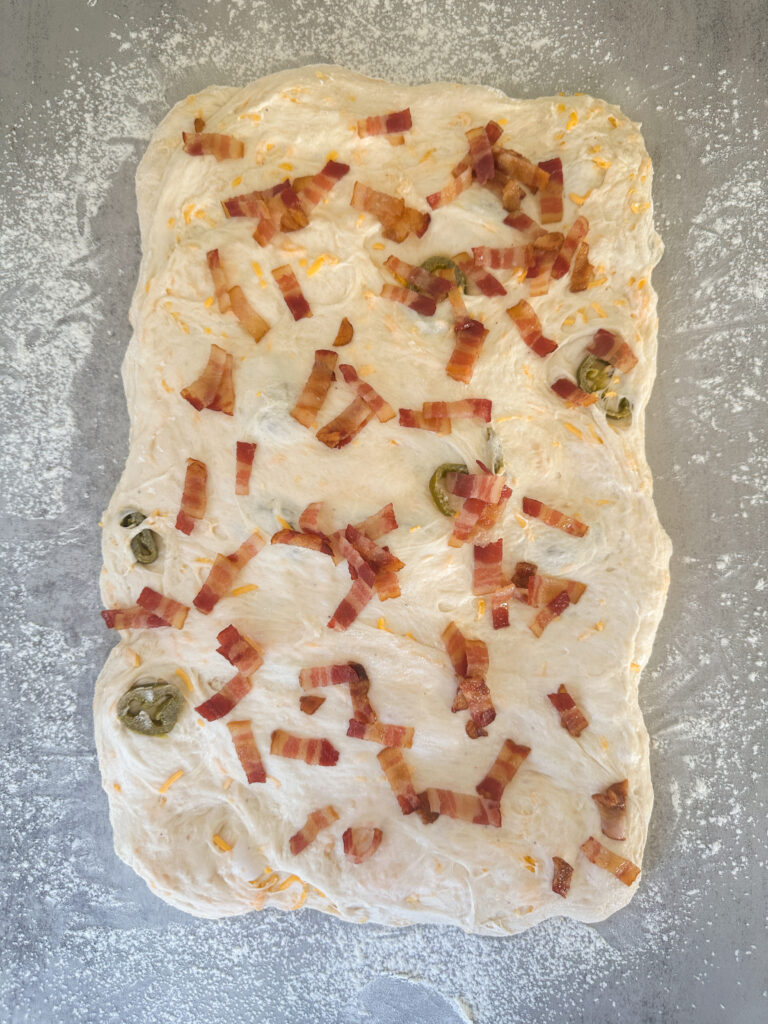
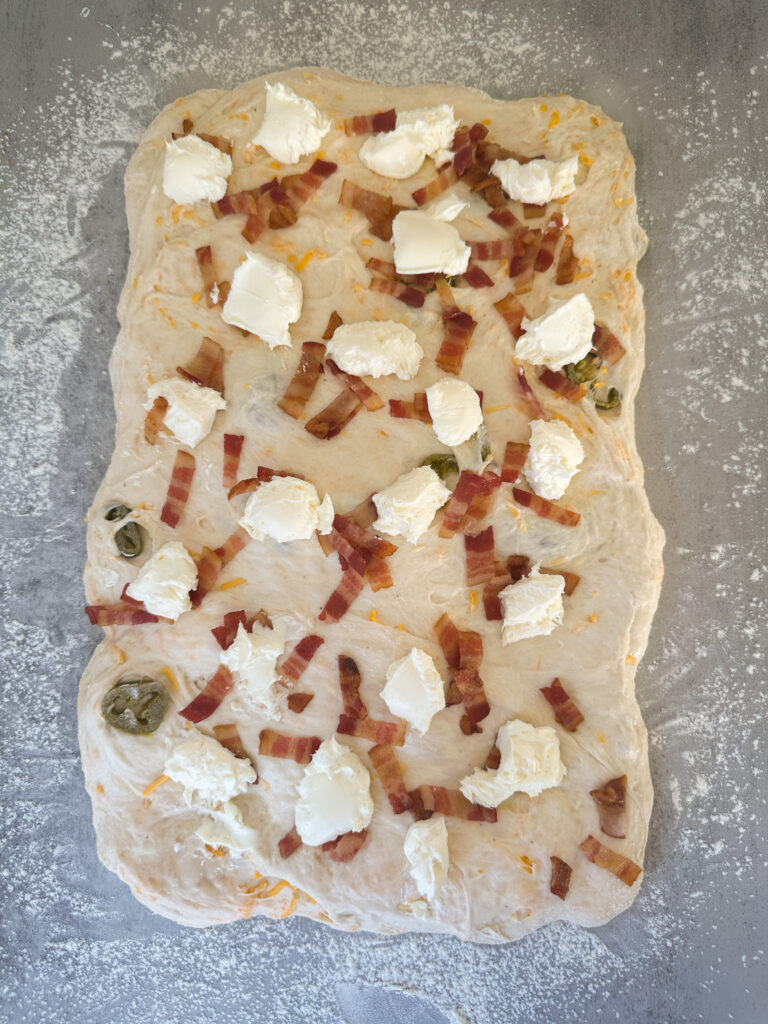
Step 7: Shaping the Dough
Flour your work surface well and turn out the dough gently. Pre-shape by gently stretching it into a loose rectangle (about 9×13 inches with the 9 inches being top and bottom).
Sprinkle the bacon pieces all over the top of the dough.
Add the creamed cream cheese in teaspoon sized balls all over the top of the bacon. Smaller amounts are best, if the cream cheese is too large you’ll get pockets.
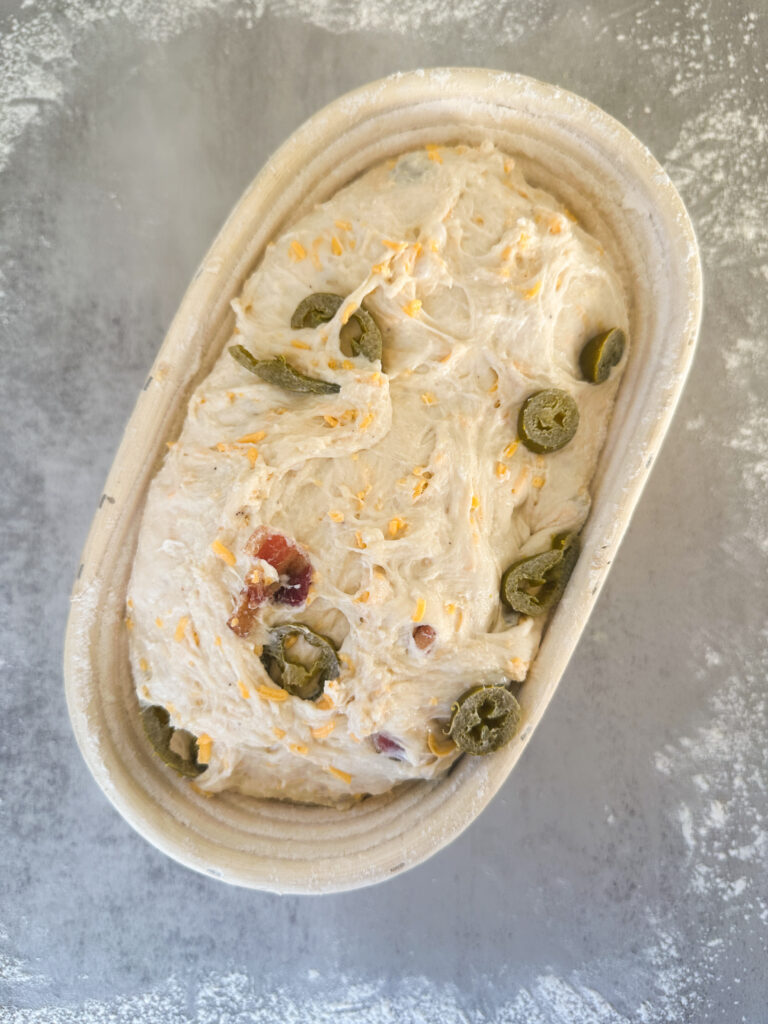
To shape your loaf, fold the right side over the center. Next, fold the left side over the center like a letter. You will now have created a long log shape. Next, roll the dough into a football shape by rolling the log up. Pinch all of the seams together at the ends. Pop any large air bubbles.
Flour your banneton and transfer your loaf seam side up into the floured banneton. Cover the banneton with a cover or plastic wrap.
Transfer the dough to the refrigerator overnight for continued cold fermentation.
Step 8: Preheat the Oven & Bake
Preheat the oven to 500°F (260°C) convection bake. Place a Dutch oven inside the oven and preheat with Dutch oven inside.
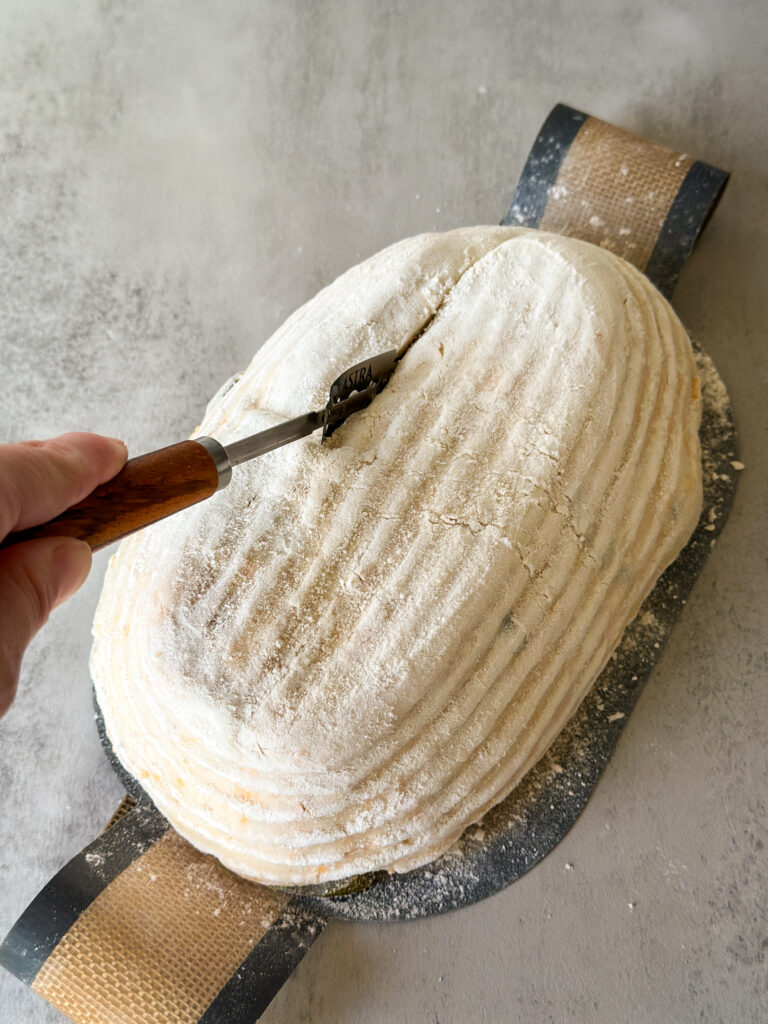
Take the dough out of the fridge. Turn it out onto parchment paper or bread sling dusted with flour. Use a lame or sharp knife to score the top (a single slash works). This cut should be about 1/2 inch deep. This score helps the loaf retain a nice shape while it rises and expands in the oven.
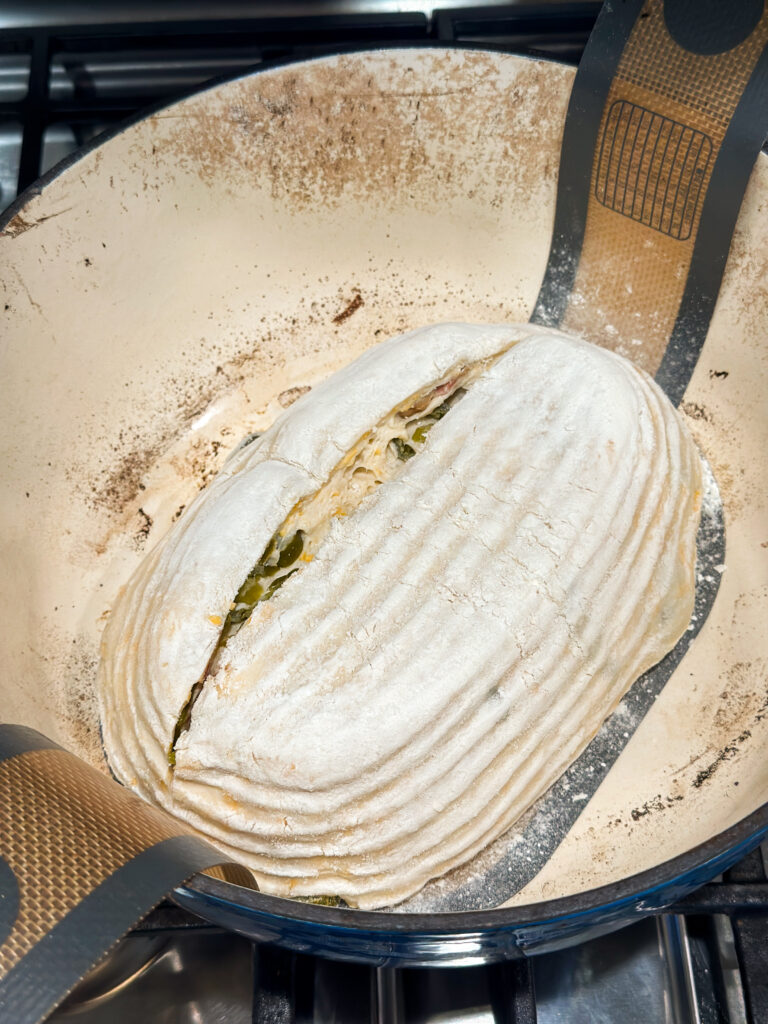
Carefully transfer the dough into the hot Dutch oven (using parchment paper or a bread sling for easy lifting).
Bake bread at 450°F (230°C) for 40 minutes with the lid on. Remove the lid and bake for another 20 minutes to develop a crispy crust. Internal temperature of loaf should read between 200-205 F.
Step 9: Cool Completely Before Slicing
Once baked, remove the bread from the Dutch oven and transfer to a wire rack carefully.
Let it cool completely (at least 1-2 hours) before slicing. Cutting too soon will result in a gummy crumb because the inside is still setting!
Yields 1 loaf
How to Store:
Room Temperature- Store wrapped at room temperature for up to 12 hours (this loaf contains bacon and cream cheese and needs to be refrigerated).
Refrigerator- Store bread tightly wrapped in plastic in the refrigerator for up to five days. Reheat slices in the oven or toaster for best texture!
Freezer- Store sliced bread in the freezer in a Ziplock bag with all air removed. For easier separation, put pieces of parchment between the slices before freezing. Allow to thaw to room temperature and toast for best flavor.
FAQ’S
I don’t recommend it. Adding more can weigh down the dough and result in a dense loaf.
No, you can cut small cubes and distribute them all over the dough. I prefer to cream it for a lighter texture and a lighter crumb!
You can, but pickled jalapeños give better flavor balance and moisture control. I’ve listed options for using fresh jalapenos in the recipe!
Either under proofing or over proofing. Follow my steps closely for temperature and rise cues for the best results.
If you loved this recipe, drop a comment and leave a star review and don’t forget to checkout more of my artisan sourdough recipes like my Sourdough Garlic Rosemary Cheesy Pull-Apart Loaf!
Sourdough Jalapeño Popper Bread
Ingredients
To Feed the Starter:
- 1 (25g) Tablespoon mature sourdough starter
- 3/4 (100g) cup all-purpose flour
- 1/2 (100g) cup water
For the Dough:
- 1/2 (100g) cup active sourdough starter
- 4 (500g) cups bread flour
- 1 1/2 (350g) cups warm water about 80 degrees
- 1 1/2 (10g) tsp salt
Mix-Ins:
- 1 (100g) cup shredded sharp cheddar cheese
- 1/2 (75g) cup pickled jalapeños drained and dried
For the Filling:
- 6 (170g) oz cream cheese, softened
- 3-4 or 1/4 slices or cups bacon cooked and diced
Instructions
Step 1: Feed Your Starter Night Before Baking
- Baker’s Schedule: 8:00 PM
- To ensure a bubbly and active starter, feed your starter the night before baking.1 (25g) Tablespoon mature sourdough starter, 3/4 (100g) cup all-purpose flour, 1/2 (100g) cup water
- Mix flour and water in a jar with a spatula, cover loosely with lid, and mark the volume of the starter in your jar with a rubber band or piece of tape and marker. Let starter sit at room temperature (70-75 degrees) overnight until bubbly and doubled in size.
Step 2: Make the Dough
- Baker’s Schedule: Day 1- 8:00 AM
- In a large bowl or as I prefer a clear straight edge container, mix the active starter and water until the starter is dissolved.1/2 (100g) cup active sourdough starter, 1 1/2 (350g) cups warm water
- Add the salt and flour to the starter mixture. Stir and knead with your hand until all ingredients are combined into a shaggy dough. Cover with a damp towel or plastic and let it rest for 30 minutes at room temperature (70-77 degrees).4 (500g) cups bread flour, 1 1/2 (10g) tsp salt
Step 3: Prepare Inclusions
- While the dough is resting, line a bowl with a paper towel. Weigh or measure out your pickled jalapenos, and transfer them to the paper-towel lined bowl. Blot all of the moisture from the peppers.1/2 (75g) cup pickled jalapeños
- Note for fresh jalapenos: If you prefer to use fresh jalapenos, prepare them at this time by slicing them thinly into rounds (removing the seeds is up to you if you leave them it'll be spicer). I recommend using food-safe gloves handling the jalapenos and the dough once they've been added if using fresh.
- Grate your sharp cheddar cheese or measure your pre-shredded cheese and set aside.1 (100g) cup shredded sharp cheddar cheese
Step 4: Strengthen the Dough (Stretch & Folds)
- Once the 30 minute rest has finished, add the prepared jalapenos and shredded cheddar to the bowl with your dough.
- Next, you’ll begin your stretch and folds. This helps build structure in your dough, strengthen gluten bonds, and incorporate your inclusions.
- Starting at the edge of the dough with lightly wet hands, gently lift one edge of the dough, stretch it up, and fold it over the center. Rotate the bowl or container 90 degrees and repeat with the next side. Do this for all four sides of the dough to form a ball.
- Cover the dough and let it rest for 30 minutes. Repeat this stretch-and-fold process two more times at 30-minute intervals for a total of 3 sets. Your dough should go from being rough and clumpy to smooth and silky with the inclusions well distributed.
- Note on Temperature: Your dough loves a warmer climate, so aim to keep your dough between 73-78 degrees (you can use your digital thermometer to check the temperature). If you need to warm it up, try putting it in the oven with a light on, near a heater, or even on top of a dryer that's on to conduct some heat!
Step 5: Bulk Fermentation
- Assessing Rise Tip: After your dough is incorporated, try to gently push the dough down to be level in the bowl or container after the stretch and folds. Mark roughly where your dough is hitting on the side of the container with a sharpie or dry erase marker (you can put a piece of tape over if you don't want to mark your bowl or jar).
- After you mark the volume, make another mark above the that where the dough would be if it rose roughly 50 percent. This will be your target for how much you want your dough to rise during bulk fermentation. This dough is very easy to overproof, so I strongly suggest a guide and to shape it right BEFORE it reaches a 50 percent rise.
- Cover the dough and allow it to rest in a warm spot until it has reached a 40-50 percent rise.
Step 6: Prepare the Bacon and Cream Cheese
- If you’re cooking your bacon, make sure to prep it while your dough rises and pat it dry of all grease. Allow it to cool, and then break it up into bits. You can also use pre-cooked bacon bits if you’d like.3-4 or 1/4 slices or cups bacon
- Add your room temperature cream cheese to a bowl, and whip it with hand beaters so it’s light and fluffy. Set aside for later.6 (170g) oz cream cheese, softened
Step 7: Shaping the Dough
- Flour your work surface well and turn out the dough gently. Pre-shape by gently stretching it into a loose rectangle (about 9×13 inches with the 9 inches being top and bottom).
- Sprinkle the bacon pieces all over the top of the dough.
- Add the creamed cream cheese in teaspoon sized balls all over the top of the bacon. Smaller amounts are best, if the cream cheese is too large you'll get pockets.
- To shape your loaf, fold the right side over the center. Next, fold the left side over the center like a letter. You will now have created a long log shape. Next, roll the dough into a football shape by rolling the log up. Pinch all of the seams together at the ends. Pop any large air bubbles.
- Flour your banneton and transfer your loaf seam side up into the floured banneton. Cover the banneton with a cover or plastic wrap.
- Transfer the dough to the refrigerator overnight for continued cold fermentation.
Step 8: Preheat the Oven & Bake
- Preheat the oven to 500°F (260°C) convection bake. Place a Dutch oven inside the oven and preheat with Dutch oven inside.
- Take the dough out of the fridge. Turn it out onto parchment paper or bread sling dusted with flour. Use a lame or sharp knife to score the top (a single slash works). This cut should be about 1/2 inch deep. This score helps the loaf retain a nice shape while it rises and expands in the oven.
- Carefully transfer the dough into the hot Dutch oven (using parchment paper or a bread sling for easy lifting).
- Bake bread at 450°F (230°C) for 40 minutes with the lid on. Remove the lid and bake for another 20 minutes to develop a crispy crust. Internal temperature of loaf should read between 200-205 F.
Step 9: Cool Completely Before Slicing
- Once baked, remove the bread from the Dutch oven and transfer to a wire rack carefully.
- Let it cool completely (at least 1-2 hours) before slicing. Cutting too soon will result in a gummy crumb because the inside is still setting!
- Yields 1 loaf

My family and I loved this bread. Didn’t last a day! It was only my second time using inclusions, but all the tips in the blog helped me ferment perfectly. I wish I had taken a picture but I completely forget. 10 stars. Will definitely make this again.
Hi Heather! I’m so happy you found this recipe easy with all of the tips I included. Thank you for your feedback, and happy baking!