
Sourdough Cardamom Buns
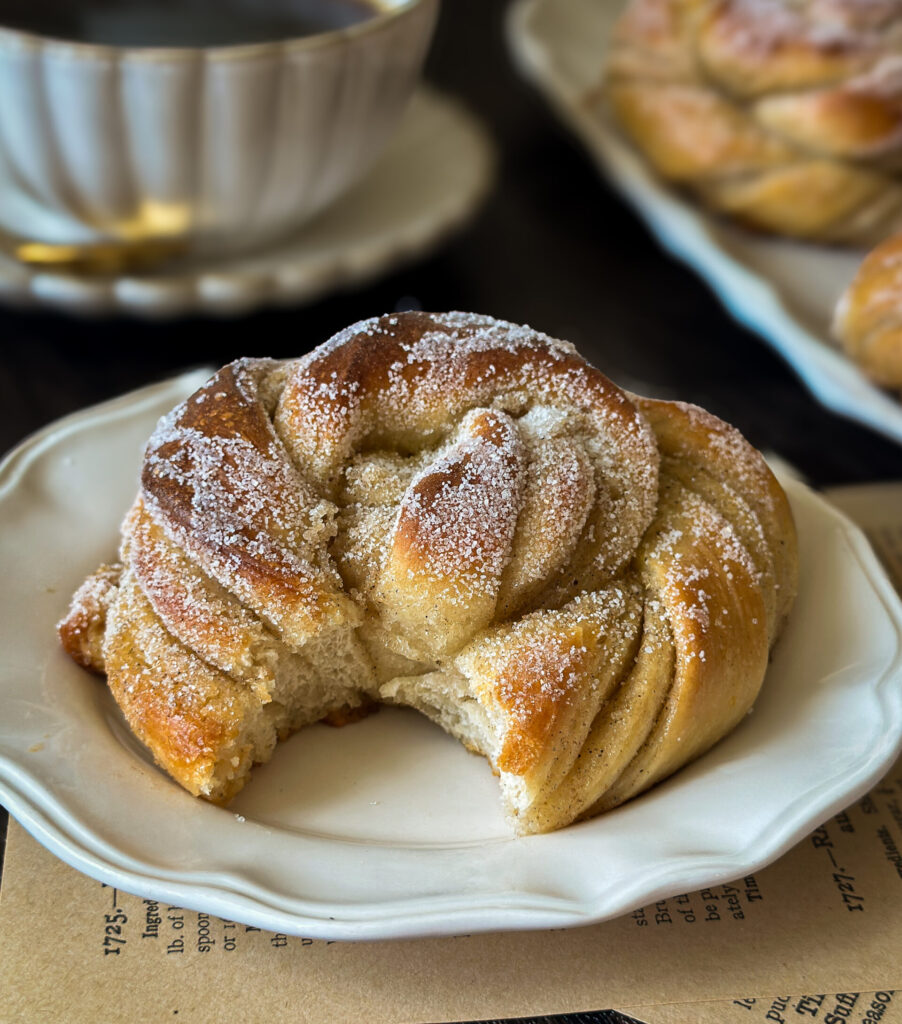
These Sourdough Cardamom Buns are soft, buttery, and layered with warm cardamom, inspired by the classic Swedish pastry. A friend of mine from Sweden shared the tradition of fika with me, a little pause in the day for coffee and something sweet. I loved the idea and how naturally it fits into sourdough baking, so I had to give these buns my own sourdough twist. I hope you enjoy these as much as we did!
Table of contents
Why You’ll Love This Recipe
- Soft + fluffy: Tangzhong gives these buns an extra soft texture that keeps them fresh longer.
- Warm cardamom layers: These buns have just the perfect amount of cardamom spice without being overpowering.
- Step-by-step directions: They look impressive, but my tips and photos for shaping them makes it simple.
- Starter or discard: Make this recipe with sourdough starter or discard and yeast depending on what works for you.
Tools You’ll Need:
- Stand mixer with dough hook (or strong hands!) – for mixing the dough. I highly recommend using a mixer as this dough needs a lot of gluten development.
- Bowl or straight edge container for proofing dough– You can use a clear square Tupperware for this, or a large bowl. I’ve linked here the container I like to use when I want to see my dough clearly and the rise.
- Mixing bowl- for cardamom sugar filling.
- Saucepan or small pot- for the tangzhong and simple syrup.
- Whisk- for stirring tangzhong and simple syrup.
- Long ruler or measuring tape (optional) – to measure dough for even buns.
- Rolling pin– to roll the dough out.
- 2 standard baking sheets- for baking the buns.
- Parchment paper- to line the baking sheets. You can also use silicone mats.
- Spatula or offset frosting knife- for spreading the cardamom filling.
- Pizza wheel or pastry wheel – to cut rolls into even strips; you can also use a sharp knife.
- Pastry brush- for the egg wash and simple syrup.
- Digital scale– recommended for accurate measurements.
- Kitchen thermometer (optional)- helpful for tangzhong and checking internal temperatures. This is my go-to kitchen thermometer.
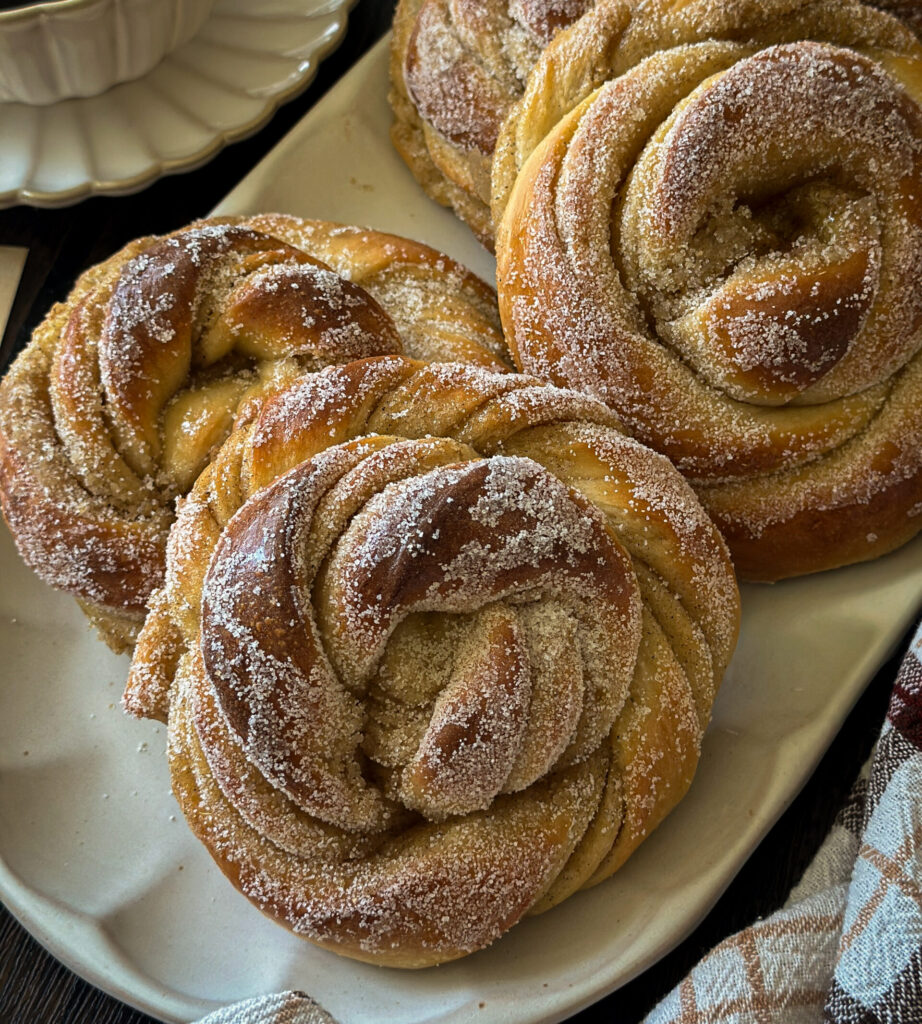
Gather Your Ingredients:
- Whole milk– milk enriches this dough making it soft and tender. You’ll also use milk to make your tangzhong.
- Egg- adds tenderness and structure to the dough working as a binder. You’ll also need egg for the egg wash to add a golden finish.
- Sourdough starter- Used as the leavening agent that causes the dough to rise. You’ll use mature sourdough starter to feed your sweet levain. If you want to add yeast and and use discard, I have this as an option on the recipe.
- Instant dry yeast (optional)- This is the leavening agent for the dough if you do the discard option, and speeds up the process! I love this Scratch Gold Yeast and always have it on hand. Please note instant dry yeast isn’t the same as active dry yeast which you have to bloom to activate. I’ll include an active dry yeast swap under FAQ’s.
- Unsalted butter- enriches dough and the cardamom filling.
- White Sugar- sweetens the dough and cuts the tang of the starter with a sweet levain. You’ll also use sugar in the filling and for the simple syrup.
- Sea salt- balances sweet and sour flavors.
- Vanilla extract- for aromatic warmth and depth of flavor to the buns.
- All-purpose flour- I recommend AP flour over bread flour to create a more tender crumb. The egg and tangzhong will provide the structure in this recipe making bread flour unnecessary, but you can substitute for bread flour if needed.
- Ground Cardamom- I used dried ground cardamom for this recipe and it’s the star of the show; some like to grind their own cardamom and use that, but be aware the flavor can be a lot stronger.
Instructions
Step 1: Make the Sweet Levain (Night Before)
To start your dough, you’ll want to mix a sweet levain the night before. If this sounds intimidating, it’s not! It’s literally just adding sugar to your starter. This curbs the tang of the sourdough in your bun.
In a clean jar, mix your mother starter with the flour, water, and sugar. Give it a good stir, and allow it to rest at room temperature (optimally 73-75 degrees F). I like to mark the volume in my jar with a rubber band so it’s easy to asses the rise the next morning. When the sweet levain has doubled in size, it’s time to mix your donut dough.
Sourdough Discard Option: If you make this recipe with discard and yeast, skip this step.
Step 2: Make the Tangzhong
Before you get started on mixing your dough, you’ll make your tangzhong. Whisk milk and flour together in a small saucepan.
Cook the tangzhong over medium/low heat, stirring constantly, until it thickens into a paste that is similar to pudding (about 2–3 minutes). For precision, use your digital thermometer and heat to 148-155 F. Do not overheat, or your mixture will be too thick.
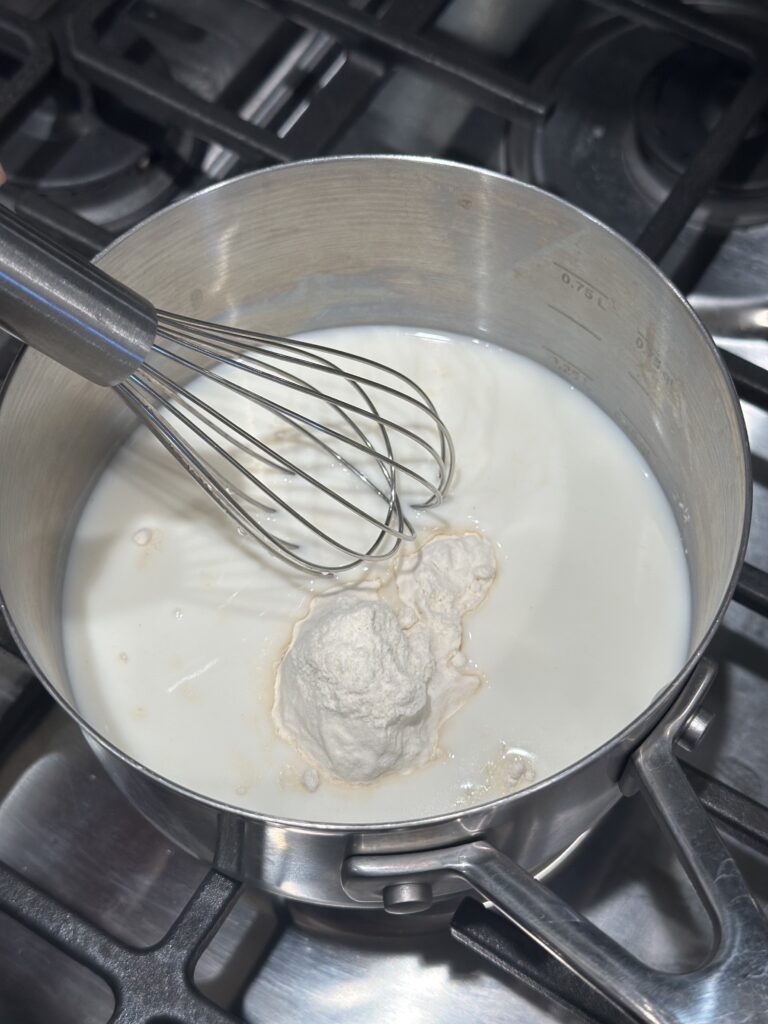
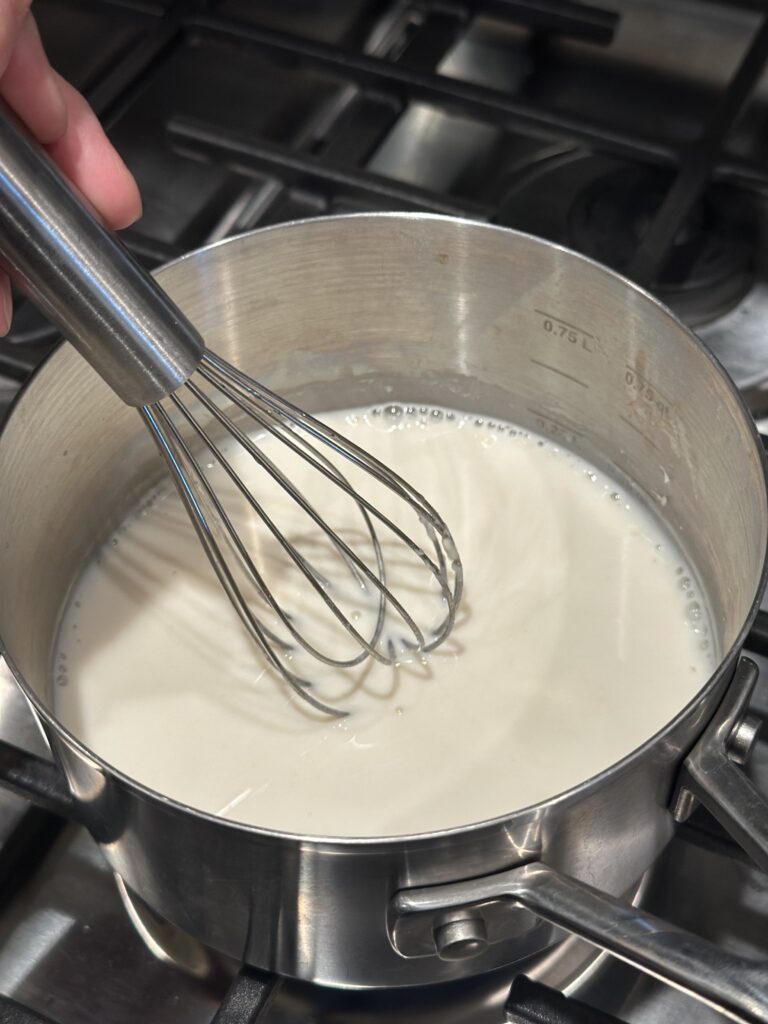
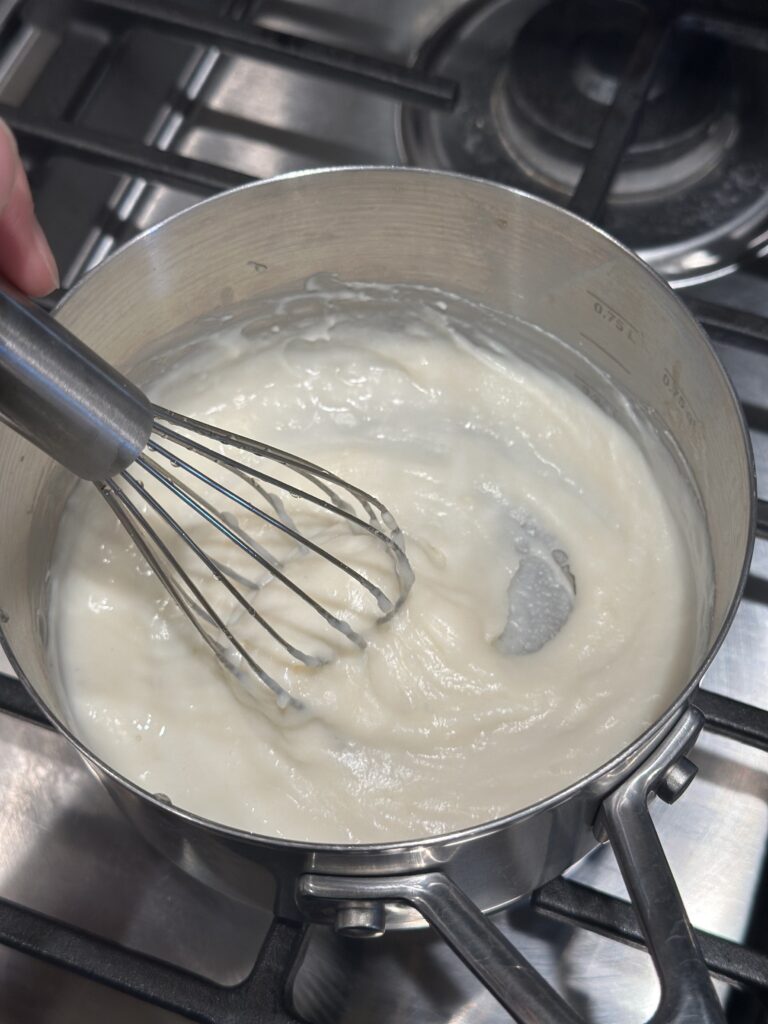
Scrape into a bowl immediately to prevent further cooking, cover, and let cool to room temperature before adding to your dough.
Prepare your dough while tangzhong cools.
Step 3: Mix the Dough
In a stand mixer fitted with a dough hook or large mixing bowl, add the whole milk, sweet levain, egg, sugar, ground cardamom, vanilla, and all of the tangzhong. Whisk ingredients together quickly, it’s okay if it’s lumpy.
Sourdough Discard Option: If you’re making this recipe with discard and yeast, add the discard and instant yeast instead of the sweet levain to the wet ingredients and whisk in.
Add your flour and salt into your wet ingredients.
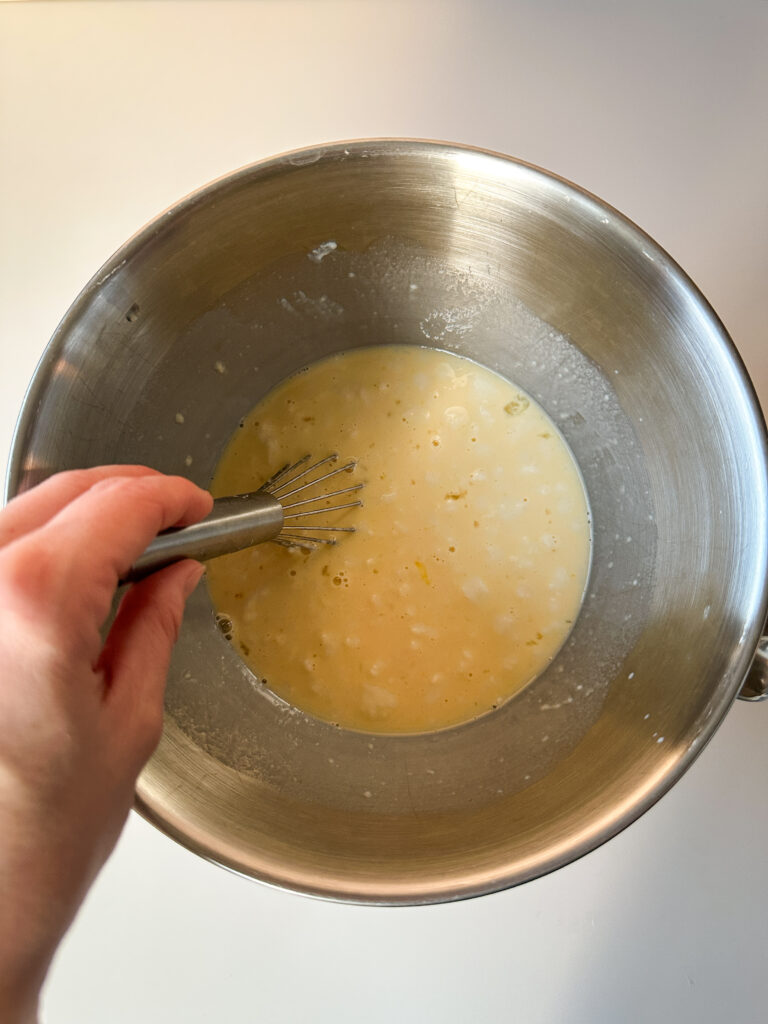
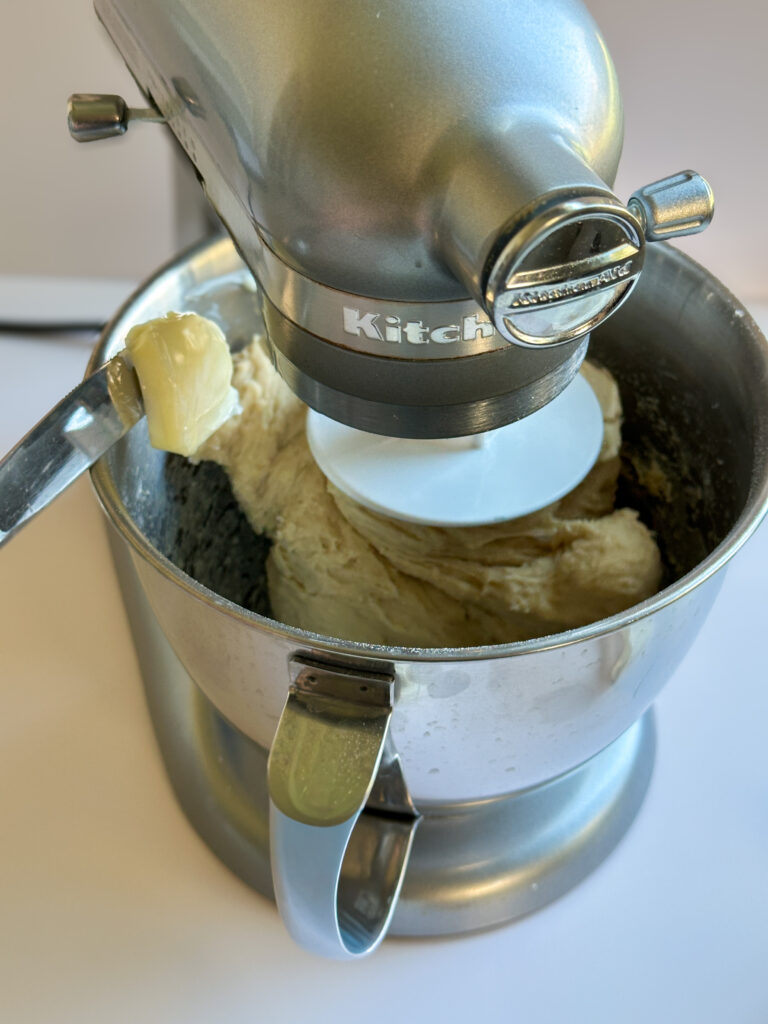
Mix on low until a shaggy dough forms, about 2-3 minutes. Scrape down bowl if needed. If using your hands, knead until you work dough together. This is a higher hydration dough, so be aware it will be sticky.
Once the dough has come together add the softened butter, a tablespoon at a time mixing each tablespoon in until adding the next. Use a dough scraper to scrape the edges of the bowl to make sure everything is getting mixed in.
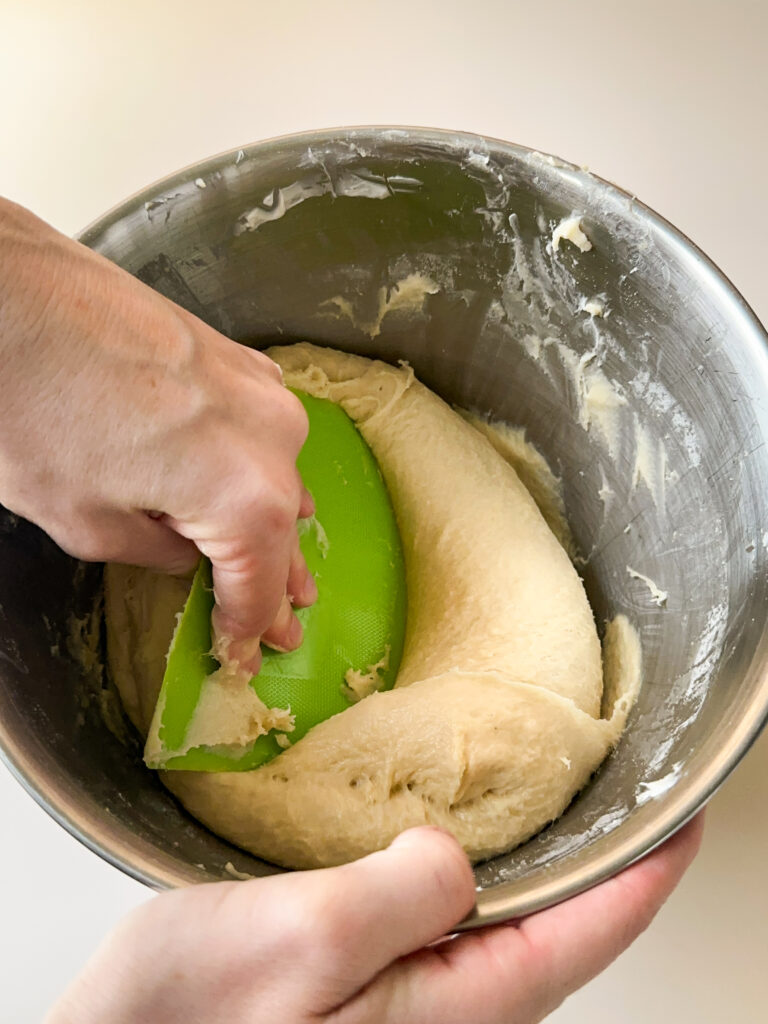
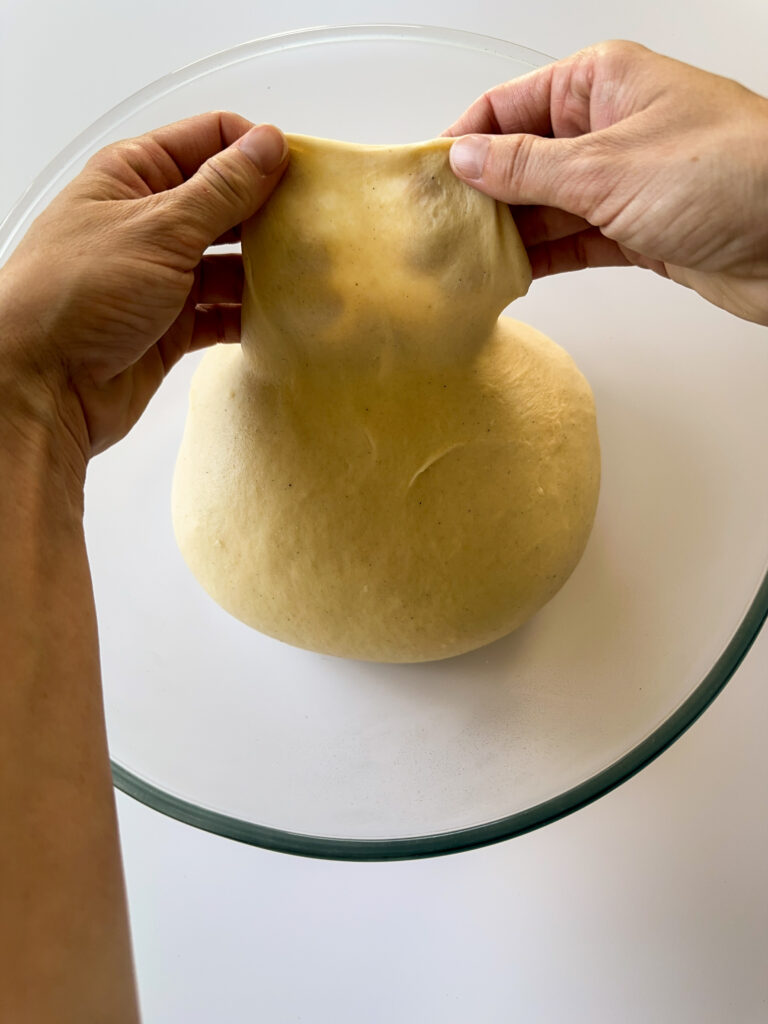
Continue mixing on medium-low (speed 2–3) for 8–10 minutes, until dough is smooth, elastic, and tacky but not sticky. If mixing by hand knead dough until butter has fully incorporated and dough is smooth and tacky.
It’s really important to work the gluten at this stage, so don’t cut the kneading time. This will create a strong dough that makes it possible to laminate with the cardamom filling.
Mixing Notes: If kneading in a mixer or if dough is very wet when mixing by hand, add an additional 25 grams (3 Tablespoons) of flour and mix into dough. Make sure to work flour in completely and assess if you need more flour.
Do not add more than 50 grams of flour at this stage, or you will lose the high hydration of the dough and end up with a dense dough. If using a stand mixer, dough can become more warm and sticky and I have found kneading dough with my hand (perform a set of stretch and folds) for a minute after mixing in my stand mixer really helps bring the dough together.
Step 4: Bulk Fermentation
Spray a clean bowl with oil. Shape the dough into a smooth ball and place it in the bowl. Cover with plastic wrap.
Stand mixer directions: perform one set of stretch and folds after 30 minutes to strengthen your dough.
Hand mixing directions: perform 3 sets of stretch and folds at 30 minute intervals at the beginning of bulk fermentation. After stretch and folds are completed, cover dough and allow to continue proofing.
How to do a stretch and fold: Starting at the edge of the dough with wet hands, gently lift one edge of the dough, stretch it up, and fold it over the center. Rotate the bowl/container 90 degrees and repeat with the next side. Do this for all four sides of the dough to form a ball.
Sourdough Discard Option: After the 20 minute rest, knead the dough by hand for a minute or two to get the dough even softer and to work the gluten. Once you’ve finished this kneading step, cover the bowl again.
Let the dough rise at 75–80°F until doubled in size, this takes about 5–6 hours. If your house is very cold, you can put dough in the oven with the light on for a warmer atmosphere. This proofing time is a general guide, this process may take longer the key is to assess when the dough has nearly doubled that’s when it’s ready.
Sourdough Discard Option: Allow the dough to rest about 1 1/2 hours at room temperature and the dough is ~75–90% risen. You don’t want this dough to proof double fully at this rising point. If the dough proofs sooner than the time I mentioned, shape it. You want to watch the dough to make sure it doesn’t overproof at this stage!
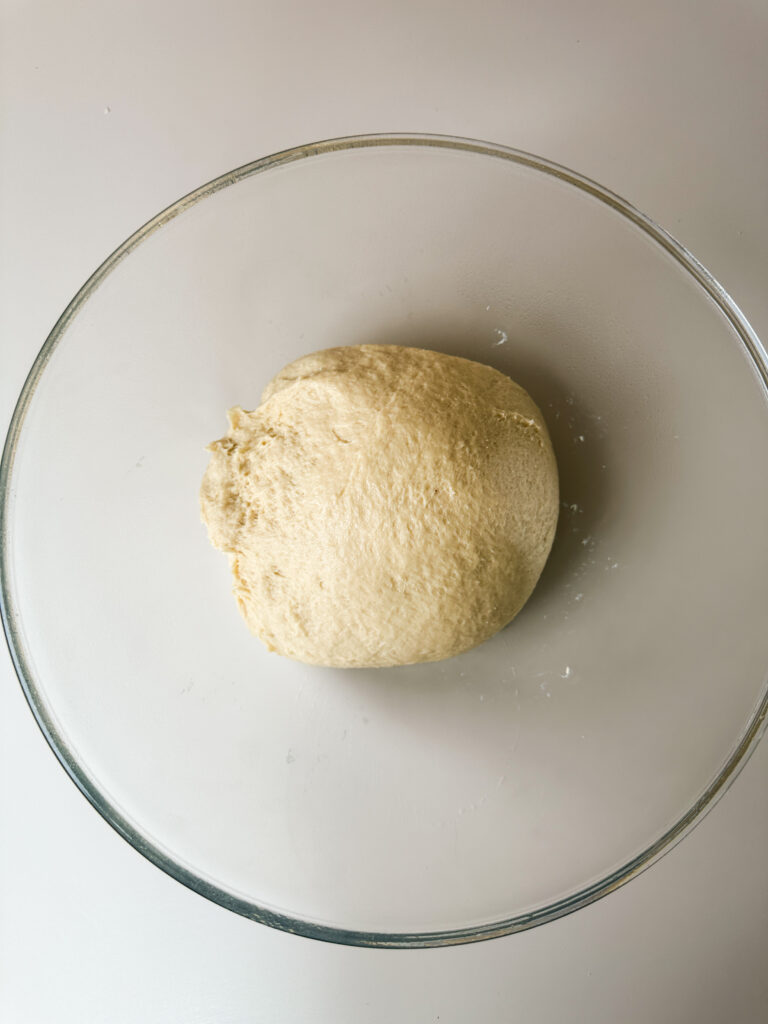
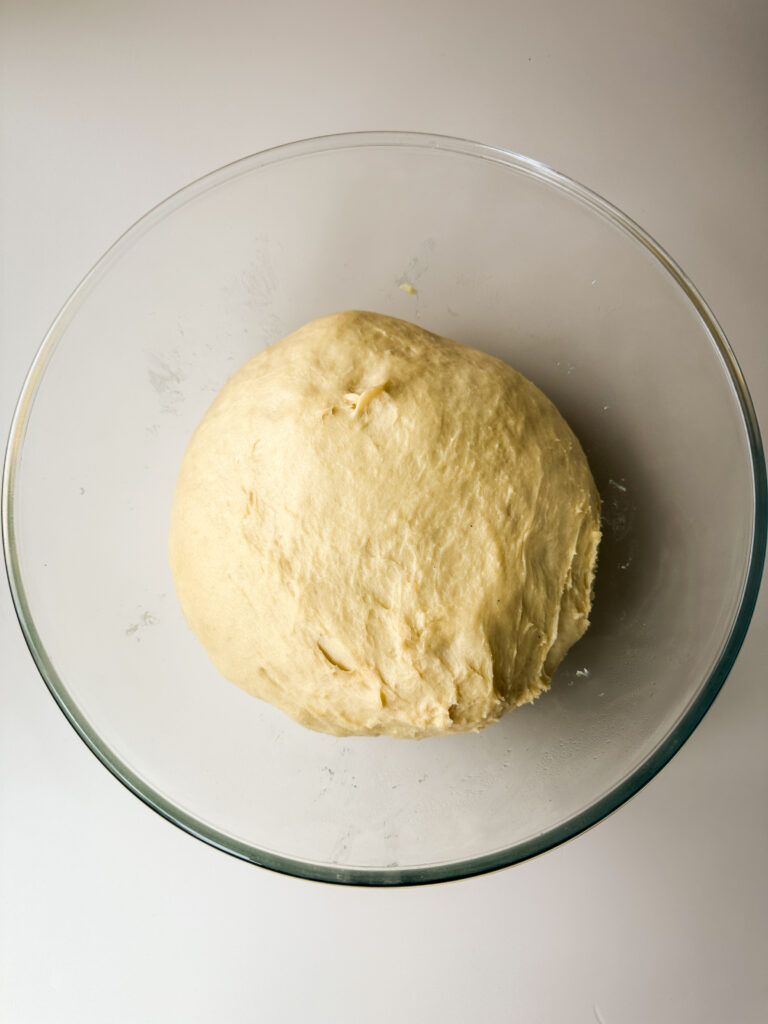
Overnight Fermentation: Once dough has finished rising, you can cover and transfer to the refrigerator overnight for a longer ferment or you can skip this step and go straight to making your buns.
Step 5: Mix the Cardamom Filling
Your butter needs to be very soft for the filling, but NOT MELTED.
Add your butter to a small mixing bowl, and add the white sugar, ground cardamom, vanilla, and salt.
Mix the filling with a spoon or even better hand beaters, until the filling is smooth and well combined. Set this aside for later.
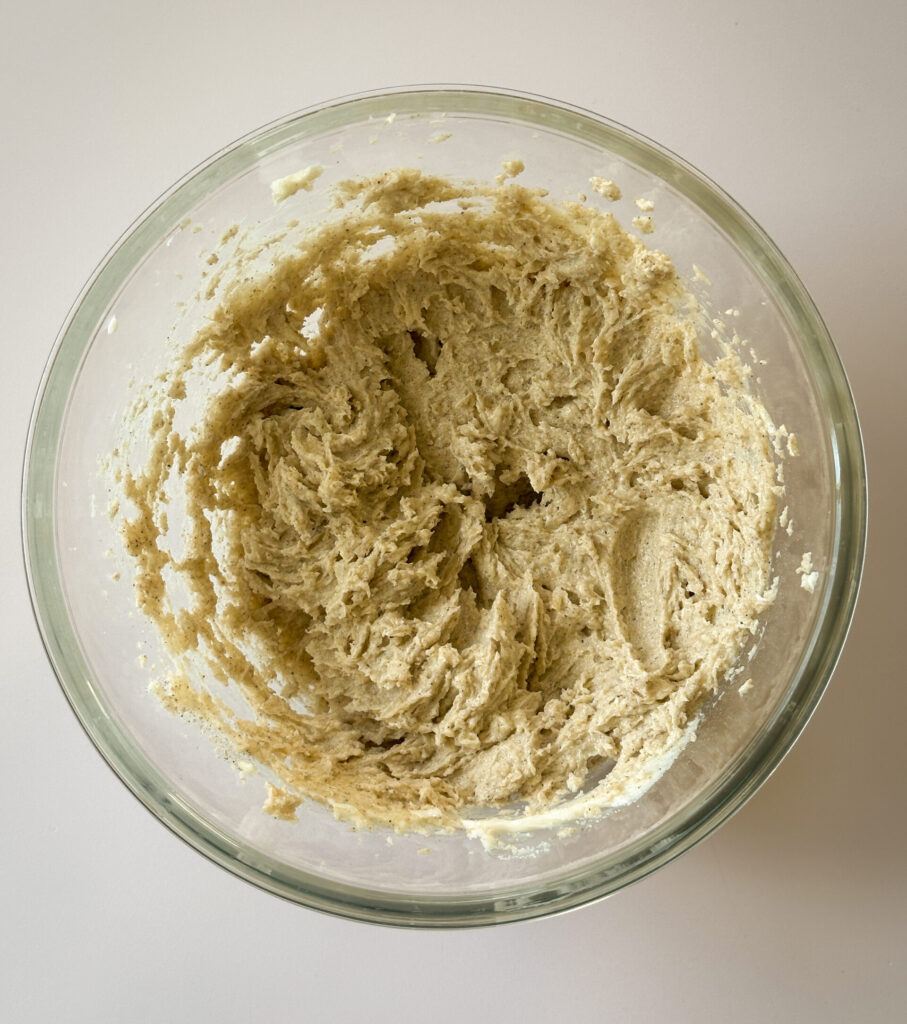
In a separate small bowl, combine the sugar and cardamom for the cardamom sugar topping. Set aside.
Step 6: Shape the Cardamom Buns
Flour a clean work surface well, and turn out the dough onto your work surface (make sure you have plenty of space).
Roll the dough out into an approximately 18 × 24-inch rectangle, with the 24-inch side running horizontally.
If you’re struggling to roll out the dough, roll it out to about a 9×12 rectangle. Cover the dough with a lint-free cloth or plastic, and allow the dough to rest for 15-20 minutes. This will allow the dough to relax and then you should be able to continue rolling out the dough to your desired size.
Once the dough is rolled out to a 18 × 24-inch rectangle, use an offset spatula to spread the cardamom filling evenly over the entire surface, going nearly to the edges.
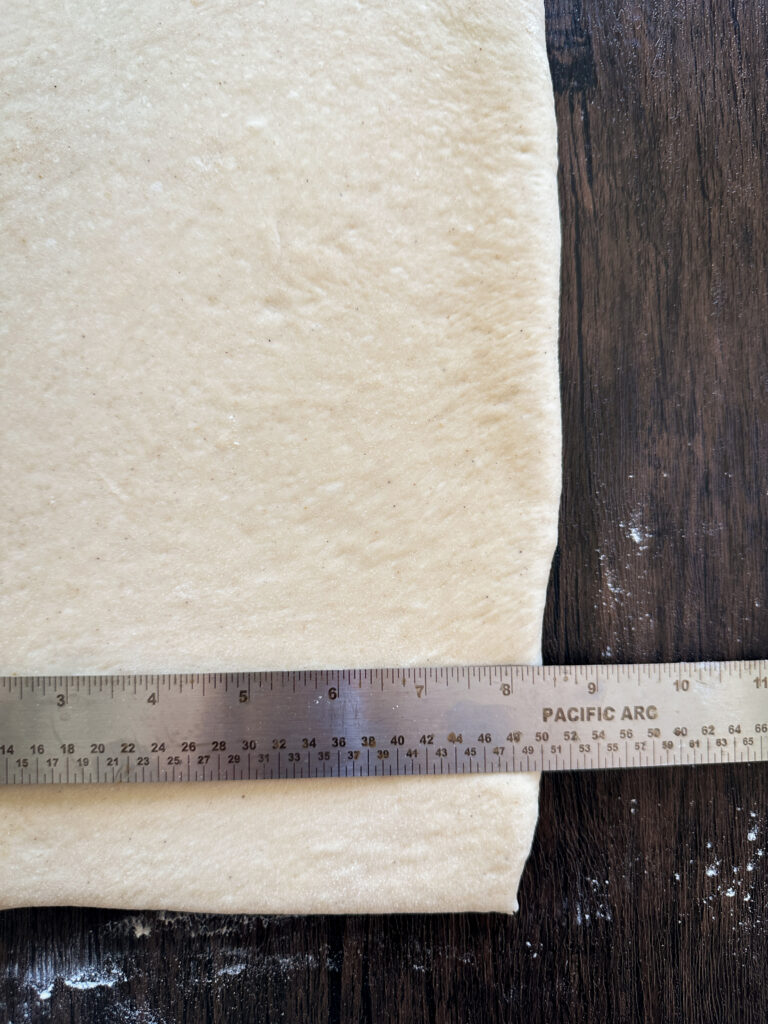
Perform a letter fold: With the 24 inch side running horizontally, fold the left third of the dough toward the center. Fold the right third over the first fold, just like folding a letter. You should now have an approximately 8 × 18 inch layered rectangle.
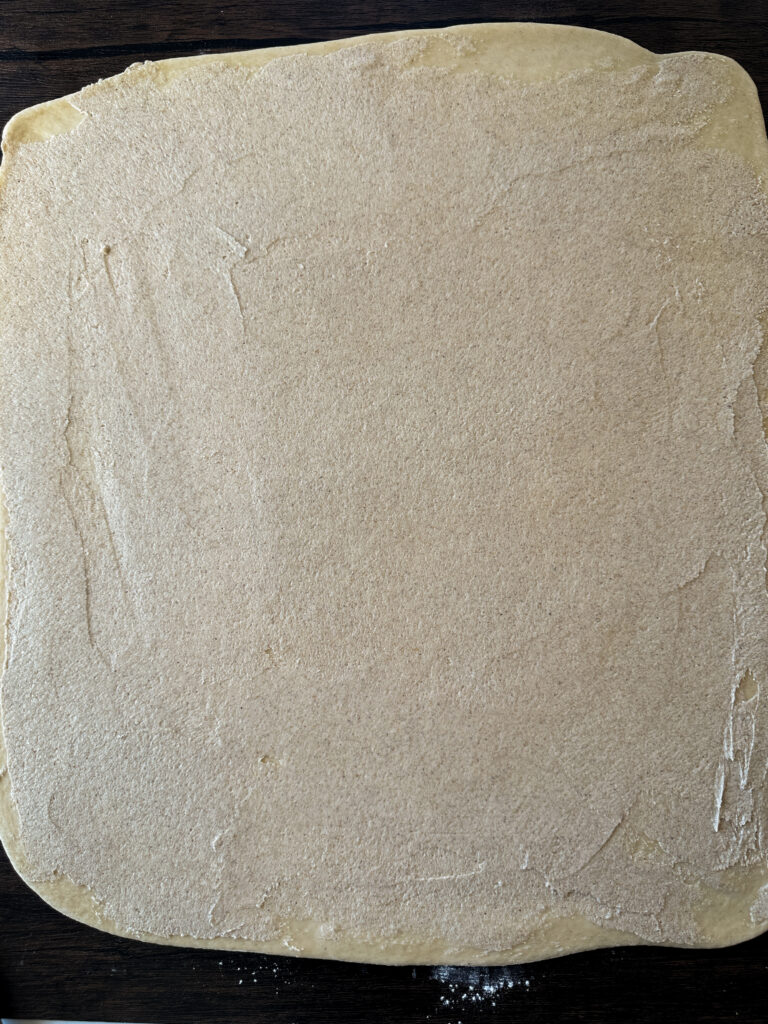
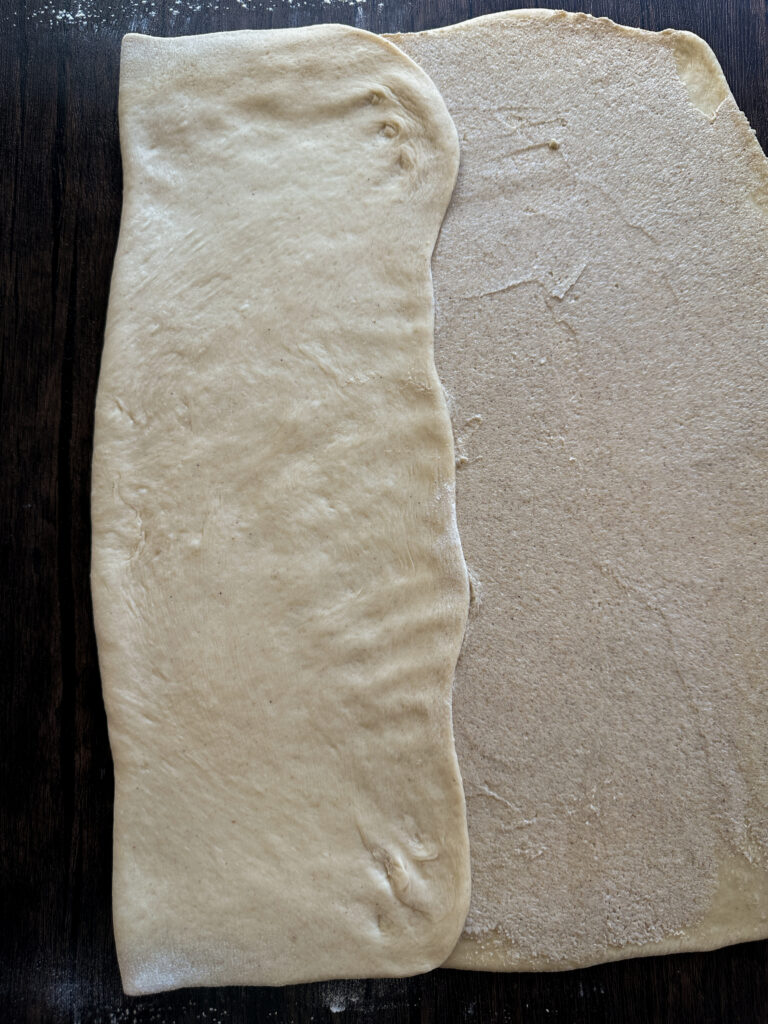
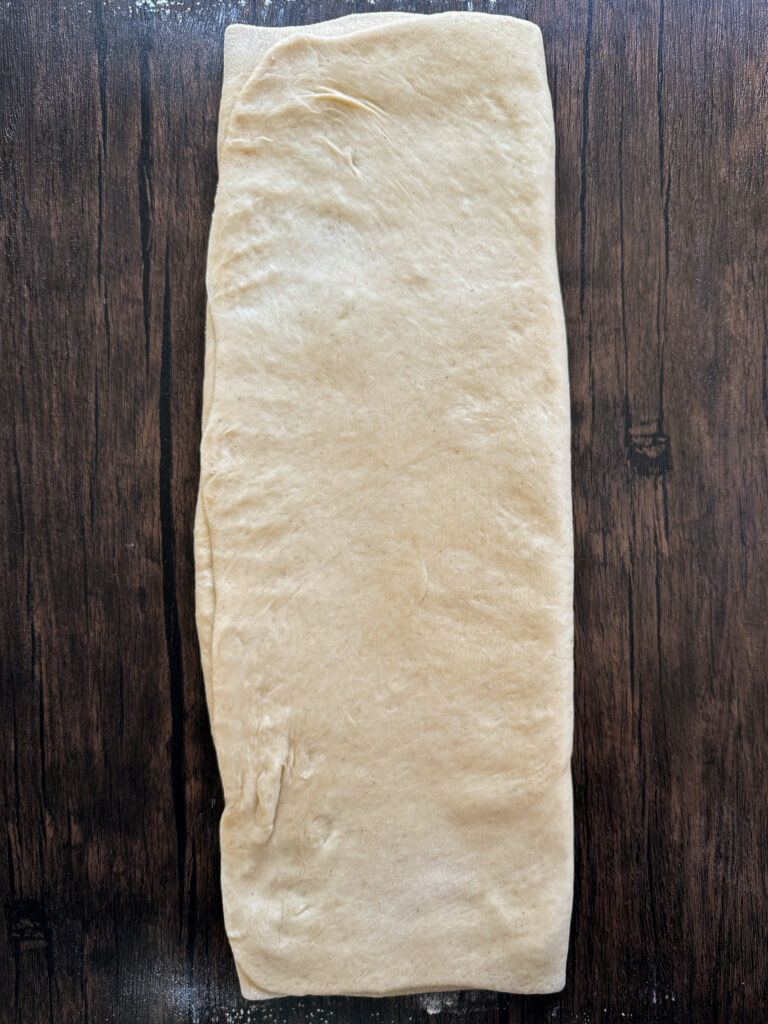
Using a rolling pin, gently press and roll over the folded dough just enough to help the layers adhere and roll it to the 8×18 inch rectangle if the dough is smaller than this. Don’t roll it thin again, you want to keep those distinct buttery layers.
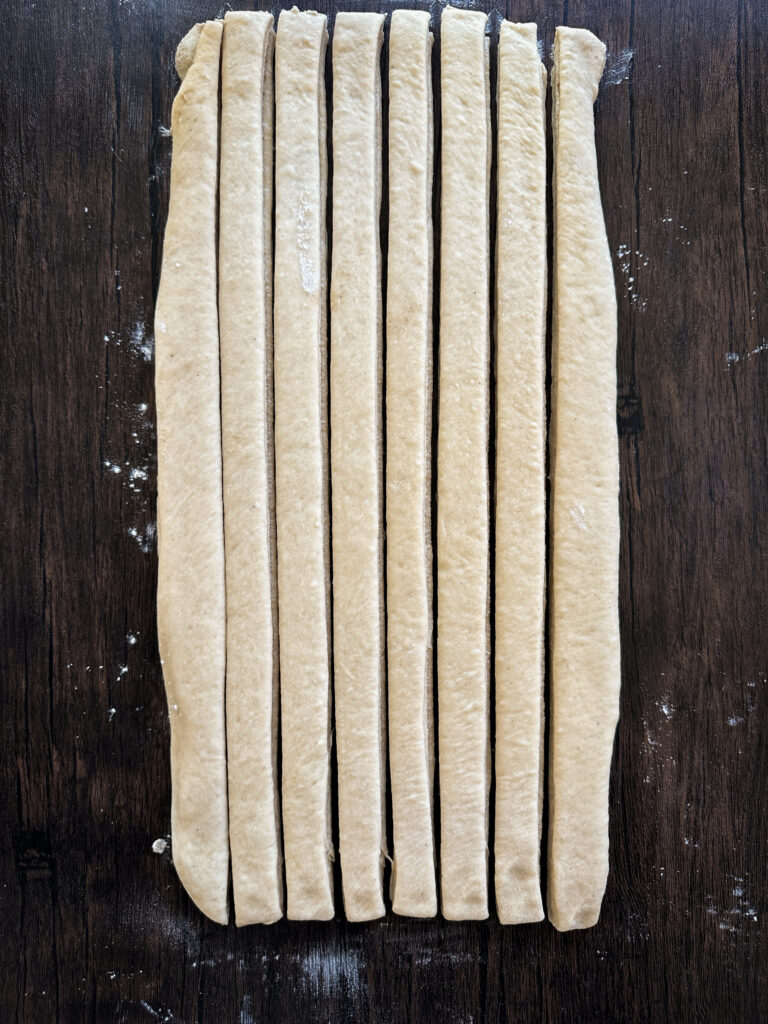
Using a pastry wheel or sharp knife, cut across the width to divide the dough into 8 long strips, each approximately 1 inch wide × 18 inches long.
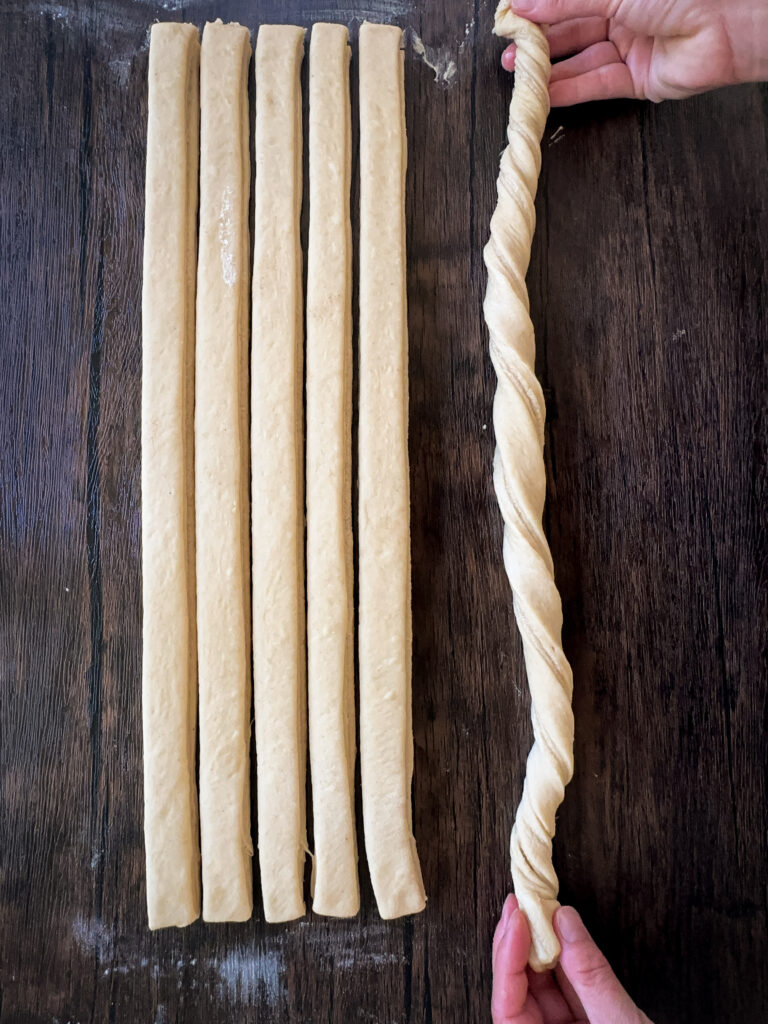
Working with one strip at a time, twist the entire strip into a rope so the laminated layers spiral from end to end.
Starting at one end of the dough rope, curl and coil the twisted rope into a rosette, tucking the tail under the bun.
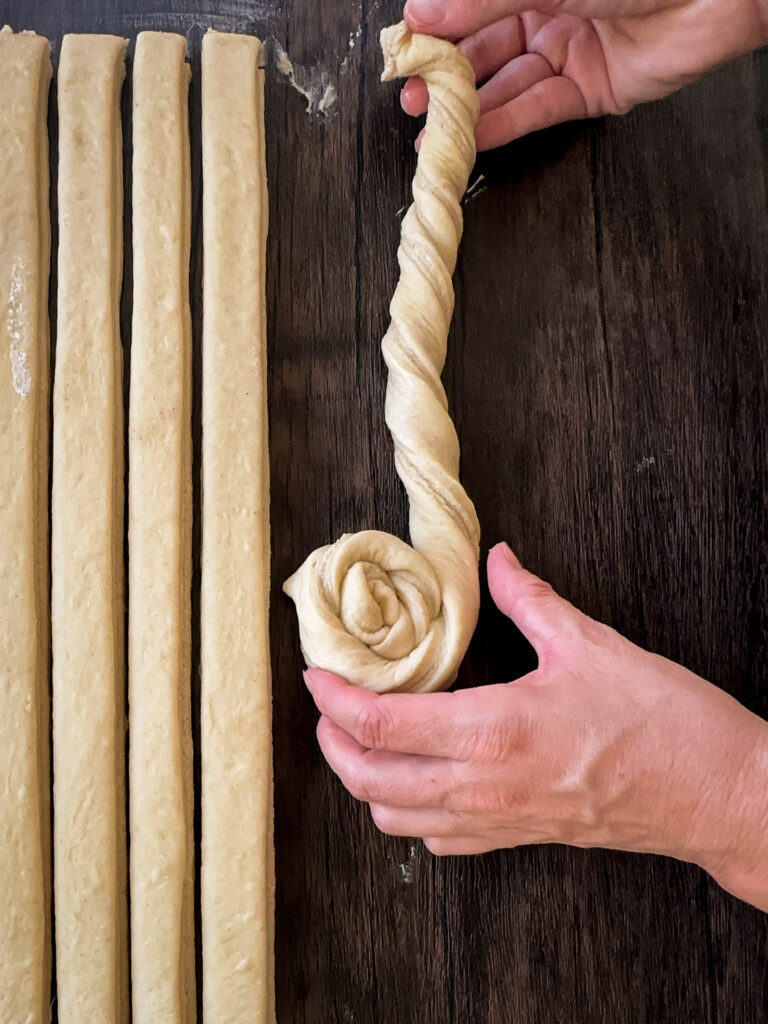
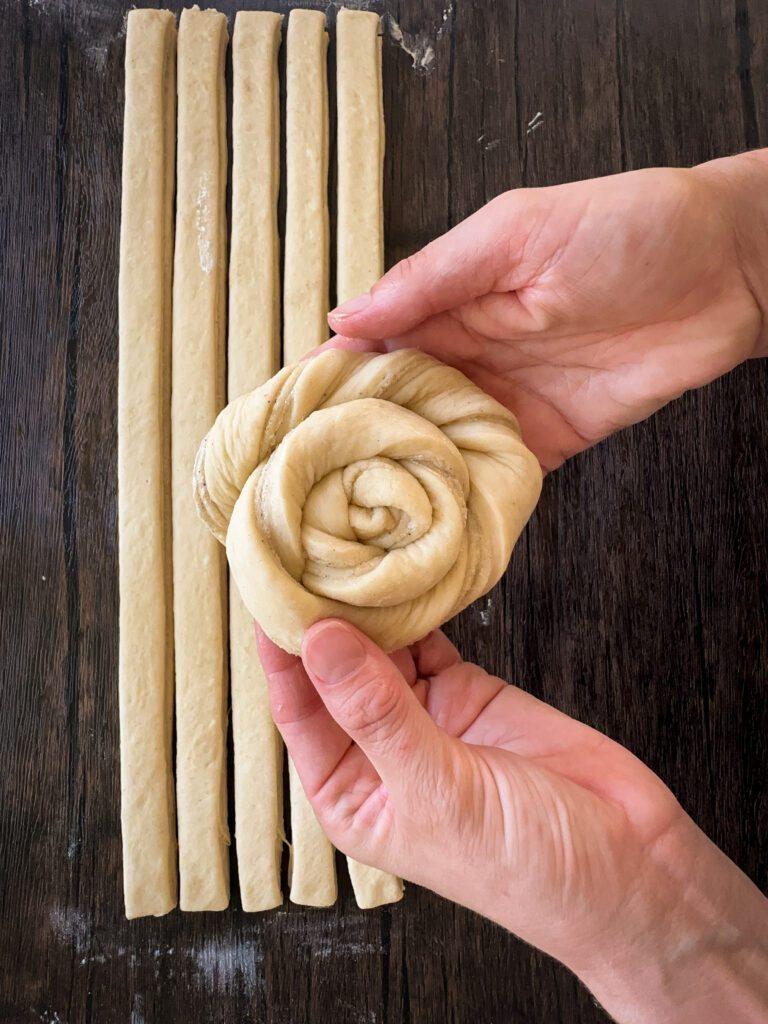
Place the bun on a parchment lined baking sheet with the tucked end underneath. Repeat with the remaining strips. To give the buns plenty of space to proof, I recommend only placing 6 buns on one baking sheet.
Step 7: Final Proof
Cover buns loosely with plastic sprayed with cooking oil and let rise at room temperature for 1 1/2 hours, or until puffy and jiggly.
When poked gently with a fingertip, the dough should spring back slowly, not immediately. Because this dough has the tangzhong to provide stability to the dough, you can push your final proof a little longer to get a really fluffy bun.
Sourdough Discard Option: The second rise will be faster if you used discard and yeast, allow the buns to proof about 45 minutes to an hour and then bake them.
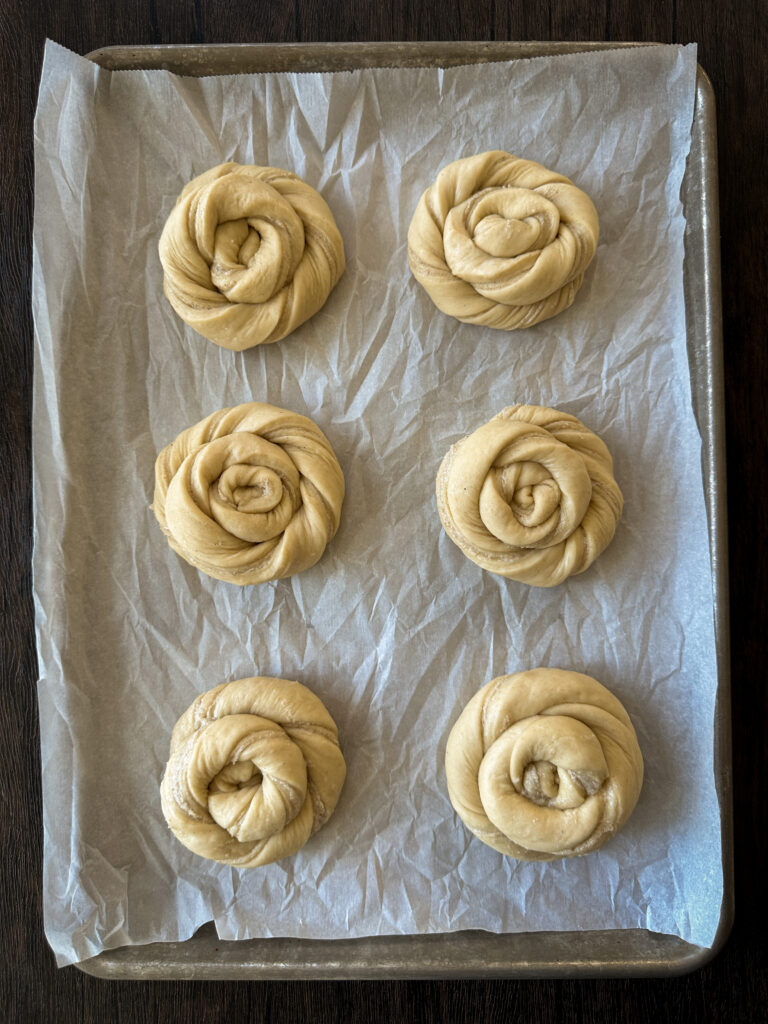
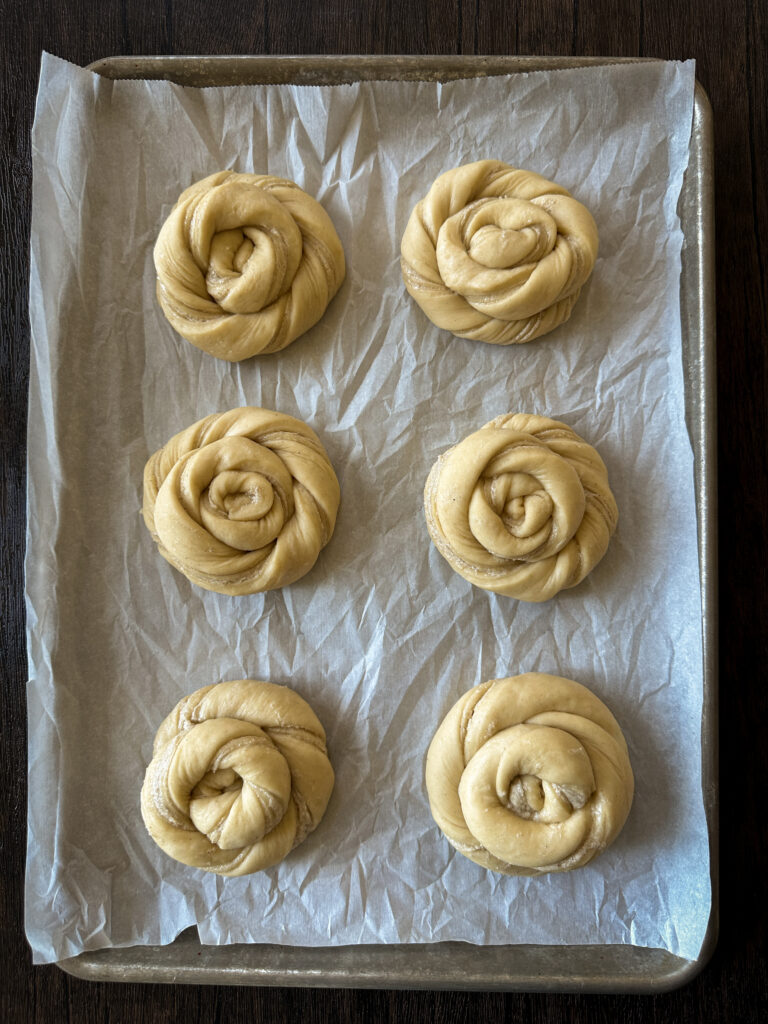
Step 8: Bake and Finish the Buns
Preheat the oven to 400°F.
Whisk together the egg and water for the egg wash. Lightly brush the proofed buns with the egg wash, making sure to get the exposed twists and layers. If you don’t have a pastry brush, you can also use a folded paper towel.
Transfer the buns to the oven, and bake for approximately 18-20 minutes or until the buns are deeply golden brown and the centers reach approximately 190°F.
While the buns bake, make a simple syrup that will help the sugar coating stick to the buns.
In a small pot, add the water and white sugar. Cook the mixture over medium heat, whisking constantly. Once the syrup simmers and bubbles for a few minutes, remove it from the heat and stir in the vanilla. Allow it to cool before using.
As soon as the buns come out of the oven, generously brush the hot buns with the vanilla simple syrup. Allow the buns to cool and for the surface to get glossy and tacky.
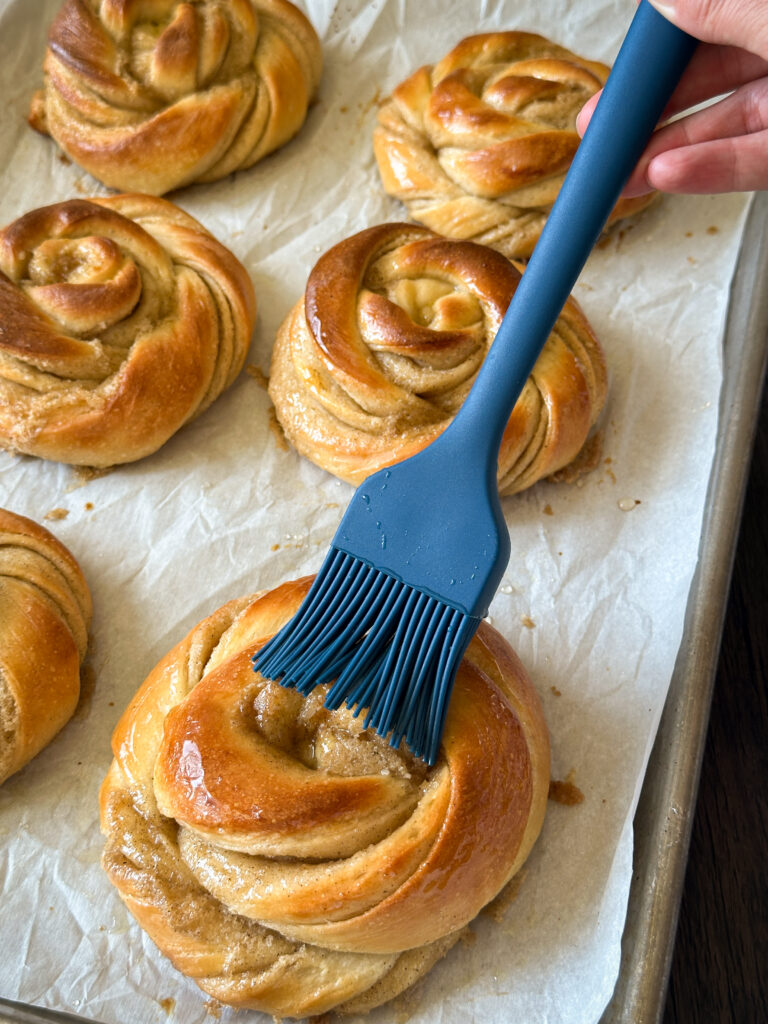
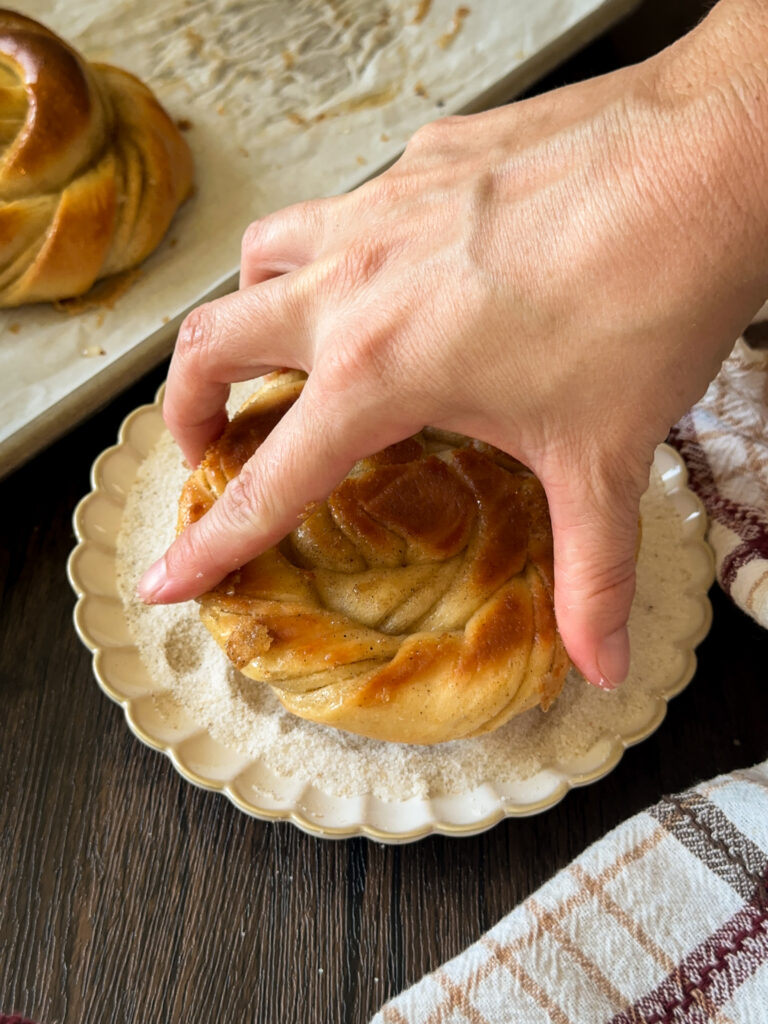
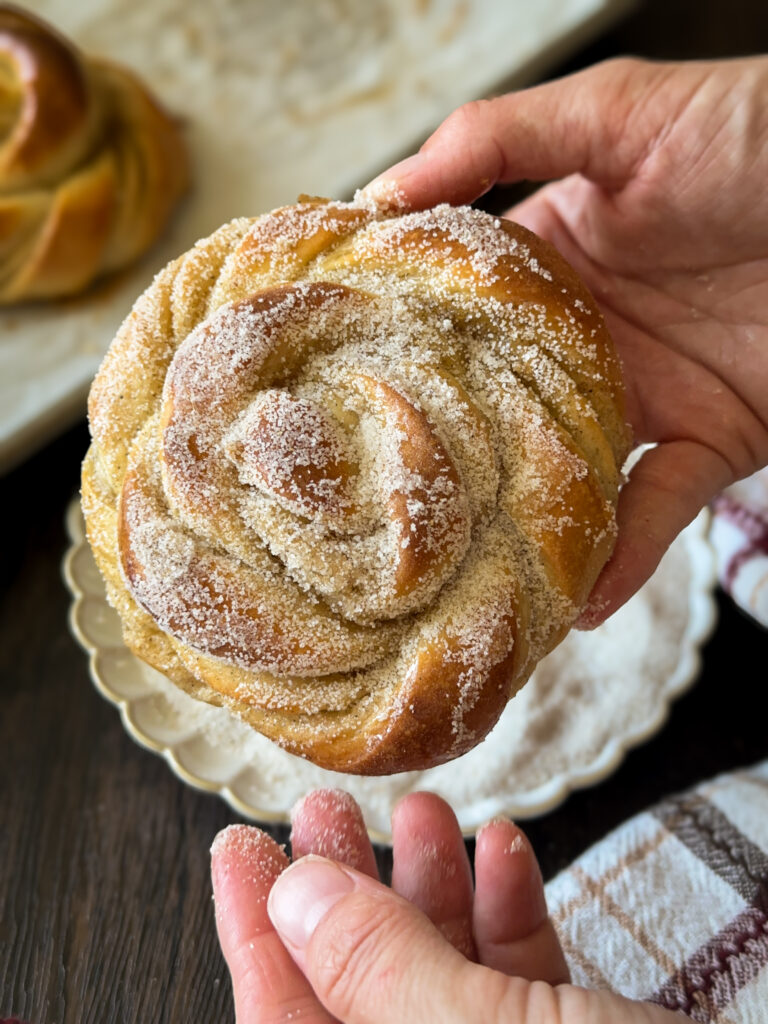
Using the cardamom sugar mixture you made earlier, roll the tops of the buns in the sugar mixture coating the sides and top. This gives the buns a gorgeous finish and light spiced flavor.
Allow the buns to cool slightly and serve!
Yields 8 large Danish buns
How to Store:
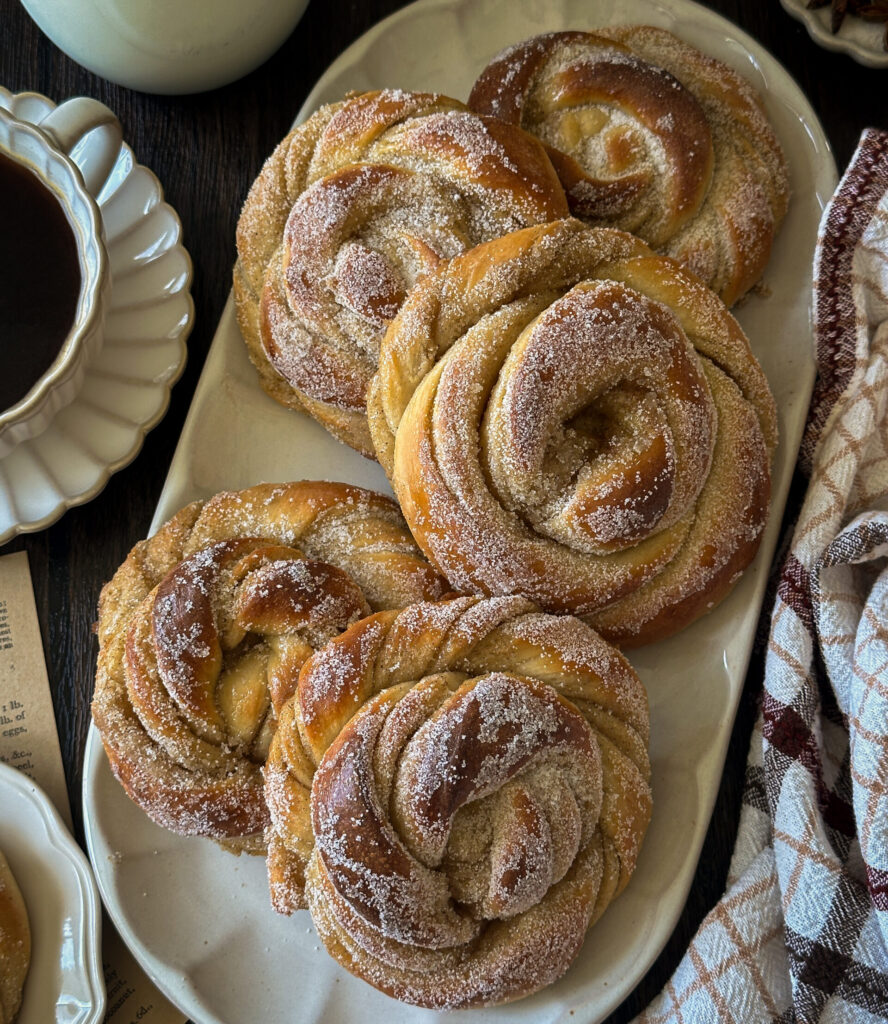
Room Temperature: These cardamom buns are best the day they’re baked while the edges are slightly crisp and the centers are soft and buttery. Store leftovers in an airtight container at room temperature for up to 2 days.
To bring back that fresh baked texture, warm a bun for 15 seconds in the microwave or briefly in a low oven before serving.
FAQ’S
Tangzhong allows the flour to hold onto more moisture, giving the finished buns an especially soft, fluffy texture and helping them stay tender longer.
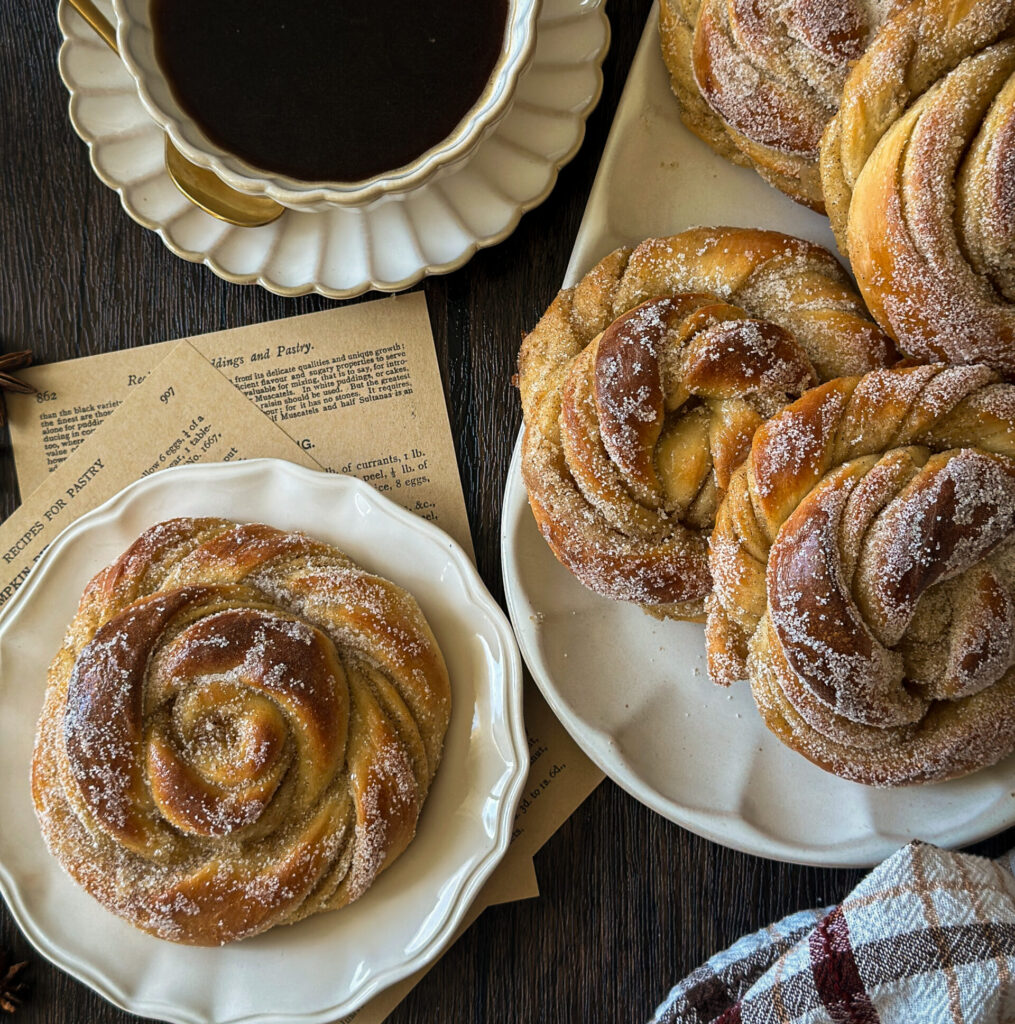
The letter fold sandwiches the cardamom filling between multiple layers of dough. Once the strips are twisted, those layers become the visible spirals that give cardamom buns their signature appearance.
Use very soft butter rather than melted butter and avoid pressing too firmly after completing the letter fold. You only need enough pressure to help the layers adhere.
Yes. After shaping, cover the buns well and refrigerate overnight. The next day, let them finish proofing at room temperature until noticeably puffy before adding the egg wash and baking.
Yes! Replace the 200g starter or discard with 3/4 cup (100g) all-purpose flour, 1/2 (100g) whole milk, and 2 1/4 tsp (7g) instant yeast. Everything else stays the same!
Yes! Swap it 1:1 (2 1/4 tsp or 7g). Bloom the active dry yeast first by mixing it with the milk from the recipe and a pinch of the sugar. Make sure you warm the milk first in the microwave until warm to touch. Add the yeast and whisk, then let it sit 5–10 minutes until foamy, then add it in with the wet ingredients and continue as written. The dough may take slightly longer to rise (about 15–30 minutes more), but the texture will still be soft and fluffy.
If you loved this recipe, drop a comment and leave a star review and don’t forget to checkout more of my sourdough pastry recipes!
Sourdough Pastry Recipes:
- Sourdough Discard Carmel Apple Danish Buns
- Sourdough Discard Blueberry Danish Buns
- Sourdough Cream Puffs (Sourdough Pâte à Choux)
Sourdough Cardamom Buns
Ingredients
Sweet Levain:
- 1 (25g) Tbsp mature sourdough starter
- 1/2 (100g) cup water
- 3/4 (100g) cup all-purpose flour
- 1 1/2 (20g) Tbsp white sugar
Tangzhong:
- 2 (20g) Tbsp all-purpose flour
- ⅓ (100g) cup whole milk
Dough:
- All of the tangzhong
- ¾ (200g) cup sweet levain or 200g sourdough discard + 2¼ tsp (7g) instant yeast
- ⅔ (150g) cup whole milk
- ¼ (50g) cup granulated white sugar
- 1 large egg
- 1 tsp vanilla extract
- 6 (85g) Tbsp unsalted butter softened
- 4 (500g) cups all-purpose flour
- ½ tsp ground cardamom
- 1½ (10g) tsp fine sea salt
Cardamom Filling:
- ½ (113g) cup unsalted butter very soft
- ½ (100g) cup granulated white sugar
- 2½ tsp ground cardamom
- 1 tsp vanilla extract
- ¼ tsp fine sea salt
Egg Wash:
- 1 large egg
- 1 Tbsp water
Cardamom Sugar Topping:
- ¼ (50g) cup granulated white sugar
- 1 tsp ground cardamom
Vanilla Simple Syrup:
- ¼ (50g) cup granulated white sugar
- ¼ (60g) cup water
- ½ tsp vanilla extract
Instructions
Step 1: Make the Sweet Levain (Night Before)
- In a clean jar, mix your mother starter with the flour, water, and sugar. Give it a good stir, and allow it to rest at room temperature (optimally 73-75 degrees F). I like to mark the volume in my jar with a rubber band so it’s easy to asses the rise the next morning. When the sweet levain has doubled in size, it’s time to mix your donut dough.1 (25g) Tbsp mature sourdough starter, 1/2 (100g) cup water, 3/4 (100g) cup all-purpose flour, 1 1/2 (20g) Tbsp white sugar
- Sourdough Discard Option: If you make this recipe with discard and yeast, skip this step.
Step 2: Make the Tangzhong
- Before you get started on mixing your dough, you’ll make your tangzhong. Whisk milk and flour together in a small saucepan.2 (20g) Tbsp all-purpose flour, ⅓ (100g) cup whole milk
- Cook the tangzhong over medium/low heat, stirring constantly, until it thickens into a paste that is similar to pudding (about 2–3 minutes). For precision, use your digital thermometer and heat to 148-155 F. Do not overheat, or your mixture will be too thick.
- Scrape into a bowl immediately to prevent further cooking, cover, and let cool to room temperature before adding to your dough.
- Prepare your dough while tangzhong cools.
Step 3: Mix the Dough
- In a stand mixer fitted with a dough hook or large mixing bowl, add the whole milk, sweet levain, egg, sugar, ground cardamom, vanilla, and all of the tangzhong. Whisk ingredients together quickly, it’s okay if it’s lumpy.All of the tangzhong, ¾ (200g) cup sweet levain, ⅔ (150g) cup whole milk, ¼ (50g) cup granulated white sugar, 1 large egg, 1 tsp vanilla extract, ½ tsp ground cardamom
- Sourdough Discard Option: If you're making this recipe with discard and yeast, add the discard and instant yeast instead of the sweet levain to the wet ingredients and whisk in.
- Add your flour and salt into your wet ingredients.4 (500g) cups all-purpose flour, 1½ (10g) tsp fine sea salt
- Mix on low until a shaggy dough forms, about 2-3 minutes. Scrape down bowl if needed. If using your hands, knead until you work dough together. This is a higher hydration dough, so be aware it will be sticky.
- Once the dough has come together add the softened butter, a tablespoon at a time mixing each tablespoon in until adding the next. Use a dough scraper to scrape the edges of the bowl to make sure everything is getting mixed in.6 (85g) Tbsp unsalted butter
- Continue mixing on medium-low (speed 2–3) for 8–10 minutes, until dough is smooth, elastic, and tacky but not sticky. If mixing by hand knead dough until butter has fully incorporated and dough is smooth and tacky.
- It’s really important to work the gluten at this stage, so don’t cut the kneading time. This will create a strong dough that makes it possible to laminate with the cardamom filling.
- Mixing Notes: If kneading in a mixer or if dough is very wet when mixing by hand, add an additional 25 grams (3 Tablespoons) of flour and mix into dough. Make sure to work flour in completely and assess if you need more flour.
- Do not add more than 50 grams of flour at this stage, or you will lose the high hydration of the dough and end up with a dense dough. If using a stand mixer, dough can become more warm and sticky and I have found kneading dough with my hand (perform a set of stretch and folds) for a minute after mixing in my stand mixer really helps bring the dough together.
Step 4: Bulk Fermentation
- Spray a clean bowl with oil. Shape the dough into a smooth ball and place it in the bowl. Cover with plastic wrap.
- Stand mixer directions: perform one set of stretch and folds after 30 minutes to strengthen your dough.
- Hand mixing directions: perform 3 sets of stretch and folds at 30 minute intervals at the beginning of bulk fermentation. After stretch and folds are completed, cover dough and allow to continue proofing.
- How to do a stretch and fold: Starting at the edge of the dough with wet hands, gently lift one edge of the dough, stretch it up, and fold it over the center. Rotate the bowl/container 90 degrees and repeat with the next side. Do this for all four sides of the dough to form a ball.
- Sourdough Discard Option: After the 20 minute rest, knead the dough by hand for a minute or two to get the dough even softer and to work the gluten. Once you've finished this kneading step, cover the bowl again.
- Let the dough rise at 75–80°F until doubled in size, this takes about 5–6 hours. If your house is very cold, you can put dough in the oven with the light on for a warmer atmosphere. This proofing time is a general guide, this process may take longer the key is to assess when the dough has nearly doubled that’s when it’s ready.
- Sourdough Discard Option: Allow the dough to rest about 1 1/2 hours at room temperature and the dough is ~75–90% risen. You don't want this dough to proof double fully at this rising point. If the dough proofs sooner than the time I mentioned, shape it. You want to watch the dough to make sure it doesn't overproof at this stage!
- Overnight Fermentation Option: Once dough has finished rising, you can cover and transfer to the refrigerator overnight for a longer ferment or you can skip this step and go straight to making your buns.
Step 5: Mix the Cardamom Filling
- Your butter needs to be very soft for the filling, but NOT MELTED.½ (113g) cup unsalted butter
- Add your butter to a small mixing bowl, and add the white sugar, ground cardamom, vanilla, and salt.½ (100g) cup granulated white sugar, 2½ tsp ground cardamom, 1 tsp vanilla extract, ¼ tsp fine sea salt
- Mix the filling with a spoon or even better hand beaters, until the filling is smooth and well combined. Set this aside for later.
- In a separate small bowl, combine the sugar and cardamom for the cardamom sugar topping. Set aside.¼ (50g) cup granulated white sugar, 1 tsp ground cardamom
Step 6: Shape the Cardamom Buns
- Flour a clean work surface well, and turn out the dough onto your work surface (make sure you have plenty of space).
- Roll the dough out into an approximately 18 × 24-inch rectangle, with the 24-inch side running horizontally.
- If you’re struggling to roll out the dough, roll it out to about a 9×12 rectangle. Cover the dough with a lint-free cloth or plastic, and allow the dough to rest for 15-20 minutes. This will allow the dough to relax and then you should be able to continue rolling out the dough to your desired size.
- Once the dough is rolled out to a 18 × 24-inch rectangle, use an offset spatula to spread the cardamom filling evenly over the entire surface, going nearly to the edges.
- Perform a letter fold: With the 24 inch side running horizontally, fold the left third of the dough toward the center. Fold the right third over the first fold, just like folding a letter. You should now have an approximately 8 × 18 inch layered rectangle.
- Using a rolling pin, gently press and roll over the folded dough just enough to help the layers adhere and roll it to the 8×18 inch rectangle if the dough is smaller than this. Don’t roll it thin again, you want to keep those distinct buttery layers.
- Using a pastry wheel or sharp knife, cut across the width to divide the dough into 8 long strips, each approximately 1 inch wide × 18 inches long.
- Working with one strip at a time, twist the entire strip into a rope so the laminated layers spiral from end to end.
- Starting at one end of the dough rope, curl and coil the twisted rope into a rosette, tucking the tail under the bun.
- Place the bun on a parchment lined baking sheet with the tucked end underneath. Repeat with the remaining strips. To give the buns plenty of space to proof, I recommend only placing 6 buns on one baking sheet.
Step 7: Final Proof
- Cover buns loosely with plastic sprayed with cooking oil and let rise at room temperature for 1 1/2 hours, or until puffy and jiggly.
- When poked gently with a fingertip, the dough should spring back slowly, not immediately. Because this dough has the tangzhong to provide stability to the dough, you can push your final proof a little longer to get a really fluffy bun.
- Sourdough Discard Option: The second rise will be faster if you used discard and yeast, allow the buns to proof about 45 minutes to an hour and then bake them.
Step 8: Bake and Finish the Buns
- Preheat the oven to 400°F.
- Whisk together the egg and water for the egg wash. Lightly brush the proofed buns with the egg wash, making sure to get the exposed twists and layers. If you don't have a pastry brush, you can also use a folded paper towel.1 large egg, 1 Tbsp water
- Transfer the buns to the oven, and bake for approximately 18-20 minutes or until the buns are deeply golden brown and the centers reach approximately 190°F.
- While the buns bake, make a simple syrup that will help the sugar coating stick to the buns.
- In a small pot, add the water and white sugar. Cook the mixture over medium heat, whisking constantly. Once the syrup simmers and bubbles for a few minutes, remove it from the heat and stir in the vanilla. Allow it to cool before using.¼ (50g) cup granulated white sugar, ¼ (60g) cup water, ½ tsp vanilla extract
- As soon as the buns come out of the oven, generously brush the hot buns with the vanilla simple syrup. Allow the buns to cool and for the surface to get glossy and tacky.
- Using the cardamom sugar mixture you made earlier, roll the tops of the buns in the sugar mixture coating the sides and top. This gives the buns a gorgeous finish and light spiced flavor.
- Allow the buns to cool slightly and serve!
- Yields 8 large Danish buns