
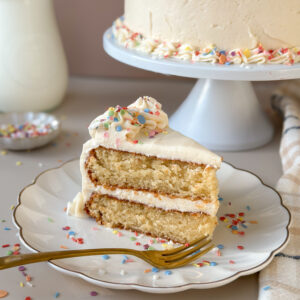
Sourdough Vanilla Cake (moist and fluffy!)
Everyone deserves a homemade birthday cake, and this Sourdough Vanilla Cake (moist and fluffy!) is the kind of go-to recipe you’ll come back to whenever you want something classic, cozy, and made from scratch. It’s soft, tall, and plush – finished with a rich vanilla bean buttercream frosting for that perfect bite. It’s the only vanilla cake recipe you’ll need for birthdays, celebrations, or just because you want a sweet little moment in the middle of your week.
Why You’ll Love This Recipe
- Long-fermented batter- gives you the most tender crumb and that extra “bakery-style” flavor with the added benefits of fermentation for digestion.
- Very easy- if you’re intimidated by baking cakes, this is the simplest cake you’ll ever make with a simple measure + mix method.
- Moist for days- this is an all oil cake, so it stays soft and plush (no drying out overnight).
- Fluffy + tall- bakes up beautifully with even layers and that bakery-style rise.
- Classic vanilla flavor- sweet, cozy, and nostalgic without being boring.
- Easy vanilla buttercream- light, fluffy, and full of real vanilla flavor for the perfect finishing touch.
Why Use Sourdough Starter in this Sourdough Vanilla Cake?
Using sourdough starter/discard in this Sourdough Vanilla Cake enhances moisture retention and makes the crumb softer and more tender. The fermentation process also helps break down gluten, making this cake easier to digest for those sensitive to gluten.
As an amazon affiliate this post may contain affiliate links, which means I may receive a commission for qualifying purchases. I will only recommend products that I personally love and use.
Tools You’ll Need:
- Mixing bowls (large and medium)- for mixing batter and frosting. You can also use your stand mixer bowl for the frosting if you wish.
- Whisk- for combining ingredients.
- Kitchen scale (optional)– for accurate measuring, especially helpful with sourdough baking linked here.
- Measuring cups and spoons- if not using a scale and for smaller ingredients.
- Cake pans– two 9-inch round pans or one 9×13-inch pan (I love these 9 inch cake pans linked here with anodized steel for even baking and a perfect exterior).
- Parchment paper- (optional) for lining pans. This really helps the cake release cleanly from the pan. Cut a circle to fit the bottom.
- Hand beaters or stand mixer- to whip frosting.
- Cooling rack- for cooling cakes.
- Toothpick or cake tester- to test when cake is done.
- Offset spatula– for spreading frosting on cake.
- Fine-mesh sieve or sifter- for powdered sugar to avoid grainy frosting.
- Pastry bags and decorating tips (optional)– for adding decorations to the cake. If you’re new to cake decoration, this set linked here has pastry bags and an assortment of classic tips to choose from.
- Cake stand or platter– for serving cake.
Gather Your Ingredients:
- Sourdough starter- (flat or past peak, can be cold or room temperature). Adds depth of flavor and moisture without making this cake “sour”. Key for fermentation.
- All-purpose flour- Gives cake structure and keeps the crumb tender. You can also substitute for cake flour.
- Buttermilk or milk- Lightens the batter and keeps the crumb soft. I personally highly recommend using buttermilk, the texture and tenderness is so lovely. If you don’t have it though, you can substitute with whole milk.
- White sugar– Sweetens the cake and gives it a golden finish.
- Vanilla extract– Enhances the flavor and brings warmth. Used in the cake and the buttercream for that classic vanilla flavor.
- Eggs (room temperature)– provide structure and lift with moisture, works as a binder for ingredients.
- Baking powder + Baking soda– Ensures the right rise and tenderness.
- Salt- Balances sweetness and enhances all the other flavors. You’ll need this for the cake and the frosting.
- Avocado Oil- Adds moisture and keeps the cake soft and tender. You can substitute for any neutral cooking oil.
- Unsalted Butter- Used to make the base of the vanilla buttercream frosting.
- Powdered Sugar- Sweetens and stabilizes the buttercream. Do not use granulated sugar or your icing will be grainy.
- Heavy Cream- Whips into the buttercream for a silky finish.
- Sprinkles (optional)- I found dye-free naturally colored celebration sprinkles at Trader Joe’s, but you can also find a variety of dye-free options on Amazon like these Supernatural Rainbow Softies or Whole Foods Market Rainbow Sprinkles.
Now let’s bake a cake!
Instructions
Step 1: Mix The Base
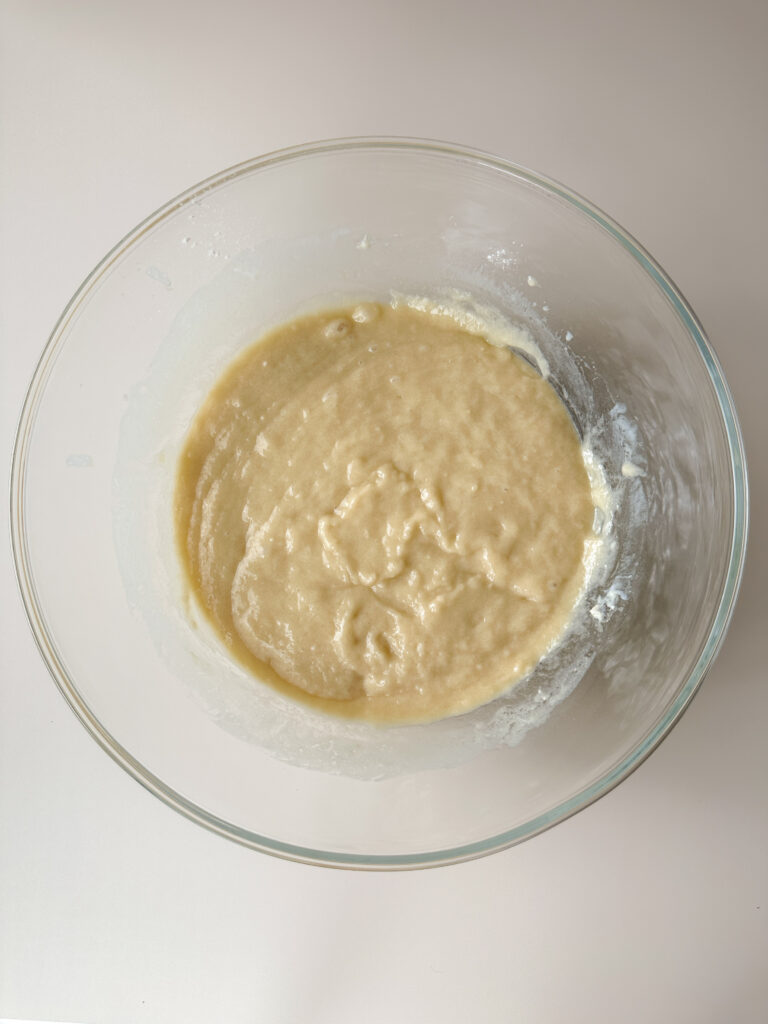
In a bowl, combine with a whisk loosely the flour, sourdough discard, white sugar, buttermilk or milk, avocado oil (or neutral oil), and the vanilla. It’s okay if a few small lumps remain, you don’t want to overmix this base.
Optional Overnight Fermentation: Cover the bowl with plastic wrap, and refrigerate overnight. This step is key in your fermentation process. If you want to shorten your fermentation time, you can allow the batter to rest for 4 hours at room temperature for a same day bake. I don’t advise leaving this batter at room temperature overnight, its too hydrated and will overproof.
Step 2: Finish Mixing Batter
If you fermented the batter overnight in the refrigerator, allow the bowl of batter to rest on the counter for roughly 1 hour. This is a key step to achieving a tender crumb, don’t skip this step! If you like temperature cues, the temperature of the batter should read roughly 70 F before proceeding.
If you allowed batter to rest on the counter and did not refrigerate or you’re doing a quick bake, skip this step of resting.
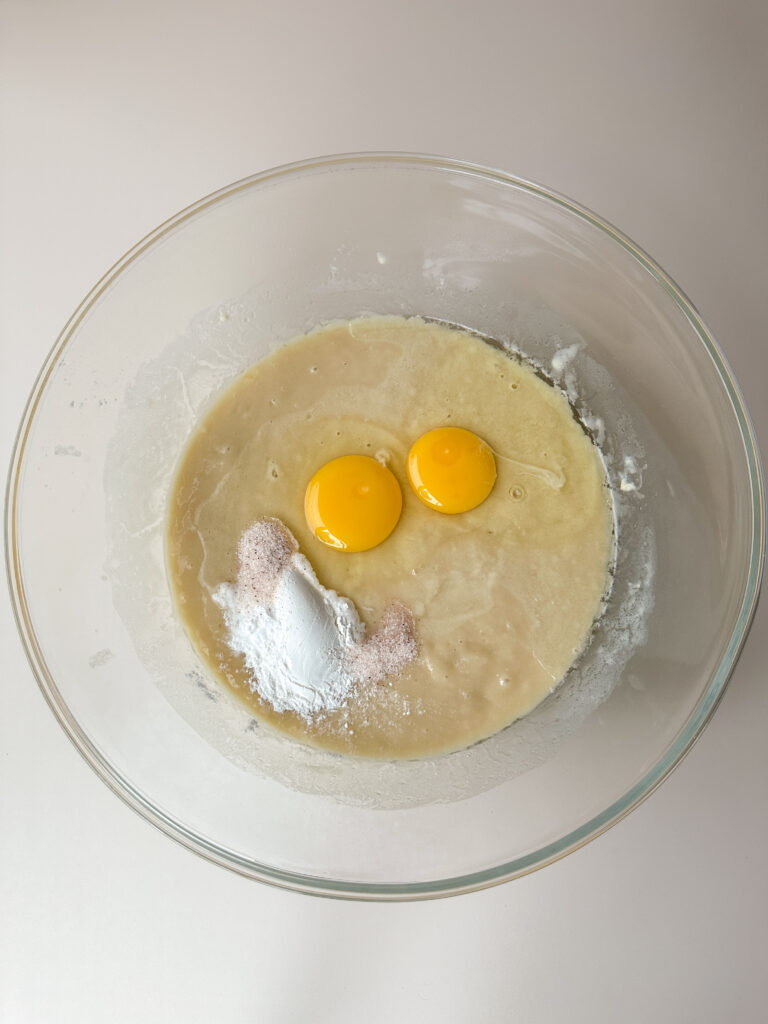
Once the batter has reached room temperature, add the eggs, baking powder, baking soda, and salt to the bowl.
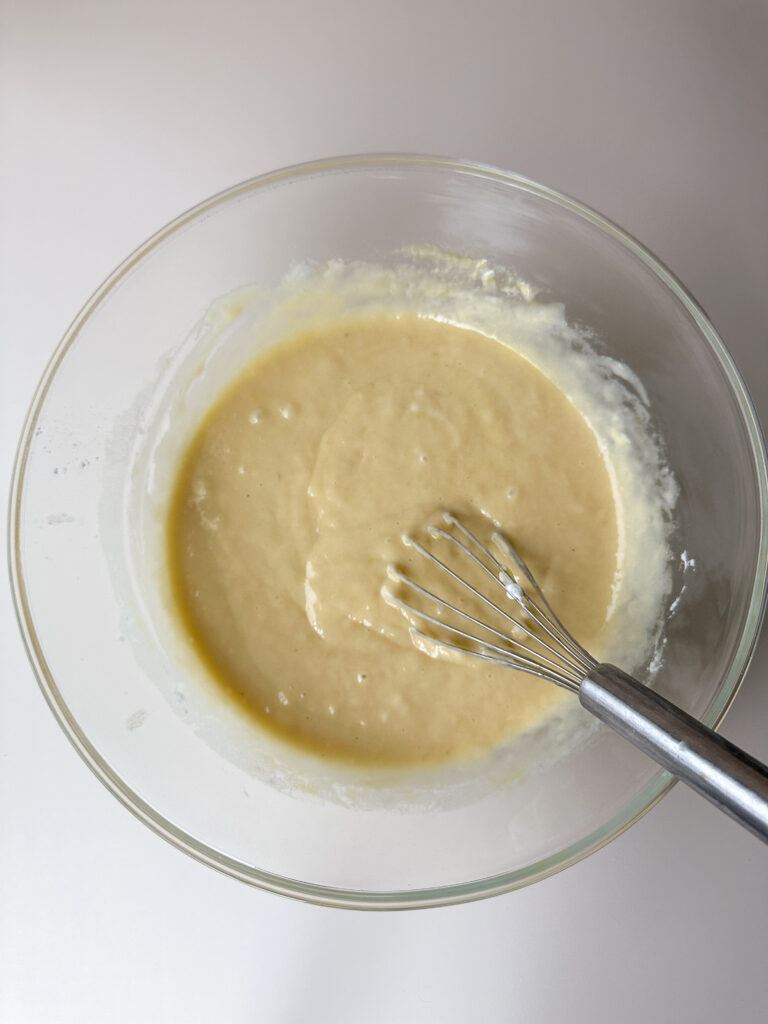
Whisk gently the remaining ingredients into the batter just until combined and smooth, avoiding overmixing to make sure your cake crumb doesn’t get tough.
Step 3: Bake Cakes
Preheat the oven to 350°F (175°C). Grease and lightly flour two 9-inch pans or one 9×13 baking pan. I strongly recommend lining the very bottom of the pan with parchment paper at this time, this helps the cake release evenly.
Baker’s Tip: If you aren’t sure how to line the bottom of your cake pan with parchment, simply place your cake pan on a sheet of parchment and draw along the edge to form the shape you need. Cut and place at the bottom of your pan.
If you’re using 2 9-inch cake pans, divide batter evenly between the two pans. This should roughly be 2 1/4 cups (500g) batter per 9-inch pan. If using a sheet pan, pour all of the batter into the pan. Tap the pans lightly on a hard surface to release any air bubbles before baking.

Set your timer for 30 minutes. Check the cake at 30 minutes, inserting a toothpick to check doneness. This cake takes me anywhere between 30-35 minutes to be done. When the cake is done, a toothpick should come out with a few moist crumbs but not with wet batter. When you touch the top of the center of the cake, it should be firm and not overly glossy. Internal temperature should be between 200-205 F in the center.
Note: If vanilla cake is under done, when cake is removed from heat the center will fall. If you overbake the cake, it will err on the side of being dry. Go slow and check frequently after the 30 minute mark to ensure the cake is baked properly without losing moisture. Use the notes above to make sure cake is baked correctly.
When cakes are done, cool slightly in pans then turn out onto racks. Allow to cool completely. If desired, trim any uneven tops and wrap in plastic. Freeze cake while you prepare your frosting.
Step 4: Make the Vanilla Buttercream
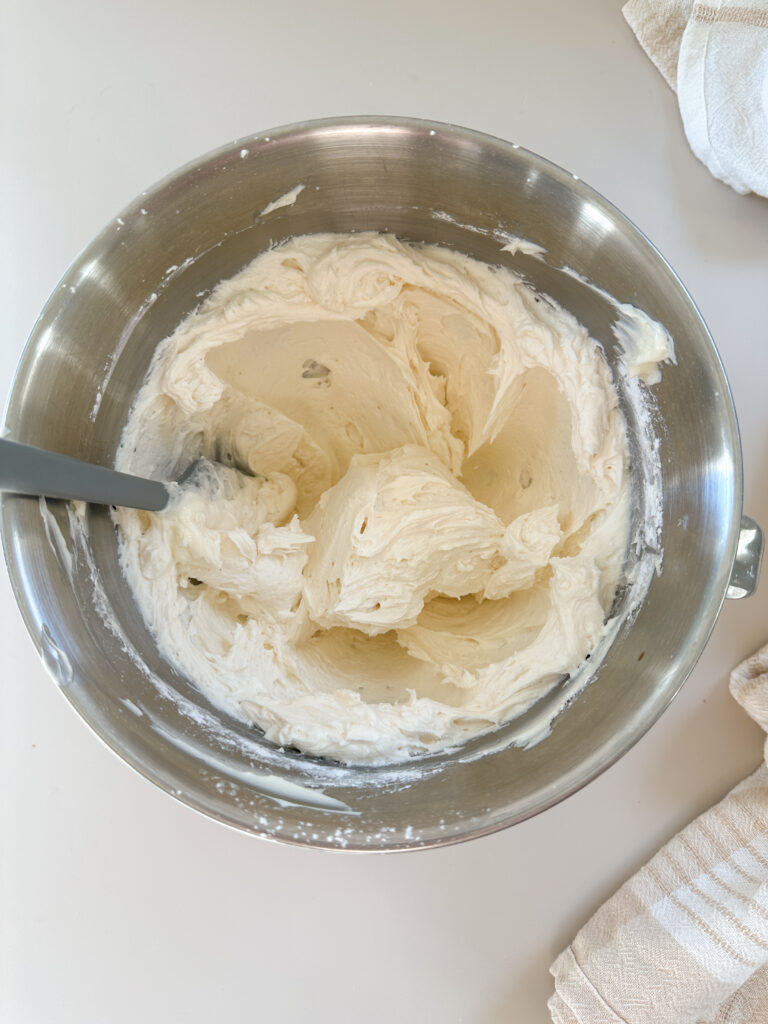
In a stand mixer or a large bowl, add your butter. Cream on high for 3-4 minutes until pale and fluffy.
Add sifted powdered sugar and salt to the frosting, and beat on low to incorporate. Once the sugar and salt are mixed in, whip the frosting on high for a minute or two until the frosting is smooth. At this point the icing may look very stiff. Don’t worry!
Add vanilla and half of the cream to the icing. Whip on high until the frosting starts to become light and fluffy. Add the remaining cream in 1 Tablespoon intervals until the frosting has achieved your desired consistency.

Step 5: Frost the Cake
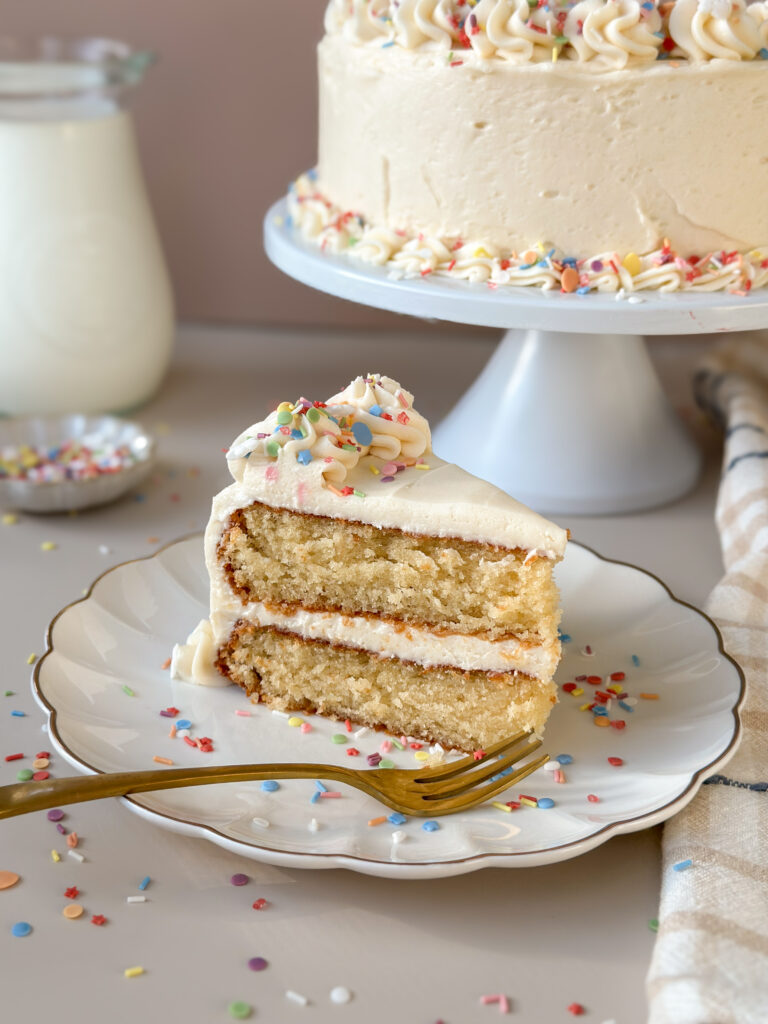
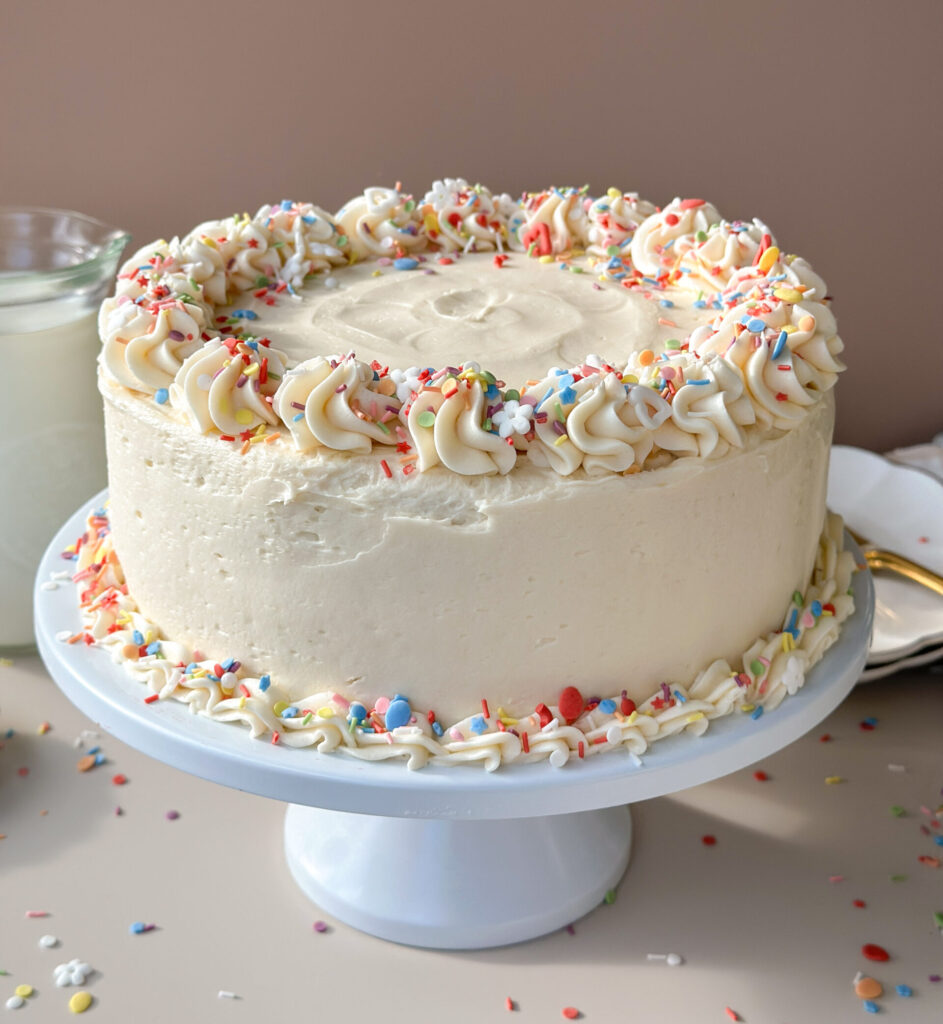
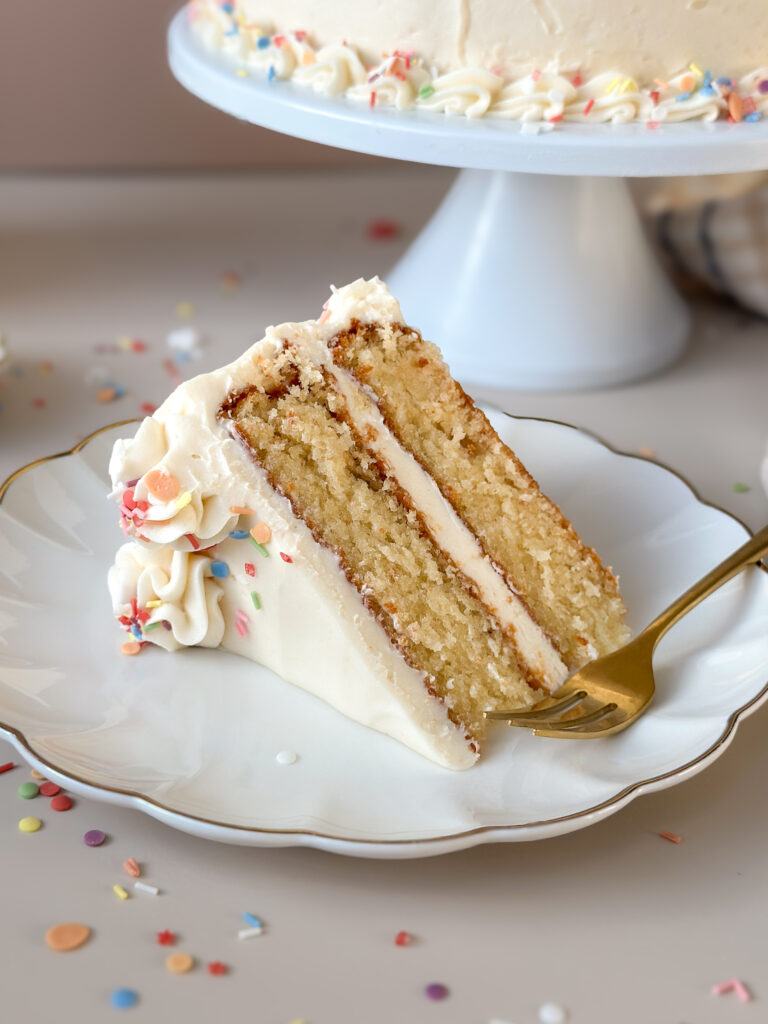
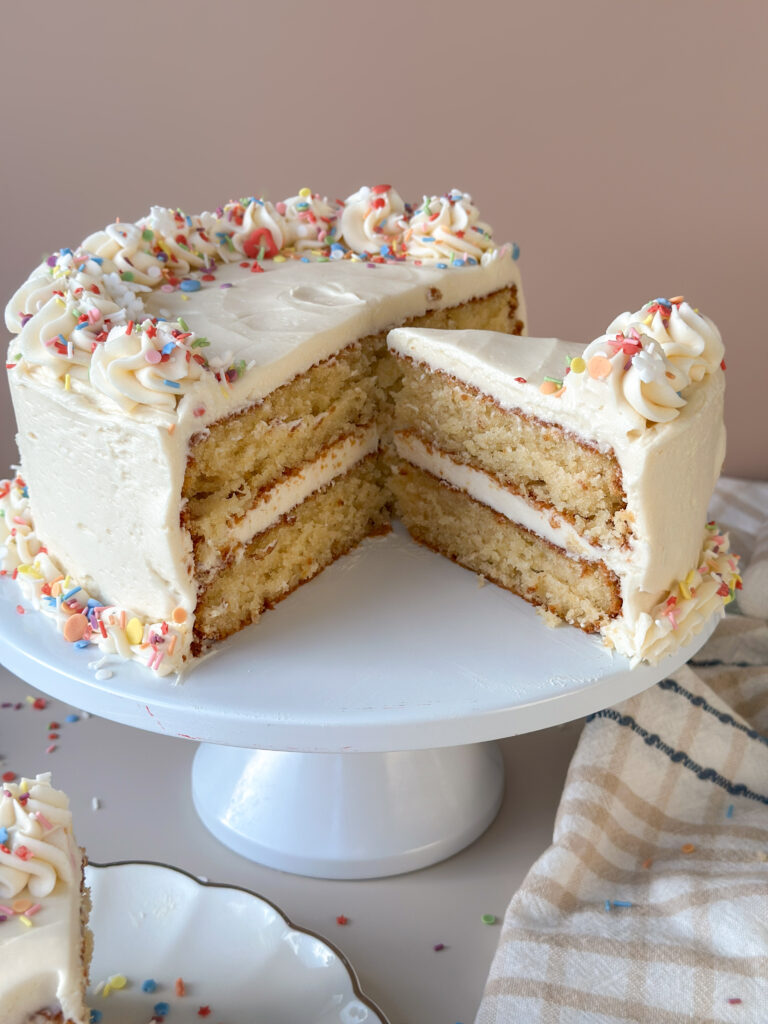
For a two-tier cake: If frosting a two-tier cake remove cakes from the freezer, and place 1 cake upside down on cake stand. I like to put a dollop of icing on the cake stand first to help the cake stick to the stand. Use half of the vanilla buttercream to frost the 1st layer of cake.
When first layer of cake is smoothly covered in frosting, place the second layer upside down on top of the first. Use remaining frosting to cover the top and sides of the second layer, leaving some left over frosting if you want to pipe any decorative details. I piped small swirls around the top of my cake and added a shell border, then sprinkled dye-free celebration sprinkles over the edges for a festive touch.
For a single sheet cake: turn cake upside down onto serving platter. Spread frosting over the top and sides of the entire cake, smoothing with a spatula. Decorate cake if desired with left over frosting and sprinkles.
Slice cake and serve!
Yields 2 9 inch cakes or 1 9×13 cake
How to Store:
Room Temperature– store at room temperature in airtight container or stand with lid for up to 3 days.
Refrigerator– store in airtight container for up to 5 days. Bring to room temperature before serving.
Freezer– Wrap unfrosted cakes tightly in plastic, freeze up to 2 months. Thaw overnight in refrigerator when ready to use. Frost and serve cake.
FAQ’S
No. If you want to bake the cake the same day, just follow the directions to mix and simply bake the cake.
Nope! It tastes like a classic vanilla cake the sourdough just adds depth and tenderness.
The flour may have been packed in the measuring cup OR the batter was overmixed. Make sure to gently mix!
Drop a comment and leave a review if you loved this recipe, and don’t forget to try more of my sourdough cake recipes like my Sourdough Brown Butter Carrot Cake or this Sourdough Chocolate Cake!
Sourdough Vanilla Cake (moist and fluffy!)
Equipment
- Mixing bowls (large and medium) – for mixing batter and frosting. You can also use your stand mixer bowl for the frosting if you wish.
- Whisk – for combining ingredients.
- Kitchen scale (optional) – for accurate measuring, especially helpful with sourdough baking linked here.
- Measuring cups and spoons – if not using a scale and for smaller ingredients.
- Cake pans – two 9-inch round pans or one 9×13-inch pan (I love these 9 inch cake pans linked here with anodized steel for even baking and a perfect exterior).
- Parchment paper – (optional) for lining pans. This really helps the cake release cleanly from the pan. Cut a circle to fit the bottom.
- Hand beaters or stand mixer – to whip frosting.
- Cooling rack – for cooling cakes.
- Toothpick or cake tester – to test when cake is done.
- Offset spatula – for spreading frosting on cake.
- Fine-mesh sieve or sifter – for powdered sugar to avoid grainy frosting.
- Pastry bags and decorating tips (optional) – for adding decorations to the cake. If you're new to cake decoration, this set linked here has pastry bags and an assortment of classic tips to choose from
- Cake stand or platter – for serving cake.
Ingredients
Wet Ingredients:
- 1/2 (120g) cup sourdough discard 100% hydration
- 1 ½ (300g) cups granulated sugar
- 1 (240g) cup milk or buttermilk
- ¾ (190g) cup neutral oil
- 2 large eggs room temperature
- 1 Tbsp vanilla extract
Dry Ingredients:
- 1 ¾ (225g) cups all-purpose flour
- 1 Tbspn baking powder
- ¾ tsp salt
- ¼ tsp baking soda
Vanilla Buttercream:
- 1½ (339g) cups unsalted butter room temperature
- 5¼ (630g) cups powdered sugar sifted
- ¼ tsp fine sea salt
- 1½ Tbsp vanilla extract
- 1/4 (60g) cup heavy cream cold
Instructions
Step 1: Mix The Base
- In a bowl, combine with a whisk loosely the flour, sourdough discard, white sugar, buttermilk or milk, avocado oil (or neutral oil), and the vanilla. It’s okay if a few small lumps remain, you don’t want to overmix this base.1/2 (120g) cup sourdough discard, 1 ½ (300g) cups granulated sugar, 1 (240g) cup milk or buttermilk, ¾ (190g) cup neutral oil, 1 ¾ (225g) cups all-purpose flour, 1 Tbsp vanilla extract
- Optional Overnight Fermentation: Cover the bowl with plastic wrap, and refrigerate overnight. This step is key in your fermentation process. If you want to shorten your fermentation time, you can allow the batter to rest for 4 hours at room temperature for a same day bake. I don't advise leaving this batter at room temperature overnight, its too hydrated and will overproof.
Step 2: Finish Mixing Batter
- If you fermented the batter overnight in the refrigerator, allow the bowl of batter to rest on the counter for roughly 1 hour. This is a key step to achieving a tender crumb, don’t skip this step! If you like temperature cues, the temperature of the batter should read roughly 70 F before proceeding.
- If you allowed batter to rest on the counter and did not refrigerate or you’re doing a quick bake, skip this step of resting.
- Once the batter has reached room temperature, add the eggs, baking powder, baking soda, and salt to the bowl.2 large eggs, 1 Tbspn baking powder, ¾ tsp salt, ¼ tsp baking soda
- Whisk gently the remaining ingredients into the batter just until combined and smooth, avoiding overmixing to make sure your cake crumb doesn’t get tough.
Step 3: Bake Cakes
- Preheat the oven to 350°F (175°C). Grease and lightly flour two 9-inch pans or one 9×13 baking pan. I strongly recommend lining the very bottom of the pan with parchment paper at this time, this helps the cake release evenly.
- Baker's Tip: If you aren't sure how to line the bottom of your cake pan with parchment, simply place your cake pan on a sheet of parchment and draw along the edge to form the shape you need. Cut and place at the bottom of your pan.
- If you’re using 2 9-inch cake pans, divide batter evenly between the two pans. This should roughly be 2 1/4 cups (500g) batter per 9-inch pan. If using a sheet pan, pour all of the batter into the pan. Tap the pans lightly on a hard surface to release any air bubbles before baking.
- Set your timer for 30 minutes. Check the cake at 30 minutes, inserting a toothpick to check doneness. This cake takes me anywhere between 30-35 minutes to be done. When the cake is done, a toothpick should come out with a few moist crumbs but not with wet batter. When you touch the top of the center of the cake, it should be firm and not overly glossy. Internal temperature should be between 200-205 F in the center.
- Note: If vanilla cake is under done, when cake is removed from heat the center will fall. If you overbake the cake, it will err on the side of being dry. Go slow and check frequently after the 30 minute mark to ensure the cake is baked properly without losing moisture. Use the notes above to make sure cake is baked correctly.
- When cakes are done, cool slightly in pans then turn out onto racks. Allow to cool completely. If desired, trim any uneven tops and wrap in plastic. Freeze cake while you prepare your frosting.
Step 4: Make the Vanilla Buttercream
- In a stand mixer or a large bowl, add your butter. Cream on high for 3-4 minutes until pale and fluffy.1½ (339g) cups unsalted butter
- Add sifted powdered sugar and salt to the frosting, and beat on low to incorporate. Once the sugar and salt are mixed in, whip the frosting on high for a minute or two until the frosting is smooth. At this point the icing may look very stiff. Don’t worry!5¼ (630g) cups powdered sugar, ¼ tsp fine sea salt
- Add vanilla and half of the cream to the icing. Whip on high until the frosting starts to become light and fluffy. Add the remaining cream in 1 Tablespoon intervals until the frosting has achieved your desired consistency.1/4 (60g) cup heavy cream, 1½ Tbsp vanilla extract
Step 5: Frost the Cake
- For a two-tier cake: If frosting a two-tier cake remove cakes from the freezer, and place 1 cake upside down on cake stand. I like to put a dollop of icing on the cake stand first to help the cake stick to the stand. Use half of the vanilla buttercream to frost the 1st layer of cake.
- When first layer of cake is smoothly covered in frosting, place the second layer upside down on top of the first. Use remaining frosting to cover the top and sides of the second layer, leaving some left over frosting if you want to pipe any decorative details. I piped small swirls around the top of my cake and added a shell border, then sprinkled dye-free celebration sprinkles over the edges for a festive touch.
- For a single sheet cake: turn cake upside down onto serving platter. Spread frosting over the top and sides of the entire cake, smoothing with a spatula. Decorate cake if desired with left over frosting and sprinkles.
- Slice cake and serve!
- Yields 2 9 inch cakes or 1 9×13 cake
This is the ultimate sourdough birthday cake! It has a melt-in-your-mouth crumb (heavenly) with thorough instructions to follow. It was very simple to follow and bake the most delicious sourdough vanilla cake. It was an immediate hit for me and my family. Thank you for sharing your amazing recipe.
Hi Liz, thank you so much for your feedback, I’m so happy this cake was a hit!
This is thee best vanilla cake I’ve ever had. It was easy to make. I was able to make this for my sister’s birthday so I added glitter instead.
Hi Ann, glad this cake was easy and delicious!
Made this cake today after fermenting overnight. The absolute best cake I’ve ever made. Moist, rich and fluffy. Whole family loved it. Thank you for sharing this recipe.
Hi Linda, I love to hear that this was delicious and such a hit. Thank you for your comment:)
Loved this! Made last night. I started mid-afternoon. Mixed all the wet – was going to do quick ferment and back last night – later, I realized I hadn’t added the flour – duh! So it really only got about 2 hours on the counter but I wanted to bake it. I used a 9X13 because I just wanted to see how this went and it’s just my husband and me. Oh my goodness! It turned out perfectly. I made a small batch of buttercream and just frosted it in the pan. It is definitely not a box mix – the crumb is moist and tender and the flavor is so good. Next time i’ll let it ferment completely and see what that flavor is all about. Yum! And so easy! And another wonderful way to use up discard!
Hi Colleen, I appreciate your feedback and so happy that you loved the vanilla cake!