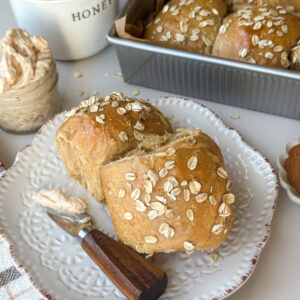
Sourdough Oatmeal Molasses Dinner Rolls
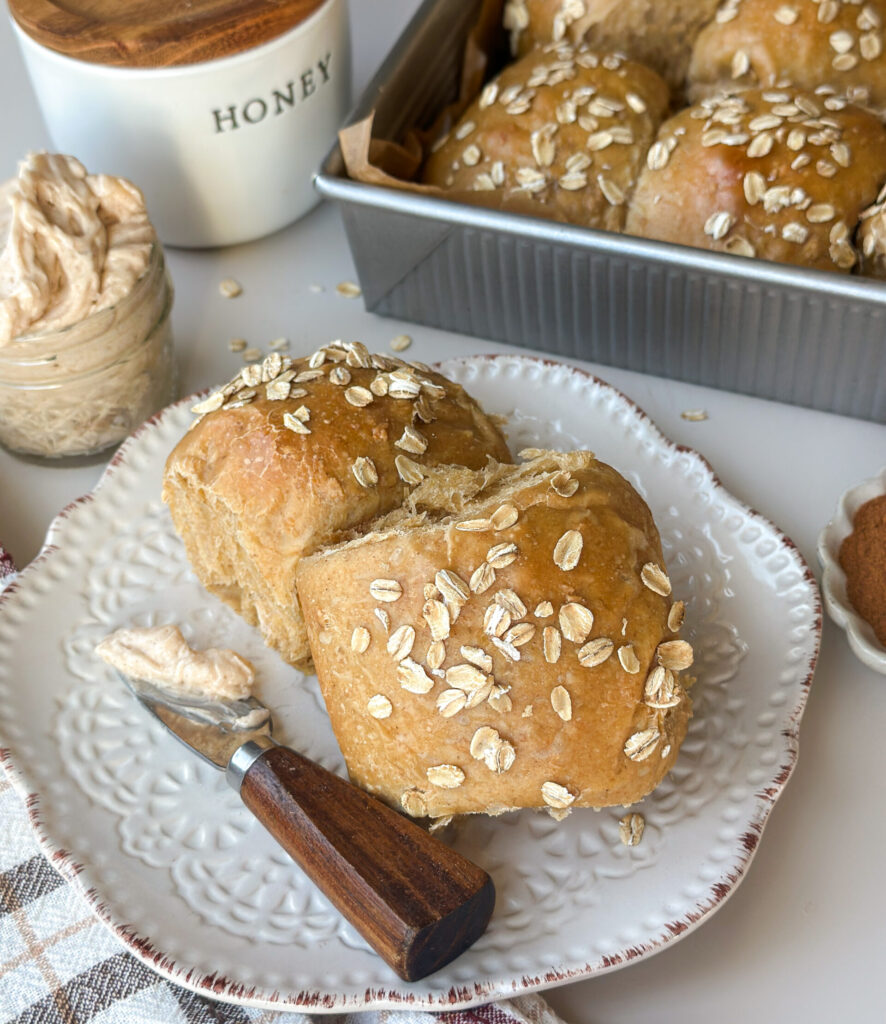
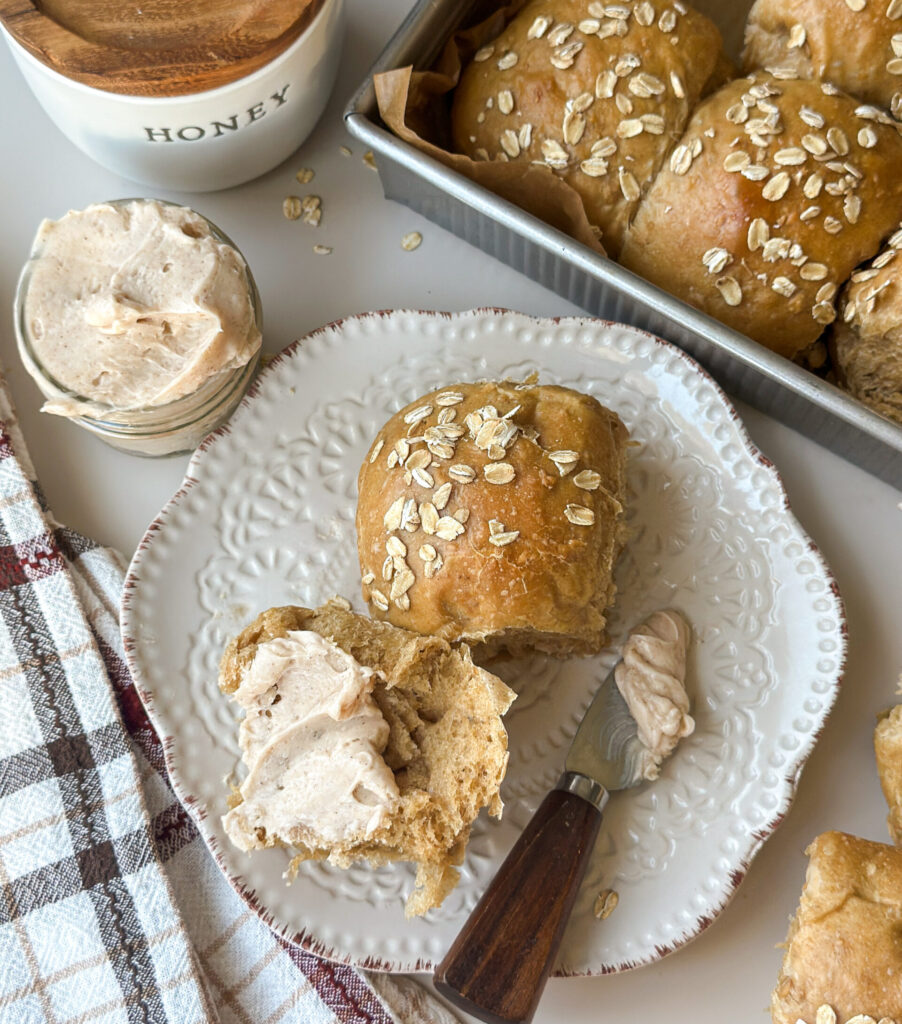
If you want dinner rolls that actually steal the show, you need these. These Sourdough Oatmeal Molasses Dinner Rolls are soft, fluffy, and just slightly sweet, with cozy notes of honey and molasses that pair perfectly with the oats for a rustic warm flavor. So light and soft, these are made for slathering with Honey Cinnamon Butter.
Why You’ll Love This Recipe
- Soft & fluffy texture: These rolls bake up light and pillowy, never dense.
- Cozy rustic flavor: Honey, oats, and molasses create a rich, slightly sweet, warm flavor.
- Beginner friendly: This recipe is so simple and easy to make, making this forgiving recipe perfect even for those new to sourdough.
- Same-day or prep ahead: Make and bake these rolls same day, or shape and chill overnight for easy planning and extra fermentation.
- Perfect for holidays or everyday: A perfect cozy elevated dinner rolls for holidays but also easy enough to make year round.
As an amazon affiliate, this post may contain affiliate links which means I may receive a commission for qualifying purchases. I will only recommend products that I personally love and use.
Tools You’ll Need:
- Stand mixer with dough hook (or strong hands!) – for mixing dough.
- Bowl or straight edge container- for proofing dough. I love this container with a straight edge and lid to easily assess rise linked here.
- Whisk– for mixing.
- 9×13-inch baking pan- for baking rolls. I love this pan from USA linked here. If you’re baking these rolls in bulk, I recommend using these 18×13 baking sheets that are larger and have a nice lip which bake 24 rolls at a time.
- Digital scale– recommended for accurate measurements and weighing your rolls. I love this scale linked here.
- Bench scraper or knife- for cutting dough for rolls. I like this bench knife linked here.
- Pastry brush (optional)- for the egg white topping. You can also use a folded paper towel for this.
- Digital food thermometer (optional)- helpful for checking internal temperatures. This is my go-to kitchen thermometer linked here.
Gather Your Ingredients:
- Sourdough Starter– recently fed and doubled, ready to use in your rolls.
- All-purpose Flour– I recommend AP flour over bread flour to create a more tender crumb, but you can substitute for bread flour if needed.
- Whole Wheat Flour- Adds a rustic depth to the rolls. This is optional and you can replace it with all-purpose if you don’t have whole wheat.
- Molasses- sweetens and adds a rich iconic flavor to the dough. I prefer using unsulphered, like Grandma’s linked here that can also easily be found in major grocery stores.
- Honey- this adds sweetness and makes the crumb extra soft.
- Vanilla- adds a hint of warmth to the dough.
- Cinnamon- this is my secret ingredient, and there is something it adds to the dough that you won’t want to skip!
- Rolled Oats- adds texture and chew to these rolls. Only used rolled oats, don’t use steel cut!
- Water- used to hydrate the dough.
- Whole milk – milk enriches this dough making it soft and tender.
- Avocado Oil- helps retain moisture for a longer time period in the rolls. You can use any neutral cooking oil, but I prefer avocado oil for it’s neutral taste. Don’t use olive oil, it will overpower the flavors of the roll.
- Egg- adds tenderness and structure to the dough working as a binder.
- Sea Salt – balances sweet and sour flavors.
- Honey Cinnamon Butter (optional)- I pair these rolls with my Honey Cinnamon Butter recipe for the perfect pairing!
Instructions
Step 1: Feed the Starter the Night Before
In a clean jar, mix your mother starter with the flour and water. Give it a good stir, and allow it to rest at room temperature (optimally 73-75 degrees F). I like to mark the volume in my jar with a rubber band so it’s easy to asses the rise the next morning. When the starter has doubled in size, it’s time to mix your dough.
Step 2: Mix the Dough
In a microwave safe bowl add the water and milk. Gently heat in the microwave for about 15 seconds to gently warm. Be careful to avoid overheating this mixture. Set aside for the dough.
In a shallow bowl, add the rolled oats and pour 2 Tablespoons of hot water over the oats and stir them with a spoon to hydrate the oats for the dough. Set this aside for the dough.
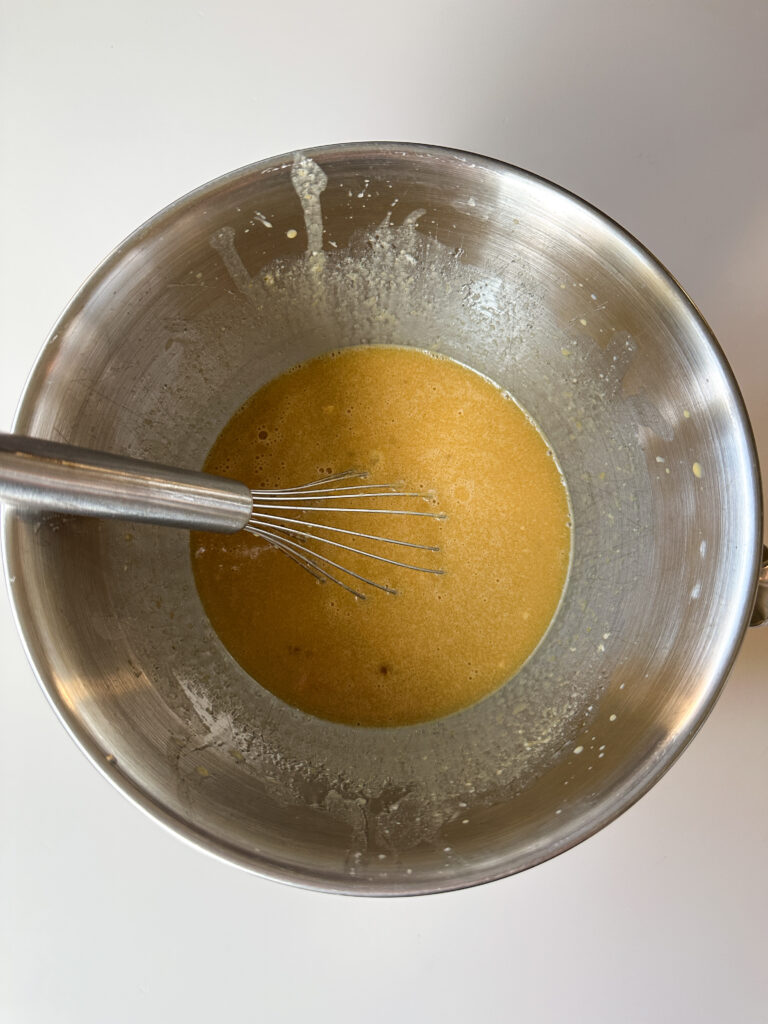
In a mixing bowl or stand mixer bowl add the sourdough starter, egg, avocado oil, the heated water and milk, molasses, honey, and vanilla extract. Whisk the wet ingredients until they’re loosely combined, a few lumps are okay.
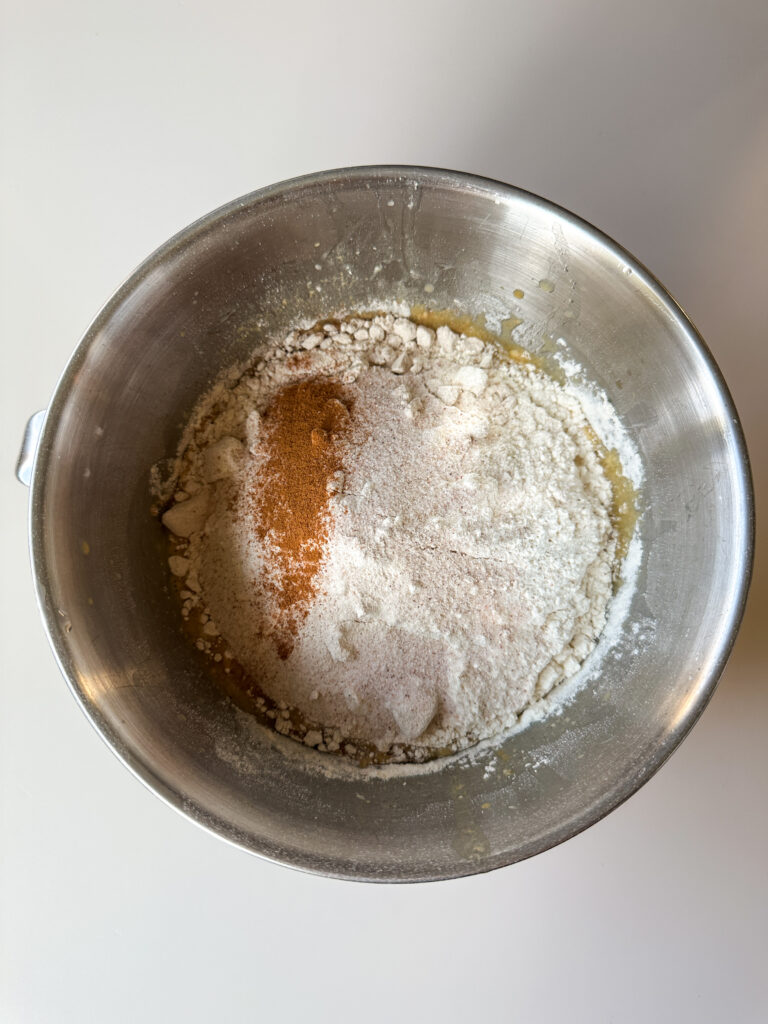
Add the all-purpose flour, whole wheat flour, oats that have been soaked, cinnamon, and salt to the bowl.
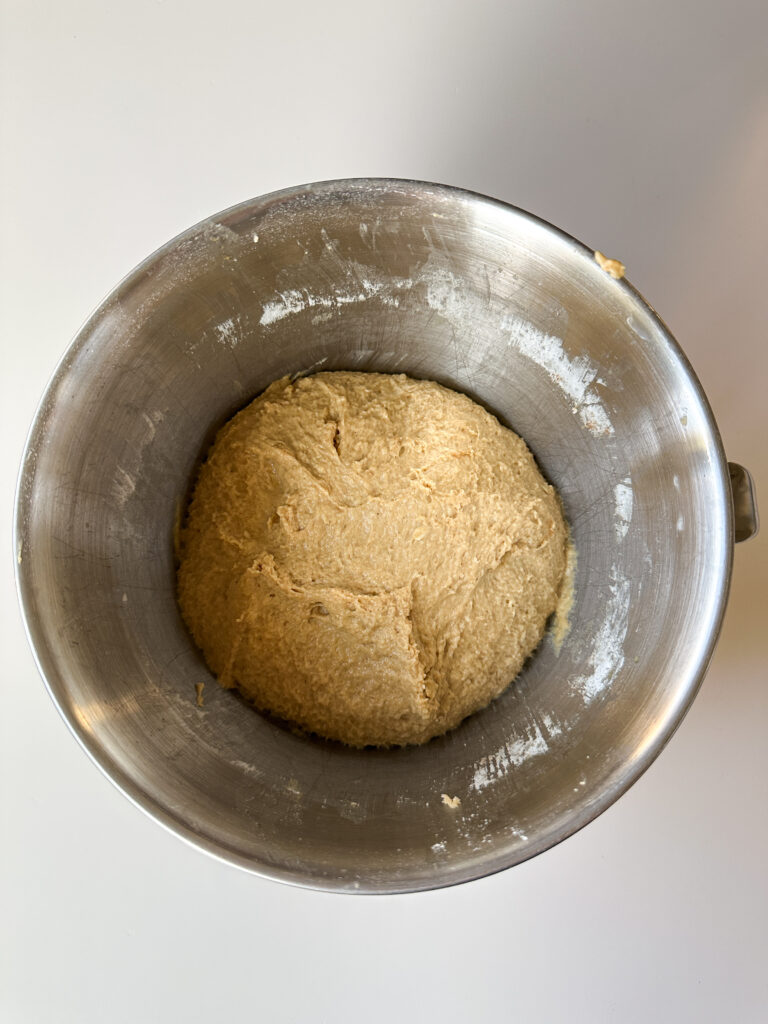
To knead the dough using a stand mixer, knead the dough on low for ten minutes. If mixing by hand, knead for 2-3 minutes and the dough comes together into a smooth ball. This dough is high hydration so it’s important to work the gluten at this stage. Don’t be worried if it feels sticky, I promise as it rests the flour will absorb the moisture.
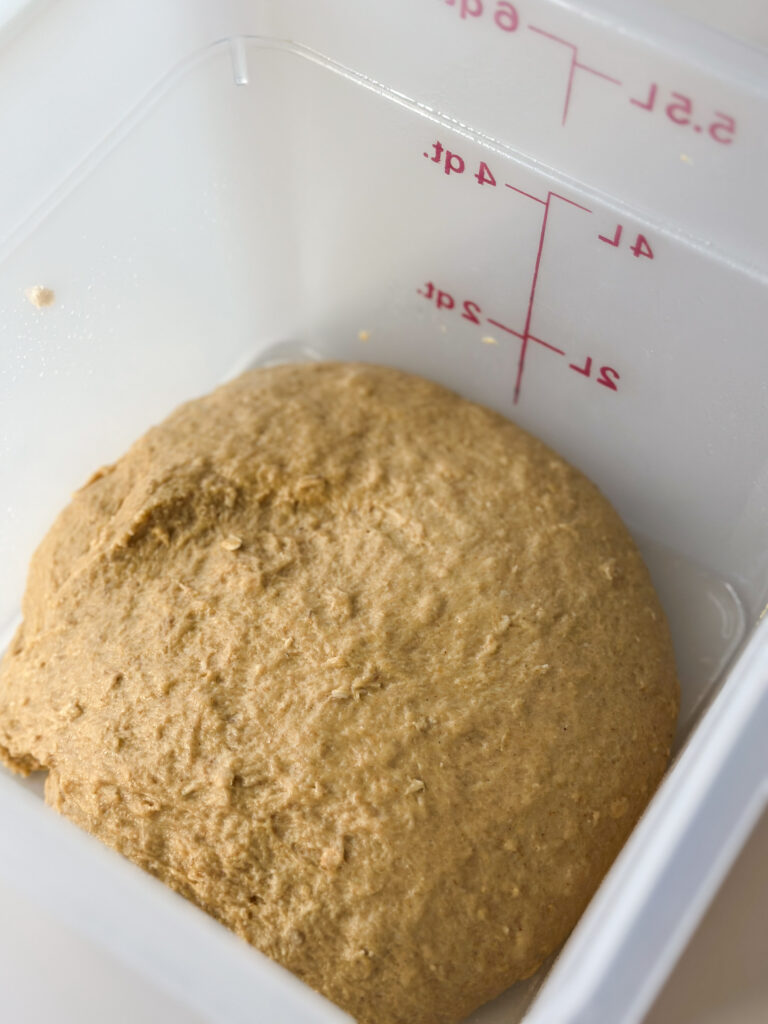
Spray a straight edge container or bowl with cooking oil. Transfer the dough to the prepared bowl. Perform a few sets of stretch and folds to work the dough into a ball again.
Step 3: Bulk Fermentation
Cover the dough with plastic or a lint free cloth. If you used a stand mixer to mix the dough, perform one set of stretch and folds after 30 minutes of the dough resting.
If you are hand mixing this dough, you’ll need to work the gluten a bit more. Perform three sets of stretch and folds at 30 minute intervals at the beginning of bulk fermentation to do this.
To perform a set of stretch and folds: simply grab the dough at the edge of the bowl and pull it up, then fold it down into the center of the bowl. Repeat this step until you’ve worked around the entire edge of the bowl, and the dough forms a ball.
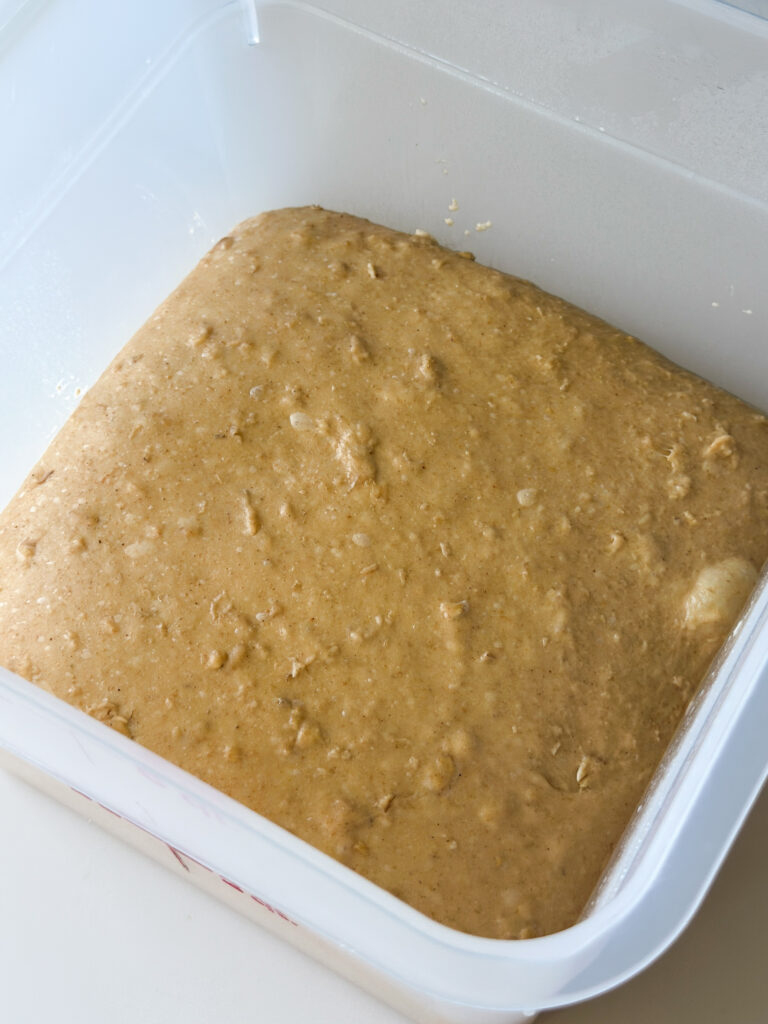
After you’ve completed your stretch and folds, cover dough and allow the dough to double in size (proofing 100% in volume). Make sure you watch that this dough doesn’t overproof, it can with the high ratio of starter. I allowed my dough to proof 6 hours in the oven with the light OFF, for a warmer environment (75-80 degrees).
Overnight Fermentation: When your dough has doubled in size, you can either transfer the dough covered with plastic or a sealed lid to the refrigerator to rest overnight, or you can continue straight to shaping the rolls. You can also shape the rolls into the pan, and cover with plastic to bake the next day.
Step 4: Shaping the Rolls
If you refrigerated your dough overnight, allow the dough to sit at room temperature for 30 minutes before shaping to take the chill off. If you didn’t chill the dough, skip this step.
Line a 9×13 baking pan with parchment paper and spray with non-stick cooking spray. Set aside.
Spray your work surface with cooking spray, and gently turn the dough out onto the work surface. I find cooking spray works better than flour with this process as the dough is stickier, but you can also use flour if you prefer.
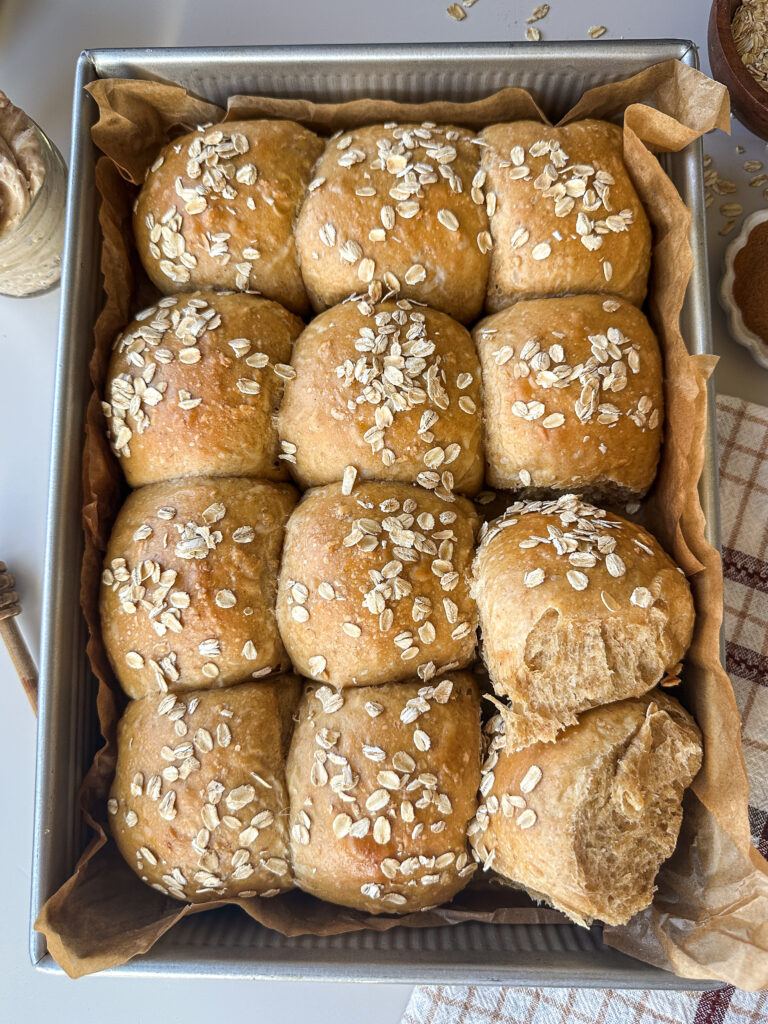
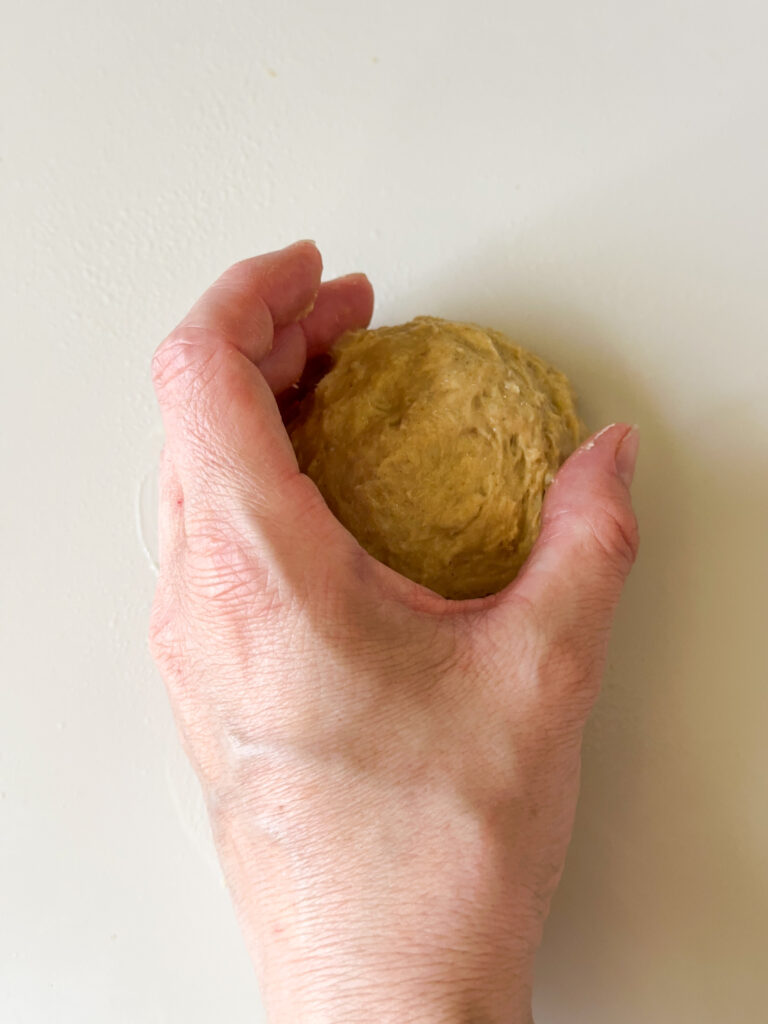
Cut the dough into 12 even pieces. If you’re weighing the rolls for precision, they should each weigh roughly 95g each.
Shape each piece of dough by tucking the dough under itself to form a ball, then gently roll it on your work surface to shape the roll evenly.
Repeat this step to shape all of the rolls, then transfer the shaped rolls to the prepared baking pan. Line the rolls in three rows of four. Cover the pan with plastic or a lint free cloth.
Overnight Refrigeration: If you want to shape and wait to bake your rolls till the next day, you can cover your pan and transfer the rolls to the refrigerator overnight at this point. Proof rolls the next day as instructed below and bake as listed.
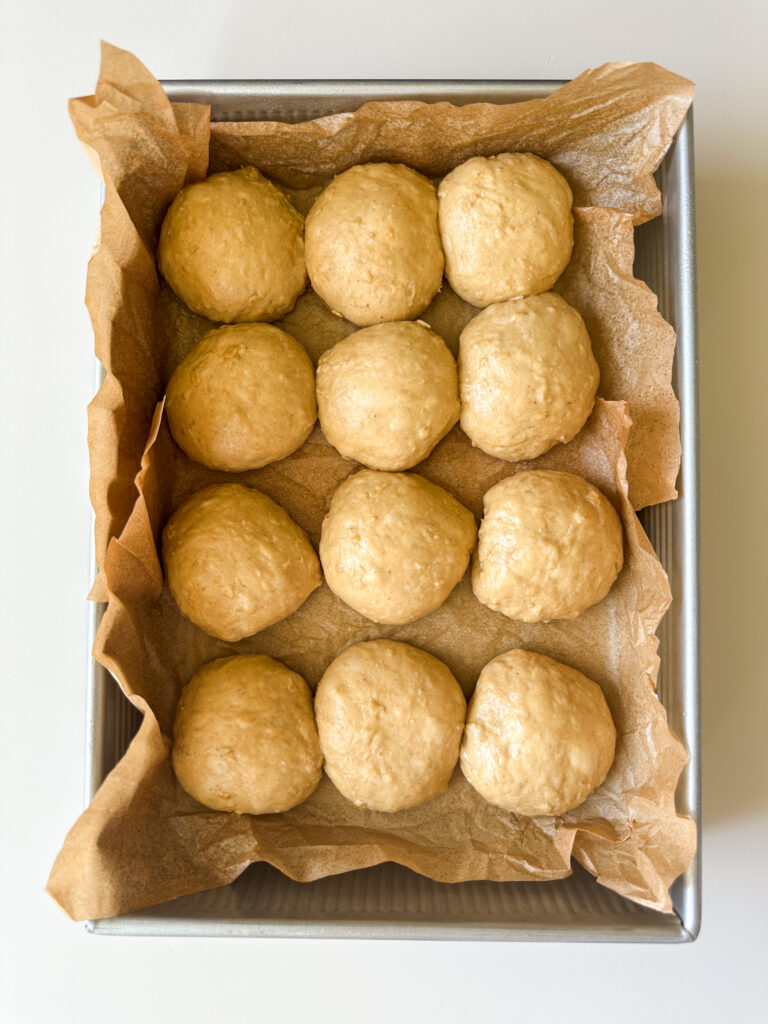

Allow the rolls to proof until about doubled in size, about an hour and a half (this may take longer if you refrigerated the rolls overnight). Don’t skip letting these proof until they’re very puffy and touching, or you will end up with a more dense roll.
Step 5: Bake the Rolls
Preheat your oven to 350°F (175°C)
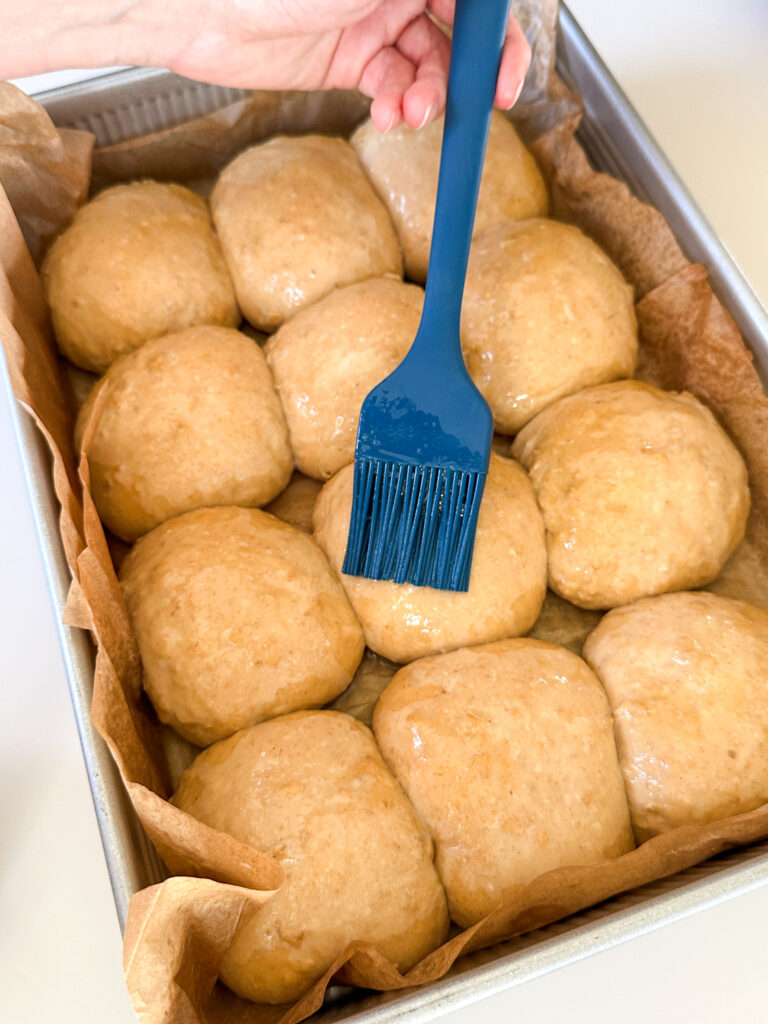
While the oven is heating, beat one egg white with with 2 teaspoons of water. Brush the egg white wash over the tops of the rolls.
Sprinkle the tops of the rolls with more rolled oats for a garnish.
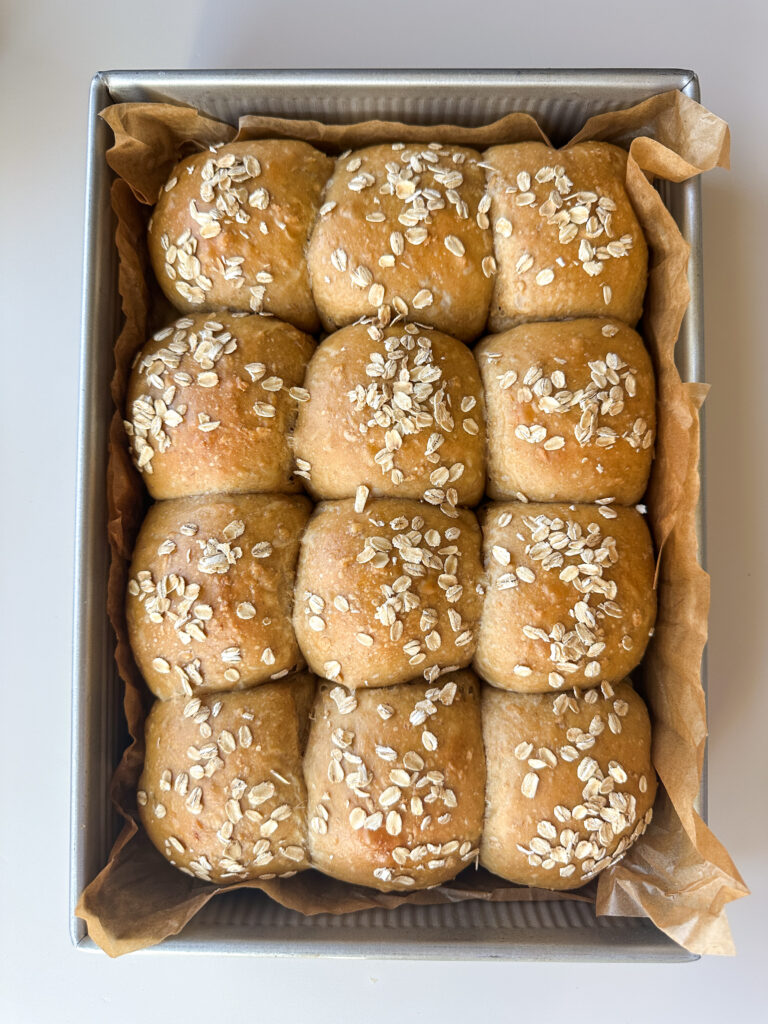
Bake rolls for 30-35 minutes and tops are golden brown. Internal temperature should be between 195 F and 200 F. Remove rolls from oven when done and transfer to a cooling rack to avoid soggy bottoms from sitting in the pan.
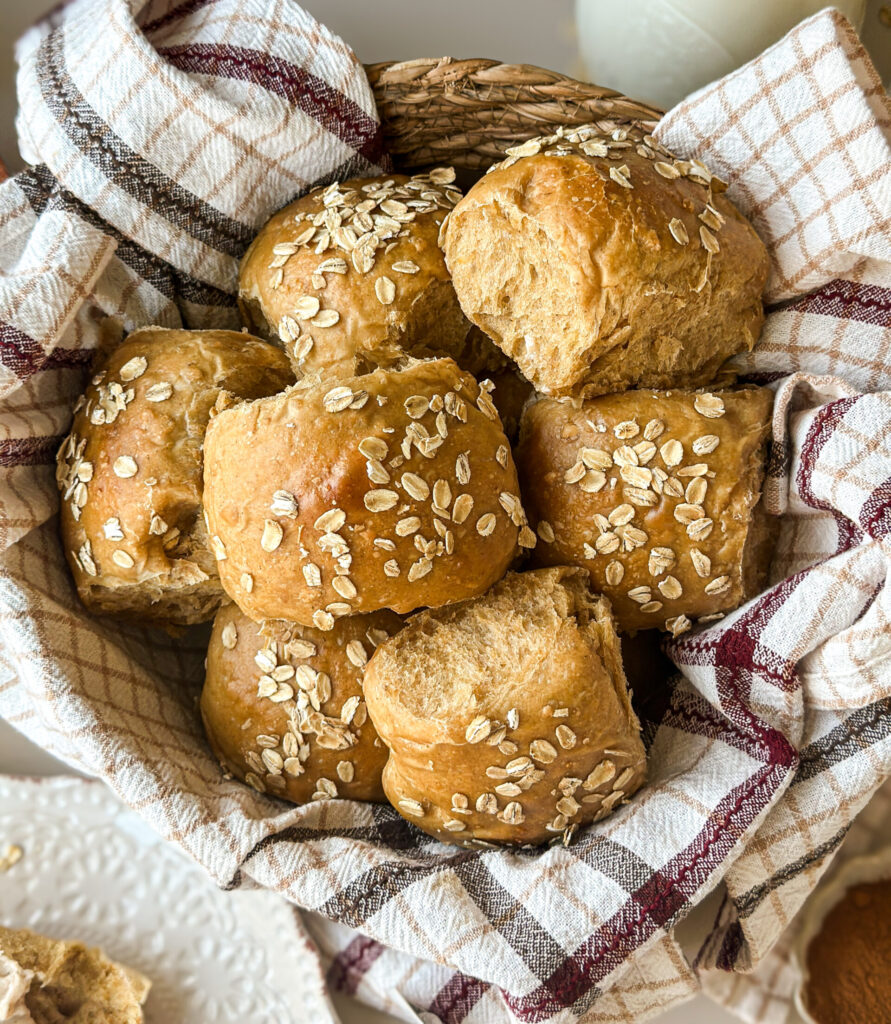
Allow rolls to cool slightly, then serve warm with my delicious Honey Cinnamon Butter.
Yields 12 dinner rolls
Make-Ahead, Freezing + Storage Tips:
Room Temperature- store rolls in airtight container up to 3 days.
Freezing and Re-heating (Baked Rolls)- Bake rolls for 30 minutes at 350°F, cool fully, then freeze. To reheat, thaw 6 hours at room temp, bake at 350 F covered with foil for 15-20 minutes. Check internal temperature to make sure center has been heated to 195 F.
Freezing and Baking (Unbaked Rolls)- shape rolls into your pan, and cover with plastic and foil. Transfer to the freezer. When you’re ready to bake the rolls, transfer to the refrigerator to thaw overnight. Replace the plastic on top of the pan to avoid condensation build up. Allow the rolls to proof at room temperature after thawing, and bake as recipe directs. I only recommend freezing dough up to 7 days ahead, longer may kill the starter in the rolls and they won’t rise.
FAQ’S:
Yes! Shape the rolls and refrigerate up to 48 hours, then proceed with proofing and baking. Note that cold dough may take longer to proof.
They should look almost twice as large, puffy, and spring back slowly when poked. See my photo above on how my rolls looked after proofing.
It keeps them soft so they blend into the dough instead of drying it out.
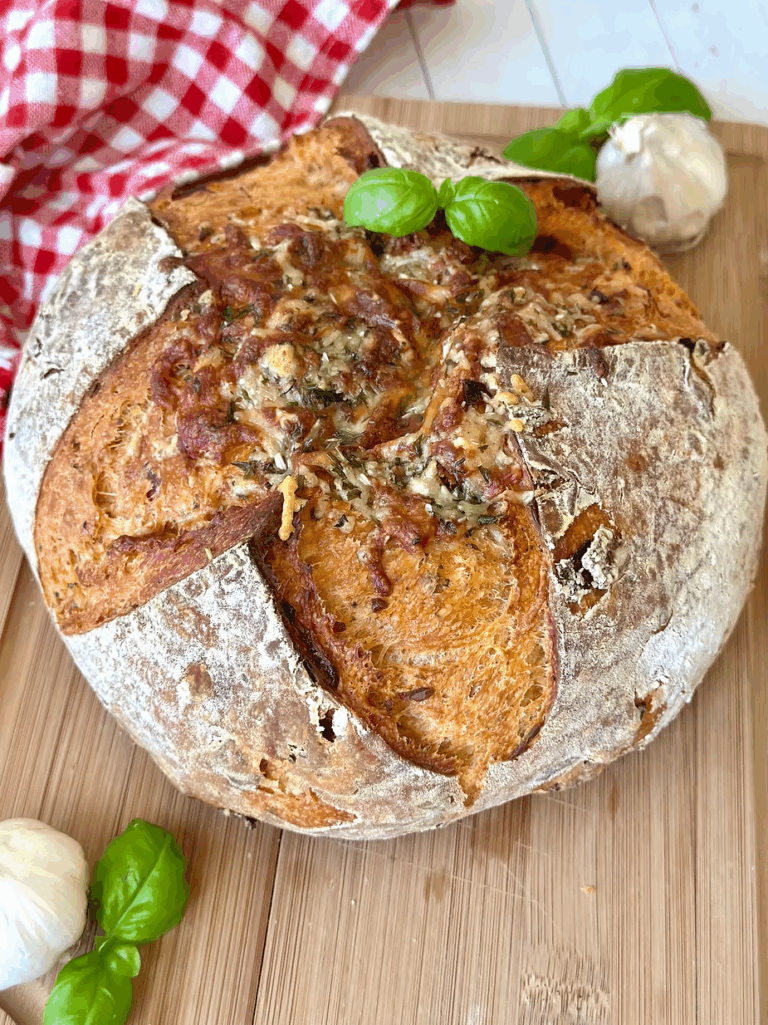
If you enjoyed this recipe don’t forget to leave a comment and star review, and try more of my delicious sourdough rolls like these Sourdough Texas Roadhouse Rolls or my Sourdough Brown Butter Herb Dinner Rolls!
Sourdough Oatmeal Molasses Dinner Rolls
Equipment
- Stand mixer with dough hook (or strong hands!) – for mixing dough.
- Bowl or straight edge container – for proofing dough. I love this container with a straight edge and lid to easily assess rise linked here.
- Whisk – for mixing.
- 9×13-inch baking pan – for baking rolls. I love this pan from USA linked here. If you're baking these rolls in bulk, I recommend using these 18×13 baking sheets that are larger and have a nice lip which bake 24 rolls at a time.
- Digital scale – recommended for accurate measurements and weighing your rolls. I love this scale linked here.
- Bench scraper or knife – for cutting dough for rolls. I like this bench knife linked here.
- Pastry brush (optional) – for the egg white topping. You can also use a folded paper towel for this.
- Digital food thermometer (optional) – helpful for checking internal temperatures. This is my go-to kitchen thermometer linked here.
Ingredients
Feed Your Starter:
- 1/2 (100g) cup water
- 3/4 (100g) cup all-purpose flour
- 2 (30g) Tbspns mature mother starter
Wet Ingredients:
- 3/4 (200g) cup sourdough starter at peak
- 1/3 (80g) cup whole milk
- 1/2 (140g) cup water
- 3 (60g) Tbsp molasses (not blackstrap)
- 3 (65g) Tbsp honey
- 1 large egg
- 1/4 (57g) cup avocado oil or any neutral cooking oil
- 1/2 tsp vanilla extract
- 2 (30g) Tbspns water hot
Dry Ingredients:
- 3 1/4 (400g) cups all-purpose flour
- 1/2 (75g) cup whole wheat flour
- 3/4 (65g) cup rolled oats
- 1 1/4 (10g) tsp fine sea salt
- 1/4 tsp cinnamon
Egg Wash:
- 1 egg white
- 2 tsp water
Garnish:
- 1/4 (25g) cup rolled oats for sprinkling
Instructions
Step 1: Feed the Starter the Night Before
- In a clean jar, mix your mother starter with the flour and water. Give it a good stir, and allow it to rest at room temperature (optimally 73-75 degrees F). I like to mark the volume in my jar with a rubber band so it’s easy to asses the rise the next morning. When the starter has doubled in size, it’s time to mix your dough.1/2 (100g) cup water, 3/4 (100g) cup all-purpose flour, 2 (30g) Tbspns mature mother starter
Step 2: Mix the Dough
- In a microwave safe bowl add the water and milk. Gently heat in the microwave for about 15 seconds to gently warm. Be careful to avoid overheating this mixture. Set aside for the dough.1/3 (80g) cup whole milk, 1/2 (140g) cup water
- In a shallow bowl, add the rolled oats and pour 2 Tablespoons of hot water over the oats and stir them with a spoon to hydrate the oats for the dough. Set this aside for the dough.3/4 (65g) cup rolled oats, 2 (30g) Tbspns water
- In a mixing bowl or stand mixer bowl add the sourdough starter, egg, avocado oil, the heated water and milk, molasses, honey, and vanilla extract. Whisk the wet ingredients until they’re loosely combined, a few lumps are okay.3/4 (200g) cup sourdough starter, 3 (60g) Tbsp molasses, 3 (65g) Tbsp honey, 1 large egg, 1/4 (57g) cup avocado oil, 1/2 tsp vanilla extract
- Add the all-purpose flour, whole wheat flour, oats that have been soaked, cinnamon, and salt to the bowl.3 1/4 (400g) cups all-purpose flour, 1/2 (75g) cup whole wheat flour, 1 1/4 (10g) tsp fine sea salt, 1/4 tsp cinnamon
- Knead for ten minutes the dough should be slightly sticky and well mixed
- To knead the dough using a stand mixer, knead the dough on low for ten minutes. If mixing by hand, knead for 2-3 minutes and the dough comes together into a smooth ball. This dough is high hydration so it’s important to work the gluten at this stage. Don’t be worried if it feels sticky, I promise as it rests the flour will absorb the moisture.
- Spray a straight edge container or bowl with cooking oil. Transfer the dough to the prepared bowl. Perform a few sets of stretch and folds to work the dough into a ball again.
Step 3: Bulk Fermentation
- Cover the dough with plastic or a lint free cloth. If you used a stand mixer to mix the dough, perform one set of stretch and folds after 30 minutes of the dough resting.
- If you are hand mixing this dough, you’ll need to work the gluten a bit more. Perform three sets of stretch and folds at 30 minute intervals at the beginning of bulk fermentation to do this.
- To perform a set of stretch and folds: simply grab the dough at the edge of the bowl and pull it up, then fold it down into the center of the bowl. Repeat this step until you’ve worked around the entire edge of the bowl, and the dough forms a ball.
- After you’ve completed your stretch and folds, cover dough and allow the dough to double in size (proofing 100% in volume). Make sure you watch that this dough doesn’t overproof, it can with the high ratio of starter. I allowed my dough to proof 6 hours in the oven with the light OFF, for a warmer environment (75-80 degrees).
- Overnight Fermentation: When your dough has doubled in size, you can either transfer the dough covered with plastic or a sealed lid to the refrigerator to rest overnight, or you can continue straight to shaping the rolls. You can also shape the rolls into the pan, and cover with plastic to bake the next day.
Step 4: Shaping the Rolls
- If you refrigerated your dough overnight, allow the dough to sit at room temperature for 30 minutes before shaping to take the chill off. If you didn’t chill the dough, skip this step.
- Line a 9×13 baking pan with parchment paper and spray with non-stick cooking spray. Set aside.
- Spray your work surface with cooking spray, and gently turn the dough out onto the work surface. I find cooking spray works better than flour with this process as the dough is stickier, but you can also use flour if you prefer.
- Cut the dough into 12 even pieces. If you’re weighing the rolls for precision, they should each weigh roughly 95g each.
- Shape each piece of dough by tucking the dough under itself to form a ball, then gently roll it on your work surface to shape the roll evenly.
- Repeat this step to shape all of the rolls, then transfer the shaped rolls to the prepared baking pan. Line the rolls in three rows of four. Cover the pan with plastic or a lint free cloth.
- Overnight Refrigeration: If you want to shape and wait to bake your rolls till the next day, you can cover your pan and transfer the rolls to the refrigerator overnight at this point. Proof rolls the next day as instructed below and bake as listed.
- Allow the rolls to proof until about doubled in size, about an hour and a half (this may take longer if you refrigerated the rolls overnight). Don’t skip letting these proof until they’re very puffy and touching, or you will end up with a more dense roll.
Step 5: Bake the Rolls
- Preheat your oven to 350°F (175°C)
- While the oven is heating, beat one egg white with with 2 teaspoons of water. Brush the egg white wash over the tops of the rolls.1 egg white, 2 tsp water
- Sprinkle the tops of the rolls with more rolled oats for a garnish.1/4 (25g) cup rolled oats
- Bake rolls for 30-35 minutes and tops are golden brown. Internal temperature should be between 195 F and 200 F. Remove rolls from oven when done and transfer to a cooling rack to avoid soggy bottoms from sitting in the pan.
- Allow rolls to cool slightly, then serve warm with my delicious Honey Cinnamon Butter.
- Yields 12 dinner rolls