
Sourdough Cookie Butter Donuts
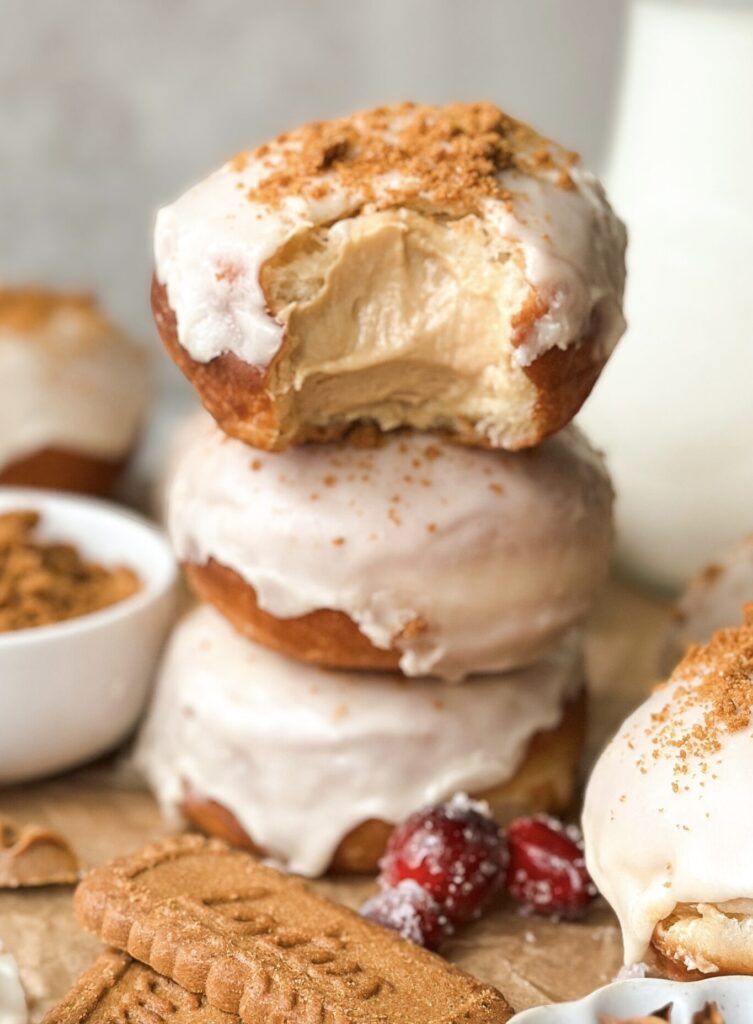
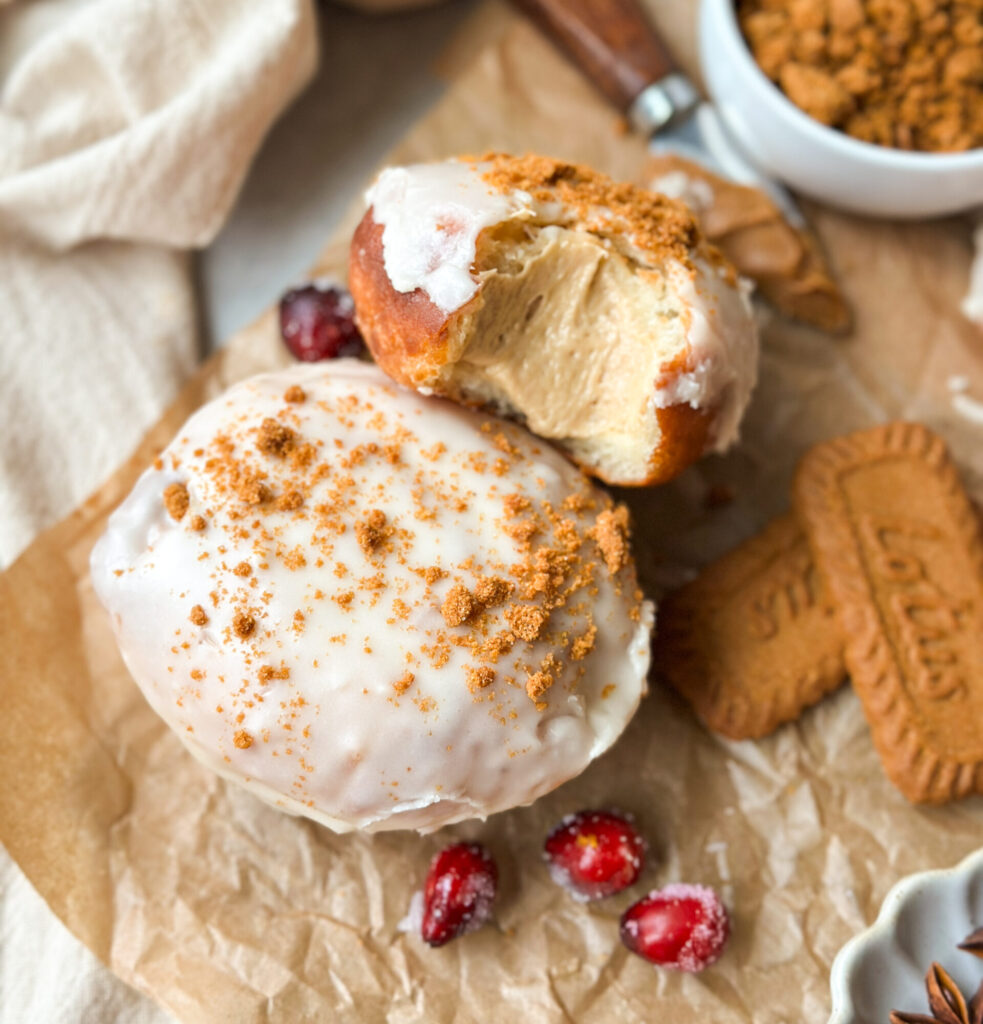
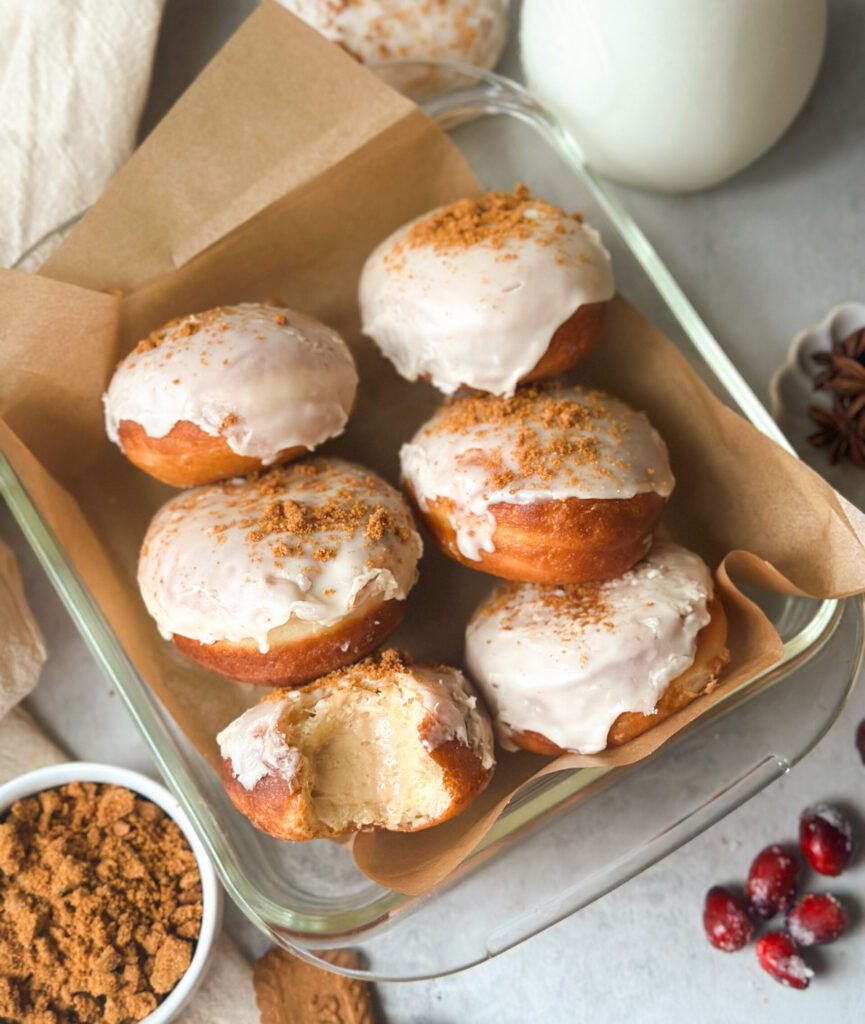
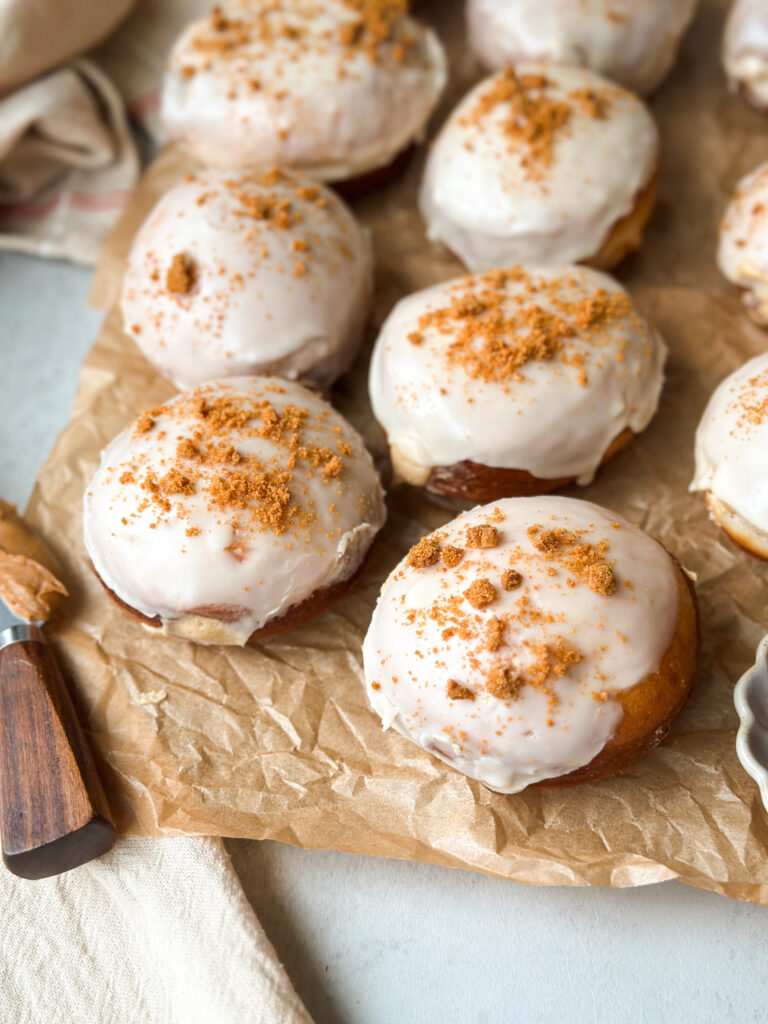
There’s something magical about a warm, freshly fried donut, especially when it’s filled with cookie butter. These Sourdough Cookie Butter Donuts taste like the upgraded, homemade version of that famous Dunkin’ holiday cookie butter donut… but softer, fluffier, and way more special thanks to sourdough. The donut is my traditional sourdough donut base, and inside you’ll find a silky, bakery-stable cookie butter filling that pipes like a dream and is so delicious. Each donut is finished with a thick maple glaze that sets beautifully (no drips!) and topped with crushed Biscoff® cookies. This donut is one you must try immediately, and will have everyone begging for more.
Why You’ll Love This Recipe
- Made completely from sourdough– this donut base is made entirely from sourdough starter, and thanks to a sweet levain the dough is mild and sweet. I use a tangzhong in this dough to give it the most airy texture!
- Filling that pipes easily- this cookie butter filling comes together quickly and is stable for piping into your donuts.
- Glaze that sets- the maple glaze is so thick and looks exactly like the glaze you see in donut shops with a gorgeous color and it sets perfectly.
- Tips and tricks for frying- I’ve included detailed steps to achieve a bakery-level donut right at home with all of my best tips.
- Make-ahead friendly- this dough can be made the day before, so that you can quickly roll out the donuts and let them proof while you prepare your filling.
Why Use a Sweet Levain?
Milder flavor. The added sugar in the levain feeds the yeast while tempering the sourness of the sourdough. The sugar works to stabilize fermentation and works beautifully in enriched doughs.
Why Use a Tangzhong?
Tangzhong is a simple process of heating up milk with flour and creating a roux. Done in minutes, this process pre-gelatinizes the starches allowing the dough to hold more moisture. This process locks in moisture while also strengthening the dough, resulting in pillowy soft texture with an expanded shelf-life. This will give you yeasted results while keeping it sourdough!
Tools You’ll Need:
- Stand mixer or hand-held beaters (optional)- for kneading dough. You can mix the dough by hand but a mixer is easiest. You will need either a stand mixer or hand beaters to beat the cookie butter filling.
- Small and medium sized pot- for making tangzhong and glaze.
- Kitchen scale or measuring cups and spoons– for measuring ingredients.
- Rolling pin- for rolling out donuts.
- Round cookie cutter- for cutting out donuts, you can also use a cup. I used a 4″ cookie cutter linked here.
- 12 4×4 parchment squares- This make frying the donuts so easy! You can either cut your own squares or buy them, I’ve linked pre-cut squares here.
- Deep pot or Dutch oven– for frying donuts.
- Frying thermometer– for keeping oil at 340–350°F. I strongly recommend using this tool to avoid burning I use this one linked here and love it.
- Slotted spoon or spider- to flip donuts. The spider I use is linked here.
- Chopsticks (optional)- helpful for flipping donuts. I like these reusable chopsticks linked here. I also used these to poke a hole in my donuts first to create a pocket for my filling.
- Cooling rack + paper towels– for drying donuts after frying.
- Tongs- for removing parchment from oil while frying.
- Digital Thermometer (optional)- helps with assessing when tangzhong is done.
- Spatula– to transfer cookie butter filling.
- Wire rack– for draining excess glaze from donuts after glazing.
- Piping bag and star tip- for filling the donuts. I used these pastry bags linked here and this tip linked here.
*As an amazon affiliate this post may contain affiliate links, which means I may receive a commission for qualifying purchases. I only recommend products that I personally love and use.*
Gather Your Ingredients:
- Whole milk – milk enriches this dough making it soft and tender. You’ll also use milk to make your tangzhong.
- Egg and egg yolk– adds tenderness and structure to the dough working as a binder.
- Unsalted butter – enriches dough and adds rich flavor to glaze. Needed for the cookie butter filling.
- White Sugar – sweetens the dough and cuts the tang of the starter with a sweet levain.
- Sea salt – balances sweet and sour flavors.
- Vanilla extract – for aromatic warmth and depth of flavor to dough, filling, and glaze.
- All-purpose flour– I recommend AP flour over bread flour to create a more tender crumb. The egg and tangzhong will provide the structure in this recipe making bread flour unnecessary, but you can substitute for bread flour if needed.
- Organic Coconut Oil- for frying donuts and achieving a crisp texture without a strong aftertaste. I highly recommend Carrington Organic coconut oil linked here. This container lasts me several batches when frying, and you just allow the oil to cool after frying and remove any excess bits before transferring left over oil to a glass jar. Coconut oil has a higher smoke point which is ideal for frying, has little to no aftertaste, and is more stable under high heat making it less likely to oxidize and form harmful free radicals.
- Cookie Butter- This is essential for the flavor and texture of the cookie butter filling, I used Biscoff® linked here but any will work.
- Cornstarch- helps the filling stabilize.
- Powdered sugar – also known as confectioners sugar, to sweeten and thicken the filling and the maple glaze. Don’t use granulated sugar.
- Heavy Cream- used to lighten the texture of the filling and used in the glaze for a thick rich finish.
- Milk- added to glaze to thin to desired consistency.
- Pure Maple Syrup- added to glaze for that signature maple flavoring. Make sure you use pure maple syrup!
- Maple Flavoring (optional)- if you want to really taste the maple in the glaze, I recommend a small amount of maple flavoring. I’ve linked Frontier Co-op’s maple flavoring here that I LOVE and has better ingredients.
- Biscoff® Cookies (optional)- to crush and sprinkle on top for that perfect finish. I’ve linked the cookies here for you!
Now let’s make Sourdough Cookie Butter Donuts!
Instructions
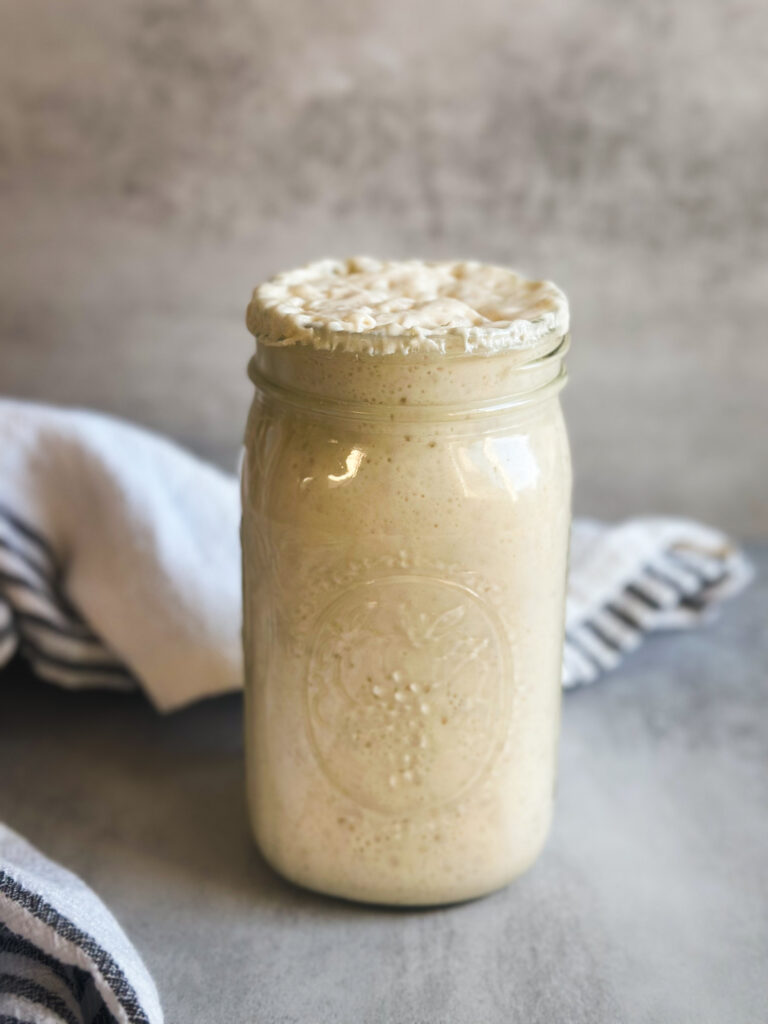
Step 1: Make the Sweet Levain (Night Before)
Baker’s Schedule: 8:00 PM- Night Before
To start your dough, you’ll want to mix a sweet levain the night before. If this sounds intimidating, it’s not! It’s literally just adding sugar to your starter. This curbs the tang of the sourdough for the perfect donut.
In a clean jar, mix your mother starter with the flour, water, and sugar. Give it a good stir, and allow it to rest at room temperature (optimally 73-75 degrees F). I like to mark the volume in my jar with a rubber band so it’s easy to asses the rise the next morning. When the sweet levain has doubled in size, it’s time to mix your donut dough.
Step 2: Make the Tangzhong
Baker’s Schedule: 8:00 AM- Day 1
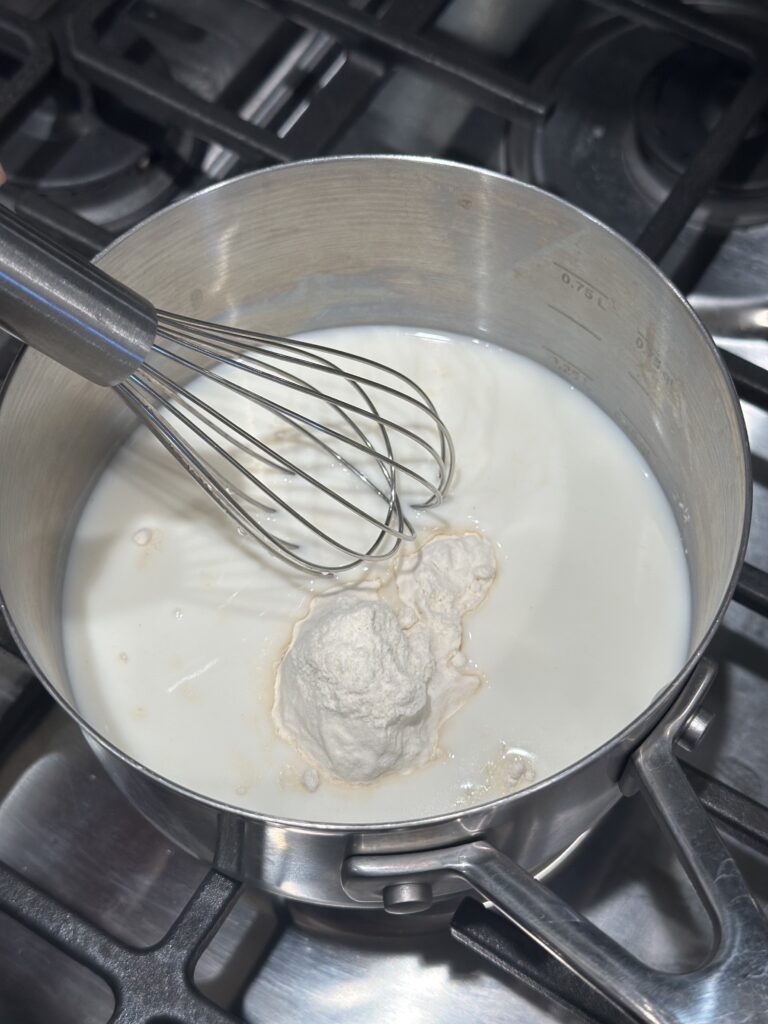
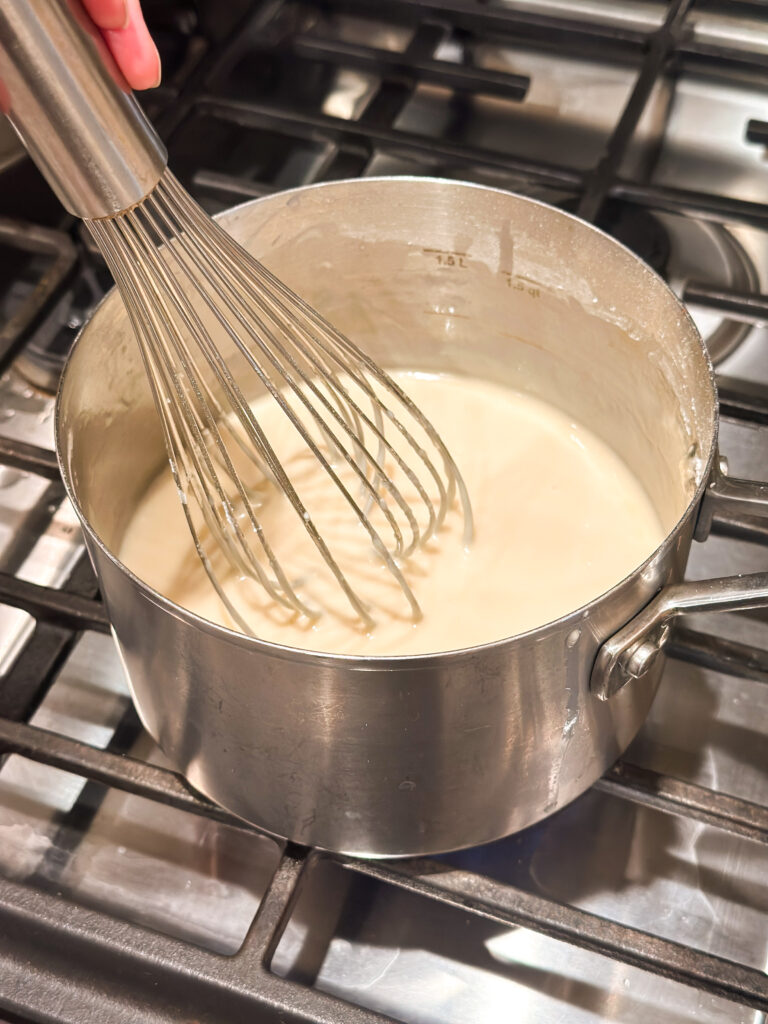
Before you get started on mixing your dough, you’ll make your tangzhong. Whisk milk and flour together in a small saucepan.
Cook the tangzhong over medium/low heat, stirring constantly, until it thickens into a paste that is similar to pudding (about 2–3 minutes). For precision, use your digital thermometer and heat to 148-155 F. Do not overheat, or your mixture will be too thick.
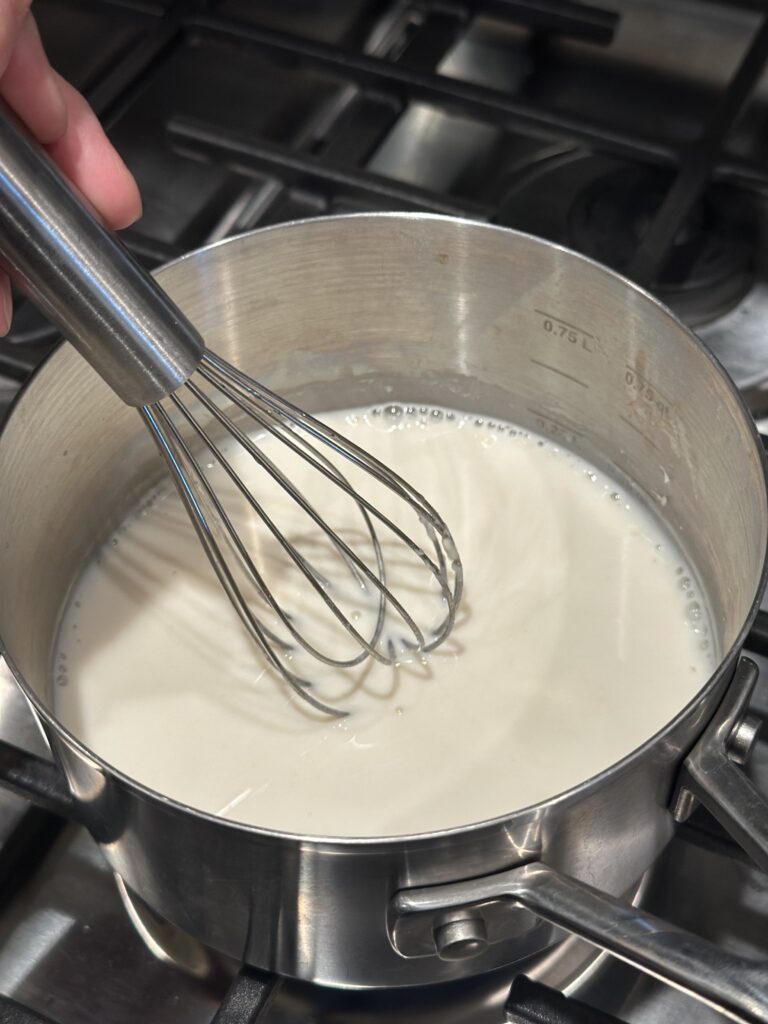
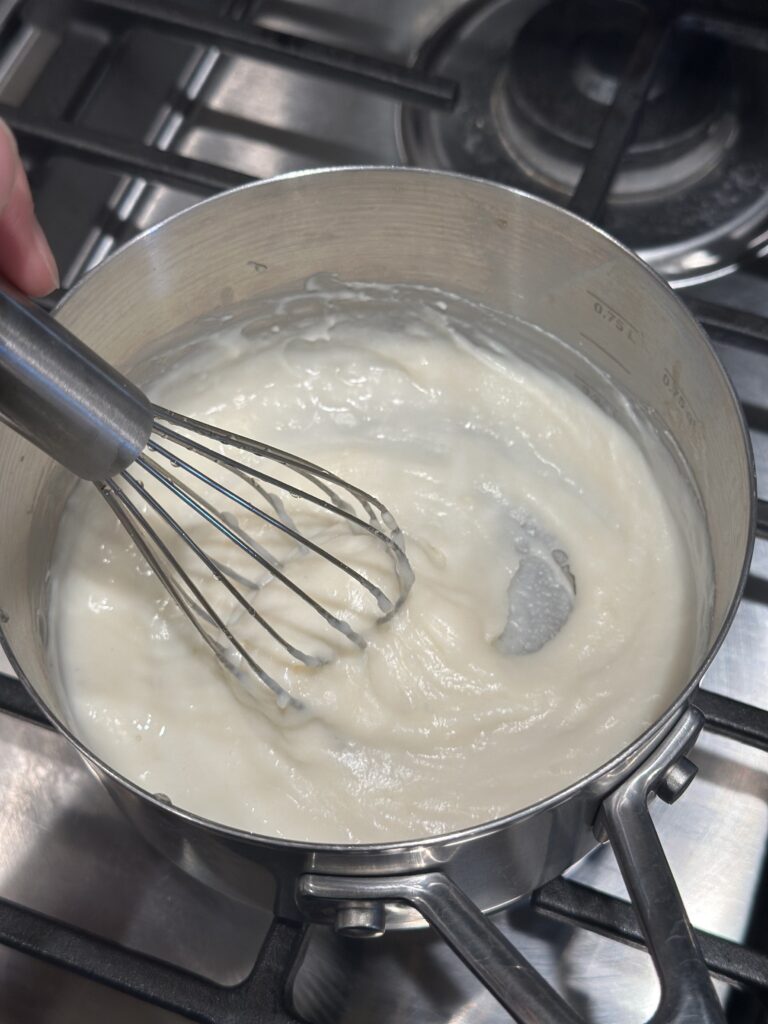
Scrape into a bowl immediately to prevent further cooking, cover, and let cool to room temperature before adding to your dough.
Prepare your dough while tangzhong cools.
Step 3: Mix the Dough
Baker’s Schedule: 8:30 AM- Day 1
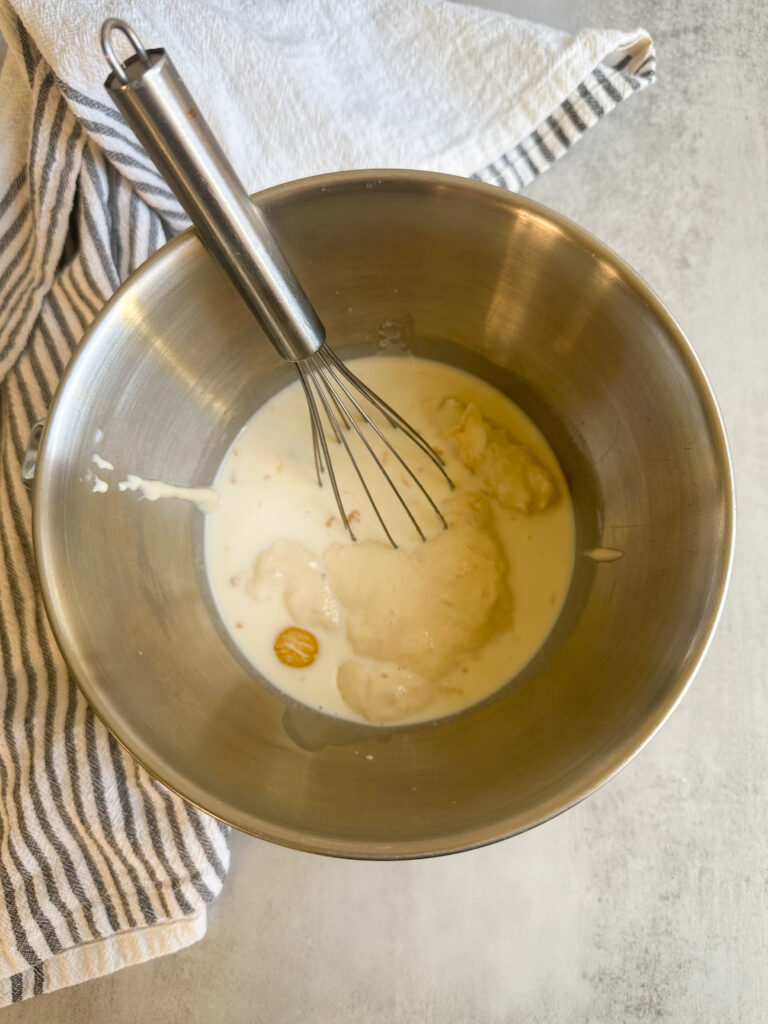
In a stand mixer fitted with a dough hook or large mixing bowl, add the whole milk, sweet levain, egg and egg yolk, sugar, vanilla, and all of the tangzhong. Whisk ingredients together quickly, it’s okay if it’s lumpy.
Add your flour and salt into your wet ingredients.
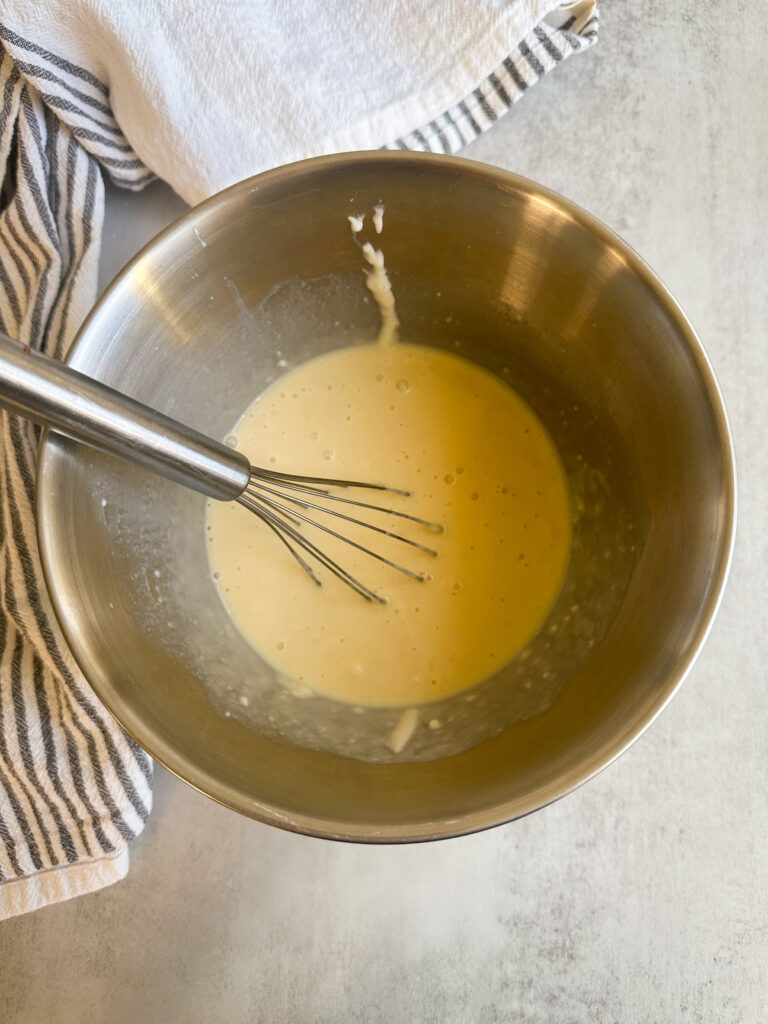
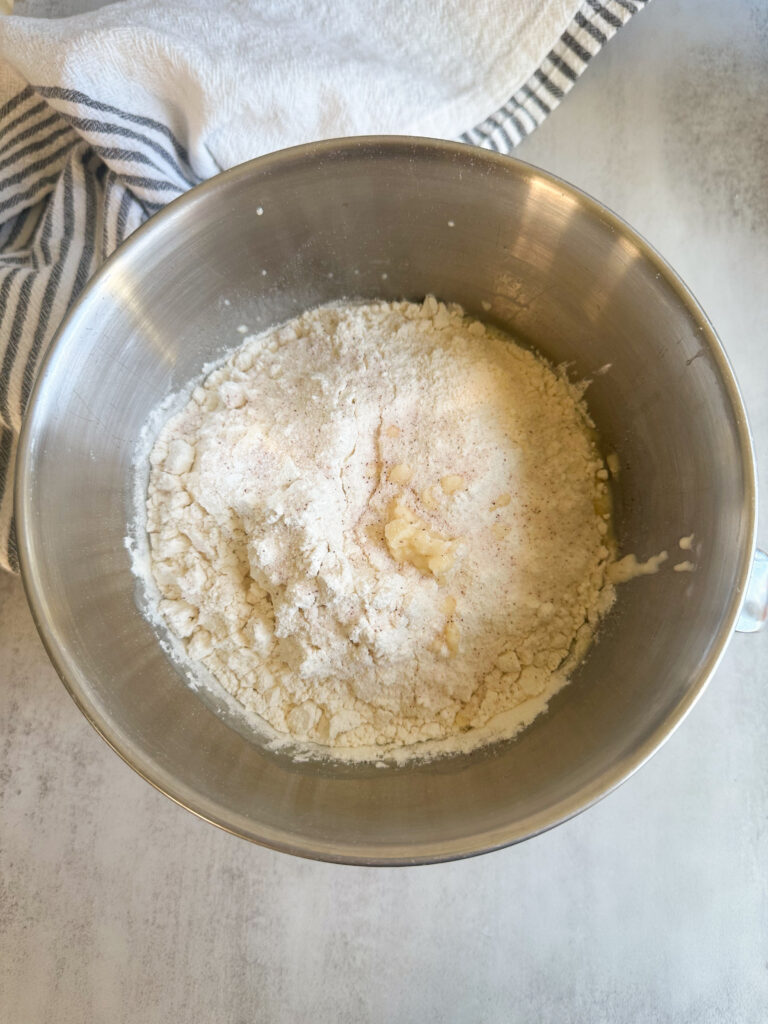
Mix on low until a shaggy dough forms, about 2-3 minutes. Scrape down bowl if needed. If using your hands, knead until you work dough together. This is a higher hydration dough, so be aware it will be sticky.
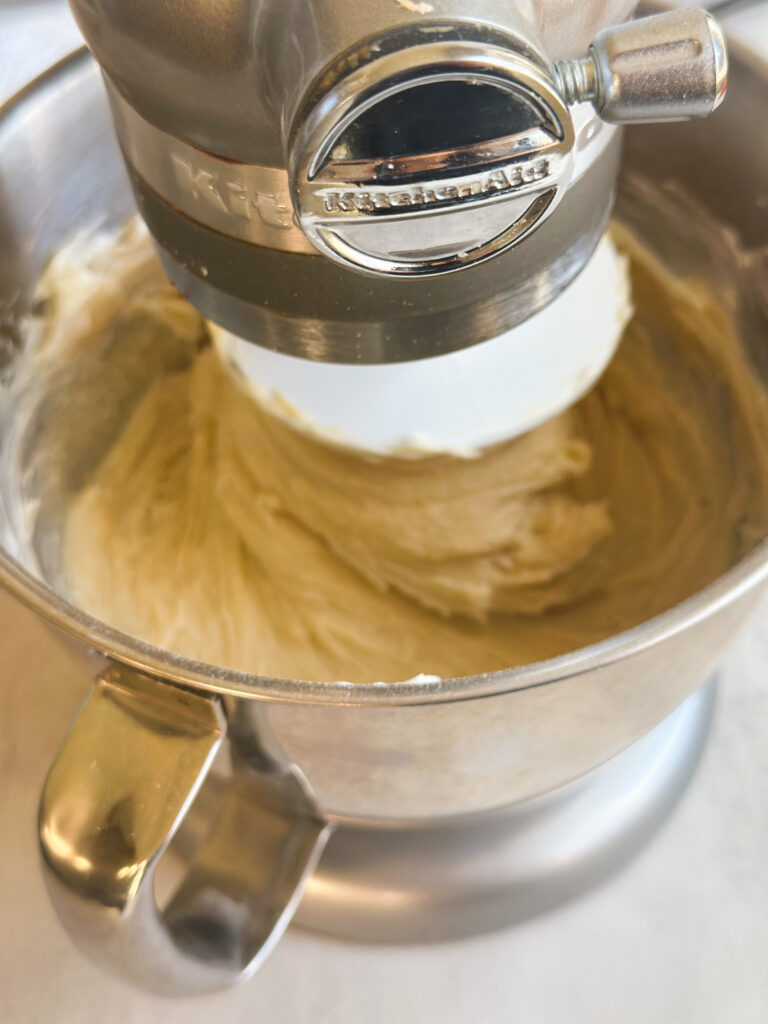
Once the dough has come together add softened butter, a tablespoon at a time mixing each tablespoon in until adding the next. Use a dough scraper to scrape the edges of the bowl to make sure everything is getting mixed in.
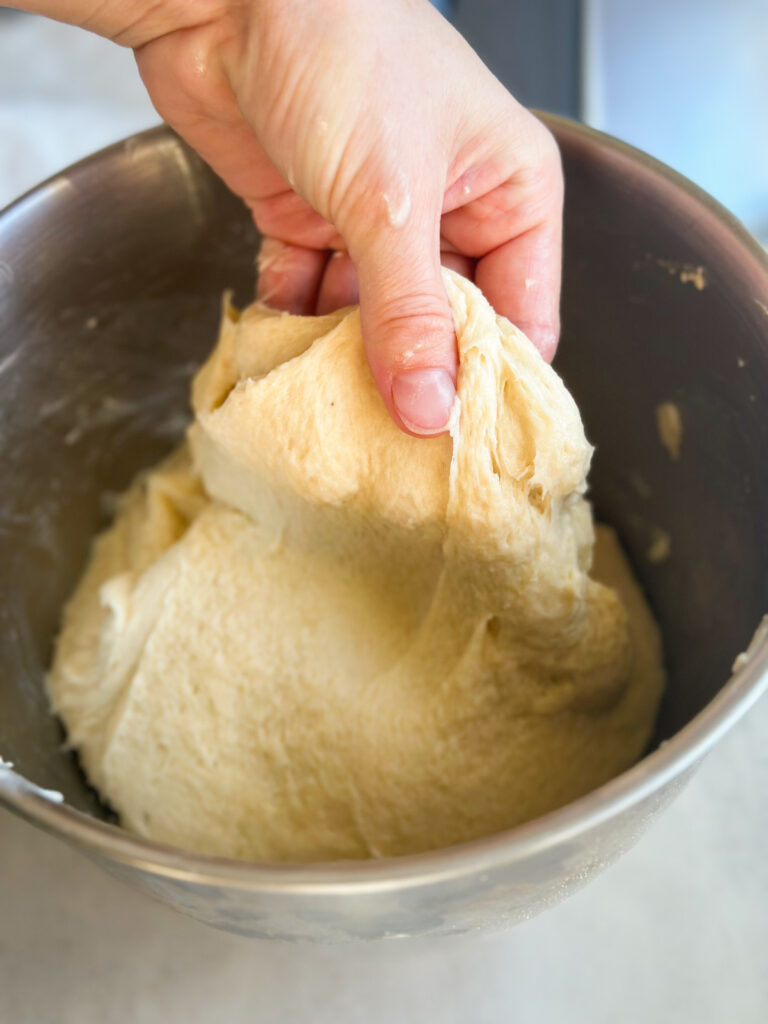
Continue mixing on medium-low (speed 2–3) for 8–10 minutes, until dough is smooth, elastic, and tacky but not sticky. If mixing by hand knead dough until butter has fully incorporated and dough is smooth and tacky.
Mixing Notes: If kneading in a mixer or if dough is very wet when mixing by hand, add an additional 25 grams (3 Tablespoons) of flour and mix into dough. Make sure to work flour in completely and assess if you need more flour. I did this twice adding in a total of 50 grams (6 Tablespoons) of flour for the dough consistency I liked.
Do not add more than 50 grams of flour at this stage, or you will lose the high hydration of the dough and end up with a dense donut. If using a stand mixer, dough can become more warm and sticky and I have found kneading dough with my hand (perform a set of stretch and folds) for a minute after mixing in my stand mixer really helps bring the dough together.
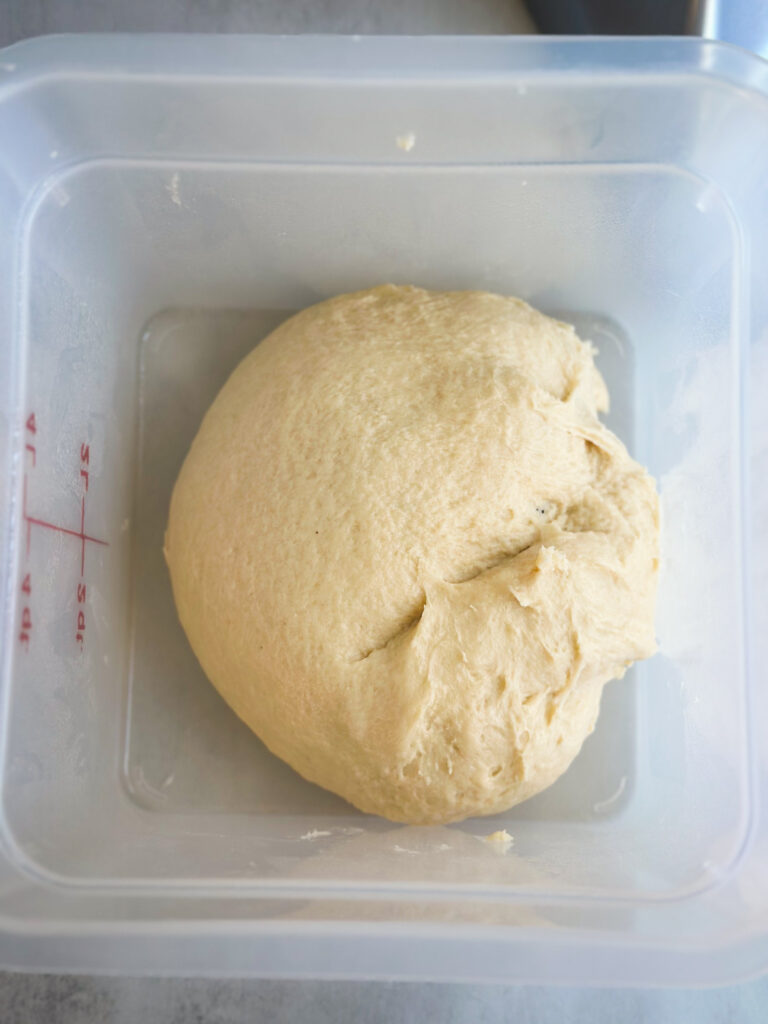
Step 4: Bulk Fermentation
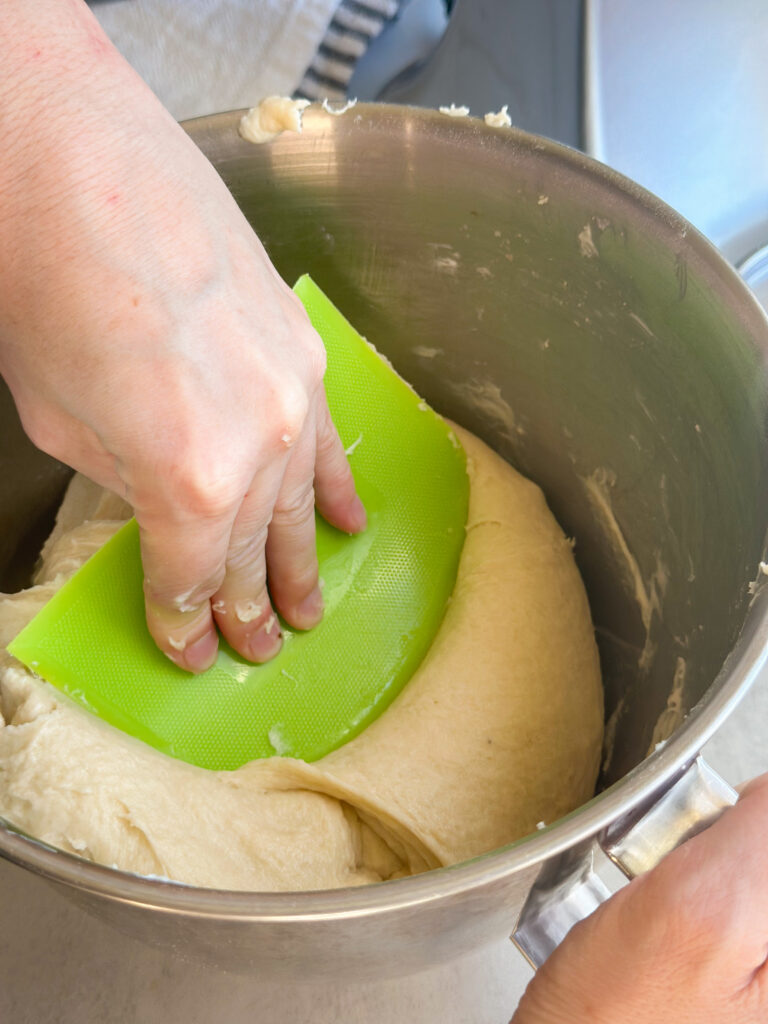
Spray a clean bowl with oil. Shape the dough into a smooth ball and place it in the bowl. Cover with plastic wrap.
If you used a stand mixer, perform one set of stretch and folds after 30 minutes to strengthen your dough. If you mixed dough by hand, perform 3 sets of stretch and folds at 30 minute intervals at the beginning of bulk fermentation. After stretch and folds are completed, cover dough and allow to continue proofing.
Let dough rise at 75–80°F until doubled in size, this takes about 5–6 hours. If your house is very cold, you can put dough in the oven with the light on for a warmer atmosphere. This proofing time is a general guide, this process may take longer the key is to assess when the dough has nearly doubled that’s when it’s ready.
Overnight Fermentation: Once dough has finished rising, you can cover and transfer to the refrigerator overnight for a longer ferment or you can skip this step and go straight to making your donuts. I do find it to be easier to shape the donuts when the dough has been refrigerated but it isn’t necessary.
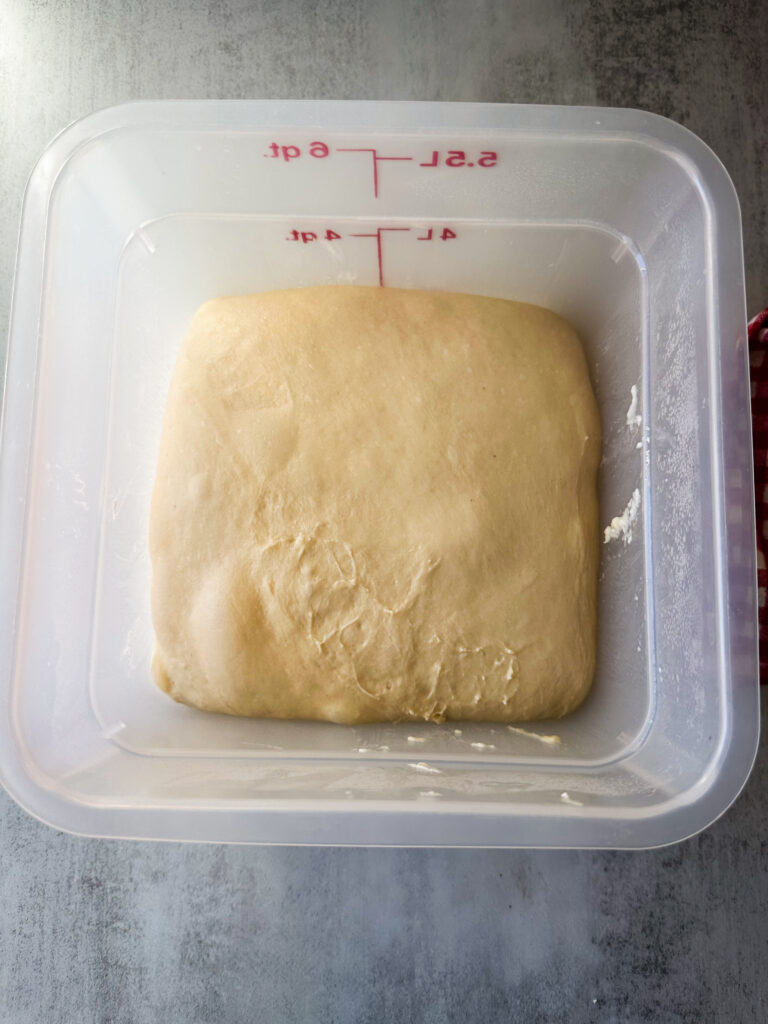
Step 5: Shape the Donuts
Baker’s Schedule- 8:00 AM Day 2 (if doing overnight ferment)
If you refrigerated the dough overnight, remove from the refrigerator and allow to rest at room temperature for about 30 minutes to take the chill off.
When dough is ready, flour a surface well and dump the dough onto the work area. Flour the top of the dough and the rolling pin as well, and gently roll out the dough to a circle that is about 1/2 inch thickness (it doesn’t have to be a perfect circle just roll out the dough).
Flour the cookie cutter or the cup, and cut out 12 even circles of dough. I don’t recommend gathering this dough and rolling it to make more donuts, I find that the initial time you roll out and cut the shapes it has the best texture so keep that in mind. The scraps would make excellent donut holes though!
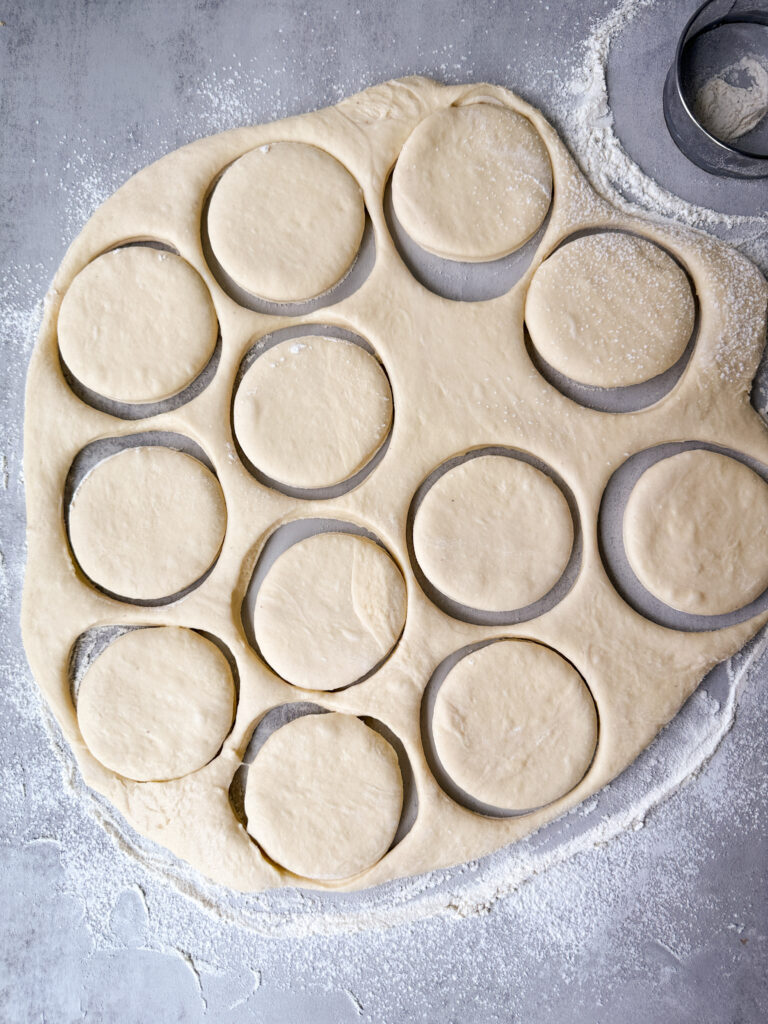
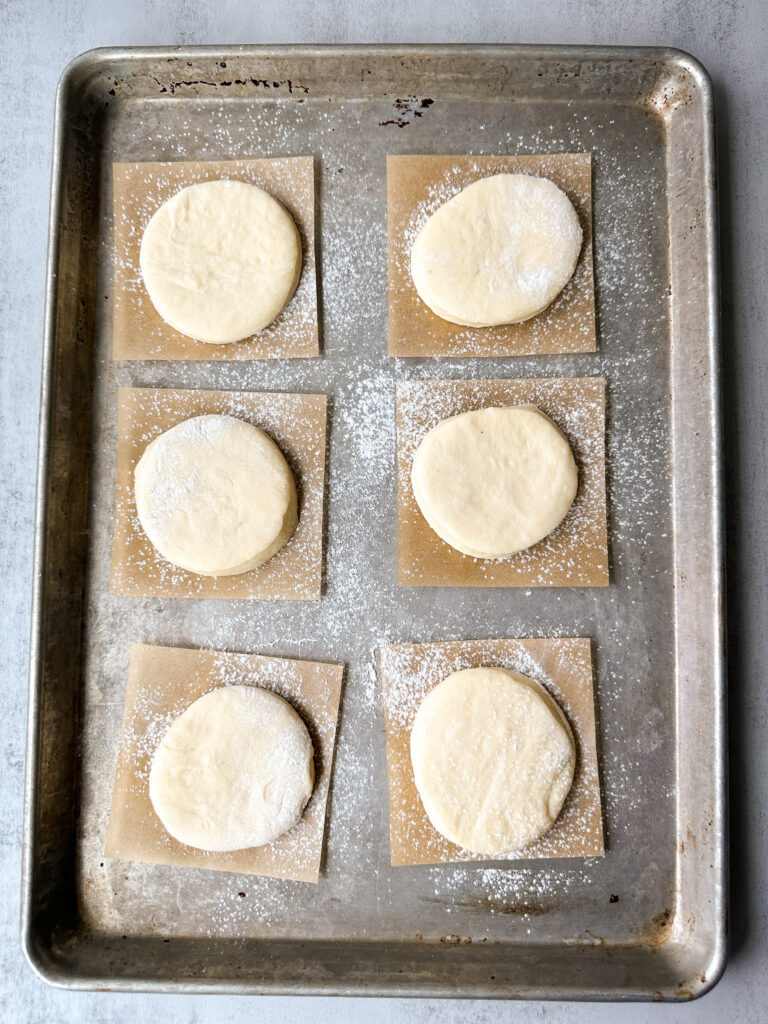
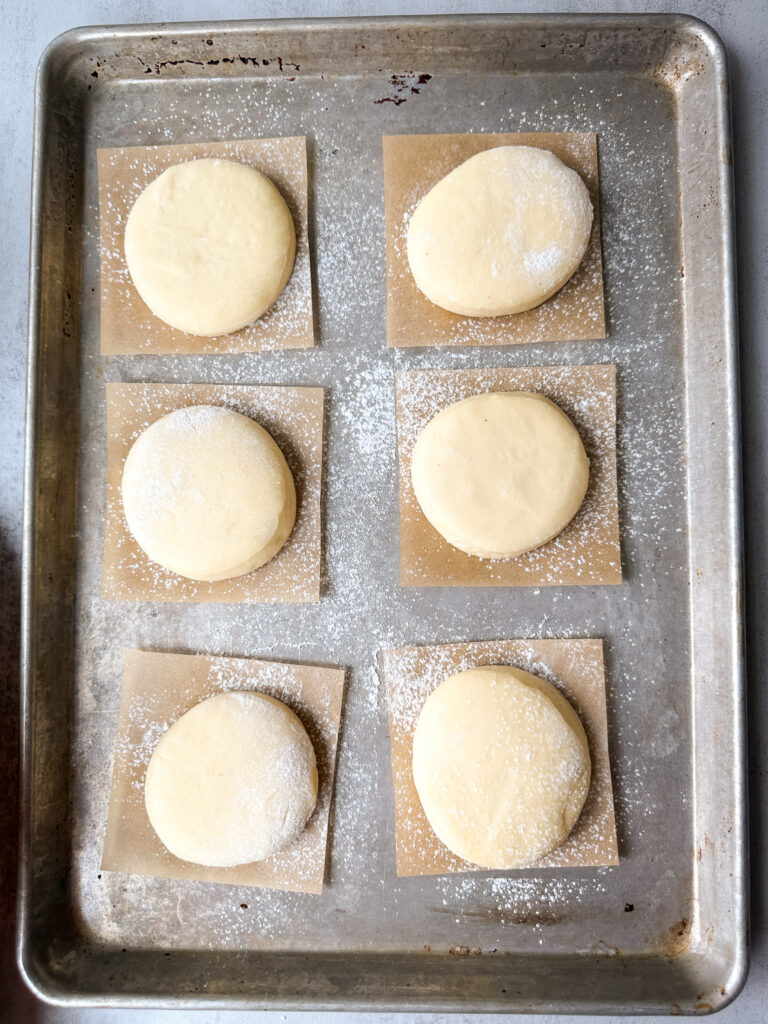
Transfer the donuts to 4×4 pre-cut parchment squares that are lightly floured, and lay them to proof on 2 baking sheets.
Cover your pans with plastic wrap and allow donuts to proof at room temperature roughly 1 1/2 to 2 hours. They should be puffy and jiggly when they’re done proofing. This step is key to a light donut, so make sure you don’t skip it!
Step 6: Make the Cookie Butter Filling
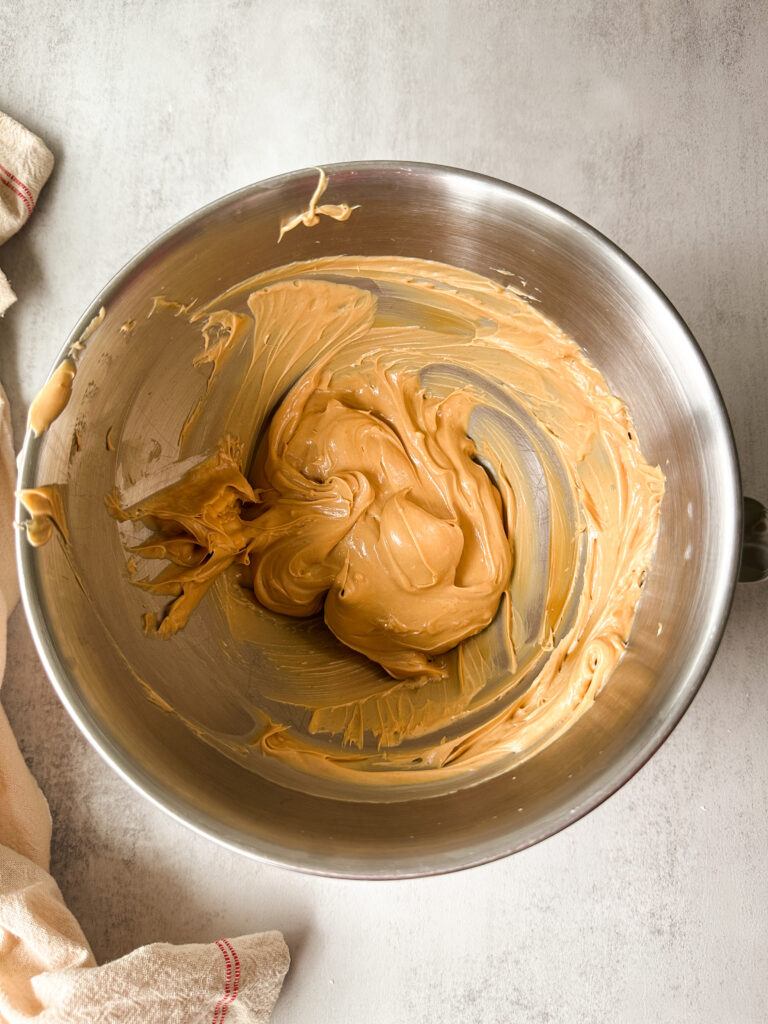
While the donuts proof, prepare your cookie butter filling. In a stand mixer bowl or a large mixing bowl, add the softened butter and the cookie butter (make sure this is room temperature).
Whip the butter and cookie butter together for 3-4 minutes on high until light and smooth.
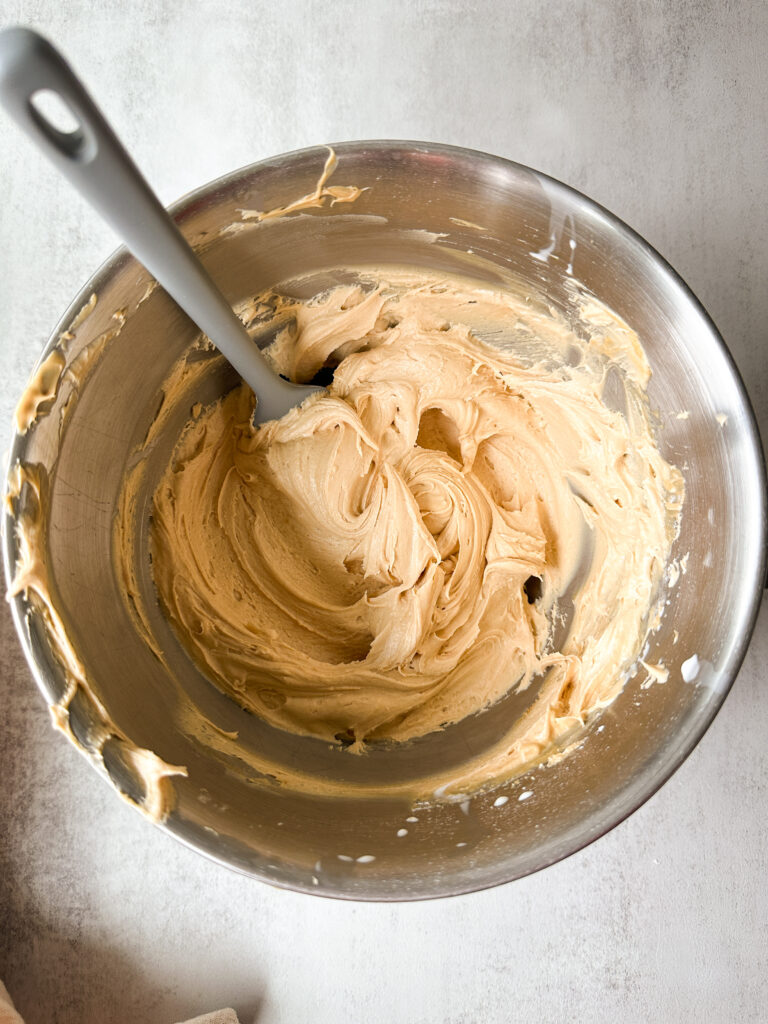
Add the powdered sugar and cornstarch to the filling, and mix on low for a minute until dry ingredients are mixed in. Once sugar is incorporated, beat on high until the filling is light and creamy.
Add the vanilla, cream, and salt to the filling and beat into the filling on high for a minute or two more until everything is well combined and the filling is airy and fluffy.
Fit the pastry bag with a piping tip, and transfer the cookie butter filling to the prepared pastry bag. You can place this in the refrigerator while you fry the donuts to make sure it doesn’t get too soft, but don’t leave it in the cold for longer than 30 minutes or the filling will be too stiff to pipe.
Place cookies for topping in a plastic bag, and crush with a rolling pin for the garnish. Transfer to a shallow dish for later.
Step 7: Fry the Donuts
Line a cooling rack with paper towels. Fit your candy thermometer into your deep pot. Transfer 3–4 cups of organic coconut oil to a deep pot or Dutch oven, and heat to 350-360°F on medium heat. If oil gets hotter than this, reduce heat accordingly. Watch your temperatures very closely and adjust your heat as needed to avoid burning the donuts.
When oil is ready, transfer 2-3 donuts with parchment paper into oil (you can remove paper with tongs when it separates).
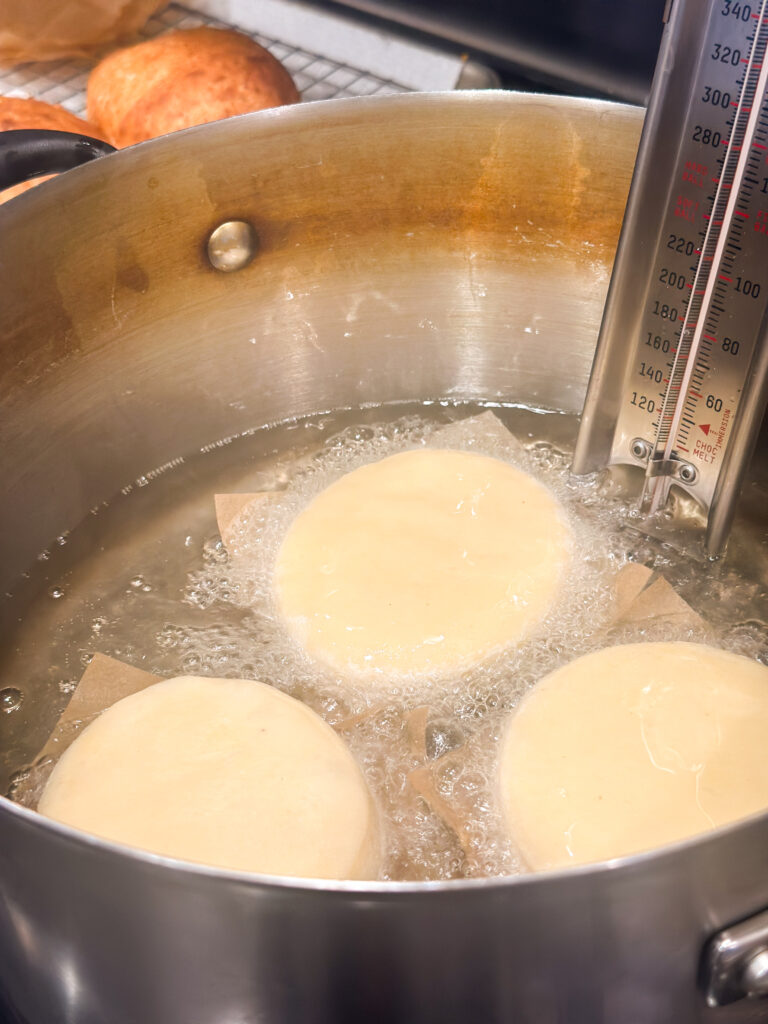
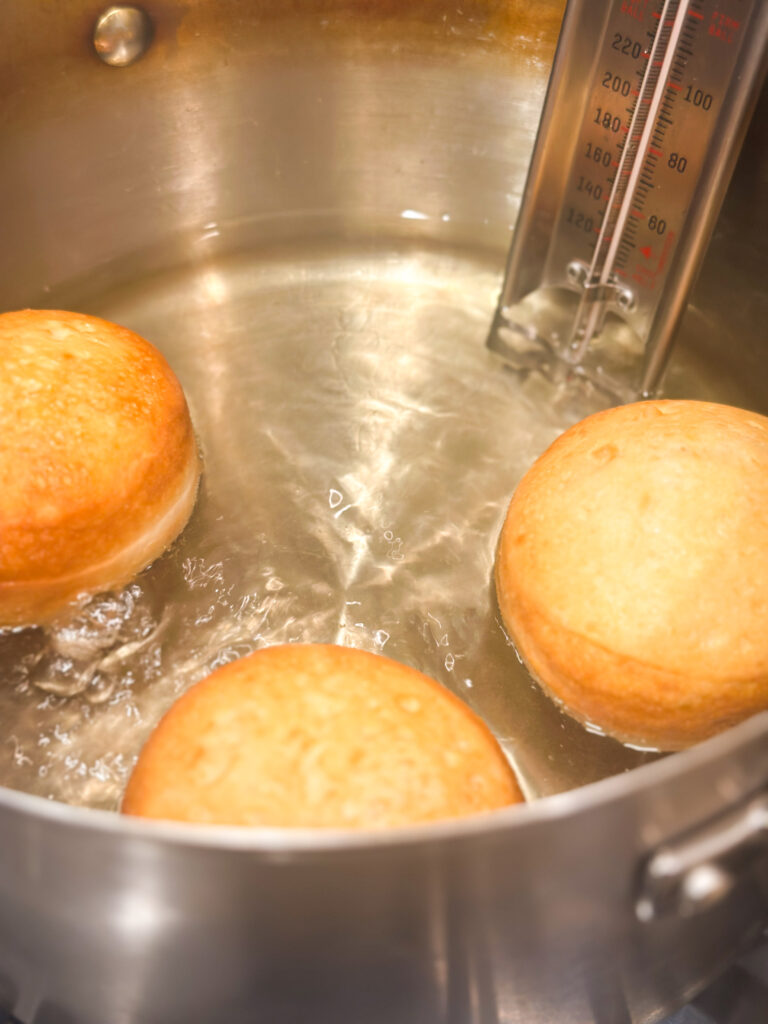
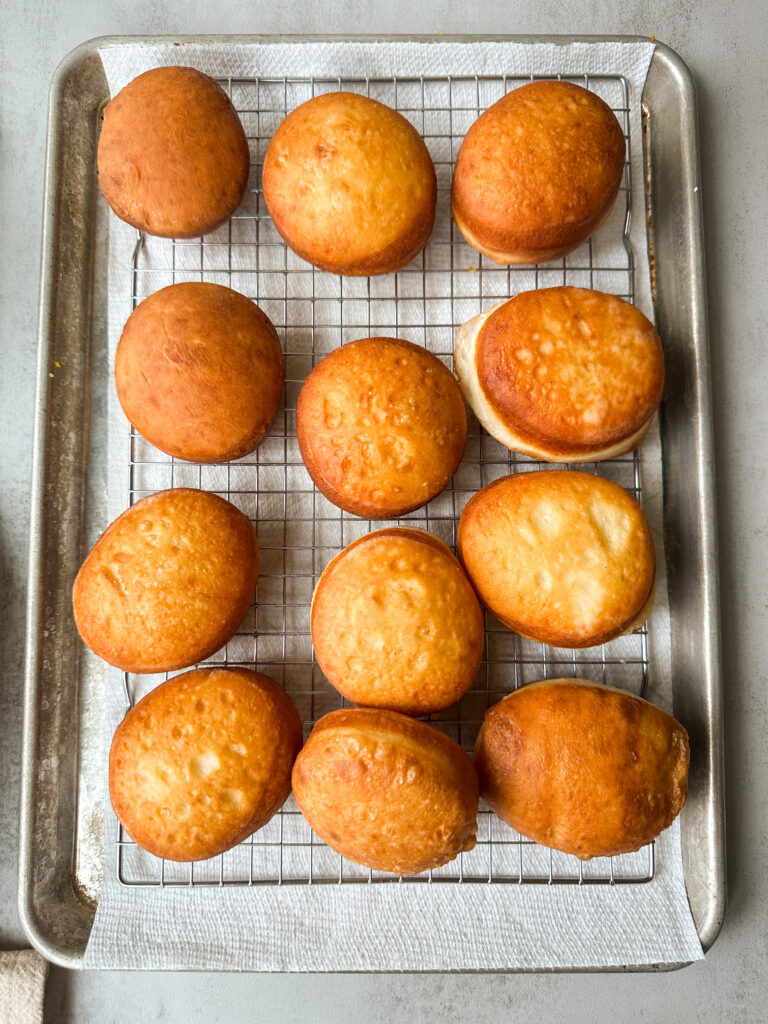
Fry 30 seconds at a time per side, flipping fritters gently using chopsticks or a slotted spoon. I repeat this step a few times rotating donuts to avoid burning. Remove after 2-3 minutes with a slotted spoon or spider spoon and donuts are a golden brown. Transfer donuts to a rack lined with paper towels to cool.
Step 8: Make the Maple Glaze
Melt the butter for your glaze in a medium sized pot over low heat.
When the butter has melted, add the powdered sugar, maple syrup, cream and cream. Whisk until the powdered sugar has completely dissolved, making sure to keep this on LOW heat.
Remove from heat immediately after sugar has dissolved, and whisk in the vanilla, maple flavoring and salt.
If the glaze is too thick, thin with a couple tablespoons of milk at a time until it reaches the desired thickness. Be aware that if you overheat the glaze, it will be more thin. I try to heat it just to the point that it needs just a minute to cool and then I can comfortably dip the donuts with my hand in the glaze.
Step 9: Fill and Glaze the Donuts
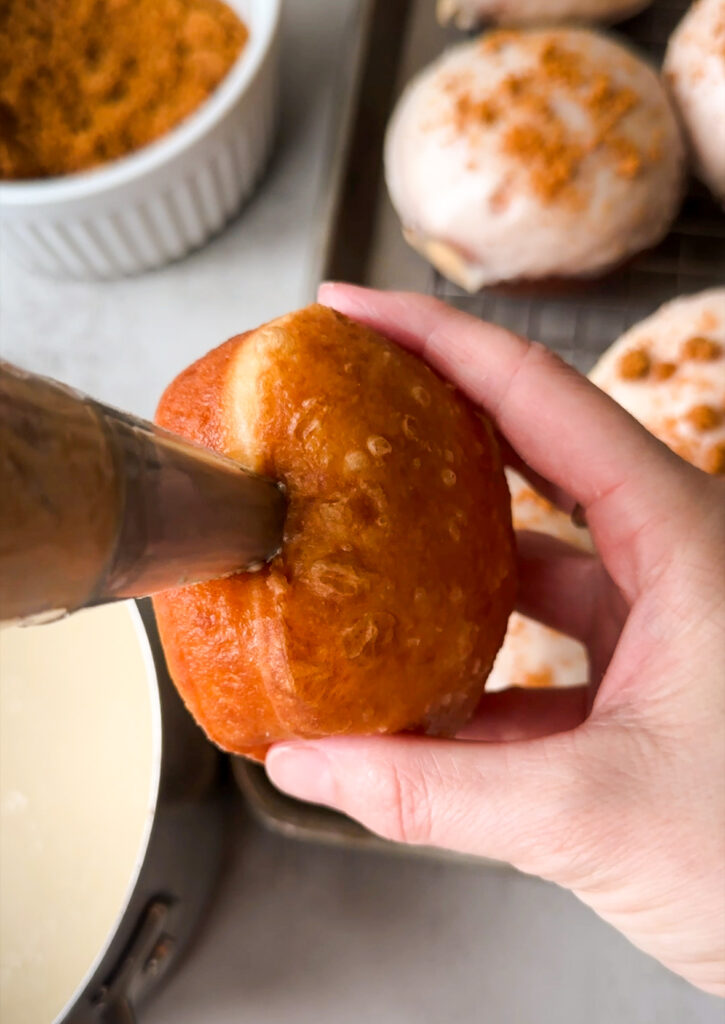
Gather your piping bag filled with the cookie butter and a skewer or chopstick.
Make sure the donuts have cooled first before you proceed with filling them! Poke a hole into the top of one of the donuts with a skewer to make a hole to fill the donut. Place the piping tip into the donut, and pipe the cookie butter cream into the donut. Repeat this step until all of the donuts have been filled.
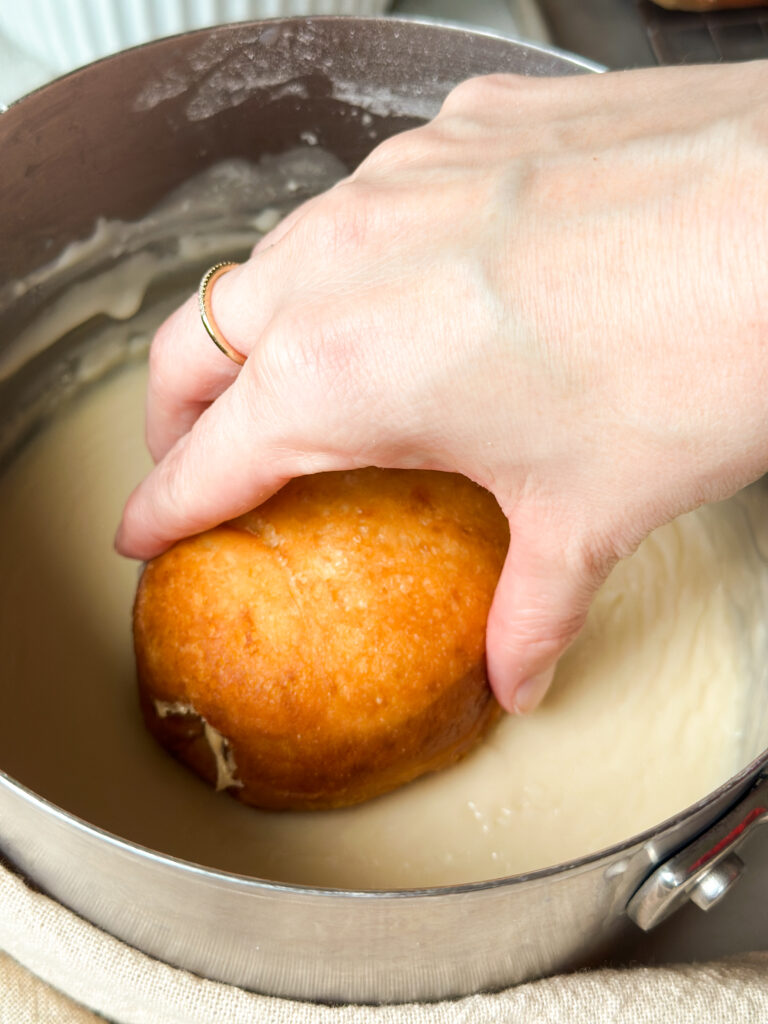
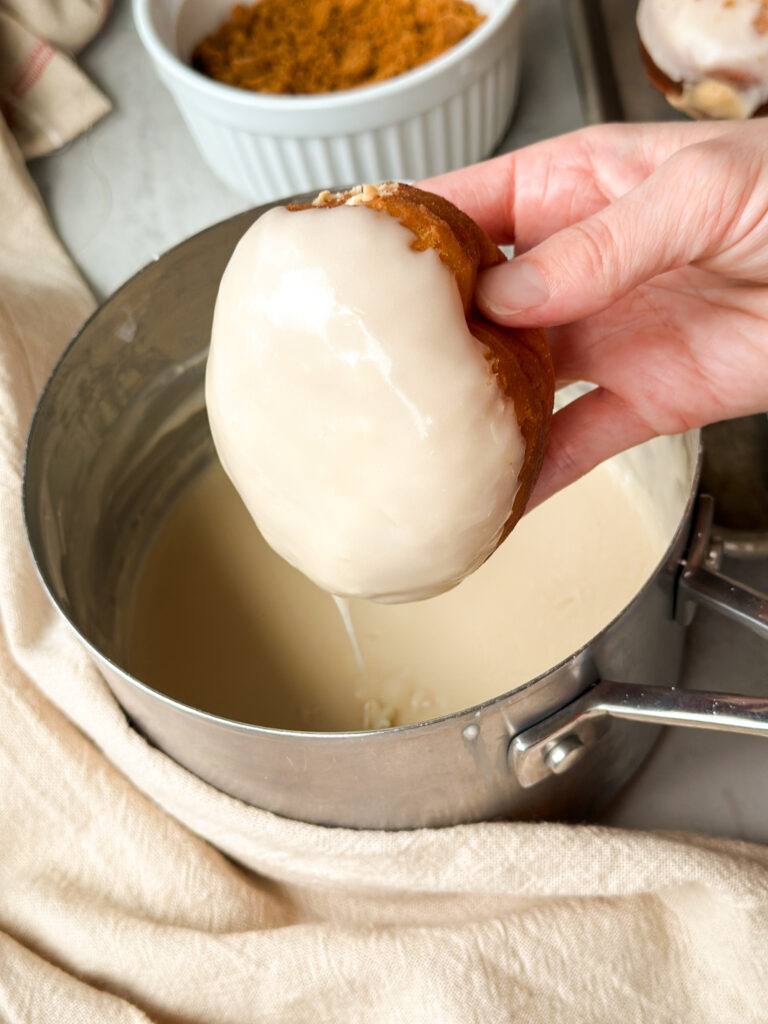
Dip filled donuts face-down into glaze and cover half the donut. Remove from glaze and let excess drip off, then transfer back to an unlined wire rack face up to let the glaze set. Top the donuts with the crushed cookie crumbles for extra crunch and goodness. Let glaze set for 15 minutes before serving.
Yields 12 donuts
How to Store:
Room Temperature- Keep donuts in an airtight container at room temp up to 2 days. But in my opinion, these are best enjoyed fresh!
FAQ’S:
Do I have to use a sweet levain or can I use my regular starter?
You can use your regular starter as long as it’s fed, but be aware the result may be more tangy and sour.
Can I make these without an overnight proof?
Yes! Let the dough rise 6-8 hours at room temp till doubled then continue with shaping.
Can I bake these instead of frying?
They won’t have the same crisp texture. Frying is traditional and gives the best flavor and look.
Why are my donuts greasy?
The oil wasn’t hot enough. Keep it at 350°F and let it rebound between batches.
Why are my donuts too dark?
The oil was too hot when you fried them. Make sure your oil is 350°F.
Why are my donuts dense?
Most likely they’re under-proofed. Fully proofed donuts look soft and jiggle.
Why is my filling melting?
The donuts were too warm. Let them cool completely before piping the cookie butter filling inside them.
Why is my glaze running?
You added too much milk. Add more powdered sugar to thicken the glaze.
If you loved this recipe, drop a comment and leave a star review and don’t forget to checkout more of my yummy sourdough donut recipes like my Krispy Kreme Style Sourdough Glazed Donuts or these Sourdough Maple Bacon Bars!

Sourdough Cookie Butter Donuts
Ingredients
Sweet Levain:
- 2 (25g) Tbsp sourdough starter (100% hydration)
- 1/3 (100g) cup water
- 3/4 (100g) cup all-purpose flour
- 2 (25g) Tbsp white sugar
Tangzhong:
- 2 (20g) Tbsp all-purpose flour
- 1/3 (100g) cup whole milk
Dough:
- 1 (225g) cup whole milk
- 1 (200g) cup sweet levain
- 1 (50g) egg
- 1 egg yolk
- 1/3 (75g) cup white granulated sugar
- 1 tsp vanilla extract
- All of the tangzhong
- 4 1/2 (500g-530g) cups all-purpose flour or bread flour
- 1 (10g) tsp sea salt
- 6 (85g) tbsp unsalted butter, softened
Cookie Butter Filling:
- 1 (226g) cup unsalted butter softened
- ¾ (180g) cup cookie butter
- 2 ½ (300g) cups powdered sugar
- 1 tsp vanilla
- ¼ tsp sea salt
- 1 tsp cornstarch optional for extra firmness
- 4 (60g) Tbsp heavy cream
Maple Glaze:
- 3 ½ (420g) cups powdered sugar
- 2 (30g) tbsp unsalted butter melted
- ½ tsp vanilla extract
- 1 tsp maple extract
- 3 (63g) tbsp pure maple syrup
- 4 (60g) tbsp heavy cream
- 3 (45g) tbsp milk
- ¼ tsp fine salt
Garnish:
- 1/2 (60g) Biscoff® cookies crushed
For Frying Donuts:
- 3-4 cups organic coconut oil or neutral oil
Instructions
Step 1: Make the Sweet Levain (Night Before)
- Baker’s Schedule: 8:00 PM- Night Before
- In a clean jar, mix your mother starter with the flour, water, and sugar. Give it a good stir, and allow it to rest at room temperature (optimally 73-75 degrees F). I like to mark the volume in my jar with a rubber band so it’s easy to asses the rise the next morning. When the sweet levain has doubled in size, it’s time to mix your donut dough.2 (25g) Tbsp sourdough starter (100% hydration), 1/3 (100g) cup water, 3/4 (100g) cup all-purpose flour, 2 (25g) Tbsp white sugar
Step 2: Make the Tangzhong
- Baker’s Schedule: 8:00 AM- Day 1
- Before you get started on mixing your dough, you’ll make your tangzhong. Whisk milk and flour together in a small saucepan.2 (20g) Tbsp all-purpose flour, 1/3 (100g) cup whole milk
- Cook the tangzhong over medium/low heat, stirring constantly, until it thickens into a paste that is similar to pudding (about 2–3 minutes). For precision, use your digital thermometer and heat to 148-155 F. Do not overheat, or your mixture will be too thick.
- Scrape into a bowl immediately to prevent further cooking, cover, and let cool to room temperature before adding to your dough.
- Prepare your dough while tangzhong cools.
Step 3: Mix the Dough
- Baker’s Schedule: 8:30 AM- Day 1
- In a stand mixer fitted with a dough hook or large mixing bowl, add the whole milk, sweet levain, egg and egg yolk, sugar, vanilla, and all of the tangzhong. Whisk ingredients together quickly, it’s okay if it’s lumpy.1 (225g) cup whole milk, 1 (200g) cup sweet levain, 1 (50g) egg, 1 egg yolk, 1/3 (75g) cup white granulated sugar, 1 tsp vanilla extract, All of the tangzhong
- Add your flour and salt into your wet ingredients.4 1/2 (500g-530g) cups all-purpose flour, 1 (10g) tsp sea salt
- Mix on low until a shaggy dough forms, about 2-3 minutes. Scrape down bowl if needed. If using your hands, knead until you work dough together. This is a higher hydration dough, so be aware it will be sticky.
- Once the dough has come together add softened butter, a tablespoon at a time mixing each tablespoon in until adding the next. Use a dough scraper to scrape the edges of the bowl to make sure everything is getting mixed in.6 (85g) tbsp unsalted butter, softened
- Continue mixing on medium-low (speed 2–3) for 8–10 minutes, until dough is smooth, elastic, and tacky but not sticky. If mixing by hand knead dough until butter has fully incorporated and dough is smooth and tacky.
- Mixing Notes: If kneading in a mixer or if dough is very wet when mixing by hand, add an additional 25 grams (3 Tablespoons) of flour and mix into dough. Make sure to work flour in completely and assess if you need more flour. I did this twice adding in a total of 50 grams (6 Tablespoons) of flour for the dough consistency I liked.
- Do not add more than 50 grams of flour at this stage, or you will lose the high hydration of the dough and end up with a dense donut. If using a stand mixer, dough can become more warm and sticky and I have found kneading dough with my hand (perform a set of stretch and folds) for a minute after mixing in my stand mixer really helps bring the dough together.
Step 4: Bulk Fermentation
- Spray a clean bowl with oil. Shape the dough into a smooth ball and place it in the bowl. Cover with plastic wrap.
- If you used a stand mixer, perform one set of stretch and folds after 30 minutes to strengthen your dough. If you mixed dough by hand, perform 3 sets of stretch and folds at 30 minute intervals at the beginning of bulk fermentation. After stretch and folds are completed, cover dough and allow to continue proofing.
- Let dough rise at 75–80°F until doubled in size, this takes about 5–6 hours. If your house is very cold, you can put dough in the oven with the light on for a warmer atmosphere. This proofing time is a general guide, this process may take longer the key is to assess when the dough has nearly doubled that’s when it’s ready.
- Overnight Fermentation: Once dough has finished rising, you can cover and transfer to the refrigerator overnight for a longer ferment or you can skip this step and go straight to making your donuts. I do find it to be easier to shape the donuts when the dough has been refrigerated but it isn’t necessary.
Step 5: Shape the Donuts
- If you refrigerated the dough overnight, remove from the refrigerator and allow to rest at room temperature for about 30 minutes to take the chill off.
- When dough is ready, flour a surface well and dump the dough onto the work area. Flour the top of the dough and the rolling pin as well, and gently roll out the dough to a circle that is about 1/2 inch thickness (it doesn’t have to be a perfect circle just roll out the dough).
- Flour the cookie cutter or the cup, and cut out 12 even circles of dough. I don’t recommend gathering this dough and rolling it to make more donuts, I find that the initial time you roll out and cut the shapes it has the best texture so keep that in mind. The scraps would make excellent donut holes though!
- Transfer the donuts to 4×4 pre-cut parchment squares that are lightly floured, and lay them to proof on 2 baking sheets.
- Cover your pans with plastic wrap and allow fritters to proof at room temperature roughly 1 1/2 to 2 hours. They should be puffy and jiggly when they’re done proofing. This step is key to a light donut, so make sure you don’t skip it!
Step 6: Make the Cookie Butter Filling
- While the donuts proof, prepare your cookie butter filling. In a stand mixer bowl or a large mixing bowl, add the softened butter and the cookie butter (make sure this is room temperature).
- Whip the butter and cookie butter together for 3-4 minutes on high until light and smooth.1 (226g) cup unsalted butter, ¾ (180g) cup cookie butter
- Add the powdered sugar and cornstarch to the filling, and mix on low for a minute until dry ingredients are mixed in. Once sugar is incorporated, beat on high until the filling is light and creamy.2 ½ (300g) cups powdered sugar, 1 tsp cornstarch
- Add the vanilla, cream, and salt to the filling and beat into the filling on high for a minute or two more until everything is well combined and the filling is airy and fluffy.1 tsp vanilla, 4 (60g) Tbsp heavy cream, ¼ tsp sea salt
- Fit the pastry bag with a piping tip, and transfer the cookie butter filling to the prepared pastry bag. You can place this in the refrigerator while you fry the donuts to make sure it doesn’t get too soft, but don’t leave it in the cold for longer than 30 minutes or the filling will be too stiff to pipe.
- Place cookies for topping in a plastic bag, and crush with a rolling pin for the garnish. Transfer to a shallow dish for later.
Step 7: Fry the Donuts
- Line a cooling rack with paper towels. Fit your candy thermometer into your deep pot. Transfer 3–4 cups of organic coconut oil to a deep pot or Dutch oven, and heat to 350-360°F on medium heat. If oil gets hotter than this, reduce heat accordingly. Watch your temperatures very closely and adjust your heat as needed to avoid burning the donuts.3-4 cups organic coconut oil
- When oil is ready, transfer 2-3 donuts with parchment paper into oil (you can remove paper with tongs when it separates).
- Fry 30 seconds at a time per side, flipping fritters gently using chopsticks or a slotted spoon. I repeat this step a few times rotating donuts to avoid burning. Remove after 2-3 minutes with a slotted spoon or spider spoon and donuts are a golden brown. Transfer donuts to a rack lined with paper towels to cool.
Step 8: Make the Maple Glaze
- Melt the butter for your glaze in a medium sized pot over low heat.2 (30g) tbsp unsalted butter
- When the butter has melted, add the powdered sugar, maple syrup, and cream. Whisk until the powdered sugar has completely dissolved, making sure to keep this on LOW heat.3 ½ (420g) cups powdered sugar, 3 (63g) tbsp pure maple syrup, 4 (60g) tbsp heavy cream
- Remove from heat immediately after sugar has dissolved, and whisk in the vanilla, maple extract and salt.½ tsp vanilla extract, 1 tsp maple extract, ¼ tsp fine salt
- If the glaze is too thick, thin with a couple tablespoons of milk at a time until it reaches the desired thickness. Be aware that if you overheat the glaze, it will be more thin. I try to heat it just to the point that it needs just a minute to cool and then I can comfortably dip the donuts with my hand in the glaze.3 (45g) tbsp milk
Step 9: Fill and Glaze the Donuts
- Gather your piping bag filled with the cookie butter and a skewer or chopstick.
- Make sure the donuts have cooled first before you proceed with filling them! Poke a hole into the top of one of the donuts with a skewer to make a hole to fill the donut. Place the piping tip into the donut, and pipe the cookie butter cream into the donut. Repeat this step until all of the donuts have been filled.
- Dip filled donuts face-down into glaze and cover half the donut. Remove from glaze and let excess drip off, then transfer back to an unlined wire rack face up to let the glaze set. Top the donuts with the crushed cookie crumbles for extra crunch and goodness. Let glaze set for 15 minutes before serving.1/2 (60g) Biscoff® cookies
- Yields 12 donuts
These are the best donuts I have ever had! Every part is perfection – the dough, the filling, the glaze. They are perfectly sweet without being too sweet. So so so good!
Hi Christian, thank you for your sweet review! So happy you loved these!
You have not had a real donut until you try this one! Delicious, and so dense. I’m not a donut person and if all of them tasted like this I really would have a donut everyday. I also love how detailed the recipe is, in my opinion you can never have too much. You won’t regret making This!
Hi Gabby, thank you for your comment and feedback! I’m so happy you found this easy and you loved the results <3