
Beginner Artisan Sourdough Sandwich Loaf
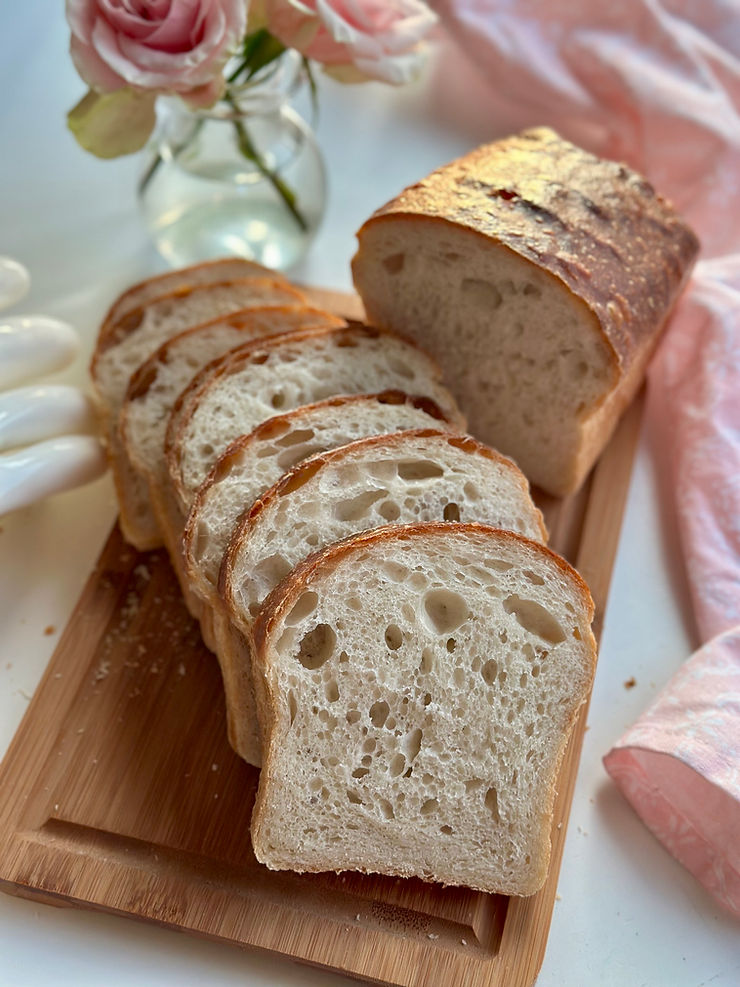
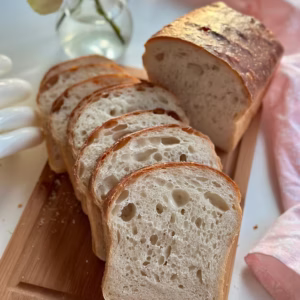
If you’re just starting your sourdough journey, this beginner-friendly sandwich loaf is the perfect place to start. It’s soft, fluffy, and slightly tangy, making it ideal for sandwiches, toast, or simply enjoying with butter. This recipe includes detailed steps, tips for shaping, and easy-to-follow instructions, whether you’re new to sourdough or simply looking for a foolproof artisan sandwich loaf.
Why You’ll Love This Recipe:
This recipe is versatile and easy! With simple ingredients and tips on how to bake this loaf same-day or ferment overnight in the refrigerator, this recipe is one that can fit your schedule instead of you trying to fit your life around a loaf of bread! Baking in a loaf pan makes this recipe very beginner friendly, as the structure of the pan does the shape work for you.
Table of Contents
Tools You’ll Need:
1. Measuring Cups and Spoons- For measuring ingredients.
2. Large Square Tupperware- For combining and working with the dough. I like this container that comes with a lid https://amzn.to/3Cy0KZr and is clear to easily see how my dough is rising.
Note: You can use a bowl, it just may be more difficult to assess an accurate rise leading to possible over/under fermentation. However, if that is all you have just do your best to pay attention to visual cues I will list below to help you know when your dough is ready.
3. Plastic Wrap or Damp Kitchen Towel- To cover the dough during fermentation and proofing.
4. Loaf Pan- A standard 8.5 x 4.5-inch or 9 x 5-inch pan for baking. I love this loaf pan from USA Bakeware https://amzn.to/3WzgaUi, but any loaf pan will work.
5. Silicone Spatula or Dough Scraper- For mixing and handling the dough.
6. Meat Thermometer (Optional)- for checking dough temperature during fermentation (ideal range: 75–79°F).
7. Cooling Rack- For cooling the bread after baking.
8. Serrated Bread Knife- For slicing the cooled loaf cleanly. This is my favorite bread knife https://amzn.to/4jr2jcl
As an amazon affiliate, this post may contain affiliate links. Which means I may receive a commission for qualifying purchases. I will only recommend products that I personally love and use.
Gather Your Ingredients:
- Flour- To make this process simple, my recommendation is to start off using high protein (high-gluten) flour. Why? Because this flour has the highest gluten percentage to best support the ideal structure and high nutrients needed to support a fast active fermentation process. Typically you’ll see a protein percentage on the bag of flour, I recommend using flour between 11-12% protein (gluten).
- Water- Water hydrates the flour, activating enzymes that break down starches into sugars. These sugars then feed the wild yeast and lactic acid bacteria, creating more fermentation in your bread. It is best practice to use water that is free of chlorine, which can inhibit the microbes. Filtered water, spring water, and non-chlorinated tap water are all fine options to use.
- Salt- any high quality sea salt is fine to use in your bread. I typically use Redmond Sea Salt, I recommend staying away from iodized salt as it can inhibit yeast and bacteria development.
- Raw Honey- honey is a wonderful ingredient in sourdough to slightly sweeten the loaf and attracts and retains moisture which helps keep bread softer for longer time periods. If needed, you can substitute with sugar.
- Salted Butter (optional)- brushing the top of your loaf with butter with soften the crust and add a rich flavor. If you don’t have butter on hand or you’re dairy free- you can skip this step.
Instructions:
Step 1: Feed Your Starter Night Before Baking
Baker’s Schedule: 8:00 PM
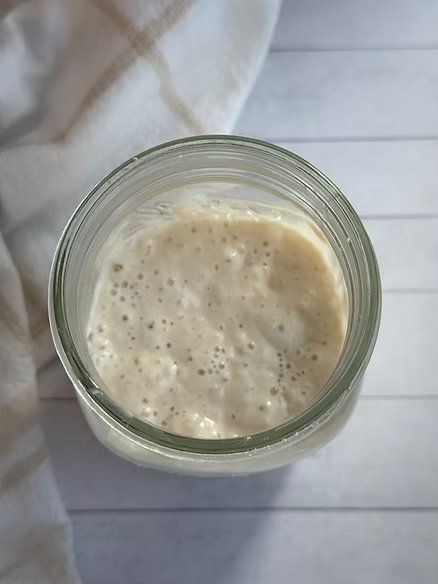
To ensure a bubbly and active starter, feed your starter the night before baking.
Use a 1:5:5 ratio to feed your starter (this means one part mature mother starter, five times the water, five times the flour).
Mix flour and water in a jar with a spatula, cover loosely with lid, and mark the volume of the starter in your jar with a rubber band or piece of tape and marker. Let starter sit at room temperature (70-75 degrees) overnight until bubbly and doubled in size.
Step 2: Make the Dough
Baker’s Schedule: Day 1- 8:00 AM
1. Combine Ingredients:
In a large bowl, mix the 100g active starter, 360g water, 25g honey, 10g salt, and 500g flour. Stir and knead with your hand until all ingredients are combined into a shaggy dough. Cover with a damp towel or plastic and let it rest for 30 minutes at room temperature (70-77 degrees).
2. Stretch and Folds:
After the rest, begin your stretch and folds. This helps build structure in your dough.
Starting at the edge of the dough with wet hands, gently lift one edge of the dough, stretch it up, and fold it over the center. Rotate the bowl 90 degrees and repeat with the next side. Do this for all four sides of the dough to form a ball.
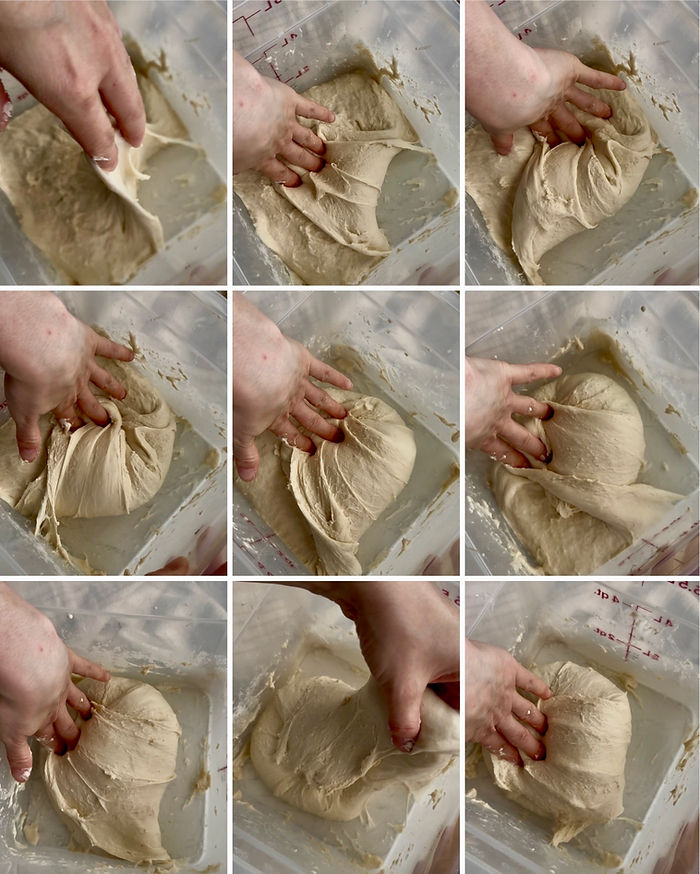
Cover the dough and let it rest for 30 minutes. Repeat this stretch-and-fold process two more times at 30-minute intervals for a total of 3 sets. Your dough should go from being rough and clumpy to smooth and silky.
Step 3: Bulk Fermentation
After the stretch and folds, cover the dough and let it bulk ferment for 5-6 hours. Keep the dough at a temperature of 75–78°F (24–26°C) for best results. The dough should rise by 80%, stopping just shy of doubling in size.
The best way to measure dough has proofed 80 percent in volume is to mark the volume of the dough in your container or bowl when you first mix your dough, then as the dough ferments you can more accurately assess how much it has risen in volume and when it’s ready to shape. Other signs of dough being properly fermented and ready for shaping include fermentation bubbles, a domed top, and springs back when you poke it with your finger.
Note: if dough proofs over 80%, it’s best to bake same day. Over-proofed dough won’t sustain an overnight refrigeration and runs the risk of being flat.
Step 4: Shaping the Dough
Lightly spray your work surface with coconut oil to prevent sticking. Spray your sandwich loaf pan with a bit of oil as well.
• Turn the dough out onto the oiled surface and gently stretch it into a rectangle about 9×13 inches.
• Fold one third of the dough over the center, then fold the remaining third over that (like folding a letter).
Roll up your “letter” or rectangle to form an oval shape, pinching the seams together at both ends and popping any air bubbles. See guide below for more shaping details.
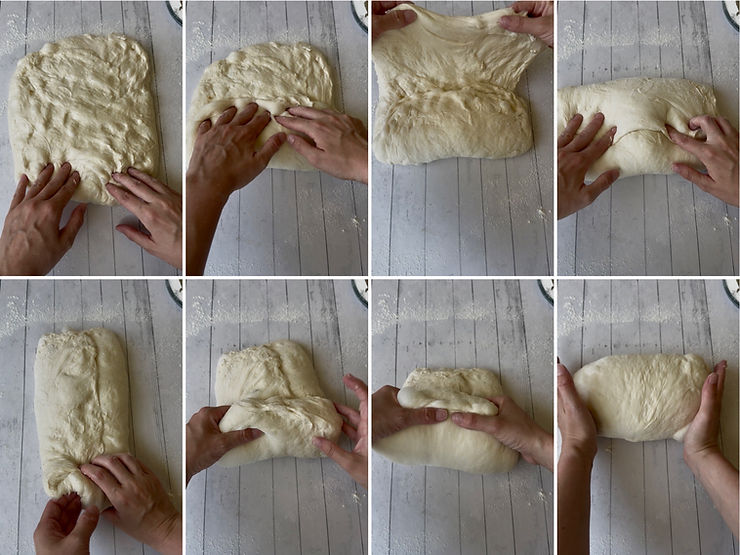
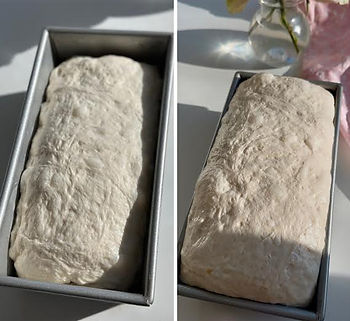
Place the shaped dough into the prepared loaf pan, seam-side down. Cover it loosely with plastic wrap.
Step 5: Optional Overnight Cold Ferment/Second Rise
Note for overnight refrigeration after shaping:
At this point you have the option to cover the loaf in the pan with plastic and refrigerate overnight for optional fermentation, or proceed with proofing and baking depending on your schedule.
If you choose to refrigerate overnight, do not proof after shaping. Dough will proof in refrigerator in pan, but will need additional proofing time at room temperature. Allow loaf to come to room temperature the next morning and proof until dough is risen over the edge of the pan and proceed with baking instructions as listed below.
If skipping overnight fermentation:
Let loaf proof at room temperature for about 1 hour, or until the dough is just peeking over the edge of the pan.
Step 6: Baking the Bread
Preheat your oven to 400°F (200°C) on convection bake.
When the oven is preheated, place the loaf in the oven and bake for 10 minutes.
If desired, remove pan from oven and score loaf after baking for ten minutes for a more even expansion. You can use a sharp knife or a bread lame to make one cut right down the center of the loaf from one end of the loaf to the other.
Return loaf to oven, and bake another 40-45 minutes. If loaf is getting too toasty on one side, rotate midway during baking. The internal temperature of the loaf should read 200-205 F, you can use a meat thermometer inserted into the loaf to check this.
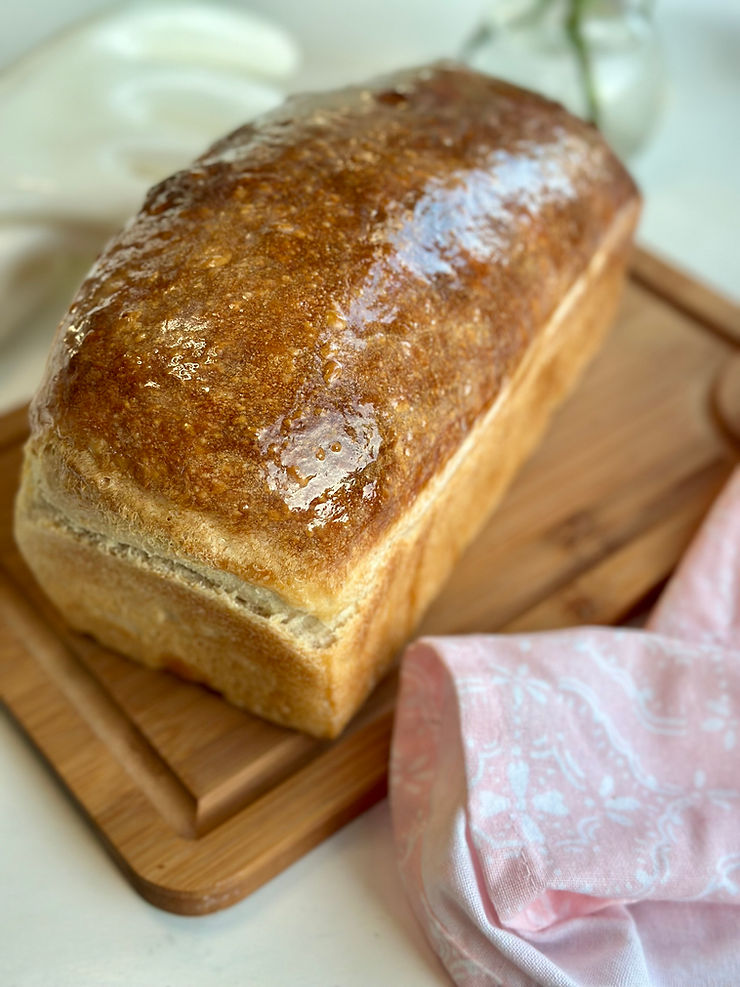
While the loaf is still warm, brush the top with a cold butter stick for a soft and shiny crust. Allow the bread to cool completely on a wire rack before slicing.
Yields 1 loaf
Final Tips:
• Cooling is Key: Cooling the bread fully ensures the interior sets properly and slices beautifully.
• Storage: Wrap in plastic or store in a bread bag for up to 3 days at room temperature, or slice and freeze for longer storage for up to 2 months.
Enjoy your homemade Beginner Artisan Sourdough Sandwich Loaf- perfectly soft, flavorful, and easy to master!
Makes 1 loaf
Beginner Artisan Sourdough Sandwich Loaf
Equipment
- Measuring cups and spoons – For measuring ingredients.
- Large Square Tupperware – For combining and working with the dough. A large bowl will also work.
- Plastic Wrap or Damp Kitchen Towel – To cover the dough during fermentation and proofing.
- 9×5-inch loaf pan – A standard 8.5 x 4.5-inch or 9 x 5-inch pan for baking.
- Silicone spatula or dough scraper – For mixing and handling the dough.
- Meat Thermometer (Optional) – for checking dough temperature during fermentation and after baking.
- Cooling rack – For cooling the bread after baking.
- Serrated bread knife – For slicing the cooled loaf cleanly.
Ingredients
Beginner Artisan Sourdough Sandwich Loaf
Mix the starter night before:
- 1 tablespoon (20g) mother starter
- 1/2 cup (100g) water
- 3/4 cup (100g) flour
The Next Day: Make the Dough
- 1/3 cup (100g) active sourdough starter (fed and bubbly)
- 1 1/2 cups (360g) room temperature water (approx 75 degrees F)
- 1 1/4 tablespoons (25g) raw honey
- 1 1/2 teaspoons (10g) 1 1/2 teaspoons salt
- 4 cups (500g) bread flour or all-purpose
- cold salted butter for brushing top
Instructions
Step 1: Feed Your Starter Night Before Baking
Baker’s Schedule: 8:00 PM
- To ensure a bubbly and active starter, feed your starter the night before baking.
- Use a 1:5:5 ratio to feed your starter (this means one part mature mother starter, five times the water, five times the flour).1 tablespoon (20g) mother starter, 1/2 cup (100g) water, 3/4 cup (100g) flour
- Mix starter, flour and water in a jar with a spatula, cover loosely with lid, and mark the volume of the starter in your jar with a rubber band or piece of tape and marker. Let starter sit at room temperature (70-75 degrees) overnight until bubbly and doubled in size.
Step 2: Make the Dough
Baker’s Schedule: Day 1- 8:00 AM
Combine Ingredients:
- In a large bowl, mix the active starter, water, honey, salt, and flour. Stir and knead with your hand until all ingredients are combined into a shaggy dough. Cover with a damp towel or plastic and let it rest for 30 minutes at room temperature (70-77 degrees).1/3 cup (100g) active sourdough starter, 1 1/2 cups (360g) room temperature water, 1 1/4 tablespoons (25g) raw honey, 1 1/2 teaspoons (10g) 1 1/2 teaspoons salt, 4 cups (500g) bread flour
Stretch and Folds:
- After the rest, begin your stretch and folds. This helps build structure in your dough.
- Starting at the edge of the dough with wet hands, gently lift one edge of the dough, stretch it up, and fold it over the center. Rotate the bowl 90 degrees and repeat with the next side. Do this for all four sides of the dough to form a ball.
- Cover the dough and let it rest for 30 minutes. Repeat this stretch-and-fold process two more times at 30-minute intervals for a total of 3 sets. Your dough should go from being rough and clumpy to smooth and silky.
Step 3: Bulk Fermentation
- After the stretch and folds, cover the dough and let it bulk ferment for 5-6 hours. Keep the dough at a temperature of 75–78°F (24–26°C) for best results. The dough should rise by 80%, stopping just shy of doubling in size.
- The best way to measure dough has proofed 80 percent in volume is to mark the volume of the dough in your container or bowl when you first mix your dough, then as the dough ferments you can more accurately assess how much it has risen in volume and when it’s ready to shape. Other signs of dough being properly fermented and ready for shaping include fermentation bubbles, a domed top, and springs back when you poke it with your finger.
- Note: if dough proofs over 80%, it’s best to bake same day. Over-proofed dough won’t sustain an overnight refrigeration and runs the risk of being flat.
Step 4: Shaping the Dough
- Lightly spray your work surface with coconut oil to prevent sticking. Spray your sandwich loaf pan with a bit of oil as well.
- Turn the dough out onto the oiled surface and gently stretch it into a rectangle about 9×13 inches.
- Fold one third of the dough over the center, then fold the remaining third over that (like folding a letter).
- Roll up your "letter" or rectangle to form an oval shape, pinching the seams together at both ends and popping any air bubbles.
- Place the shaped dough into the prepared loaf pan, seam-side down. Cover it loosely with plastic wrap.
Step 5: Optional Overnight Cold Ferment/Second Rise
Note for overnight refrigeration after shaping:
- At this point you have the option to cover the loaf in the pan with plastic and refrigerate overnight for optional fermentation, or proceed with proofing and baking depending on your schedule.
- If you choose to refrigerate overnight, do not proof after shaping. Dough will proof in refrigerator in pan, but will need additional proofing time at room temperature. Allow loaf to come to room temperature the next morning and proof until dough is risen over the edge of the pan and proceed with baking instructions as listed below.
If skipping overnight fermentation:
- Let loaf proof at room temperature for about 1 hour, or until the dough is just peeking over the edge of the pan.
Step 6: Baking the Bread
- Preheat your oven to 400°F (200°C) on convection bake.
- When the oven is preheated, place the loaf in the oven and bake for 10 minutes.
- If desired, remove pan from oven and score loaf after baking for ten minutes for a more even expansion. You can use a sharp knife or a bread lame to make one cut right down the center of the loaf from one end of the loaf to the other.
- Return loaf to oven, and bake another 40-45 minutes. If loaf is getting too toasty on one side, rotate midway during baking. The internal temperature of the loaf should read 200-205 F, you can use a meat thermometer inserted into the loaf to check this.
- While the loaf is still warm, brush the top with a cold butter stick for a soft and shiny crust. Allow the bread to cool completely on a wire rack before slicing.cold salted butter
- Yields 1 loaf


I finally found my sourdough sweet spot! After struggling with Dutch oven loaves, I decided to try your loaf pan method and wow – what a game-changer! The bread came out beautifully and makes the most perfect sandwich slices. The fact that it is a same-day bake is just cherry on top! I think I am officially converted to loaf pan sourdough. Thank you for sharing this recipe – it’s given me my confidence back in my sourdough journey!
Alla,
Thank you for your review this recipe was meant to be easy and hassle free so I’m thrilled it was that for you! Thank you for your wonderful feedback!
If you haven’t made this yet, here is your sign!!! So soft and delicious, and the flavor!
I have made at least 20 different sourdough sandwich bread recipes and this replaces them all. Thank you for sharing!! B
This loaf…so yummy, so fluffy, soft, nice crisp top! I love how easy this recipe is and that it can be a same day or next day bake and in the loaf pan! No dutch oven needed! After many trials & tribulations figuring out the heat conduction of my oven, I have perfected this loaf and my baby gives it 2 thumbs up! 🙂
Sourdough crisis averted! After some trial and error with Dutch oven loaves, I switched back to your loaf pan method and with this recipe the results are amazing. This saved the day (and my sanity)! Perfect sandwich slices, same-day bake – I’m sold! My sourdough journey just leveled up, and I’m forever grateful. Thanks for this easy bread-winning recipe.
I’m so grateful for your feedback and I’m so happy you love this recipe! Happy baking!
I cannot stop making this sourdough sandwich loaf. It is pure perfection!! My whole family actually preferred this over the traditional sourdough bread . Thank you so much for the recipe . Comes out beautifully 💛
I’m so happy this loaf is so well loved! Thank you for your feedback 🙂
I have been making sourdough for almost one year but never have tried using a loaf pan. I am pleasantly surprised ! My whole family enjoyed this and it was so simple. Clear instructions. Perfect recipe. Thank you!!
Hi Lindsay, I’m so happy this recipe was easy for you and you found the recipe easy 🙂
This is going on my weekly food prep list! I’ve made the rustic loaf for years and this was my first time making the sandwich bread- it was perfect. Love how versatile it is for sandwiches, toast, etc. I made it this morning and it’s already half gone!
Hi Brooke, the versatility of the sandwich loaf is my favorite too. Glad you loved this recipe!