Homemade Sourdough Apple Pie Recipe
This Homemade Sourdough Apple Pie Recipe checks all of the boxes for a perfect apple pie with my Buttery Sourdough Pie Crust wrapped around tender, caramel glazed Granny Smith apples. This is going to be the last apple pie recipe you'll ever need! Top and serve with vanilla ice cream for the coziest homemade treat.
Equipment
- 9-inch Pie Pan – to bake your pie.
- Digital kitchen scale (optional) - for measuring ingredients.
- Large saucepan- - to cook apple filling.
- Cutting board and knife- - to chop your apples.
- Large mixing bowl - to combine apple pie filling.
- Pastry brush (optional) - for applying egg wash.
- Rolling Pin - to roll out your pie crust.
- Fork - to "dock" pie crust.
- Sharp knife - to vent pie crust.
- Kitchen Scissors - easiest way to trim pie crust. You can also use a a sharp knife.
- Parchment paper - if par-baking or blind baking the pie crust, you'll need to line the pie crust with parchment paper for the pie weights.
- Pie Weights (optional) - to par bake the pie.
- Baking Sheet - to bake pie on to avoid overflow.
- Aluminum Foil or a Pie Guard - to protect the pie edges from burning.
Ingredients
Pie Crust:
- 1 batch Buttery Sourdough Pie Crust 1 batch makes enough for a bottom and top crust
Apple Filling:
- 8 Granny Smith apples peeled & sliced 1/8-inch
- 1/2 cup (115g) unsalted butter
- 3 Tbsp (45g) lemon juice
- 1/2 cup (100g) white sugar
- 1/2 cup (110g) brown sugar
- 3 Tbsp (45g) heavy cream
- 2 tsp cinnamon
- 1 tsp cardamom
- 1 tsp bourbon vanilla extract
- 1/4 tsp sea salt
- 1/3 cup (40g) all-purpose flour
Instructions
- Before you start your apple pie, you'll need to make your pie crust! Head on over to my Buttery Sourdough Pie Crust Recipe (Flaky and Easy), and mix up a batch for your apple pie. A single batch is enough for a top and bottom crust to make this apple pie. Come back once that's done and follow the next steps!1 batch Buttery Sourdough Pie Crust
Step 1: Prepare the Apple Pie Filling
- Wash all of your apples, and peel them. Cut the apple away from the core, and slice the pieces into thin 1/8 inch thick slices. Try to make sure your apple slices are as even as possible, this will make for a more evenly baked pie.8 Granny Smith apples
- Toss all of the apples into a bowl, and add the lemon juice. Coat the apples well in the lemon juice.3 Tbsp (45g) lemon juice
- Add the white sugar, brown sugar, flour, cream, cinnamon, vanilla, salt and cardamom to the apples, and mix until everything is combined and the apples are well coated.1/2 cup (100g) white sugar, 1/2 cup (110g) brown sugar, 3 Tbsp (45g) heavy cream, 2 tsp cinnamon, 1 tsp cardamom, 1 tsp bourbon vanilla extract, 1/3 cup (40g) all-purpose flour, 1/4 tsp sea salt
- Place a large skillet over medium heat, allowing the butter to melt as the pan heats up. Once the butter has melted, add the apple pie filling to the pan.1/2 cup (115g) unsalted butter
- This next step is key- make sure to continuously scrape the apples from the bottom of the skillet and mix, avoid the apples resting for too long and burning on the pan. Keep the heat on medium, and cook the apples for 8-10 minutes. Don't cook any longer than ten minutes! You'll see a caramel sauce form in the pan as you cook the apple filling.
- Your apples are done when you can stick a fork in a piece but they should still be firm. Transfer the apple pie filling immediately to a bowl and allow to rest while you prepare your bottom pie crust.
Step 2: Roll and Par-Bake the Bottom Crust
- Allow your pie crust to sit at room temperature about ten minutes, to take the chill off so you're able to roll it out.
- Gather your rolling pin, flour, and pie pan while your dough rests and prepare a clean work surface. This is optional, but I like to spray a little cooking spray on a paper towel and gently wipe my pie pan to ever so lightly grease it at this point. Another option is to flour your pan, to help with a clean release of your pie crust.
- Flour your work surface and rolling pin, and starting at the center of your dough disc begin to roll your crust out. This is a gentle process, you don't want to have cracking dough. You want slow even steady pressure on your dough.
- Continue to roll out your dough, aiming for a a 12-inch circle which is going to fit a 9-inch pie pan perfectly. If your circle starts to become uneven, use your hands to gently press the dough back into the shape you want. Your crust will be about 1/8 inch thickness.
- Tip: I like to lift my dough and flip it over occasionally to avoid the dough sticking to my surface. If your edges are cracking, dip your fingers in a little ice water and press the dough back together before resuming rolling it out.
- Once you've rolled out your circle of pie dough, you can use your rolling pin to gently roll the pie crust up on the rolling pin and unroll it over the pie pan. Don't roll the pie crust too tightly when you do this, or it'll stick together. Think a loose roll. This makes for an easy transfer!
- Try to center your crust over the pie pan as much as possible gently unrolling the crust over the pie pan.
- Use one hand to lift the crust, and one hand to press the crust into the edges of the pie pan fitting the dough to the pan. Using kitchen scissors, trim any excess crust to create a 1-inch overhang of pie crust all around the pie pan. Make sure no air bubbles are under the crust.
- Because we're adding a top crust later, you're going to par-bake the crust leaving the overhang of pie crust unshaped. We will deal with that later!
- Tip: Freeze the shaped pie crust for 30 minutes prior to baking to help the crust hold it's shape during baking. Don't skip this!
- Preheat your oven to 375 F.
- You'll need a piece of parchment paper, pie weights, and a baking sheet. Cut a piece of parchment paper large enough to line your pie, and crumple it up in your hands. This will keep the parchment from rolling up on you.
- If you don't have ceramic pie weights, you can also use dried beans to hold the parchment paper in place. Filling the pie with weights or beans avoids the pie crust from slipping down the side and the crust loosing it's shape. The weights should mostly fill up the pie dish for this to work properly.
- Pour the ceramic weights or beans (about 2 cups) into the parchment-lined pie dish, and transfer the pie dish to a cookie sheet. This makes for easy removal when removing the pie, and avoids the crust being destroyed by the oven mitts.
- Bake the pie crust for 18 minutes at 375 F, then remove the parchment paper and pie weights.
- Return the pie crust to the oven without the parchment and weights for another 5 minutes. The bottom of the crust should look golden.
- Once the crust has partially cooled for about ten minutes (it's easiest to trim warm), use kitchen shears or a sharp knife to trim the par-baked crust to make the crust flesh and even with the pie pan. Allow the crust to cool fully after trimming before adding the top crust.
Step 3: Fill the Pie and add the top crust
- Once the pie shell has cooled, transfer all of the apple filling to the cooled pie shell.
- Grab the second disc of pie dough, and flour your work surface and a rolling pin. Roll out the second disc of pie dough to about a 12 inch circle, roughly 1/8 inch thickness.
- Using your rolling pin, roll up the second crust and transfer the crust over the top of your pie. Center the crust as much as possible. Trim your top crust to leave a 1-inch overhang. You can use any extra bits of pie dough for decoration if desired just chill this for later.
- Now you're going to use the 1-inch overhang of pie crust and tuck it UNDER the bottom crust that is par-baked. If you need to, use a fork or knife to gently lift the bottom crust to help you tuck the top crust under the bottom crust as pictured below. If a bit of the bottom crust is crumbly, that's okay just keep tucking and working your way around the pie.
- Crimp the edges of the pie with a fork to seal the top crust down to the bottom crust. Cut vents in the top of the pie to release steam as pictured in a circular pattern.
Step 4: Bake the Pie
- Beat 1 egg with one teaspoon of water in a bowl. Brush the top of the pie and the edges well with the egg wash. You can use any remaining scraps of pie dough to add decorations to the top of your pie at this time, just make sure to apply more egg wash.
- Sprinkle the top of the pie with coarse sugar if desired, and transfer the pie to the freezer for 30 minutes to set.
- While the pie is freezing, preheat the oven to 375°F (190°C).
- Once the oven is hot, transfer the pie to a cookie sheet and bake for 30 minutes.
- After 30 minutes, check the pie and make sure the edges aren't burning. This is a great time to add a pie shield to avoid burnt edges, or you can fold a piece of foil in quarters and cut a hole in the center to create a makeshift shield for the edges.
- Return the pie to the oven for another 30 minutes to bake. Internal temperature of pie should be 195-205 F.
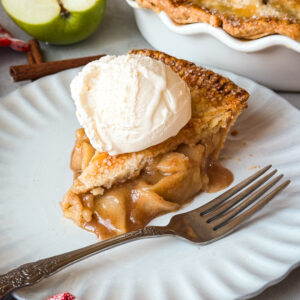
- Allow pie to cool fully ands set up (about 3 hours) before serving with vanilla ice cream!
Notes
How to Store:
- Room temperature- Cover and keep in an airtight container for up to 2 days. Gently warm when ready to serve.
- Refrigerator- Store covered in refrigerator up to 5 days. Gently warm when ready to serve.
Freezing and Baking Instructions:
If you want to make this pie ahead and freeze to bake for a later time, this is how you can do it- Follow all of the steps to assemble the pie but you'll skip the egg wash and final bake.
- Make sure to freeze the pie for 30 minutes after you add the top crust.
- Remove the pie from the freezer and wrap twice in plastic wrap, and then cover in foil. This prevents freezer burn on that delicate crust!
- Label with the date, and freeze this pie up to 2 months.
- When you're ready to bake the pie, Preheat oven to 425°F (220°C).
- Unwrap the frozen pie and place it on a parchment-lined baking sheet. Brush with egg wash and sprinkle with coarse sugar.
- Bake at 425°F for 20–25 minutes.
- Tent the pie with foil and reduce heat to 375°F (190°C) and bake for 50–65 minutes, or until the filling is bubbling in the center and the internal temp of the filling reaches 195°F–203°F.
- Cool at least 3 hours before slicing so the juices can set.
Tried this recipe?Let us know how it was!