
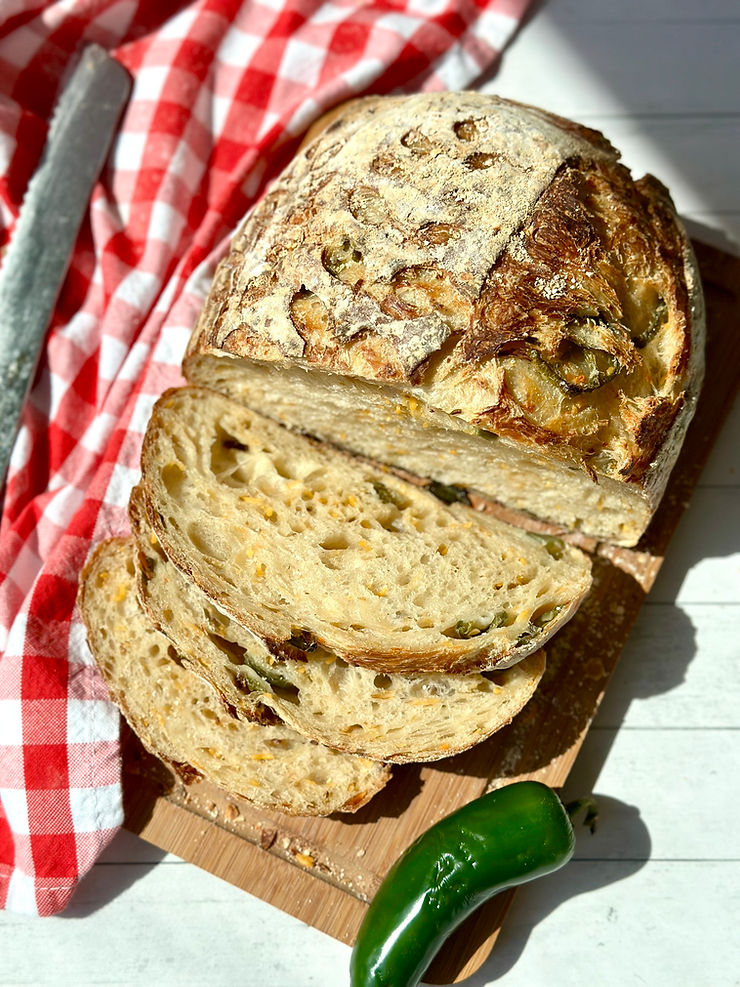
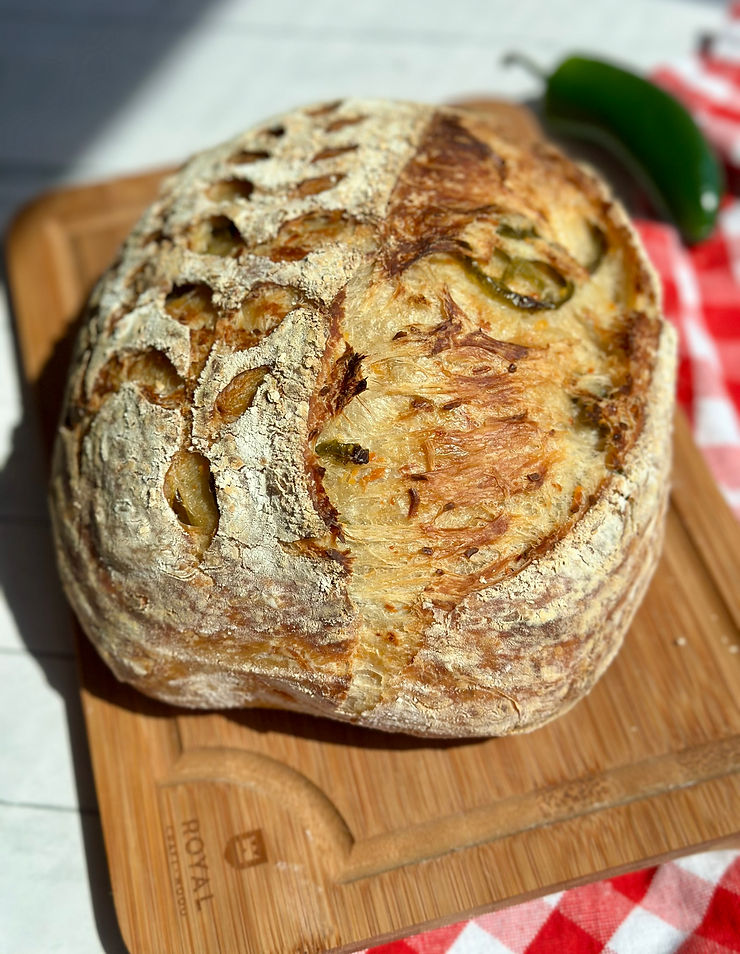
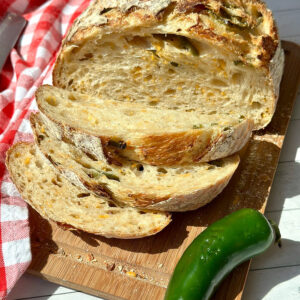
Sourdough Jalapeno Cheddar Loaf
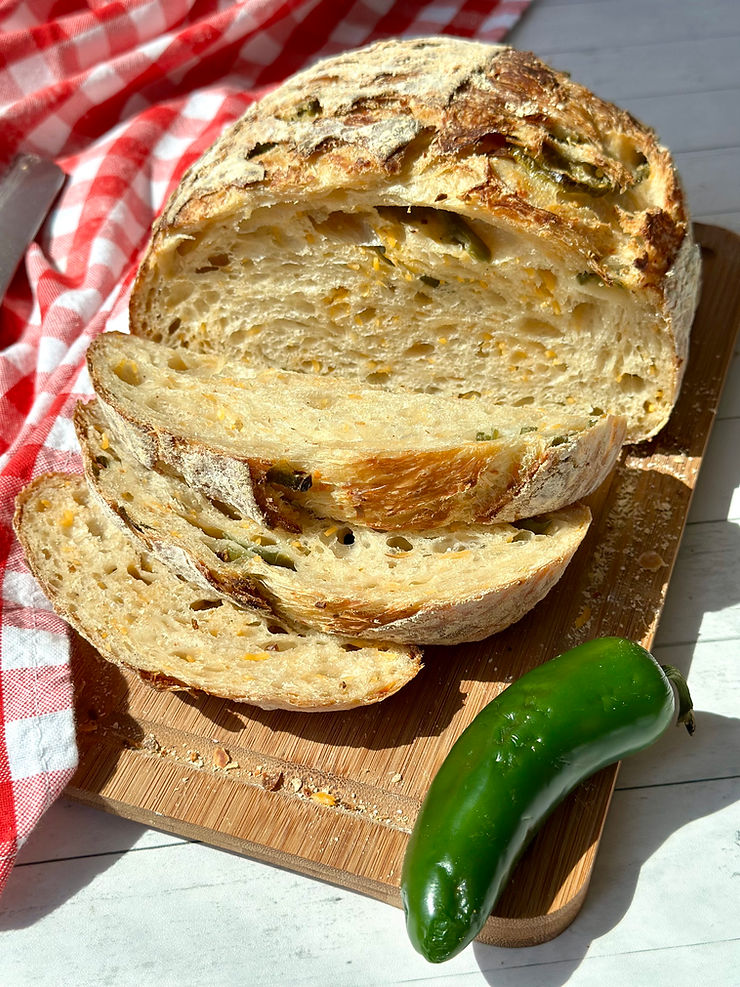
If you’re here for a gentle, mild-mannered loaf… you might want to look away. This sourdough jalapeño cheddar loaf isn’t subtle—it’s bold, cheesy, a little spicy, and totally unapologetic. It’s the kind of bread that makes basic white loaves tremble and your grilled cheese game level up instantly. With a chewy crust, a soft tangy crumb, sharp cheddar melting into pockets of heat, and just enough jalapeño to keep things interesting, this is the loaf you bake once and suddenly everyone’s “just stopping by” around dinnertime.
This isn’t just bread. It’s a power move. And your kitchen is about to smell legendary.
If you’re new to sourdough, this recipe keeps things simple with clear steps, easy shaping, and minimal equipment.
Now let’s get started!
As an amazon affiliate, this post may contain affiliate links. Which means I may receive a commission for qualifying purchases. I will only recommend products that I personally love and use.
Tools You’ll Need:
• Digital kitchen scale– for weighing out your ingredients (highly recommended for accuracy). This one linked here is great to start with https://amzn.to/41ADLXw
• Measuring cups & spoons (optional, if you prefer to not use a scale)
•Bowl or straight edge container for mixing and proofing dough– to mix your dough and make sure your dough is rising properly. You can use a clear square Tupperware for this, I don’t recommend a bowl as it is hard to assess your rise. I’ve linked here the container I like to use https://amzn.to/3R20Qwl.
• Bench knife (optional)- for shaping loaf. I use this one all the time https://amzn.to/41pGqlk
• Banneton basket (or a medium bowl lined with a lint-free cloth)- to proof dough. I’ve linked a quality banneton and cover here if you’d like to see what I use https://amzn.to/4h4kFO6
• Lint-free cloth or plastic wrap– to cover the dough while resting
• 5-quart Dutch oven with lid- for baking your loaf. This is an affordable 5-quart Dutch oven that I purchase as my first linked here https://amzn.to/3EVhryP.
Note- you can also use a 9-inch cast iron skillet with a fitted stainless-steel bowl over the top to bake your bread if you aren’t quite ready to purchase a Dutch oven.
• Parchment paper or silicone bread sling– To keep bread from sticking to Dutch oven. A reusable bread sling can be really convenient and also helps avoid burning hands on your Dutch oven. I use this set all the time https://amzn.to/3Dnn1cQ.
• Sharp knife or lame for scoring– a sharp knife will work for scoring your bread, but I do recommend investing in a lame (razor blade) which will make the process much easier. Here is a great lame to purchase to start out https://amzn.to/4i0JqM6.
Digital food thermometer (optional) – to check the temperature of your starter and dough, this ensures a more reliable result. I use this one linked here https://amzn.to/3XoLLbC
Bread Knife– for cutting your bread once cooled. I love this bread knife linked here https://amzn.to/41BktkS.
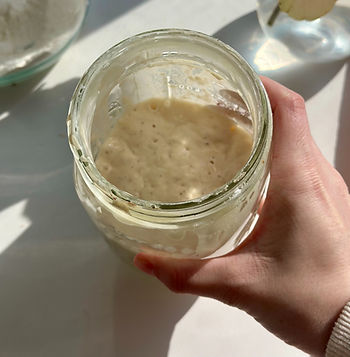
Step 1: Feed Your Starter the Night Before
To ensure your starter is strong and active, feed it the night before using a 1:5:5 ratio (if your home is 65 degrees F or over). This means 1 part mother starter, 5 parts (or 5 times) flour, and 5 parts (5 times) water.
Feed Starter:
• 20g (1 tbsp) ripe mother starter
• 100g (½ cup + 1 tbsp) water (slightly warm, 80 degrees)
• 100g (¾ cup + 1 tbsp) all-purpose or bread flour
If your home is very cold (65 degrees F or under), use a 1:3:3 ratio instead. This means 1 part mother starter, 3 parts (or 3 times) flour, and 3 parts (3 times) water.
Feed your starter:
• 15g (about 2 tsp) ripe starter
• 45g (3 tbsp) water (slightly warm, 80 degrees)
• 45g (⅓ cup) all-purpose or bread flour
Using a spatula, mix your starter, flour, and water together very well in a glass jar. Cover loosely with lid (don’t screw it down, just rest it on top) and let it sit on a cookie sheet in your oven with the light on overnight until bubbly and doubled in size. It’s a good idea to use a rubber band to mark the volume of your jar before letting it rest overnight to make sure your starter is doubling properly.
Note: Adjusting your feed ratios depending on temperature will help ensure you have properly proofed starter to use in the morning. If you add less mother starter to your feeds, it will take longer to rise. if you add more, it will rise faster. You can adjust this to fit your environment and schedule, this is meant to be a guideline. If you aren’t sure what temperature your starter is, you can use a meat thermometer and check it. Most usually though, starter acclimates to being the temperature of its environment (your home).
Step 2: Mix the Dough (Morning)
Ingredients:
• 100g (½ cup) fed & bubbly sourdough starter
• 350g (1 ½ cups) warm water (80 degrees F)
• 25g (1 tbsp) honey
• 10g (2 tsp) salt
• 500g (4 cups) all-purpose or bread flour
Mix-in’s
- 100g (1 cup) sharp cheddar cheese, shredded
- 80g (1/2 cup) pickled jalapenos (drain and then weigh or measure
Line a bowl or plate with a paper towel. Transfer jalapenos to paper towel and allow to drain thoroughly. Pat them dry of any moisture to prepare them for your dough.
Mix together your bubbly starter, flour, water, salt, and honey with a dough whisk or spatula until all the flour is incorporated and the dough looks shaggy. You can also use your hands to do this if that’s easier.
I find that my dough is best at 73-75 degrees F. To check your dough temperature, use your meat thermometer and probe the dough and check. If your dough is warmer than this, it may be sticky and hard to handle. If its colder, your dough may take longer to proof.
Cover and let the dough rest for 30 minutes before beginning stretch and folds.
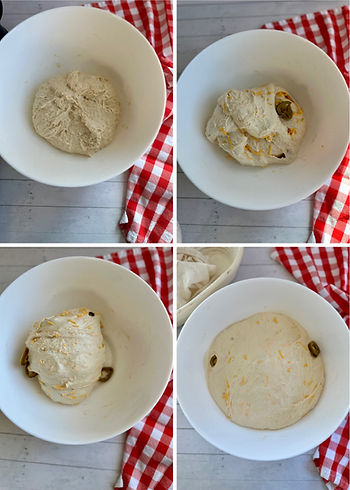
Step 3: Add Mix-in’s and Strengthen the Dough (Stretch & Folds)
Before your first set of stretch and folds, add the shredded cheddar cheese and drained and dried jalapenos to your bowl of dough.
To develop structure and gluten, perform 3 sets of stretch and folds at 30-minute intervals.
1. Grab one side of the dough, lift it up, and fold it over the center.
2. Rotate the bowl and repeat on all four sides. Your inclusions will become more incorporated as you continue your stretch and folds, don’t worry if it isn’t perfect.
3. Let the dough rest for 30 minutes between each set.
This strengthens the dough without kneading. Continue until all 3 sets have been performed. Cover and allow dough to finish bulk fermentation.
Step 4: Bulk Fermentation (6-7 Hours)
1. Keep the dough in a warm spot (73-75°F) for 5-7 hours. The dough should rise 40-50% in volume. When your dough has risen this much, its ready to shape.
Step 5: Pre-Shaping the Dough
Flour your work surface well and turn out the dough gently. Pre-shape by gently stretching it into a loose oval. To shape your loaf, fold the right side over the center. Next, fold the left side over the center like a letter. You will now have created a long log shape. Next, roll the dough into a ball by rolling the log up. Pinch all of the seams together and use a bench scraper or your hands to gently shape your ball. Pop any large air bubbles. Allow dough to rest for 30 minutes uncovered on your work surface before returning to final shape.
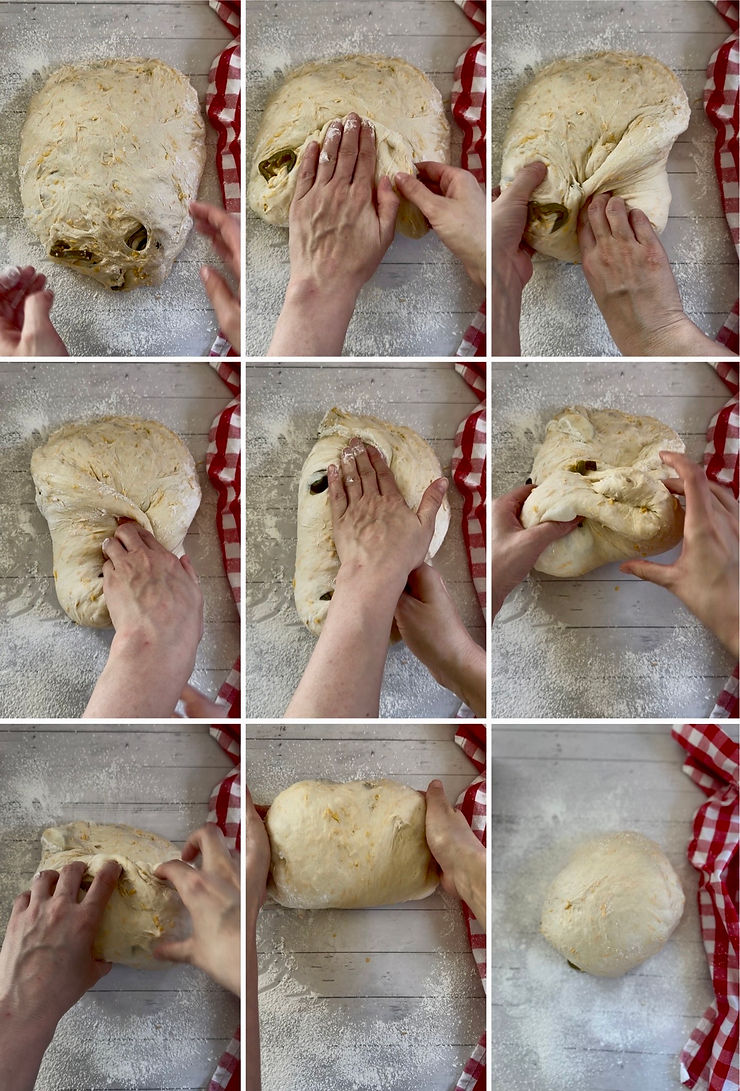
Step 6: Final Shape and Refrigerate the Dough
1. Repeat the same steps listed above to re-shape your loaf into an oval. Transfer the shaped dough into a flour-dusted banneton (or a medium bowl lined with a cloth and dusted with flour).
2. Cover with a lint-free cloth or plastic wrap.
Cold Proof Options:
• Minimum: Refrigerate for 2 hours before baking. This is for the same-day recipe option.
• Best Flavor: Refrigerate overnight for deeper sourdough complexity and longer fermentation.
Step 7: Preheat the Oven & Bake
Preheat the oven to 500°F (260°C) convection bake. Place a Dutch oven inside the oven and preheat with Dutch oven inside. Note: If you choose to use the cast iron skillet and stainless-steel bowl as a lid, you will only preheat the cast iron skillet.
Take the dough out of the fridge. Turn it out onto parchment paper or bread sling dusted with flour. Use a lame or sharp knife to score the top (a simple single slash works). This cut should be about 1/2 inch deep. Be aware dough that hasn’t been refrigerated as long may be more difficult to score or cut. This score helps the loaf retain a nice shape while it rises and expands in the oven.
Carefully transfer the dough into the hot Dutch oven (using parchment paper for easy lifting). Bake at 450°F (230°C) for 40 minutes with the lid on. Remove the lid and bake for another 10 minutes to develop a crispy crust.
Step 8: Cool Completely Before Slicing
Once baked, remove the bread from the Dutch oven and transfer to a wire rack carefully.
Let it cool completely (at least 1-2 hours) before slicing. Cutting too soon will result in a gummy crumb because the inside is still setting!
Tips for Success
Temperature is Key: If your kitchen is cool, fermentation may take longer. If you want to create a warmer environment, you can proof your dough on a cookie sheet in the oven with the light on or use a heating pad or dough mat to provide extra warmth to boost fermentation. Be aware to take your dough temperature, if your dough gets warmer that 84 degrees F you may end up with a sticky mess.
Don’t Rush Cooling: Allowing the loaf to fully cool improves texture and flavor.
So whether you’re looking to impress or just level up your sourdough game- this jalapeño cheddar loaf delivers every time. It’s spicy, it’s cheesy, it’s got that perfect sourdough tang, and once you pull it from the oven, trust me—your kitchen turns into the place everyone suddenly wants to be.
Make it once, and you’ll understand why this loaf doesn’t last more than a day in my house.
Ready to turn up the heat? Let’s bake.
Sourdough Jalapeno Cheddar Loaf
Ingredients
Feed Starter:
- 20 g 1 tbsp ripe mother starter
- 100 g ½ cup + 1 tbsp water (slightly warm, 80 degrees)
- 100 g ¾ cup + 1 tbsp all-purpose or bread flour
Feed your starter:
- 15 g about 2 tsp ripe starter
- 45 g 3 tbsp water (slightly warm, 80 degrees)
- 45 g ⅓ cup all-purpose or bread flour
- 100 g ½ cup fed & bubbly sourdough starter
- 350 g 1 ½ cups warm water (80 degrees F)
- 25 g 1 tbsp honey
- 10 g 2 tsp salt
- 500 g 4 cups all-purpose or bread flour
Mix-in’s
- 100 g 1 cup sharp cheddar cheese, shredded
- 80 g 1/2 cup pickled jalapenos (drain and then weigh or measure
Instructions
Step 1: Feed Your Starter the Night Before
- To ensure your starter is strong and active, feed it the night before using a 1:5:5 ratio (if your home is 65 degrees F or over). This means 1 part mother starter, 5 parts (or 5 times) flour, and 5 parts (5 times) water.
Step 2: Mix the Dough (Morning)
- Line a bowl or plate with a paper towel. Transfer jalapenos to paper towel and allow to drain thoroughly. Pat them dry of any moisture to prepare them for your dough.
- Mix together your bubbly starter, flour, water, salt, and honey with a dough whisk or spatula until all the flour is incorporated and the dough looks shaggy. You can also use your hands to do this if that’s easier.
- I find that my dough is best at 73-75 degrees F. To check your dough temperature, use your meat thermometer and probe the dough and check. If your dough is warmer than this, it may be sticky and hard to handle. If its colder, your dough may take longer to proof.
- Cover and let the dough rest for 30 minutes before beginning stretch and folds.
Step 3: Add Mix-in’s and Strengthen the Dough (Stretch & Folds)
- Before your first set of stretch and folds, add the shredded cheddar cheese and drained and dried jalapenos to your bowl of dough.
- To develop structure and gluten, perform 3 sets of stretch and folds at 30-minute intervals.
- Grab one side of the dough, lift it up, and fold it over the center.
- Rotate the bowl and repeat on all four sides. Your inclusions will become more incorporated as you continue your stretch and folds, don’t worry if it isn’t perfect.
- Let the dough rest for 30 minutes between each set.
- This strengthens the dough without kneading. Continue until all 3 sets have been performed. Cover and allow dough to finish bulk fermentation.
Step 4: Bulk Fermentation (6-7 Hours)
- Keep the dough in a warm spot (73-75°F) for 5-7 hours. The dough should rise 40-50% in volume. When your dough has risen this much, its ready to shape.
Step 5: Pre-Shaping the Dough
- Flour your work surface well and turn out the dough gently. Pre-shape by gently stretching it into a loose oval. To shape your loaf, fold the right side over the center. Next, fold the left side over the center like a letter. You will now have created a long log shape. Next, roll the dough into a ball by rolling the log up. Pinch all of the seams together and use a bench scraper or your hands to gently shape your ball. Pop any large air bubbles. Allow dough to rest for 30 minutes uncovered on your work surface before returning to final shape.
Step 6: Final Shape and Refrigerate the Dough
- Repeat the same steps listed above to re-shape your loaf into an oval. Transfer the shaped dough into a flour-dusted banneton (or a medium bowl lined with a cloth and dusted with flour).
- Cover with a lint-free cloth or plastic wrap.
Cold Proof Options:
- Minimum: Refrigerate for 2 hours before baking. This is for the same-day recipe option.
- Best Flavor: Refrigerate overnight for deeper sourdough complexity and longer fermentation.
Step 7: Preheat the Oven & Bake
- Preheat the oven to 500°F (260°C) convection bake. Place a Dutch oven inside the oven and preheat with Dutch oven inside. Note: If you choose to use the cast iron skillet and stainless-steel bowl as a lid, you will only preheat the cast iron skillet.
- Take the dough out of the fridge. Turn it out onto parchment paper or bread sling dusted with flour. Use a lame or sharp knife to score the top (a simple single slash works). This cut should be about 1/2 inch deep. Be aware dough that hasn’t been refrigerated as long may be more difficult to score or cut. This score helps the loaf retain a nice shape while it rises and expands in the oven.
- Carefully transfer the dough into the hot Dutch oven (using parchment paper for easy lifting). Bake at 450°F (230°C) for 40 minutes with the lid on. Remove the lid and bake for another 10 minutes to develop a crispy crust.
Step 8: Cool Completely Before Slicing
- Once baked, remove the bread from the Dutch oven and transfer to a wire rack carefully.
- Let it cool completely (at least 1-2 hours) before slicing. Cutting too soon will result in a gummy crumb because the inside is still setting!

Followed the instructions to a T and this loaf came out smelling and tasting SO good! It was so hard to have the will power to not cut into this after it came out of the oven. This was my first inclusion loaf and I cannot wait to try others!
This loaf is stunning- thank you for sharing your success!
Amazing! It will be my new kind of bread never tried bake with jalapeño and cheese before, it’s really interesting for me, I will try it! Thank you for recipes!🌷
Thanks for your comment 🙂
I hope you love this recipe!