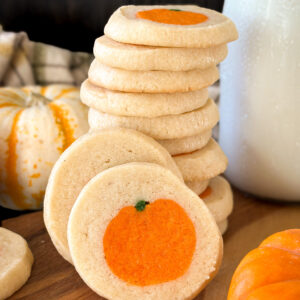
Sourdough Pumpkin Sugar Cookies (Pillsbury Copycat)
These Sourdough Pumpkin Sugar Cookies (Pillsbury Copycat) are soft, buttery, and have that nostalgic little pumpkin in the center. They're made completely from scratch, and while the pumpkin design looks impressive, I'll walk you through exactly how to make it.
Equipment
- Stand mixer or hand mixer - for mixing the cookie dough, you'll need to cream the butter.
- Rolling Pin - to roll out the cookie dough.
- Digital kitchen scale (optional) - makes things easy when baking. You can also use standard cups and spoons!
- Long skewer - to make the pumpkin shape. I used these food grade kitchen skewers.
- Parchment paper - for rolling out the cookie dough and lining the baking pans.
- Plastic wrap - to wrap and chill dough.
- Food grade gloves (optional) - to mix the colored sugar cookie dough so your hands don't stain.
- Small mixing bowls - to mix the colored cookie dough.
- 9x13 baking sheet or pan - to roll out the cookie dough.
- Baking sheets - to bake the cookies and roll out the cookie dough.
- Sharp knife - use a straight edge blade not serrated for a clean slice of your cookies.
- Cooling rack (optional) - for cooling the cookies.
Ingredients
Sourdough Sugar Cookie Dough:
- 1 (226g) cup unsalted butter softened
- ¾ (175g) cup granulated white sugar
- ⅓ (75g) cup sourdough discard
- 1 large egg yolk
- 2 tsp vanilla extract
- 2⅓ (290g) cups all-purpose flour
- 1 Tbsp cornstarch
- ¾ tsp fine sea salt
- ¼ tsp baking powder
- Orange gel food coloring
- Green gel food coloring
Instructions
Step 1: Mix the Cookie dough
- In the bowl of a stand mixer or a mixing bowl, add the softened butter and granulated sugar. Using either the paddle attachment or a hand mixer, cream the butter and sugar about 2-3 minutes until creamy and slightly fluffy.1 (226g) cup unsalted butter, ¾ (175g) cup granulated white sugar
- Add the sourdough discard, egg yolk, and vanilla extract to the butter sugar mixture. Mix this on LOW until just combined, scraping down the sides of the bowl as needed. Overmixing the discard will make the cookies fluffy not crispy.⅓ (75g) cup sourdough discard, 1 large egg yolk, 2 tsp vanilla extract
- In a separate bowl, whisk together the flour, cornstarch, salt, and baking powder.2⅓ (290g) cups all-purpose flour, 1 Tbsp cornstarch, ¾ tsp fine sea salt, ¼ tsp baking powder
- Add the dry ingredients to the butter mixture and mix on low just until the dough comes together. Avoid overmixing the sugar cookie dough! You want it combined and no flour streaks remaining.
Step 2: Color the Cookie Dough and Chill
- Divide the sugar cookie dough into three portions. Set aside approximately 3/4 cup (200g) for the orange pumpkin design and 2 Tbsps (40g) for the green stem.
- The remaining dough will be left uncolored and will be the dough you wrap around the pumpkin design.
- Add a few drops of orange food color gel to the larger portion, and green gel food coloring to the smaller portion. Gently work the colors into the dough until they're evenly incorporated.
- I recommend using food safe gloves when you're mixing the cookie dough to incorporate your colors, this will avoid your hands getting terribly stained.
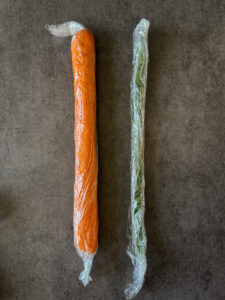
- Transfer the orange dough onto a sheet of plastic wrap and shape it into a log approximately 1 inch in diameter and 13 inches long. Wrap tightly in the plastic wrap.
- Repeat this step with the green dough, shaping it into a thin log approximately the same length (this doesn't need to be perfect we will do that later).
- Line a 9x13 baking sheet (or pan) with parchment paper, and transfer the remaining cookie dough to the lined pan.
- Cover the dough with another sheet of parchment paper, and roll the shortbread dough out to about 1/4 inch thickness. Leaving the top sheet of parchment on top of the dough while it chills.
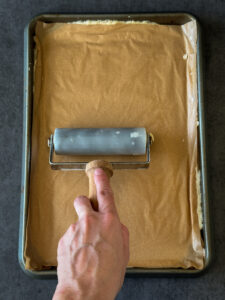
- Place the rolled out cookie dough and both colored dough logs in the refrigerator for at least an hour. Chilling is essential to shape the design of the pumpkin. Don't skip this step!
Step 3: Shape the Pumpkin Design
- Once the cookie dough has chilled for at least 1 hour, it’s time to shape your pumpkin design!
- Gather the orange log of cookie dough and a wooden skewer. While the dough is still wrapped in plastic, gently roll it on a smooth surface to make it as round and even as possible. Then carefully unwrap it.
- Place the skewer lengthwise on top of the orange log and gently press down to create an indentation in the dough.
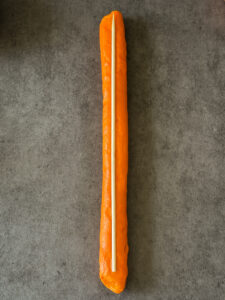
- Using the green cookie dough, roll it into long, very thin strips and place it along the indentation. You want about half of the green dough nestled into the orange dough, with the other half sticking out to create the pumpkin stem.
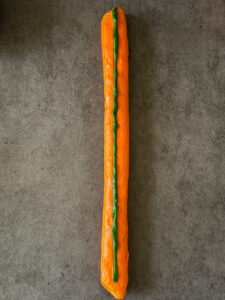
- Gather your uncolored cookie dough and remove the top sheet of parchment paper.
- Place the orange log with the green stem facing up in the slightly off center of the rolled out, uncolored dough.
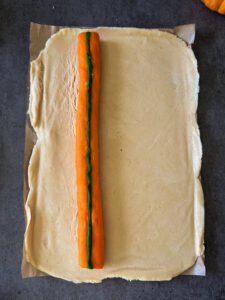
- Carefully fold the uncolored cookie dough up and around the pumpkin log until the pumpkin design is completely enclosed. Gently press the seams together.
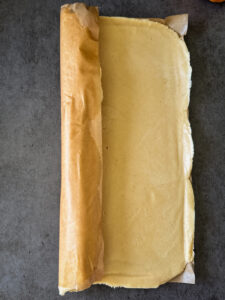
- Note: you may have a little extra uncolored dough after wrapping your pumpkin design. Avoid overlapping the dough too much, as this can make the outer layer too thick. Simply trim away excess dough, roll the scraps into balls, and bake them later for a few extra sugar cookies!
- It’s important to eliminate as many gaps as possible for a clean pumpkin design! Gently press the uncolored dough around the pumpkin and stem to remove any trapped air pockets.
- Remove the parchment paper and wrap the entire log tightly in plastic wrap and gently roll it on your work surface to smooth the outside and help the dough come together.
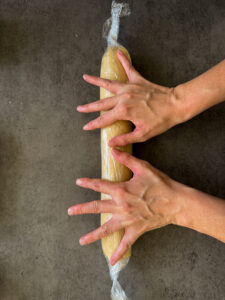
- Transfer the cookie dough log to the refrigerator to chill for at least 4 hours, preferably overnight, until firm enough to slice cleanly.
- Overnight Fermentation Option: If you want to extend the fermentation time in the refrigerator, simply leave the cookie dough in the refrigerator overnight and then continue with the recipe as directed.
Step 4: Slice and Bake the Cookies
- Preheat the oven to 350°F. Line two baking sheets with parchment paper.
- Using a sharp knife (use a straight edge not serrated), slice the chilled dough into approximately24 quarter inch thick rounds.
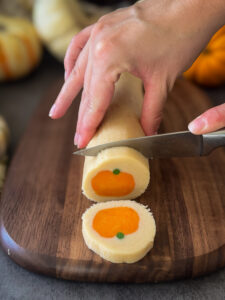
- Place the cookies about 2 inches apart on the prepared baking sheets, I did 12 to a pan in 3 rows of 4.
- If needed, gently reshape the cookies with your fingers to press out any bubbles around the pumpkin design.
- Bake for 10–12 minutes, or until the cookies are set and the edges are barely beginning to turn golden.
- Avoid overbaking these, the cookies should still look fairly pale for a soft, buttery texture.
- Allow the cookies to cool on the baking sheet for 10 minutes before transferring them to a wire rack to cool completely. Enjoy!
- Yields 24 sugar cookies
Notes
How to Store:
Room temperature- Keep in an airtight container for 5 days at room temperature. Freezing- Freeze baked cookies in an airtight container for up to one month.Nutrition
Serving: 1cookieCalories: 187kcalCarbohydrates: 23gProtein: 2gFat: 9g
Tried this recipe?Let us know how it was!