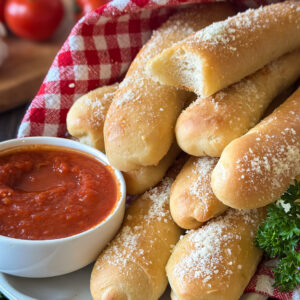
Sourdough Garlic Breadsticks (same day recipe)
These Sourdough Garlic Breadsticks (same day recipe) are easy enough for a weeknight dinner, with a soft chewy center and plenty of garlic butter and Parmesan brushed on while they're still warm. They'll be gone as soon as you set them on the table!
Equipment
- Stand mixer with dough hook (or strong hands!) - for mixing dough.
- Bowl or straight edge container - for proofing dough. I love this container with a straight edge and lid to easily assess rise linked here.
- Whisk - for mixing.
- 2 standard baking sheets - for baking the breadsticks.
- Parchment paper - to line the baking sheets to avoid the breadsticks from sticking.
- Digital scale - recommended for accurate measurements and weighing your breadsticks. I love this scale linked here.
- Bench scraper or knife - for cutting dough into sections. I like this bench knife linked here.
- Pastry brush - for the garlic butter topping.
- Digital food thermometer (optional) - helpful for checking internal temperatures. This is my go-to kitchen thermometer linked here.
Ingredients
Dough:
- ¾ (200g) cup active sourdough starter
- ½ (120g) cup whole milk slightly warmed
- ⅓ (80g) cup water slightly warmed
- 1 (15g) Tbsp granulated white sugar
- 3 (45g) Tbsp unsalted butter melted
- 2 (25g) Tbsp olive oil
- 3⅓ (400g) cups all-purpose flour
- 1½ (10g) tsp fine sea salt
Sourdough Discard Swap:
- 3/4 (200g) cup sourdough discard 100% hydration
- 1 (4g) tsp instant yeast
Garlic Butter Topping:
- 4 (57g) Tbsp salted butter melted
- ½ tsp garlic powder
Garnish:
- ¼ (20g) cup finely grated Parmesan
Instructions
Step 1: Mix the Dough
- In a microwave safe bowl, add the butter and melt it for 30 seconds in the microwave.3 (45g) Tbsp unsalted butter
- In your stand mixing bowl or a large mixing bowl, add the active sourdough starter, whole milk, warm water (about 80 degrees), sugar, melted butter, and oil to the bowl of a stand mixer. Give everything a whisk, it's okay if it's still a little lumpy.¾ (200g) cup active sourdough starter, ½ (120g) cup whole milk, ⅓ (80g) cup water, 1 (15g) Tbsp granulated white sugar, 2 (25g) Tbsp olive oil
- Sourdough Discard Swap: If you want to make these without the active starter and use discard and yeast, add the discard and yeast to the wet ingredients above in place of the starter.3/4 (200g) cup sourdough discard, 1 (4g) tsp instant yeast
- After you combine the wet ingredients, add the all-purpose flour and salt to the bowl.3⅓ (400g) cups all-purpose flour, 1½ (10g) tsp fine sea salt
- Mixing by hand: If you're mixing this dough by hand, mix and knead the dough together until it's a smooth ball. This should take about 6-8 minutes.
- Mixing with a stand mixer: If you're using a stand mixer, knead the dough on the lowest setting for 8-10 minutes, scraping the bowl halfway through to make sure everything is incorporated.
- Once the dough is mixed, grease a bowl or container large enough for the dough to double with cooking spray and transfer the dough to the container. Cover the dough with plastic or a lint-free towel, and allow the dough to rest 30 minutes.
Step 2: Stretch and Folds and Bulk Fermentation
- Once the 30 minute rest has finished, you'll begin your stretch and folds. This helps build structure in your dough and strengthen the gluten.
- How to do a stretch and fold: Starting at the edge of the dough with lightly wet hands, gently lift one edge of the dough, stretch it up, and fold it over the center. Rotate the bowl or container 90 degrees and repeat with the next side. Do this for all four sides of the dough to form a ball.
- Cover the dough and let it rest for 30 minutes. Repeat this stretch-and-fold process one more time at 30-minute intervals for a total of 2 sets. Your dough should be smooth and silky after the stretch and folds.
- Note on Temperature: Your dough loves a warmer climate, so aim to keep your dough between 73-78 degrees (you can use your digital thermometer to check the temperature). If you need to warm it up, try putting it in the oven with a light on or near a heater.
- Cover the dough and allow it to rest in a warm spot until it has reached a 90 percent rise.
- Sourdough Discard Option: If you used discard and yeast, please note that the dough will rise much faster. Shape the breadsticks once the dough doubles in size.
- Optional Overnight Fermentation: If you want to extend the fermentation time on the dough or need to wait to shape the breadsticks, cover the bowl well and transfer to the refrigerator and chill until you're ready to shape the breadsticks the next day.
Step 3: Shape the Breadsticks
- Turn the dough onto a clean work surface that's floured or sprayed with cooking spray.
- Divide the dough into 12 equal pieces, about 70g each.
- Press a section of dough out into a rectangle with your fingers, about 5 inches long and 1 1/2 inches wide.
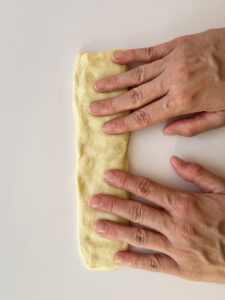
- Starting on the longer 5 inch edge, roll up the rectangle creating a long rope.
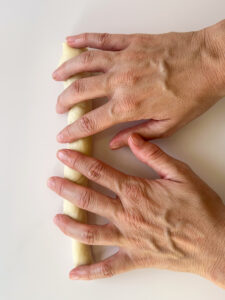
- Roll the rope out a bit more with your hands to approximately 7 inches long, pinching and shaping the ends.
- Arrange the breadsticks on a parchment lined baking sheet, leaving room between them to expand.
- Cover the breadsticks loosely with plastic or a lint free towel and allow them to rise for about 2 hours, or until very puffy and visibly expanded. Don't skip this step and give them the time to rise!
- Sourdough Discard Option: If you used discard and yeast in the dough, only allow the breadsticks to rise about 45 mins before baking or they'll be too large.
Step 4: Bake the Breadsticks
- Preheat the oven to 400°F (204°C).
- Transfer the breadsticks to the preheated oven, and bake them at 400°F for about 20 minutes or until the breadsticks are puffed and golden.
- You don’t need to bake these super dark; the goal is a beautiful golden exterior with a soft and fluffy center.
- While the breadsticks bake, melt the butter in a microwave safe bowl. Whisk the butter until it's smooth, then add the garlic powder and whisk it in.4 (57g) Tbsp salted butter, ½ tsp garlic powder
- Brush the warm breadsticks with the garlic butter mixture, then sprinkle the tops with finely shredded parmesan cheese.¼ (20g) cup finely grated Parmesan
- Serve warm with marinara for dipping!
- Yields 12 breadsticks
Notes
How to Store:
Room temperature: Store leftover breadsticks in an airtight container at room temperature for up to 3 days. To reheat, warm them very briefly in the microwave for the softest texture or place them in a low oven until warmed through. Freezer: You can freeze the completely cooled breadsticks in an airtight container for up to 2 months. Thaw and reheat before serving. To reheat, warm at 300°F for 5–8 minutes for fresh baked texture.Nutrition
Serving: 1breadstickCalories: 250kcalCarbohydrates: 34gProtein: 5gFat: 10g
Tried this recipe?Let us know how it was!