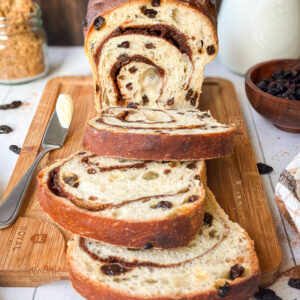
Sourdough Cinnamon Raisin Swirl Bread
Sourdough Cinnamon Raisin Swirl Bread is one of those nostalgic bakes that just feels like home. Soft, lightly sweet, and swirled with cinnamon sugar and packed with juicy raisins. This is a recipe you'll want to keep coming back to!
Equipment
- digital kitchen scale - for weighing out your ingredients (highly recommended for accuracy). This one linked here is great to start with.
- Measuring cups & spoons - (optional, if you prefer to not use a scale).
- Bowl or straight edge container for mixing and proofing dough - to mix your dough and make sure your dough is rising properly. You can use a clear square Tupperware for this, I don't recommend a bowl as it is hard to assess your rise. I've linked here the container I like to use.
- Silicone Bread Spatula - to mix and shape the loaf. I love these dough spatulas linked here.
- Rolling Pin (optional) - to help you roll out the dough to the desired size. You can laminate by hand if you prefer. I love this small rolling pin linked here.
- Lint-free cloth or plastic wrap - to cover the dough while resting.
- Small Bowl - for mixing the cinnamon sugar filling.
- Lint-free cloth or plastic wrap - to cover the dough while resting.
- Digital food thermometer (optional) - to check the temperature of your starter and dough, this ensures a more reliable result. I use this one linked here.
- 9x5 loaf pan - standard size for shaping and baking the final loaf. I love this loaf pan from USA Bakeware linked here.
- Bread knife - for cutting your bread once cooled. I love this bread knife linked here.
- Cooling rack - to cool your loaf evenly after baking.
Ingredients
Feed Your Starter:
- 1/2 (100g) cup water
- 3/4 (100g) cup flour
- 2 (30g) Tbspns mature sourdough starter
Main Dough:
- 1 2/3 (380g) cups water room temperature
- 1/2 (100g) cup active sourdough starter fed from the night before
- 1 (25g) Tablespoon honey
- 2 (30g) Tablespoons avocado oil or neutral cooking oil
- 4 (500g) cups all-purpose flour or bread flour
- 1 (10g) tsp sea salt
- 2/3 (100g) cup raisins
Cinnamon Swirl:
- 1/2 (67g) cup brown sugar, packed
- 2 (16g) Tablespoons all-purpose flour
- 1 1/2 (10g) Tablespoon ground cinnamon
For Brushing:
- 1 Tbsp salted butter cold
Instructions
Step 1: Feed Your Starter Night Before Baking
- Baker's Schedule: Day 1- 8:00 PM
- To ensure a bubbly and active starter, feed your starter the night before baking.
- Mix flour and water in a jar with a spatula, cover loosely with lid, and mark the volume of the starter in your jar with a rubber band or piece of tape and marker. Let starter sit at room temperature (70-75 degrees) overnight until bubbly and doubled in size.1/2 (100g) cup water, 3/4 (100g) cup flour, 2 (30g) Tbspns mature sourdough starter
- Please note this makes enough starter for your loaf and some left over for future use.
Step 2: Make the Dough
- Baker's Schedule: Day 2- 8:00 AM
- In a large bowl or as I prefer a clear straight edge container, mix the active starter, water, avocado oil, and honey until the starter is dissolved.1 2/3 (380g) cups water, 1/2 (100g) cup active sourdough starter, 1 (25g) Tablespoon honey, 2 (30g) Tablespoons avocado oil
- Add the salt, flour, and raisins to the starter mixture. Stir and knead with your hand until all ingredients are combined into a shaggy dough. Cover with a damp towel or plastic and let it rest for 30 minutes at room temperature (70-77 degrees).4 (500g) cups all-purpose flour, 1 (10g) tsp sea salt, 2/3 (100g) cup raisins
Step 3: Stretch and Folds
- After the rest, begin your stretch and folds. This helps build structure in your dough.
- How to do a stretch and fold: Starting at the edge of the dough with wet hands, gently lift one edge of the dough, stretch it up, and fold it over the center. Rotate the bowl/container 90 degrees and repeat with the next side. Do this for all four sides of the dough to form a ball.
- Cover the dough and let it rest for 30 minutes. Repeat this stretch-and-fold process two more times at 30 minute intervals for a total of 3 sets. Your dough should go from being rough and clumpy to smooth and silky.
Step 4. Bulk Fermentation
- After the stretch and folds, cover the dough and let it bulk ferment for 5-6 hours. Keep the dough at a temperature of 75–78°F (24–26°C) for best results. The dough should rise by 80%, stopping just shy of doubling in size.
- The best way to measure dough has proofed 80 percent in volume is to mark the volume of the dough in your container or bowl when you first mix your dough, then as the dough ferments you can more accurately assess how much it has risen in volume and when it's ready to shape. Other signs of dough being properly fermented and ready for shaping include fermentation bubbles, a domed top, and springs back when you poke it with your finger.
- Same Day Baking Note: If dough proofs over 80%, it’s best to bake same day. Over proofed dough won’t sustain an overnight refrigeration and runs the risk of being flat.
Step 5: Shaping & Filling the Cinnamon Swirl Loaf
- In a small bowl, prepare your cinnamon swirl filling by whisking together the brown sugar, cinnamon, and flour until well combined. Set aside.1/2 (67g) cup brown sugar, packed, 2 (16g) Tablespoons all-purpose flour, 1 1/2 (10g) Tablespoon ground cinnamon
- Lightly flour your work surface to prevent sticking, and grease your loaf pan with a light coat of oil or nonstick spray.
- Gently turn your dough out onto the floured surface. Using a rolling pin, roll the dough into a large rectangle approximately 10x20 inches (bottom and top being 10 inches). The width should match the length of your loaf pan; the longer the rectangle, the more distinct the swirl will be.
- Evenly sprinkle the cinnamon sugar mixture over the surface of the dough, leaving a ½-inch border along the edges to help seal the bread.
- Starting at the bottom (the edge closest to you), gently roll the dough up into a tight log using your hands or a dough scraper to help lift and tuck as you go. Once rolled, pinch the seam closed along the top and seal the ends by pinching and tucking them under slightly.
- Carefully transfer the rolled dough into the greased loaf pan, seam side down. Cover loaf pan with plastic.
- NOTE FOR OVERNIGHT REFRIGERATION AFTER SHAPING: At this point you have the option to cover the loaf in the pan with plastic and refrigerate overnight for longer fermentation, or proceed with proofing and baking.
- If you choose to refrigerate overnight, do not proof after shaping. Bread will proof in refrigerator in pan, but will need additional proofing time at room temperature the next day. Allow the bread to come to room temperature the next morning and proof 1-2 hours or until dough is risen over the edge of the pan and proceed with baking instructions as listed below.
- IF SKIPPING OVERNIGHT FERMENTATION: Let the bread proof at room temperature for about 1 hour, or until the dough is just peeking over the edge of the pan. See the picture above for how the bread should look before baking.
- Note: If you over proof the bread while it's in the pan, you will end up with a distorted swirl.
Step 6: Baking the Bread
- Preheat your oven to 400°F (200°C) on convection bake.
- When the oven is hot, place the loaf in the oven on the center rack and bake for 45-50 minutes or the internal temperature of the loaf reads 200-205 F. You can use a digital thermometer inserted into the loaf to check this.
- If the top of the loaf starts to get too brown, tent the top with foil and continue baking.
- Remove the loaf from the oven as soon as it's done baking, and allow to cool five minutes before brushing the top with butter.
- While the loaf is still warm, brush the top with cold butter for a soft and shiny crust. Allow the bread to cool completely on a wire rack before slicing.1 Tbsp salted butter
- Yields 1 loaf
Notes
How to Store:
Room Temperature- Store wrapped in plastic or cloth at room temperature for up to 3 days. Toast for best texture and enjoy! Refrigerator- Store bread tightly wrapped in plastic in the refrigerator for up to five days. Reheat slices in the oven or toaster for best texture! Freezer- Store sliced bread in the freezer in a Ziplock bag with all air removed. For easier separation, put pieces of parchment between the slices before freezing. Allow bread to thaw to room temperature and toast for best flavor.Nutrition
Serving: 1sliceCalories: 210kcalCarbohydrates: 39gProtein: 6gFat: 4g
Tried this recipe?Let us know how it was!