Sourdough Cheesecake Factory Brown Bread
This Sourdough Cheesecake Factory Brown Bread brings that same cozy restaurant vibe right into your kitchen, but made with real sourdough and zero commercial yeast. These rolls bake up soft and fluffy inside with that signature cocoa-kissed color, gentle sweetness from honey and molasses, and the classic oat topping we all love.
Equipment
- Large mixing bowl or stand mixer bowl - for mixing your dough.
- Stand mixer (optional) - for mixing dough.
- Kitchen scale (optional) - for precise measurements and to weigh dough. This one linked here is my favorite.
- Measuring cups and spoons - for measuring ingredients.
- Whisk - to combine ingredients.
- Bench knife - to cut dough into desired sizes. I love this one linked here.
- Baking Sheet - to bake the rolls.
- Parchment paper - to line the baking sheet to keep the rolls from sticking to the pan.
- Pastry brush - to brush rolls with egg wash.
- hand beaters - to whip the honey cinnamon butter.
Ingredients
Feed the Starter (night before):
- 1 (25g) Tbspn mature mother starter
- 1/2 (100g) cup water
- 3/4 (100g) cup all-purpose flour
Wet Ingredients:
- 1¼ (300g) cups warm filtered water between 74-77 degrees
- ½ (100g) cup active sourdough starter (100% hydration)
- 2 (13g) tablespoons unsweetened cocoa powder
- 2 (40g) tablespoons unsulphered molasses
- 2½ (50g) tablespoons honey
- 2 (30g) Tablespoons avocado oil
- ½ teaspoon vanilla extract
- ¼ teaspoon ground cinnamon
Dry Ingredients:
- 1¾ (10g) teaspoons fine sea salt
- 3⅓ (400g) cups bread flour or all-purpose flour
- ¾ (100g) cup whole wheat flour
Egg Wash:
- 1 egg white
- 2 teaspoons water
Honey Cinnamon Butter:
- 1/4 (57g) cup salted butter
- 2 (28g) Tbspns honey
- 1 (12g) Tbspns powdered sugar
- 1/4 tsp cinnamon
Instructions
Step 1: Feed the Starter the Night Before
- In a clean jar, mix your mother starter with the flour and water. Give it a good stir, and allow it to rest at room temperature (optimally 73-75 degrees F). I like to mark the volume in my jar with a rubber band so it's easy to asses the rise the next morning. When the starter has doubled in size, it's time to mix your dough.1 (25g) Tbspn mature mother starter, 1/2 (100g) cup water, 3/4 (100g) cup all-purpose flour
Step 2: Mix the Dough
- In a mixing bowl, add the active starter, warm water, cocoa powder, molasses, honey, avocado oil, vanilla, and cinnamon and whisk until generally combined.1¼ (300g) cups warm filtered water, ½ (100g) cup active sourdough starter (100% hydration), 2 (13g) tablespoons unsweetened cocoa powder, 2 (40g) tablespoons unsulphered molasses, 2½ (50g) tablespoons honey, 2 (30g) Tablespoons avocado oil, ½ teaspoon vanilla extract, ¼ teaspoon ground cinnamon
- Once the wet ingredients are combined add the all-purpose or bread flour, whole wheat flour, and salt to the bowl.3⅓ (400g) cups bread flour or all-purpose flour, ¾ (100g) cup whole wheat flour, 1¾ (10g) teaspoons fine sea salt
- With your hand or a dough spatula, combine the dough until it's well mixed and forms a smooth ball. Cover the bowl with a lid or a damp towel, and allow it to rest 30 minutes in a warm place (75-78 degrees).
Step 3: Bulk Fermentation
- Once the dough has rested for 30 minutes, it's time to perform the first set of stretch and folds. Beginning at the edge of the bowl, lift the dough up without tearing it, and fold it back into the center. Repeat this step around the edge of the bowl until the dough forms a ball. This is one set of stretch and folds. Cover the dough again and return it to a warm environment to rest 30 minutes.
- Repeat this step of stretch and folds a total of 3 times. You should see the dough go from shaggy to smooth.
- Once these stretch and folds are finished, cover the dough again and allow it to rest in a warm spot for roughly 6-8 hours and doubled in size. The key is to make sure this dough has doubled before you continue.
- If the dough isn't rising quickly, it's probably too cold. Try placing it in the oven with a light on or on top of a warm dryer to heat it up so the starter can work.
- Optional Overnight Fermentation: If you want to chill the dough overnight at this point for further fermentation benefits or to shape and bake the following day, simply cover the dough and transfer to the refrigerator to shape the next day.
Step 4: Shaping and Proofing the Rolls
- If your dough has chilled overnight, allow it to rest at room temperature for 30 minutes to take the chill off before shaping. If your dough was not refrigerated, you can skip this step.
- Turn the dough onto a lightly oiled or floured surface. Divide into 4 equal pieces (about 250g each).
- Working with one piece of dough at a time, gently stretch the dough into a rough rectangle, about 3 inches wide and 4 inches long. Roll up the dough up tightly lengthwise, tucking as you go.
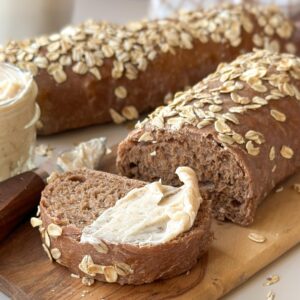
- Place the seam side up and pinch the seam closed, then roll the dough over gently and taper and tuck the ends under to form a smooth long oval roll. This creates that classic Cheesecake Factory look.
- Repeat with the remaining pieces until you have 4 rolls.
- If the rolls have a lot of excess flour sticking to them, brush the flour off lightly and coat the rolls with a bit of cooking spray to give them shine.
- Transfer the rolls seam-side down onto a parchment-lined baking sheet lightly sprayed with cooking oil to proof. Cover the rolls with a damp towel or plastic wrap.
- Overnight Fermentation Option: If you want to shape and refrigerate the rolls to bake the next day, you can cover them with plastic and transfer them to the refrigerator as long as you haven't already refrigerated this dough once overnight. Proceed with the next step the following day.
- Allow the rolls to rise in a warm spot for 1 1/2 to 2 hours until puffy and jiggly.
Step 5: Top and Bake the Rolls
- Preheat your oven to 375°F (190°C).
- In a small bowl, beat together an egg white and 2 teaspoons of water.1 egg white, 2 teaspoons water
- Lightly brush the tops of the rolls with the egg white wash, then sprinkle the tops of the rolls with the rolled oats and pat them down gently. The egg white helps the oats stick, but you can skip this step and just sprinkle the oats right on top of the rolls.
- Transfer the rolls to the oven for roughly 20-25 minutes, until brown and fluffy. Internal temperature should reach 195–200°F.
- The egg white wash can dull the outside of the bread, if you'd like to have it a deeper shinier brown simply spray the outside of the rolls with some cooking spray as soon as you remove them from the oven to give them shine.
- Allow the rolls to cool 15-20 minutes while you prepare the honey cinnamon butter.
Step 6: Make the Honey Cinnamon Butter
- Transfer your softened butter to a small mixing bowl.1/4 (57g) cup salted butter
- Add the honey, cinnamon, and powdered sugar to the bowl.2 (28g) Tbspns honey, 1 (12g) Tbspns powdered sugar, 1/4 tsp cinnamon
- Using hand beaters, whip the honey butter on high until creamy and smooth.
- Serve the honey cinnamon butter with the freshly baked brown bread!
- Yields 4 rolls
Notes
How to Store:
Room temperature: Store covered up to 3 days at room temperature.
Freezer: Up to 2 months tightly wrapped in plastic. Thaw overnight at room temperature. To reheat, warm at 300°F for 5–8 minutes for fresh-baked texture.
Honey Cinnamon Butter: Refrigerate honey cinnamon butter based on expiration of butter. Allow to soften at room temperature before enjoying.
Tried this recipe?Let us know how it was!