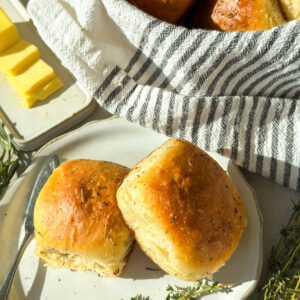
Sourdough Brown Butter Herb Dinner Rolls
Soft, buttery, and infused with plenty of herbs, these Sourdough Brown Butter Herb Dinner Rolls are everything you want on your Thanksgiving table (or any cozy dinner night). They’re made with caramelized brown butter for nutty depth and just the right amount of herbs to make your kitchen smell heavenly. Once you make these there is no going back to plain dinner rolls!
Equipment
- Stand mixer with dough hook (or strong hands!) - for mixing dough.
- Bowl or straight edge container - for proofing dough.
- Small pot - for browning the butter.
- Whisk - for mixing butter.
- 9x13-inch baking dish - for baking rolls.
- Digital scale - recommended for accurate measurements and weighing your rolls.
- Bench scraper or knife - for cutting dough for rolls.
- Pastry brush (optional) - for the butter topping.
- Digital Thermometer (optional) - helpful for checking internal temperatures.
Ingredients
Feed Starter:
- 1 (25g) Tablespoon mature sourdough starter
- 1/2 (100g) cup room temperature water
- 3/4 (100g) cup all-purpose flour
Dough:
- 3/4 (200g) cup bubbly active starter
- 1/4 (57g) cup unsalted butter, browned
- 1 1/2 (375g) cups whole milk
- 1 (25g) Tablespoon raw honey
- 2 1/2 (30g) Tablespoons white granulated sugar
- 1 1/2 (10g) teaspoon sea salt
- 4 1/4 (550g) cups all-purpose flour
- 1 egg yolk
- 1 tsp dried thyme double if using fresh
- 1 tsp dried rosemary double if using fresh
Brown Butter Herb Topping:
- 1/4 (57g) cup unsalted butter, warmed
- 1/2 tsp dried thyme double if using fresh
- 1/2 tsp dried rosemary double if using fresh
- 1/4 tsp sea salt
Instructions
Step 1: Feed the Starter the Night Before
- In a clean jar, mix your mother starter with the flour and water. Give it a good stir, and allow it to rest at room temperature (optimally 73-75 degrees F). I like to mark the volume in my jar with a rubber band so it's easy to asses the rise the next morning. When the starter has doubled in size, it's time to mix your dough.1 (25g) Tablespoon mature sourdough starter, 1/2 (100g) cup room temperature water, 3/4 (100g) cup all-purpose flour
Step 2: Brown the Butter
- In a medium sized pot, melt all your butter (1/2 cup or 113g) over medium heat. Allow to gently cook, whisking occasionally until the butter is a deep golden brown with small amber flecks.
- Remove from heat immediately and measure out out 1/4 cup or 50 g of the browned butter into a separate bowl for the butter topping.
- Note: you can skip the browned butter if you’d like and just melt the same amount of butter and allow it to cool to room temperature.
Step 3: Mix the Dough
- If using a stand mixer, fit your stand mixer with kneading arm. If mixing by hand, gather your mixing bowl.
- Add your active starter, milk, honey, sugar, salt, 57 g browned butter (half of what you made), egg yolk, rosemary, and thyme to mixer bowl and whisk together.3/4 (200g) cup bubbly active starter , 1/4 (57g) cup unsalted butter, browned, 1 1/2 (375g) cups whole milk, 1 (25g) Tablespoon raw honey, 2 1/2 (30g) Tablespoons white granulated sugar , 1 egg yolk, 1 tsp dried rosemary, 1 tsp dried thyme
- If using a stand mixer, knead the dough on low for ten minutes. If mixing by hand, knead for 2-3 minutes and the dough comes together into a smooth ball. This dough is high hydration so it’s important to work the gluten at this stage.4 1/4 (550g) cups all-purpose flour , 1 1/2 (10g) teaspoon sea salt
- Spray a straight edge container or bowl with cooking oil. Transfer dough to prepared bowl. Perform a few sets of stretch and folds to work dough into a ball again.
Step 4: Bulk Fermentation
- Cover the dough with plastic or a lint free cloth. If you used a stand mixer to mix the dough, perform one set of stretch and folds after 30 minutes of the dough resting.
- If you are hand mixing this dough, you'll need to work the gluten a bit more. Perform three sets of stretch and folds at 30 minute intervals at the beginning of bulk fermentation to do this.
- To perform a set of stretch and folds, simply grab the dough at the edge of the bowl and pull it up- then fold it down into the center of the bowl. Repeat this step until you've worked around the entire edge of the bowl, and the dough forms a ball.
- After you've completed your stretch and folds, cover dough and allow the dough to double in size (proofing 100% in volume). I allowed my dough to proof 6 hours in the oven with the light OFF, for a warmer environment (80 degrees).
- When your dough has doubled in size, you can either transfer the dough covered with plastic or a sealed lid to the refrigerator to rest overnight, or you can continue straight to shaping the rolls and baking.
Step 5: Shaping the Rolls
- If you refrigerated your dough overnight, allow to sit at room temperature for 30 minutes before shaping to take the chill off. If you didn't chill the dough, skip this step.
- Spray a 9x13 baking pan with non-stick cooking spray. Set aside.
- Spray your work surface with cooking spray, and gently turn the dough out onto the work surface. I find cooking spray works better than flour with this process.
- Cut the dough into 12 even pieces. If you're weighing the rolls for precision, they should each weigh roughly 95g each.
- Shape each piece of dough by tucking the dough under itself to form a ball, then gently roll it on your work surface to shape the roll evenly.
- Repeat this step to shape all of the rolls, then transfer the shaped rolls to the prepared baking pan. Line the rolls in three rows of four. Cover the pan with plastic or a lint free cloth.
- Overnight Refrigeration: If you want to shape and wait to bake your rolls till the next day, you can cover your pan and transfer the rolls to the refrigerator overnight at this point. Proof rolls the next day as instructed below and bake as listed.
- Allow the rolls to proof until doubled in size, about an hour and a half. Don't skip letting these proof until they're very puffy, or you will end up with a more dense roll.
Step 6: Bake the Rolls
- Preheat your oven to 375 F.
- Uncover your proofed rolls and transfer to the hot oven.
- Bake rolls for 40-45 minutes and tops are golden brown. Internal temperature should be between 195 F and 200 F. Remove rolls from oven when done and allow to cool while you prepare the herb butter.
- BAKING NOTE: these rolls can brown quickly, cover with foil if tops are getting too done and continue baking time.
- Gently reheat your reserved brown butter in the microwave or on the stove until just melted. Add rosemary, thyme, and salt to the butter, and whisk to incorporate.1/4 (57g) cup unsalted butter, warmed , 1/2 tsp dried thyme , 1/2 tsp dried rosemary , 1/4 tsp sea salt
- Note: If you skipped the brown butter and used melted butter in the dough, just substitute for 1/4 cup melted butter for brushing.
- Brush tops of warm rolls with the herbed butter, coating liberally.
- Make sure to transfer the rolls from the pan after topping with butter to a cooling rack to avoid soggy bottoms.
- Allow rolls to cool slightly, then serve with butter.
- Enjoy!
Notes
Make-Ahead + Storage Tips:
Room Temperature- store rolls in airtight container up to 3 days. Freezing and Re-heating (Baked Rolls)- Bake rolls for 40 minutes at 375°F, cool fully, then freeze. To reheat, thaw 6 hours at room temp, bake at 350 F covered with foil for 30 minutes. Check internal temperature to make sure center has been heated to 195 F. Tried this recipe?Let us know how it was!