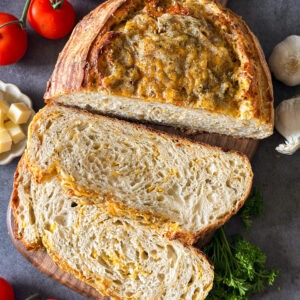
Italian Herb & Cheese Artisan Sourdough Bread
This Italian Herb & Cheese Artisan Sourdough Bread is loaded with three types of cheeses, Italian herbs, and garlic throughout the dough, then topped with even more cheese and baked until golden.
Equipment
- digital kitchen scale - for weighing out your ingredients (highly recommended for accuracy). This one linked here is great to start with.
- Measuring cups & spoons (optional) - if you prefer to not use a scale.
- Bowl or straight edge container for mixing and proofing dough - to mix your dough and make sure your dough is rising properly. I've linked here the container I like to use.
- Bench knife (optional) - for shaping your dough. I use this bench knife all the time.
- Banneton basket (or a medium bowl lined with a lint-free cloth) - to proof dough. I've linked a quality banneton and cover here if you'd like to see what I use.
- Lint-free cloth or plastic wrap - to cover the dough while resting.
- 5-quart Dutch oven with lid - for baking your loaf. This is an affordable 5-quart Dutch oven that I purchased as my first linked here.
- Parchment paper or silicone bread sling - To keep bread from sticking to Dutch oven. A reusable bread sling can be really convenient and also helps avoid burning hands on your Dutch oven. I use this set linked here all the time!
- Sharp knife or lame for scoring - a sharp knife will work for scoring your bread, but I do recommend investing in a lame (razor blade) which will make the process much easier. Here is a great lame to purchase to start out linked here.
- Digital Food Thermometer - to check the temperature of your starter and dough, this ensures a more reliable result.
- Cheese Grater (optional) - if you're grating your own cheese; I recommend this for the best results.
- Small Bowl - for cheese and herb mixture.
Ingredients
Feed Your Starter:
- 1 (20g) Tbsp mature sourdough starter
- 1/3 (50g) cup all-purpose flour
- 3 (50g) Tbsps room temperature water
Bread Dough:
- 1⅓ (350g) cups room temperature water
- ⅓ (100g) cup active sourdough starter
- 4 (500g) cups bread flour or all-purpose
- 1 1/2 (10g) tsp fine sea salt
Italian Herb & Cheese Mixture:
- 1 (100g) cup sharp cheddar cheese shredded
- ½ (50g) cup Monterey Jack cheese shredded
- ¼ (15g) cup Parmesan cheese finely shredded
- 1½ Tbsp Italian seasoning
- 1 tsp garlic powder
- ½ tsp onion powder
- ½ tsp dried parsley
For Finishing:
- 2 Tbsp salted butter melted
Instructions
Step 1: Feed Your Starter Night Before Baking
- Mix flour, starter, and water in a jar with a spatula, cover loosely with lid, and mark the volume of the starter in your jar with a rubber band or piece of tape and marker. Let starter sit at room temperature (70-75 degrees) overnight until bubbly and doubled in size.1 (20g) Tbsp mature sourdough starter, 1/3 (50g) cup all-purpose flour, 3 (50g) Tbsps room temperature water
Step 2: Make the Dough
- In a large bowl or as I prefer a clear straight edge container, mix the active starter and water until the starter is dissolved.1⅓ (350g) cups room temperature water, ⅓ (100g) cup active sourdough starter
- Add the salt and flour to the starter mixture. Stir and knead with your hand until all ingredients are combined into a shaggy dough. Cover with a damp towel or plastic and let it rest for 30 minutes at room temperature (70-77 degrees).4 (500g) cups bread flour, 1 1/2 (10g) tsp fine sea salt
Step 3: Prepare Cheese and Herb Mixture
- While the dough is resting, mix the cheese and herb mixture.
- Grate your sharp cheddar cheese, Monterey Jack, and Parmesan cheese or measure your pre-shredded cheese and add it all to a small mixing bowl.1 (100g) cup sharp cheddar cheese, ½ (50g) cup Monterey Jack cheese, ¼ (15g) cup Parmesan cheese
- Add the Italian seasoning, garlic powder, onion powder, and dried parsley to the cheese blend and mix it all together.1½ Tbsp Italian seasoning, 1 tsp garlic powder, ½ tsp onion powder, ½ tsp dried parsley
Step 4: Strengthen the Dough (Stretch & Folds)
- Once the 30 minute rest has finished, add about 3/4ths of the cheese and herb blend to the bowl with your dough (reserve 1/4th of the cheese blend for the topping on the loaf). Make sure you refrigerate left over cheese blend for later.
- Starting at the edge of the dough with lightly wet hands, gently lift one edge of the dough, stretch it up, and fold it over the center. Rotate the bowl or container 90 degrees and repeat with the next side. Do this for all four sides of the dough to form a ball.
- Cover the dough and let it rest for 30 minutes. Repeat this stretch and fold process two more times at 30-minute intervals for a total of 3 sets. Your dough should go from being rough and clumpy to smooth and silky with the inclusions well distributed.
- Note on Temperature: Your dough loves a warmer climate, so aim to keep your dough between 73-78 degrees (you can use your digital thermometer to check the temperature). If you need to warm it up, try putting it in the oven with a light on, near a heater, or even on top of a dryer that's on to conduct some heat!
Step 5: Bulk Fermentation
- Assessing Rise Tip: After your stretch and folds are done, try to gently push the dough down to be level in the bowl or container after the stretch and folds. Mark roughly where your dough is hitting on the side of the container with a sharpie or dry erase marker (you can put a piece of tape over if you don't want to mark your bowl or jar).
- After you mark the volume, make another mark above the that where the dough would be if it rose roughly 100 percent. This will be your target for how much you want your dough to rise during bulk fermentation.
- Cover the dough and allow it to rest in a warm spot until it has reached a 90-100 percent rise. DO NOT over proof this bread or your loaf will be dense.
Step 6: Shaping the Dough
- Flour your work surface well and turn out the dough gently. Pre-shape by gently stretching it into a loose square about 13x13 inches.
- To shape your loaf, fold the right side over the center. Next, fold the left side over the center like a letter. This is called a letter fold.
- You will now have created a long rectangle about 5 inches wide and 13 inches long.
- Next, roll the dough into a football shape by rolling the rectangle up. Pinch all of the seams together at the ends. Pop any large air bubbles.
- Pinch the seams and transfer seam side up to a floured banneton
- Flour your banneton and transfer your loaf seam side up into the floured banneton. Stitch and pinch all of your seams together.
- Cover the banneton with a cover or plastic wrap. Transfer the dough to the refrigerator overnight for continued cold fermentation.
- Note: If you don't have a banneton, you can use a bowl lined with a lint-free towel that is well floured. After you transfer the dough to the towel lined bowl, fold the towel over the top of the dough and refrigerate overnight.
Step 7: Preheat the Oven & Bake
- Preheat the oven to 500°F (260°C) convection bake. Place a Dutch oven inside the oven and preheat with Dutch oven inside.
- Take the dough out of the fridge. Turn it out onto parchment paper or bread sling dusted with flour. Use a lame or sharp knife to score the top (a single slash works).
- This cut should be about 1/2 inch deep from one end of the loaf to the next. This score helps the loaf retain a nice shape while it rises and expands in the oven.
- Carefully transfer the dough into the hot Dutch oven (using parchment paper or a bread sling for easy lifting).
- Reduce the heat and bake the bread at 450°F (230°C) for 40 minutes with the lid on.
- Remove the lid and sprinkle the remaining cheese blend on top of the bread. Bake for another 5-10 minutes to melt the cheese and brown the crust a little bit more.
- Internal temperature of loaf should read between 195-200 F.
- Once the bread is baked, remove the bread from the Dutch oven and transfer to a wire rack carefully.
- Melt a few Tablespoons of butter in the microwave, and then brush the crust of the loaf well with melted butter using a pastry brush (you can skip this step but I like the softness it adds to the crust).2 Tbsp salted butter
- Let the bread cool completely (at least 1-2 hours) before slicing. Cutting too soon will result in a gummy crumb because the inside is still setting!
- Yields 1 loaf
Notes
How to Store:
Room Temperature- Store wrapped at room temperature for up to 3 days. Reheat slices in the oven or toaster for best texture! Freezer- Store sliced bread in the freezer in a Ziplock bag with all air removed. For easier separation, put pieces of parchment between the slices before freezing. Allow to thaw to room temperature and toast for best flavor.Nutrition
Serving: 1sliceCalories: 305kcalCarbohydrates: 43gProtein: 11gFat: 10g
Tried this recipe?Let us know how it was!