How to Use a Bosch Mixer for Sourdough Sandwich Bread
Learn how to make soft. fluffy sourdough sandwich bread in bulk using a Bosch mixer. This streamlined method helps your mix, knead, and bake perfectly tender loaves in one day with no guess work just consistent results every time.
Equipment
- Bosch Universal Plus Mixer - The Bosch Universal Plus Mixer has the proper capacity to mix 6 900 g loaves which is what this recipe makes. You can use my code "JOSELYN20" at checkout for savings on your mixer and any appliances.
- 16-quart mixing bowl - for performing stretch and folds and allowing your dough to proof double in volume. I use this 16-quart bowl because it minimizes dishes and I know the dough can proof to the top and that's when it's ready to shape. You can always use different bowls and divide the dough as long as you're able to assess the dough has doubled.
- digital kitchen scale - for accurate measuring as this recipe is in grams, especially helpful with sourdough baking. This kitchen scale is best for weighing out heavier quantities.
- Digital food thermometer (optional) - to check the temperature of your dough and bread, this ensures a more reliable result. I use this one linked here.
- Dough Spatula (optional) - to help release the dough and divide it. I love this silicone dough spatula for mixing linked here.
- Bench knife - to divide the dough for shaping.
- Plastic wrap - to cover the bowl while the dough proofs.
- Bread Lame or sharp knife - to score the bread so it can expand properly. This bread lame is inexpensive and great as a starter tool.
- 6 Bread Pans - I always use these 1 lb sandwich loaf pans from USA Baking, they're reliable, don't stick, and give a golden finish to your bread.
- Cooling rack - to allow bread to cool.
- Bread knife - a quality bread knife is essential to even slices for your bread.
- Plastic Bread Bags (optional) - I love these bread bags with ties for easy packaging and freezing when I make bread in bulk.
Ingredients
Feed Your Starter (night before):
- 55 g mature mother starter
- 275 g all-purpose flour
- 275 g water
Ingredients:
- 600 g sourdough starter doubled and ready to use
- 3000 g all-purpose flour
- 2100 g room temperature water
- 60 g sea salt
For Brushing:
- 55g (1/4) cup salted butter melted
Instructions
Step 1: Feed Your Starter Night Before Baking
- Baker's Schedule: 8:00 PM
- To ensure a bubbly and active starter, feed your starter the night before baking.
- Use a 1:5:5 ratio to feed your starter (this means one part mature mother starter, five times the water, five times the flour).
- Add your mature starter, flour, and water to a large mixing bowl (make sure it's large enough for the starter to double in size). Combine your mixture and cover loosely with a damp lint-free towel or plastic wrap, and let the starter sit at room temperature (70-75 degrees) overnight until bubbly and doubled in size.55 g mature mother starter, 275 g all-purpose flour, 275 g water
Step 2: Mix the Dough
- Baker's Schedule: Day 1- 8:00 AM
- Make sure you have your Bosch bowl and kneading arm to mix your dough. To the Bosch bowl, add the doubled sourdough starter, water, and salt.600 g sourdough starter, 2100 g room temperature water, 60 g sea salt
- Add half of the flour to the water mixture and fit the bowl on to the Bosch base. Don't forget to secure the lid on the bowl, and turn the mixer onto Speed 1 for 1-2 minutes to combine the flour into the water.3000 g all-purpose flour
- The reason I split up the flour is to help absorb some of the flour that's sitting on top of the water and mix it in to give us more space to add the remaining flour.
- Once half of the flour has been mixed into the wet ingredients, add the remaining flour to the Bosch mixer bowl. Don't forget to make sure your lid is secured on the bowl! If you turn on the mixer and it's full of flour you'll have a mess on your hands.
- Turn the mixer back to Speed 1 (the lowest setting) and allow the dough to mix and knead for roughly 7-8 minutes.
- While your dough is kneading, spray a 16-quart mixing bowl with cooking spray. Once the dough is done mixing, you're going to transfer your dough to this bowl to complete your coil folds and proofing.
- Please note this dough is very high hydration, and will seem really wet and sticky. That's okay! As it rests and you perform the coil folds your dough will transform just trust the process.
- Cover the bowl with plastic wrap or a damp lint-free kitchen towel and allow it to rest for 30 minutes before performing your first set of coil folds.
Step 3: Bulk Fermentation
- How to do a coil fold:
- After the dough has rested 30 minutes, you'll do your first set of coil folds. This is what will transform the dough form wet and sticky, to smooth and workable.
- Lightly dampen your hands with water to prevent sticking, then gently scoop underneath the dough, lifting it up from the center of the bowl.
- Stretch the dough upward as far as it will comfortably go, then allow it to fold back down onto itself.
- Repeat this step 3 more times at 30 minute intervals, rotating the bowl as needed. The dough should begin to feel smoother, tighter and more structured. Don't forget to cover the dough between sets!
- After you've completed a total of 4 coil folds, allow the dough to finish bulk fermentation. This dough if using a 16-quart bowl should rise to at least 1 inch from the rim or to the rim. If you're not using a 16-quart bowl, just make sure the dough has doubled in size (risen 100 percent in volume).
- As a general guide, I keep my dough at 75 degrees and this proof takes roughly six hours. Depending on how warm or cold your environment is, this could take more or less time.
- I recommend keeping your dough between 70-78 degrees. If it's too cold this process will be long, and if it's too hot your dough will be sticky and difficult to shape. You can use a digital thermometer and stick it in your dough to assess the temperature as needed.
- Note: Don't go off of time, go off of how much the dough has risen. This is more important that time!
Step 4: Shaping Your Loaves
- Once the dough has finished bulk fermentation, prepare 6 sandwich bread pans by greasing them with cooking spray or melted butter. Set aside.
- Lightly spray a clean work surface with cooking spray or dust with flour, then gently turn out your dough. I prefer cooking spray here; it makes shaping easier and helps prevent sticking.
- Divide the dough into six equal portions, about 900-925g each.
- To shape the sandwich loaf: Gently stretch one portion about 8 inches wide and 9 inches long.
- Starting with on of the (9 inch) sides, fold the dough into thirds over itself, like a letter. Repeat this step on the other side. You should now have a rectangle about 9 inches long and 5 inches wide.
- Starting at the bottom, roll the dough up gently to form a log shape. Pinch the seam and ends to seal.
- Transfer your loaf to the oiled pan, seam side down. Cover loosely with plastic or a damp towel to proof.
- Repeat this step with the remaining five sandwich loaves until all of the dough has been shaped.
Step 5: Final Proofing
- Allow the sandwich loaves to proof roughly an hour at room temperature covered, the dough should rise about 1/2 inch over the edge of the pan. Don't skip this rise, it's key to a light and airy loaf!
- Overnight Fermentation Option: If you want to refrigerate your loaves overnight, simply cover the dough filled pans with plastic (I use a disposable shower cap) and transfer to the refrigerator overnight. You WILL NOT proof the dough in the pan until the next day.
- When you're ready to bake the loaves the next day, follow the directions to proof the dough over the edge of the pan before baking. Please note that this make take longer as the dough is colder, and that the loaf may brown more on the edges due to condensation.
Step 6: Baking the Bread
- Preheat your oven to 400 F. Make sure your oven is full preheated before baking your bread.
- Transfer your bread pans to the oven, and set the timer for ten minutes.
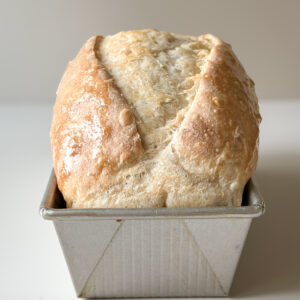
- After ten minutes, remove the bread pans and cut a single deep score down the center of the loaves. This score helps with expansion and makes sure the bread can rise properly.
- Return the bread quickly back to the hot oven (400 F), and set the timer for another 20 minutes. After 20 minutes of baking, rotate the pans to make sure none of the loaves are getting too done on the edges.
- Bake the bread for another 20 minutes after this at 400 F, for a total of 50 minutes. Your bread internal temperature should read between 200-205 F, you can check this by inserting a digital thermometer into the side of the bread (Don't worry, it won't hurt it!).
- Remove the bread from the oven as soon as it's finished baking, and let them rest in the pan a minute or two. Once slightly cooled, remove the bread from the pans and transfer the loaves to a wire cooling rack to completely cool and to prevent soggy crusts.
- If you want an extra golden crust and shine, you can brush the tops of the loaves with melted butter but this is optional.55g (1/4) cup salted butter
- Allow bread to fully cool before slicing and serving!
Notes
How to Store:
Room Temperature- Allow loaves to cool completely before storing. Transfer to a sealed bag of your choice with the air removed. These loaves will stay fresh at room temperature for 4-5 days before molding. For best results, slice and freeze by day 3-4 to extend freshness. Freezer- Store sliced bread in the freezer-safe bag with as much air removed as possible. For easier separation, place pieces of parchment between the slices before freezing. Thaw at room temperature and toast directly for best flavor and texture.Nutrition
Serving: 1sliceCalories: 139kcalCarbohydrates: 28gProtein: 5gFat: 0.6g
Tried this recipe?Let us know how it was!